
Purchasing and Enabling WTP
Scenario
HSS provides static and dynamic (Tomcat) Web Tamper Protection (WTP) functions. WTP monitors website directories in real time, backs up files, and restores tampered files. In addition, multiple server security protection functions are provided. For details, see Product Functions.
The following is an example to describe how to buy and enable HSS.
- Server: EulerOS 2.9 Huawei Cloud ECS
- Protection quotas
- Billing mode: Yearly/Monthly
- Edition: WTP
- Quantity: 1
Process
|
Procedure |
Description |
|---|---|
|
Grant permissions to IAM users, and prepare the cloud servers to be protected. |
|
|
Set the billing mode and edition, and purchase protection quota for your server. |
|
|
Install the agent on the target server. |
|
|
Enable protection for the target server. |
Preparations
- If you perform operations as an IAM user, ensure that the IAM user has been assigned the HSS FullAccess permission. For details, see Creating a User and Granting Permissions.
When purchasing HSS protection quotas, you need to assign the BSS Administrator and Tenant Guest permissions to IAM users.
- A Huawei Cloud ECS for which WTP will be enabled is available.
Step 1: Purchase HSS Quota
- Go to the Buy HSS page.
- Configure parameters.
Parameter
Example
Description
Region
CN-Hong Kong
Select the region of server. After the HSS is purchased, the region cannot be changed. Exercise caution when selecting a region.
Billing Mode
Yearly/Monthly
WTP supports only the Yearly/Monthly billing mode.
Yearly/Monthly is a prepaid billing. You pay in advance for a subscription term, and in exchange, you get a discounted rate. The longer the subscription term, the bigger the discount. For more information, see Pricing Details.
Edition Specifications
WTP Edition
HSS provides basic, professional, premium, WTP, and container editions. Functions vary depending on editions. For details about functions supported by each edition, see Functions.
Enterprise Project
default
This parameter is displayed only when you use an enterprise account to purchase protection quotas.
It enables unified management of cloud resources by project.
Tag
Not added
Tags are used to identify server security, facilitating cloud resource classification and management.
Automatically assign
Not selected
When a server or container node is added and the agent is installed for the first time, it will be bound to an available yearly/monthly quota.
Only unused quotas will be bound, and no new order or fee will be generated.
Required Duration
1 month
Select the required duration. The longer the subscription period, the higher the discount.
Auto-Renewal
Not selected
The Auto-renew option enables the system to renew your service by the required duration when the service is about to expire.
Quantity
1
Set the value based on the actual number of servers.
- In the lower right corner of the page, click Next.
- After confirming that the order, select I have read and agree to the Host Security Service Disclaimer.
- Click Pay Now and complete the payment.
- Click Back to Host Security Service Console to return to the HSS console.
Step 2: Install an Agent
- In the navigation pane, choose .
- In the upper right corner of the page, click Install HSS Agent.
- Select ECS and click Configure Now.
- Select an installation mode. For details about the parameters, see Table 1.
Figure 1 Installing an agent

Table 1 Parameters for installing the agent Parameter
Example
Description
Installation Mode
CLI-based installation
- GUI: You need to provide server account password or key for installing the agent. HSS does not save the password file you upload. To install the agent in this mode, ensure there is already an executor ECS, which is an ECS with an online agent in the same VPC as the target ECS.
- CLI: You need to log in to the server and run commands or scripts. This method is used when you install the agent for the first time.
Owner Account
Current account
- Current account installation: The server and the HSS quota you purchased are under the same account. You can log in to the account to obtain the installation commands or script and install the agent on the server.
- Cross-account installation: The server and the HSS quota you purchased are not under the same account. You can log in to account A to obtain the installation command or script and install the agent on the target server under account B. After the agent is successfully installed, you can view the target server on the page of account A.
Server OS
Linux
Select an OS type based on the server OS.
Scale
A single
Select the scale based on the number of servers on which the agent is to be installed.
- (Optional) Select the servers that need to be connected to the current HSS region and click Next.
- Perform this operation only in the CN East2 and CN Southwest-Guiyang1 regions. HSS will automatically create a VPC endpoint, which occupies an IP address of your VPC subnet. Only one VPC endpoint will be created for each of your VPCs to ensure the communication between your servers and HSS.
- In other regions, ensure the security groups of your servers allow outbound traffic through port 10180 of the 100.125.0.0/16 CIDR block. This port is used to communicate with HSS.
- Install the agent as prompted.
For CN East2 and CN Southwest-Guiyang1 regions, wait until the network communication succeeds (that is, the VPC endpoint is created) before performing the following operations.
- On the console page, click
 in the Install HSS Agent dialog box to copy the installation command.
Figure 2 Copying the installation command
in the Install HSS Agent dialog box to copy the installation command.
Figure 2 Copying the installation command
- Log in to the server as the root user and paste the installation command.
If the command output shown in Figure 3 is displayed, the agent has been installed.
- On the console page, click
- Wait for 5 to 10 minutes and return to the HSS console. On the Server Install & Config page, click the Agents tab, and click Servers with Agents. Check the agent status of the target server.
If the Agent Status is Online, the agent is successfully installed.

Step 3: Enable Protection
- In the navigation pane, choose Prevention > Web Tamper Protection.
- On the Servers tab, click Add Server. The Add Server page is displayed.
- On the Add Server page, select servers and click Next. For more information, see Table 2.
Figure 4 Selecting servers
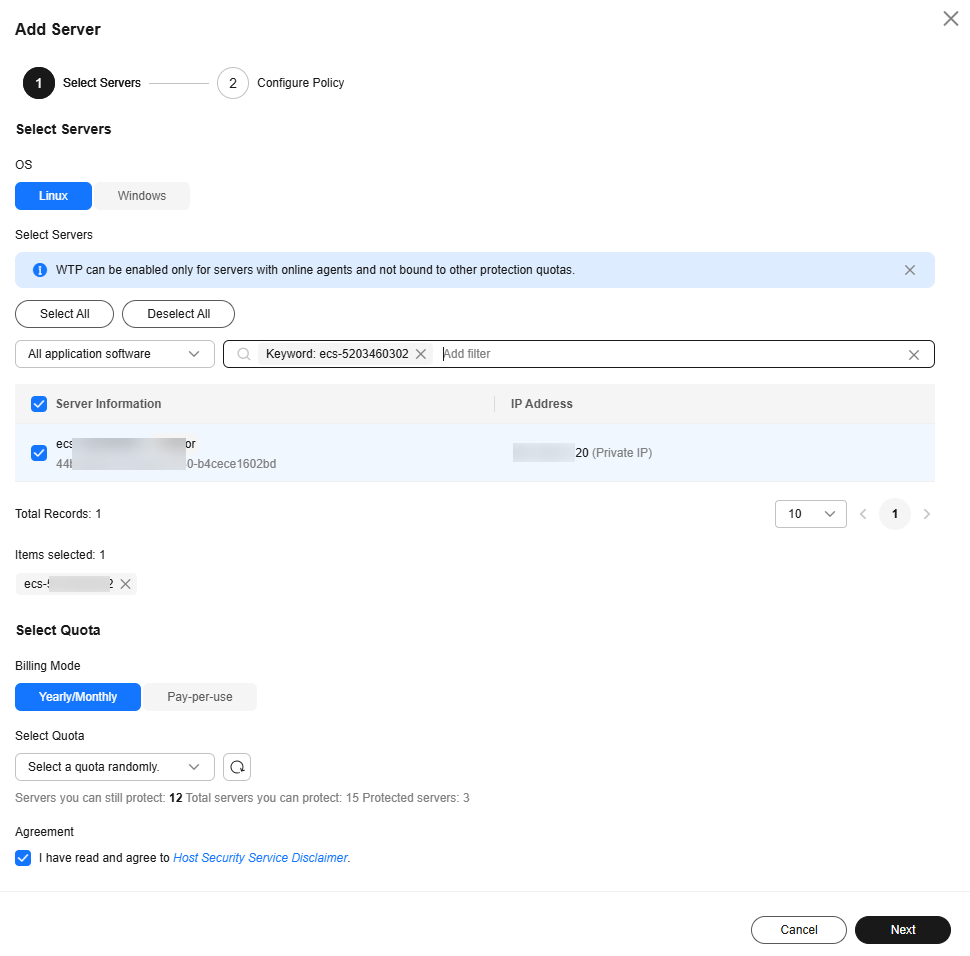
Table 2 Parameters for selecting protected servers Parameter
Example
Description
OS
Linux
Select the OS type of the server to be protected by WTP.
- Linux
- Windows
Select Servers
-
Select servers.
You can filter the servers by software type or other attributes.
Select Quota
Yearly/Monthly
The HSS WTP edition supports two billing modes, yearly/monthly and pay-per-use billing, to meet requirements in different scenarios.
- Yearly/Monthly billing is a prepaid mode in which you pay for the service before using it. Your bill is generated based on the required duration you specify in the order. The longer the subscription term, the bigger the discount.
- Pay-per-use is a postpaid billing mode. You pay as you go and just pay for what you use. The HSS usage is calculated by the second but billed every hour. With the pay-per-use billing mode, you can easily adapt to resource requirement changes, reducing the risk of over-provisioning resources or lacking capacity. In this mode, there are no upfront commitments required.
When selecting the yearly/monthly billing mode, you can select a quota or retain the default value Select a quota randomly.
Agreement
Select it.
Before enabling WTP, ensure that you have read the Host Security Service Disclaimer.
Select I have read and agree to the Host Security Service Disclaimer.
- On the Add Server page, configure policies. For more information, see Table 3.
Figure 5 Configuring policies

- After the policy is configured, click OK.
- On the Servers tab, check the static and dynamic anti-tamper status of the target server
If the static WTP status is Protected and the dynamic WTP status is
 , the static and dynamic WTP is enabled successfully. After dynamic WTP is enabled, you need to restart Tomcat to apply the settings.
After the protection is enabled, it takes 2 to 3 minutes for HSS to send protection policies to agents. The protection is successful only after all policies are sent. To check policy statuses, choose and click a server name. On the server details page, choose . If all the policy statuses are Enabled, the policies have been sent.


Follow-Up Procedure
- Modify a file or folder in a protected directory.
If WTP is enabled, files or folders in the protected directory are read-only and cannot be modified. To modify files or folders in the protected directory, perform the following steps:
- Add privileged processes: You can add a maximum of 10 privileged processes. For details, see Modifying WTP Configuration.
- Enable/Disable scheduled static WTP: In addition to adding a privileged process, you can set periodic static WTP and modify files or folders when WTP is disabled, for details, see Modifying WTP Configuration.
- Enable active protection for servers.
WTP provides some proactive functions for servers. These functions are not enabled or not completely enabled when WTP is enabled. You can determine whether to use these functions based on your requirements, the following table Table 4 describes the functions.
Table 4 Proactive server protection functions Function
Description
Ransomware is one of the biggest cybersecurity threats today. Ransomware can intrude a server, encrypt data, and ask for ransom, causing service interruption, data leakage, or data loss. Attackers may not unlock the data even after receiving the ransom. HSS provides static and dynamic ransomware prevention. You can periodically back up server data to reduce potential losses.
Ransomware prevention is automatically enabled with the container edition. HSS will deploy honeypot files on servers and automatically isolate suspicious encryption processes. You can modify the ransomware protection policy. You are also advised to enable backup so that you can restore data.
To protect your applications with RASP, you simply need to add probes to them, without having to modify application files.
HSS can learn the characteristics of application processes on servers and manage their running. Suspicious and trusted processes are allowed to run, and alarms are generated for malicious processes.
The virus detection engine scans for virus-infected files on the server. The scanned file types include executable files, compressed files, script files, documents, images, and audiovisual files. You can perform quick scan and full-disk scan on the server as required. You can also customize scan tasks and handle detected virus files in a timely manner to enhance the virus defense capability of your service system.
HSS comes in multiple editions, including basic, professional, premium, WTP, and container editions. Except for the basic edition, they each have a default protection policy group. A policy group is a collection of policies. These policies can be applied to servers to centrally manage and configure the sensitivity, rules, and scope of HSS detection and protection. You can customize policies for asset management, baseline inspection, and intrusion detection as needed. Some policies in the policy group are not enabled by default. You can enable them as needed.
Feedback
Was this page helpful?
Provide feedbackThank you very much for your feedback. We will continue working to improve the documentation.See the reply and handling status in My Cloud VOC.
For any further questions, feel free to contact us through the chatbot.
Chatbot


