Configuring Routes for a Logstash Cluster
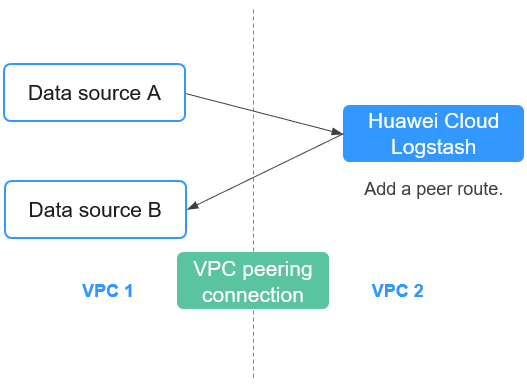
By default, a CSS Logstash cluster (server) cannot access data sources that are located in a different VPC—it cannot pull data from or push data to the data sources. To enable it, you need to configure routes for the Logstash cluster that point to the data sources.

- Establish a VPC peering connection to connect two VPCs.
- On CSS, configure routes for the Logstash cluster that point to the data sources, enabling the cluster to pull data from or push data to the data sources.
- Verify network connectivity between the data sources and Logstash.
Configuring routes to enable cluster communication offers the following advantages:
- Improved cross-VPC communication performance: A route table specifies the traffic forwarding paths, so that traffic does not have to pass through the public network.
- Secure communication: Private networks can communicate through VPC peering connections, which is more secure than transmitting data over the public network.
- Flexible access control policies: You can customize access permissions for specific subnets.
- Support for a hybrid cloud architecture: Services can communicate across VPCs in different environments.
Constraints
Adding cluster routes will alter network connections, possibly causing disruptions in the network. Exercise caution.
Prerequisites
- The Logstash cluster is Available, and port 9600 is allowed in the inbound direction by the cluster's security group.
- The data sources are available, and the security group used by the server of the data sources allows the necessary ports the inbound direction. For example, with an Elasticsearch cluster, port 9200 must be allowed.
Establishing a VPC Peering Connection
Before configuring routes for a Logstash cluster, establish a connection between the cluster's VPC and that of the data sources, that is, a VPC peering connection.
- If the Logstash cluster and the data sources belong to the same account, see Creating a VPC Peering Connection to Connect Two VPCs in the Same Account.
- If the Logstash cluster and the data sources belong to different accounts, see Creating a VPC Peering Connection to Connect Two VPCs in Different Accounts.
Set the peer VPC to the VPC where the Logstash cluster is located and the local VPC to the VPC where the data sources are located.
When adding routes for a VPC peering connection, configure the destination addresses based on service requirements.
If the Logstash cluster and the data sources share the same security group, there is no need to configure security group rules for the instances in the VPC at either end of the VPC peering connection.
Configuring Routes for a Logstash Cluster
On CSS, configure routes for the Logstash cluster that point to the data sources, enabling the cluster to pull data from or push data to the data sources.
- Log in to the CSS management console.
- In the navigation pane on the left, choose Clusters > Logstash.
- In the cluster list, click the name of the target cluster. The cluster information page is displayed.
- On the Overview tab, click Add Route under Cluster Route in the Network Information area.
- In the displayed dialog box, configure the route information.
Table 1 Adding a route Parameter
Description
IP Address
Enter the IP address (or a CIDR block) of a data source, for example, 10.10.1.0.
If the IP addresses of data sources are scattered, configure multiple routes for them.
Subnet Mask
Enter the subnet mask used with the IP address.
The subnet mask must align with the network part of the IP address. That is:- The network bits (the 1s) of the subnet mask must encompass those of the IP address.
- The host bits (the 0s) of the subnet mask must accommodate the IP address's host bits.
The subnet mask should not cover too wide a range, avoiding unnecessary IP address exposure or waste of the address space. 255.255.255.0 (that is, /24) is recommended, which applies to most internal networking scenarios.
- Click OK to add the route.
After the route is added, click View Route to check the route information. You can click Add Route to add another route; or click Delete Route to delete one—In the Delete Route dialog box, select a route, enter DELETE manually, and then click OK.
Testing Connectivity
Test the connectivity between the Logstash cluster and the data sources.
- Log in to the CSS management console.
- In the navigation pane on the left, choose Clusters > Logstash.
- In the cluster list, click the name of the target cluster. The cluster information page is displayed.
- Select the Configuration Center tab, and click Test Connectivity.
- In the Test Connectivity dialog box, enter the IP address and port number of a data source, and click Test.
Figure 2 Testing connectivity

If Available is displayed, the network between the Logstash cluster and the data source is connected.

You can test a maximum of 10 IP addresses at a time. Click Add to add multiple IP addresses and click Test at the bottom to test connectivity to all these IP addresses at the same time.
Feedback
Was this page helpful?
Provide feedbackThank you very much for your feedback. We will continue working to improve the documentation.See the reply and handling status in My Cloud VOC.
For any further questions, feel free to contact us through the chatbot.
Chatbot


