
Purchasing Pay-per-Use Desktop Pools
Scenarios
Administrators can select the pay-per-use billing mode and packages to purchase desktop pools.
Purchase Page
- Logging In to the Workspace Console
- On the Desktops page, choose Desktop Pools and click Purchase Desktop Pool.
The page for buying desktop pools is displayed.

When you purchase a desktop pool for the first time, the system prompts you to perform authorization.
- IMS permissions
Workspace supports image creation. Therefore, the permission to access IMS is required.
- Administrator permissions for related cloud services
Workspace supports scheduled disk recomposing and auto scaling. Therefore, the tenant administrator permissions are required.
- VPC service permissions
Workspace allows created networks to run on VPCs. Therefore, the permission to access the VPC service is required.
After the permission granting is approved, an agency named workspace_admin_trust will be created on IAM. To ensure normal service usage, do not delete or modify the workspace_admin_trust agency when performing scheduled tasks or using the desktop pool. For details, see System Entrustment Description.
- IMS permissions
Basic Configurations
- Configure desktop information, as described in Table 1.
Table 1 Basic Configurations Parameter
Description
Example Value
Billing Mode
Select Pay-per-use.
Pay-per-use
Region
Desktops in different regions cannot communicate with each other over the intranet, and desktops need to be managed by region. You are advised to create desktops in the same region.
NOTE:A region is the location of the physical data center of Workspace. Different regions indicate different physical distances between the physical data center and users, as well as different network latency. To reduce latency and improve access speed, select the region closest to your workloads.
-
Project
Select a project as required.
NOTE:If no target project is available, click
 and choose Create Project. The page for creating a project is displayed. Create a project by referring to Creating a Project.
-
Pool Name
User-defined desktop pool name.
-
Pool Type
Select Dynamic pool or Static pool.
For details about the concepts, see Related Concepts in Service Overview.
-
AZ
An AZ is a physical region where resources use independent power supplies and networks. AZs are physically isolated but connected through an intranet. If an AZ becomes faulty, other AZs in the same region will not be affected.
NOTE:To achieve better disaster recovery, you are advised to create desktops in different AZs.
Random
CPU Architecture
Select x86.
x86
Package Type
Select specifications as required.
Ultimate
Ultimate | 2 vCPUs | 4 GB
- Configure an image.
- Image Type: Select an image type as required.
- A public image is a widely used standard image provided by Workspace. It contains an OS and pre-installed public applications and is visible to all users. Public images are very stable and their OS and any included software have been officially authorized for use. If a public image does not contain the application environments or software you need, you can use a public image to create an application environment and then deploy required software. Currently, Windows public images are marketplace images.
- A private image is created based on an existing cloud desktop or external image file and is visible only to the user who created it. It contains an OS, preinstalled public applications, and the user's personal applications. Using a private image to create a desktop saves more time.
- The pay-per-use desktop supports public images running Windows, private images converted from desktops generated using Windows images, and private images converted from ECSs created using Windows image files. To use a private image to purchase a desktop, see Converting a Desktop to an Image and Creating a Windows Desktop Private Image.
- OS: Select a Windows OS type in the supported OS list.
- Image Type: Select an image type as required.
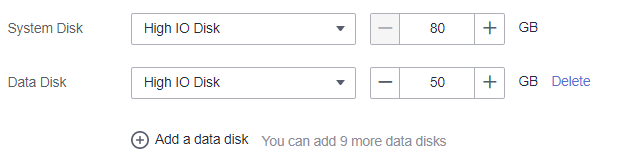
- Configure disks as required, as shown in Figure 1.
- For details about the disk type performance, see EVS Disk Types and Performance.
- High I/O disks use serial attached SCSI (SAS) drives to store data.
- Ultra-high I/O disks use solid state disk (SSD) drives to store data.
- General purpose SSD disks use SSD drives to store data.
- After the desktop is created, you will be billed for the disk until the desktop is deleted.
- The disk size must be an integer multiple of 10.
- A maximum of 10 data disks can be configured.
- For details about the disk type performance, see EVS Disk Types and Performance.
- Click Next: Configure advanced settings.
The page for configuring advanced settings is displayed.
Advanced Settings
- Configure the network, as shown in Figure 2.
Click
 and select a VPC and a subnet.
 - Configure the automatic creation mode of desktop pool autoscaling.
- Created upon access: When a user accesses the system and no idle desktop is available, the system automatically creates a desktop.
A maximum of x desktops can be automatically created: The maximum number of desktops that can be automatically created during pool desktop purchase and access is determined by the remaining quota of the user. Set this parameter as required.
- Pre-create: When the number of idle desktops is lower than the threshold, a specified number of desktops are automatically created.
- If the number of idle desktops is less than x, the value is the number of idle desktops in the desktop pool.
- x indicates the number of desktops to be pre-created.
- A maximum of x desktops can be pre-created.
For example, if the number of idle desktops is less than 5 and 10 desktops need to be pre-created. A maximum of 10 desktops can be pre-created.
When the number of idle desktops is less than 5, the system pre-creates 10 desktops. When the number of idle desktops is less than 5 again, the system detects that the number of pre-created desktops reaches the threshold and no more desktops can be created.
Desktops that are automatically created are on-demand desktops.
- Created upon access: When a user accesses the system and no idle desktop is available, the system automatically creates a desktop.
- Configure pool desktop unbinding upon disconnection.
- Disconnection and unbinding: After a client user disconnects from a desktop, the desktop can be retained for a period of time. After the retention period expires, the desktop is automatically unbound from the user and reset.
- The retention duration upon disconnection ranges from 10 to 43,200 minutes.
The desktop is reset after it is automatically unbound. Save the desktop data in a timely manner to avoid data loss.
- (Optional) Click Advanced and configure a tag, as shown in Table 2.
- You are advised to use predefined tags from TMS to add the same tag to different cloud resources.
- To learn more about tags, see Tag Management Service User Guide.
- A maximum of 20 tags can be added.
Table 2 Tag naming rules Parameter
Rule
Tag key
- The value can contain up to 36 characters.
- A tag key can contain letters, digits, spaces, and special characters (_.:=+-@), but cannot start or end with a space or start with _sys_.
Tag value
- The value can contain up to 43 characters.
- A tag value can contain letters, digits, spaces, and special characters (_.:/=+-@).
- Click Next: Assign desktops.
The page for assigning desktops is displayed.
- Select a naming rule.

Assigning Desktops
- Select the user authorization mode and configure the user to whom a desktop will be assigned.
If an existing AD domain is used, you need to create users on the AD server before assigning desktops.
Select a user authorization mode as required, as shown in Table 3.
- Assign the desktop to the user.
- Permission groups are used to distinguish users' permissions on computers.
- Windows desktop permissions:
- Administrator group: Users in this group have system administrator permissions, that is, full permissions on a computer. They can perform all management tasks, including managing all users, on the computer.
- Common user group: Users in this group have basic operation permissions on a computer, for example, running applications. A user in this group cannot modify the OS settings or data of other users, or shut down a server computer.
- You can click Batch Settings to modify the permission group of the selected user.
- Permission groups are used to distinguish users' permissions on computers.
- Select a user group authorization mode and configure a user group to which pool desktops are assigned, as shown in Table 4.
Table 4 User Group Authorization Mode User Group Authorization Mode
Parameter
Operation
Select User Group
- Users can be grouped to simplify user management.
- You can find the corresponding user group based on the entered user group name and click OK to add the selected user group name to the list of user groups to which pool desktops are assigned.
Create User Group
- Create a user group to manage pool desktop users.
- The value can contain letters, digits, periods (.), hyphens (-), and underscores (_).
- The value cannot be empty.
- The value can contain a maximum of 64 characters.
- There are two user group types:
- Common user group: the user group management system provided by Workspace, which provides batch user management capabilities and is applicable when interconnection with AD user groups is not required.
- AD user group: user group for interconnecting with the enterprise AD, which is applicable when user permissions are managed using the enterprise AD user group.
1. Enter the user group name.
2. Select a user group type as required.
3. Confirm the creation.
- Assign the desktop pool to the user group.
- Permission groups are used to distinguish users' permissions on computers.
- Windows desktop permissions:
- Administrator group: Users in this group have system administrator permissions, that is, full permissions on a computer. They can perform all management tasks, including managing all users, on the computer.
- Common user group: Users in this group have basic operation permissions on a computer, for example, running applications. A user in this group cannot modify the OS settings or data of other users, or shut down a server computer.
- You can click Batch Settings to modify the permission group of the selected user group.
- Permission groups are used to distinguish users' permissions on computers.
- Click Next: Confirm the settings.
The confirmation page is displayed.
Confirming the Settings
- Select Enterprise Project as needed.
You can use an enterprise project to centrally manage your cloud resources and members by project.
- After verifying that the information is correct, click Buy Now. After the task is submitted, click Back to Desktop Pool List to check whether the desktop has been created.
If the creation fails, check the failure cause. For details, see Viewing the Desktop Pool That Fails to Be Created.
The login details for the newly purchased desktop pool will be emailed to the end user. The end user can refer to the email to activate the account, download the client, and configure and use the desktop. Administrators can choose Desktops > Desktop Pools to view the purchased desktop pool.
Follow-up Operations
- The login details for the newly created desktop will be emailed to the end user. The end user can activate the account, download the client, and configure and use the desktop. Administrators can restrict desktop network interaction as required. For details, see Configuring Workspace to Access the Public Network and Configuring Workspace to Access the Intranet.
- If a Windows AD domain has been connected and an OU has been created on the Windows AD server, create the OU on the console by referring to OU Management.
Feedback
Was this page helpful?
Provide feedbackThank you very much for your feedback. We will continue working to improve the documentation.See the reply and handling status in My Cloud VOC.
For any further questions, feel free to contact us through the chatbot.
Chatbot


