Data Development Operations
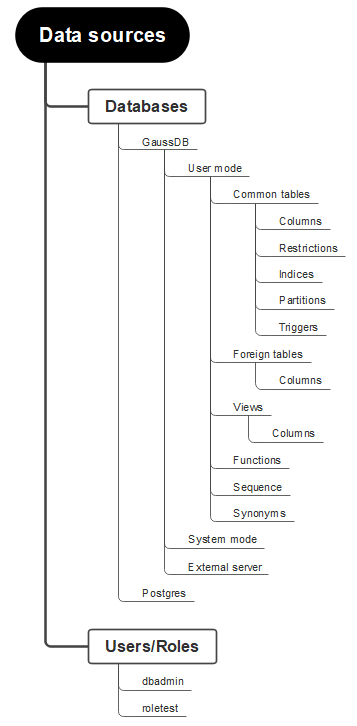
Metadata management includes the hierarchical display of metadata. The hierarchy begins with the data source at the root, branching into databases and user roles. Databases include system schemas, user schemas, and foreign servers. System schemas and user schemas are distinguished by OIDs and system schemas cannot be changed or deleted. User schemas include common/partitioned tables, foreign tables, views, functions, sequences, and synonyms. A table contains columns, constraints, indexes, partitions, and triggers. The LIST and INFO APIs are provided to query the metadata lists and details.
The following figure shows the metadata list. Currently, databases, schemas, common tables, fields, indexes, constraints, and partitions can be added.
Adding a Database
- Log in to the DWS console.
- In the navigation tree, choose Data > SQL Editor.
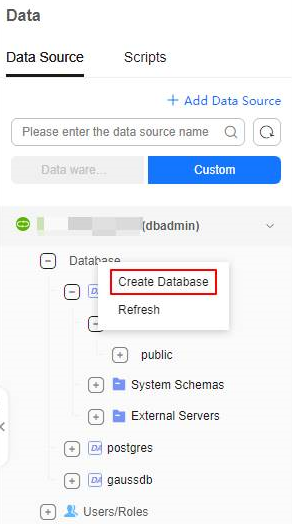
- Click Data Source. After a data source is connected, right-click the database name and click Create Database.
Figure 2 Creating a database
- On the page for adding a database, set the parameters as required.
- Database Name: Set the database name.
- Owner: Select the new database owner from the drop-down list box.
- Compatibility mode: Choose a database compatibility mode from the drop-down list. The available options include Oracle, MySQL, and Teradata. The default setting is Oracle.
- Encoding: Select the encoding mode of the new database from the drop-down list box. SQL_ASCII is recommended.
- Connection Limit: The value cannot be less than -1. The value -1 indicates no limit.
- Description: Description of the new database.
- SQL Preview: You can click Preview to view the SQL syntax for creating the database.
- Click OK.
Adding a Schema
- Log in to the DWS console.
- In the navigation tree, choose Data > SQL Editor.
- Click Data Source to add a database. For details, see Adding a Database. The database contains the user schema, system schema, and external server.

The system schema can only be viewed.
- Right-click the user mode name and click Add Schema.
- Set the parameters as required on the displayed page.
- Schema Name: Set the schema name.
- Owner: Select the owner of the new schema from the drop-down list box.
- Description: Description of the new schema.
- SQL Preview: Click Preview to display the SQL syntax for creating the schema.
Figure 3 Adding a Schema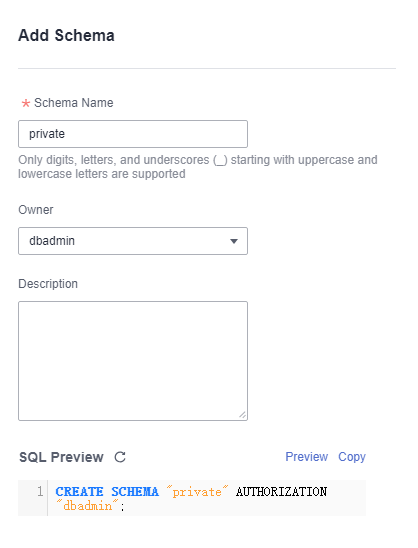
- Click OK.
Adding a Common Table
- Log in to the DWS console.
- In the navigation tree, choose Data > SQL Editor.
- Switch to the Data Source panel and add a schema (for details, see Adding a Schema). A schema contains structures such as common tables, foreign tables, views, functions, sequences, and synonyms.
- Right-click the name of the common table and click Create Common Table to add a table. The dialog box for adding a common table contains options such as Attribute, Column, Data Distribution, Partition, Index, and Constraint. The Attribute and Column fields are mandatory. You can click SQL Preview to query the SQL statement for creating a table.
Table 1 Parameters for adding a data table Tab
Description
Attribute
- Data Table Name: Set the data table name.
- Table Orientation: You can select ROW or COLUMN.
- Available or not Partition: Select whether to create a partitioned table.
- Description: Description of the new data table.
Column
Click Add Column and set the following parameters:
- Column Name: Set the column name.
- Data Type: Select the data type of the new column from the drop-down list box.
- Length: Total number of digits. If this parameter is dimmed, the length is fixed.
- Precision: Number of decimal places. If this parameter is dimmed, the precision cannot be set.
- Non-null: Select whether the new column is not null.
- Unique: Select whether the new column is unique.
Data Distribution
The options are as follows:
- ROUNDROBIN: Each row of data in the table is sent to each DN in sequence.
- REPLICATION: Each row of data in the table exists on all DNs. Each DN has complete table data.
- HASH: Specified columns are hashed and data is distributed to specified DNs through mapping.
Partition
On the Partition panel, you can select a partition type (range partition or list partition) and optional columns (corresponding to table fields). Click Add Partition and set the following parameters:
- Partition Name: Set the partition name.
- Partition Value: Select a value from the range based on the optional columns.
Indexes
Click Add Index and set the following parameters:
- Index Name: Set the index name. You can select Unique Index.
- Access Mode: Select an index access mode from the drop-down list box. B-tree indexes are recommended.
- Index Type: The options are Column and Expression.
- Condition Index: The WHERE condition constraint can be added.
Table Constraints
Click Add Constraint and set the following parameters:
- Constraint Type: The value can be check, unique, or primary.
- Expression (check): Enter field constraints.
- Constraint Name: Set the constraint name.
- Optional Column (unique\primary): Select an optional column from the drop-down list box.
SQL Preview
Click Preview to display the SQL syntax for creating a common table.
Figure 4 Creating a common table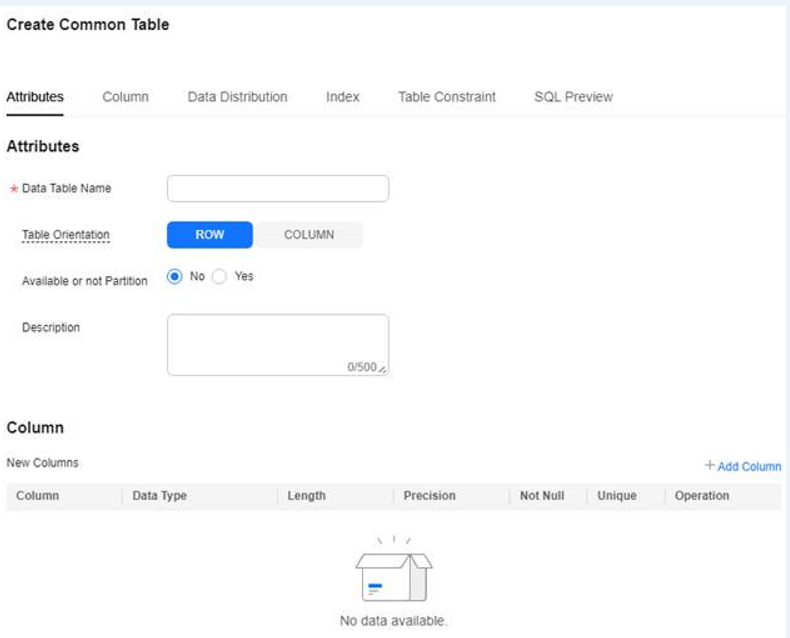
- Click OK.
Editing a Common Table
- Log in to the DWS console.
- In the navigation tree, choose Data > SQL Editor.
- Click Data Source. You can edit the created common table. For details about how to create a common table, see Adding a Common Table.
Figure 5 Editing a common table
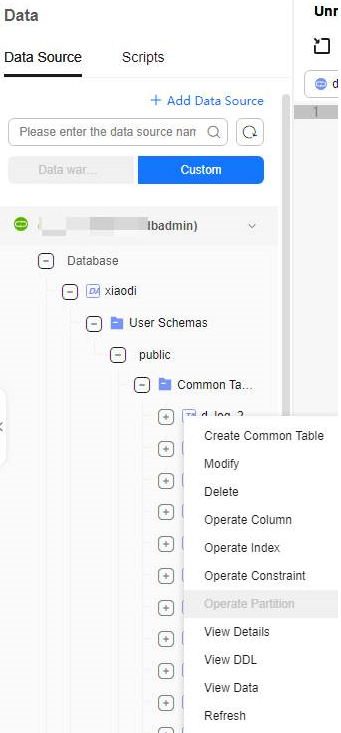
- Right-click the name of the common table name to modify it. The following table describes the modification operations.
Table 2 Table modification operations Operation
Description
Modifying a common table
You can click Modify to modify the name and schema of a table, and specify whether it is a partitioned table.
Deleting a common table
Click Delete to delete a common table.
Operating columns
Click the corresponding operation button to add, edit, and delete columns. You can edit the column name, data type, length, and specify whether it is a non-NULL column. Batch adding of columns is also available.
Operating indexes
Click Operate Index to add indexes, edit indexes (index names), and delete indexes in batches.
Operating constraints
Click Operate Constraint to add constraints, edit constraints (constraint names and optional columns), and delete constraints in batches.
Operating partitions
Click Operate partitions (unavailable for non-partitioned tables) to add, edit, and delete partitions. You can edit the partition name. Batch adding of partitions is also available.

You can also right-click a constraint, index, or partition name and choose Operate Constraint/Index/Partition from the shortcut menu to modify the corresponding attributes.
- Confirm the information and click OK.
Viewing Data in a Common Table
- Log in to the DWS console.
- In the navigation tree, choose Data > SQL Editor.
- Click Data Source and right-click the data table name.
- Click View Details to add, filter, edit, and delete data in a common table.
Figure 6 Viewing data in a common table
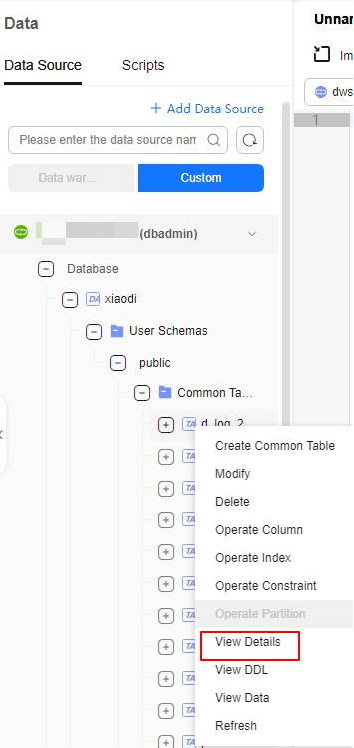

Right-click a partition name and choose View Details to add, filter, edit, or delete partition data.
Checking Views
- Log in to the DWS console.
- In the navigation tree, choose Data > SQL Editor.
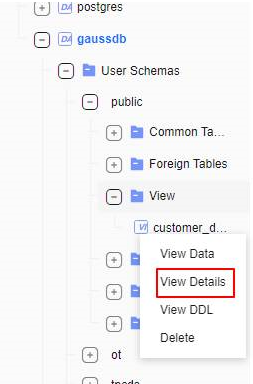
- Click Data Source, right-click a view name, and choose View Details from the shortcut menu to check the views of the database.
Figure 7 Checking views
Importing Data
- Log in to the DWS console.
- In the navigation tree, choose Data > SQL Editor.
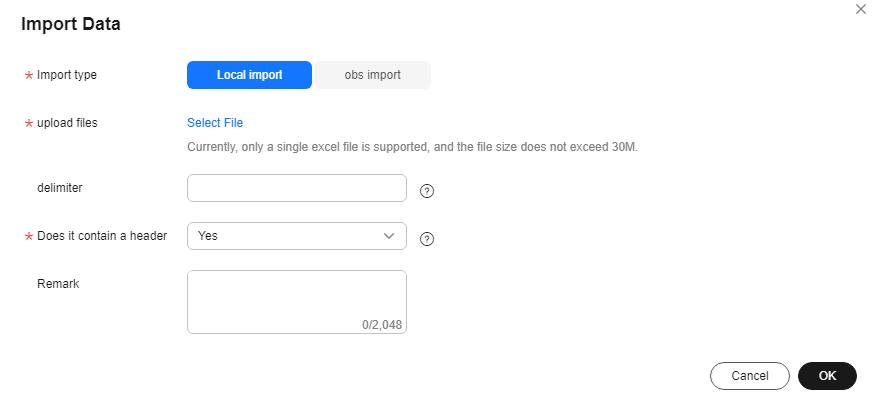
- Click Data Source and right-click the common table name. Click Import Data to import data from the local Excel file or OBS bucket file to the common table.
- Local import: When uploading an Excel file, ensure it is under 30 MB. For CSV files, select separators to divide data in each row and indicate if there is a table header. If there is no header, input data in each row according to the chosen table fields.
Figure 8 Importing Local Excel Data to a Common Table
- obs import: Choose a file from the OBS bucket or directory. Supported file types include CSV and TEXT. Set the parameters of the foreign table to be created for importing data to the OBS bucket. Use the OBS foreign table to write the OBS bucket file to the selected common table.
Table 3 OBS import parameters Parameter
Description
Example Value
storage location
Choose a file from the OBS bucket.
-
file format
Select a file format from the drop-down list. Supported formats include CSV and TEXT.
CSV
file encoding
Select a file encoding mode from the drop-down list. UTF8 is recommended.
UTF8
Delimiter
Commas (,) are the default separators for CSV files, while tab characters are the default separators for TXT files.
,
quote (CSV format)
Quotation marks are used for CSV files. The value should be a single-byte character and cannot be the same as the delimiter or null parameter.
#
newline character (TEXT format)
When importing text data, you can specify the newline character style. The maximum length of the newline character is 10 bytes, and you can use multi-character newline characters. The supported newline characters include common ones like \r, \n, and \r\n, as well as other characters or character strings like $ and #.
\r
Whether not to escape (TEXT format)
You can specify whether to escape the backslash (\) and its following characters in the TEXT format.
Yes
Null value
You can specify how null values are represented in a data file.
$
Number of data format errors
Maximum number of data format errors allowed during data import. The value -1 indicates that the number of errors is not limited.
-1
Does it contain a header (CSV format)
You can specify if the exported CSV file should contain a header row that describes each column in the table. This parameter only applies to CSV files.
Yes
Whether to ignore missing fields
Enabling this function sets the last column of a row in a data source file to NULL if it is missing, without reporting an error message.
Yes
ignore extra data
You can specify whether to ignore excessive columns when the number of columns in a source data file exceeds that defined in the foreign table.
Yes
compatible illegal chars
Enabling this function allows for invalid characters during data import.
Yes
Figure 9 Importing OBS bucket file data to a common table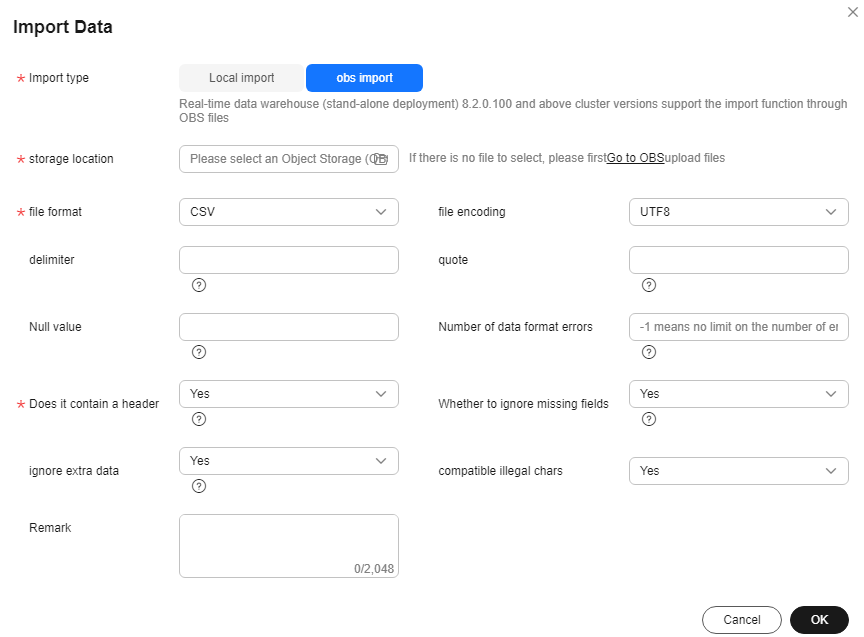
- Local import: When uploading an Excel file, ensure it is under 30 MB. For CSV files, select separators to divide data in each row and indicate if there is a table header. If there is no header, input data in each row according to the chosen table fields.
- Click OK.
- In the upper right corner of the page, choose Common Functions > Import data list and check whether the import is successful.
Exporting Data
- Log in to the DWS console.
- In the navigation tree, choose Data > SQL Editor.
- Click Data Sources, log in to the data source whose data needs to be exported, and select the corresponding database and schema.
- Enter the query SQL statement in the editor box and click Running.
- Click Export under the query result.
- Local export: Export all SQL query results to an XLSX or CSV file. You can open the file on your local PC. A maximum of 20,000 records can be exported.
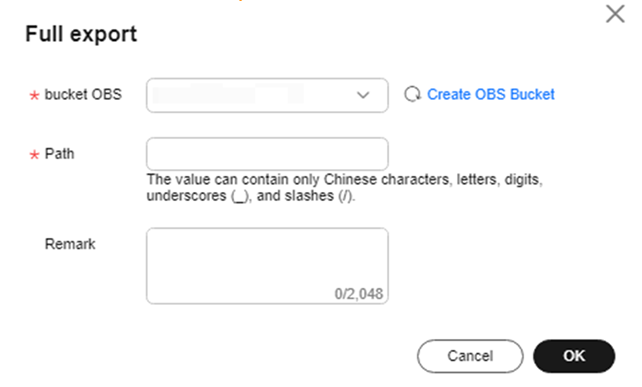
- Full export: Export all query SQL results to a specified path in an OBS bucket. By default, the results are exported to a CSV file.
Figure 10 Full data export
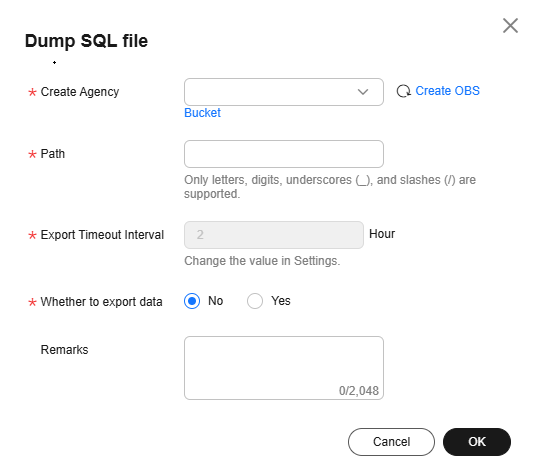
- DDL structure export: Right-click a user schema name, click Dump SQL File, and select Yes for Whether to export data to export the DDL statements of metadata such as tables, views, functions, triggers, sequences, and synonyms, and table insertion statements to a specified path in an OBS bucket. By default, the statements are exported to an SQL file.
Figure 11 Dumping the schema structure
- Click OK.
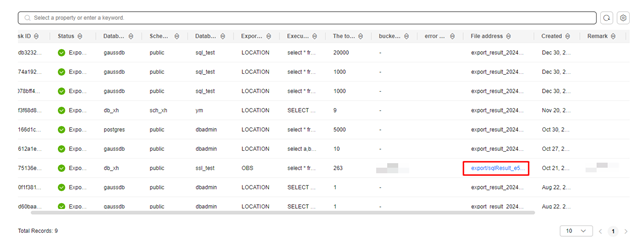
- Choose Common Functions > Export data list in the upper right corner of the page and view the exported task in the data export list.
- Click the path in the File address column to go to the OBS console to download the exported CSV or SQL file.
Figure 12 Exporting the task list
Submitting a SQL Task
- Log in to the DWS console.
- In the navigation tree, choose Data > SQL Editor.
- Click Data Sources, log in to the data source for which you want to submit the SQL task, and select the corresponding database and schema.
- Enter a non-query SQL statement in the text box and click Submit SQL task to submit the selected SQL statement to the background task for execution.

A maximum of 100 non-query SQL statements can be submitted at a time. A maximum of five SQL tasks can be executed by a user.
Figure 13 Submitting a SQL task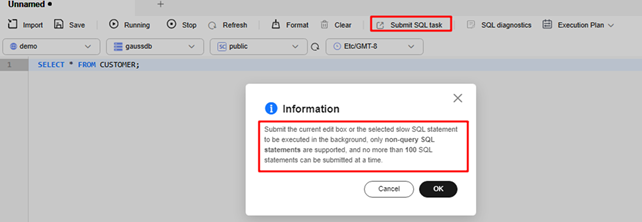
- Choose Common Functions > SQL task list in the upper right corner of the page to view the executed SQL tasks.
- Click Details in the Operation column to view the execution status of each SQL statement.
Figure 14 Viewing SQL task details

Diagnosing a Plan
- Log in to the DWS console.
- In the navigation tree, choose Data > SQL Editor.
- Click Data Sources, log in to the data source for which you need to enter SQL statements, and select the corresponding database and schema.
- Enter a query SQL statement in the text box and click Planned diagnostics. You can select EXPLAIN or PERFORMANCE.

Only one query SQL statement can be diagnosed at a time. If you enter multiple query SQL statements, the first SQL statement is diagnosed by default. If you select PERFORMANCE, the entered SQL statement is executed and the result is returned.
Figure 15 Selecting PERFORMANCE
- Click OK. The Planned diagnostics page is displayed. You can view the SQL statement diagnosis result and plan diagnosis visualization result.
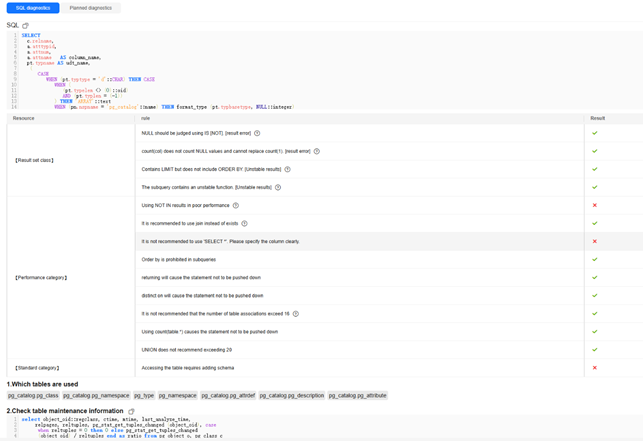
- Click SQL diagnostics to view the SQL statement formatting and diagnosis items.
Figure 16 Viewing SQL statement diagnosis results
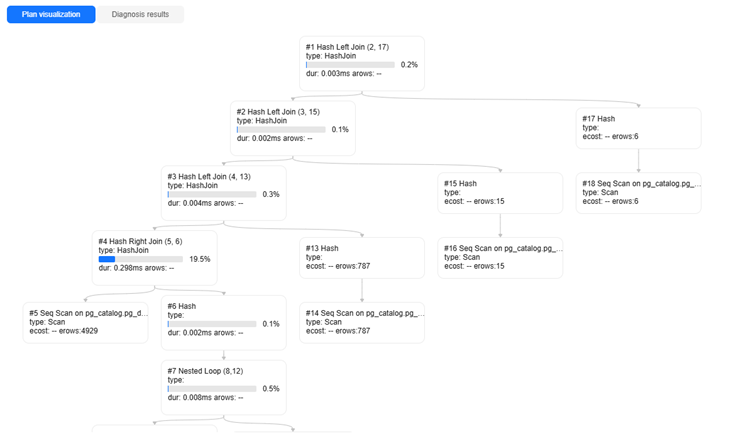
- Click Planned diagnostics to display the plan tree node and plan diagnosis result of the SQL statement.
Figure 17 Viewing SQL plan diagnosis results
- Click SQL diagnostics to view the SQL statement formatting and diagnosis items.
Viewing Statistics About Databases, Schemas, and Tables
- Log in to the DWS console.
- In the navigation tree, choose Data > SQL Editor.
- Click Data Source and double-click a database name. On the database list page that is displayed, you can search and check the detailed information about a database.
Figure 18 Viewing database details
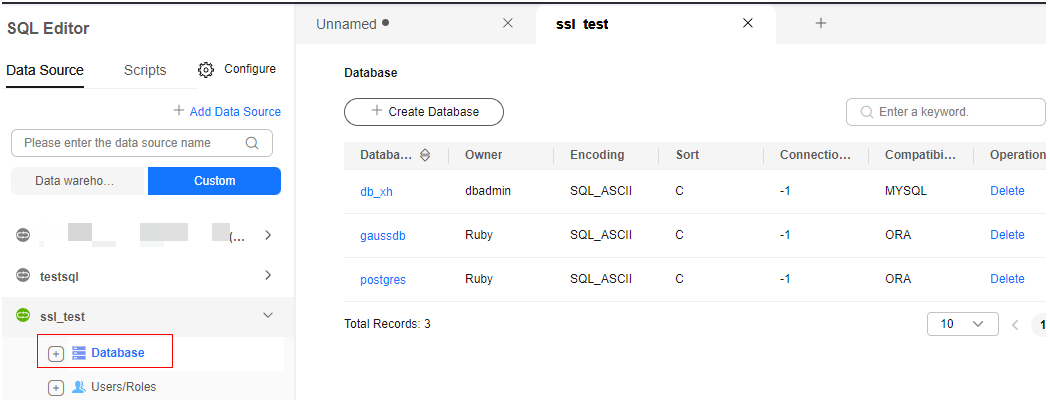
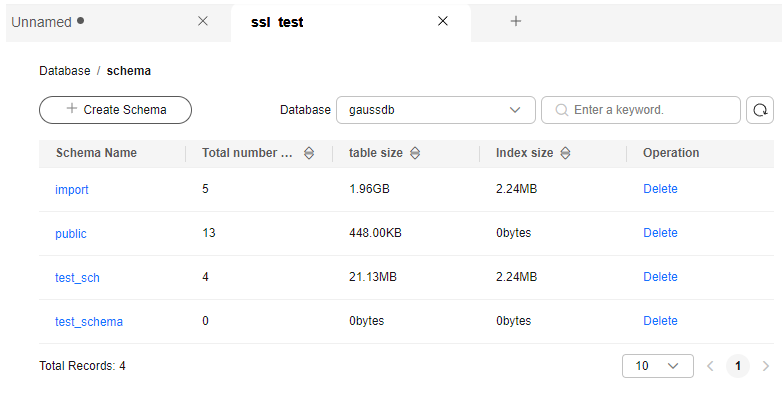
- Click a database name in the database list to go to the schema list and view the total number of tables, total table size, and index size.
Figure 19 Viewing schema information
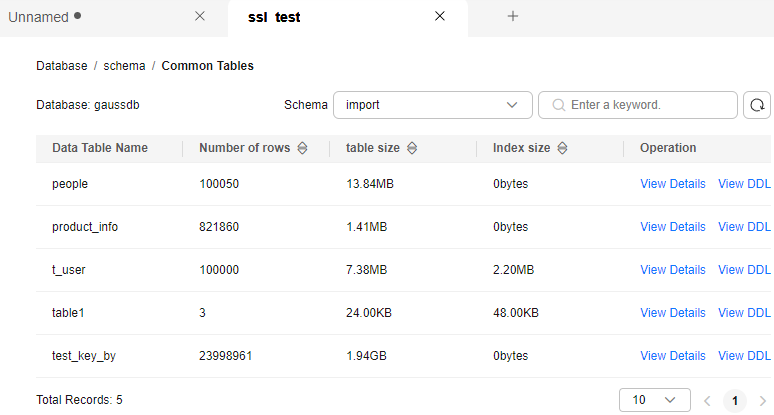
- Click a schema name in the schema list to go to the common table list. You can view the number of rows in the table, table size, and index size.
Figure 20 Viewing common table information
Configuring the Export Permission for IAM Users
You can configure whether to disable the export function for the IAM users of a cluster. If the export function is disabled for an IAM user of a cluster, the Export button is unavailable for the IAM user.
- Log in to the DWS console.
- In the navigation pane on the left, choose Data > SQL Editor.
- Choose Data Source > Custom and create a custom data source based on the required cluster.
- Right-click the custom data source name and select Export permissions (this function is available only for clusters). You can view the list of IAM users for whom the export function is disabled.
- Click Add disabled permissions above the list. You can disable the export function for other IAM users of the same tenant and set an end time for disabling the export function.
- Click Undisable permissions in the Operation column of an IAM user for whom the export function is disabled.
- Click Modify in the Operation column of an IAM user for whom the export function is disabled to change the expiration time and IAM username.
Figure 21 Disabling the export function for a cluster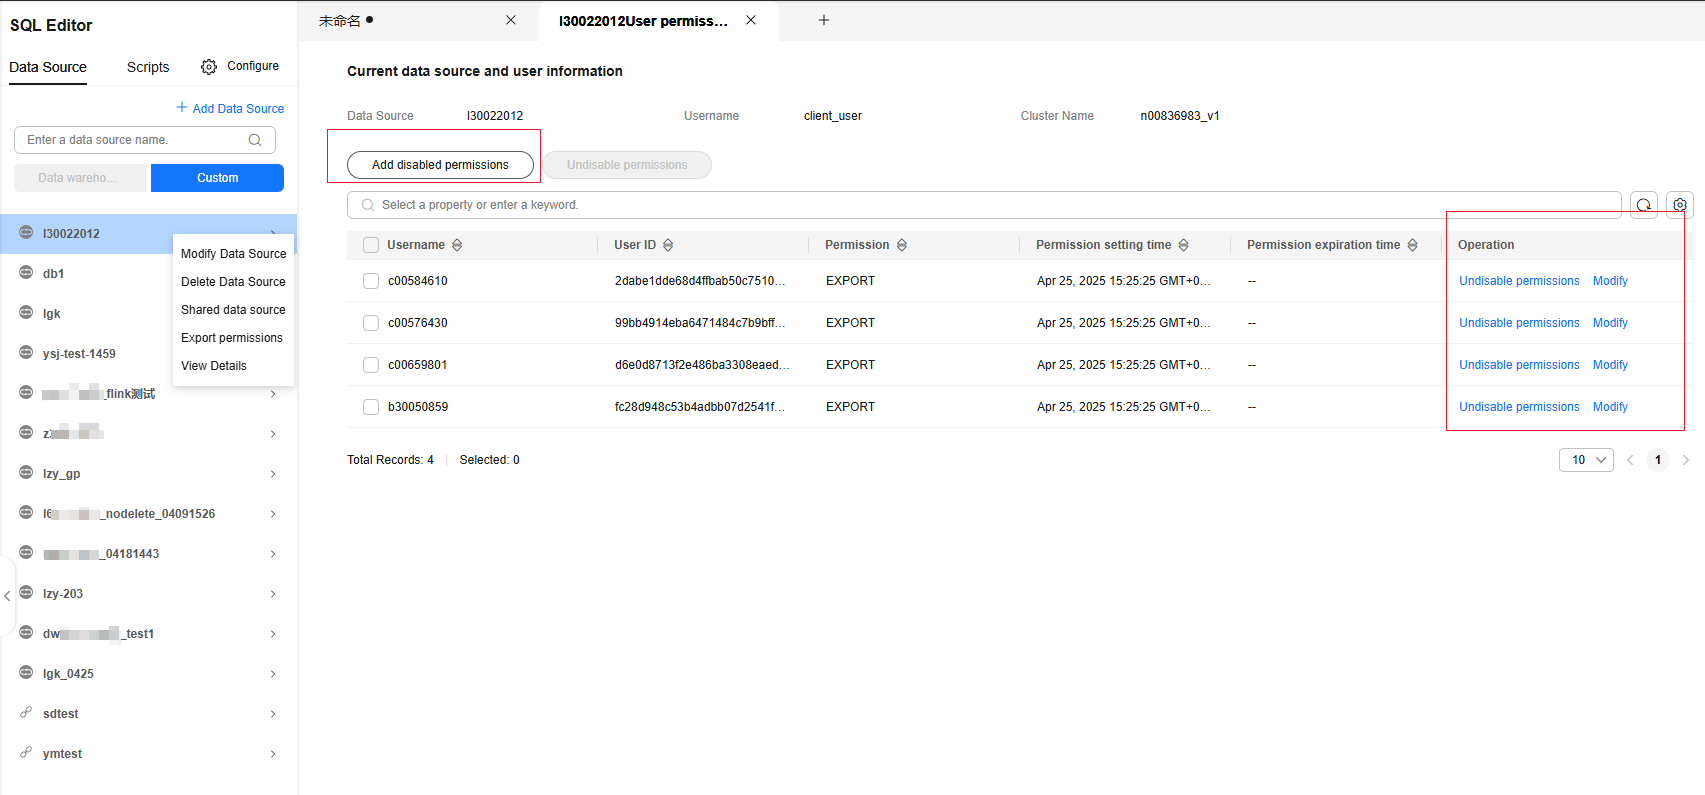
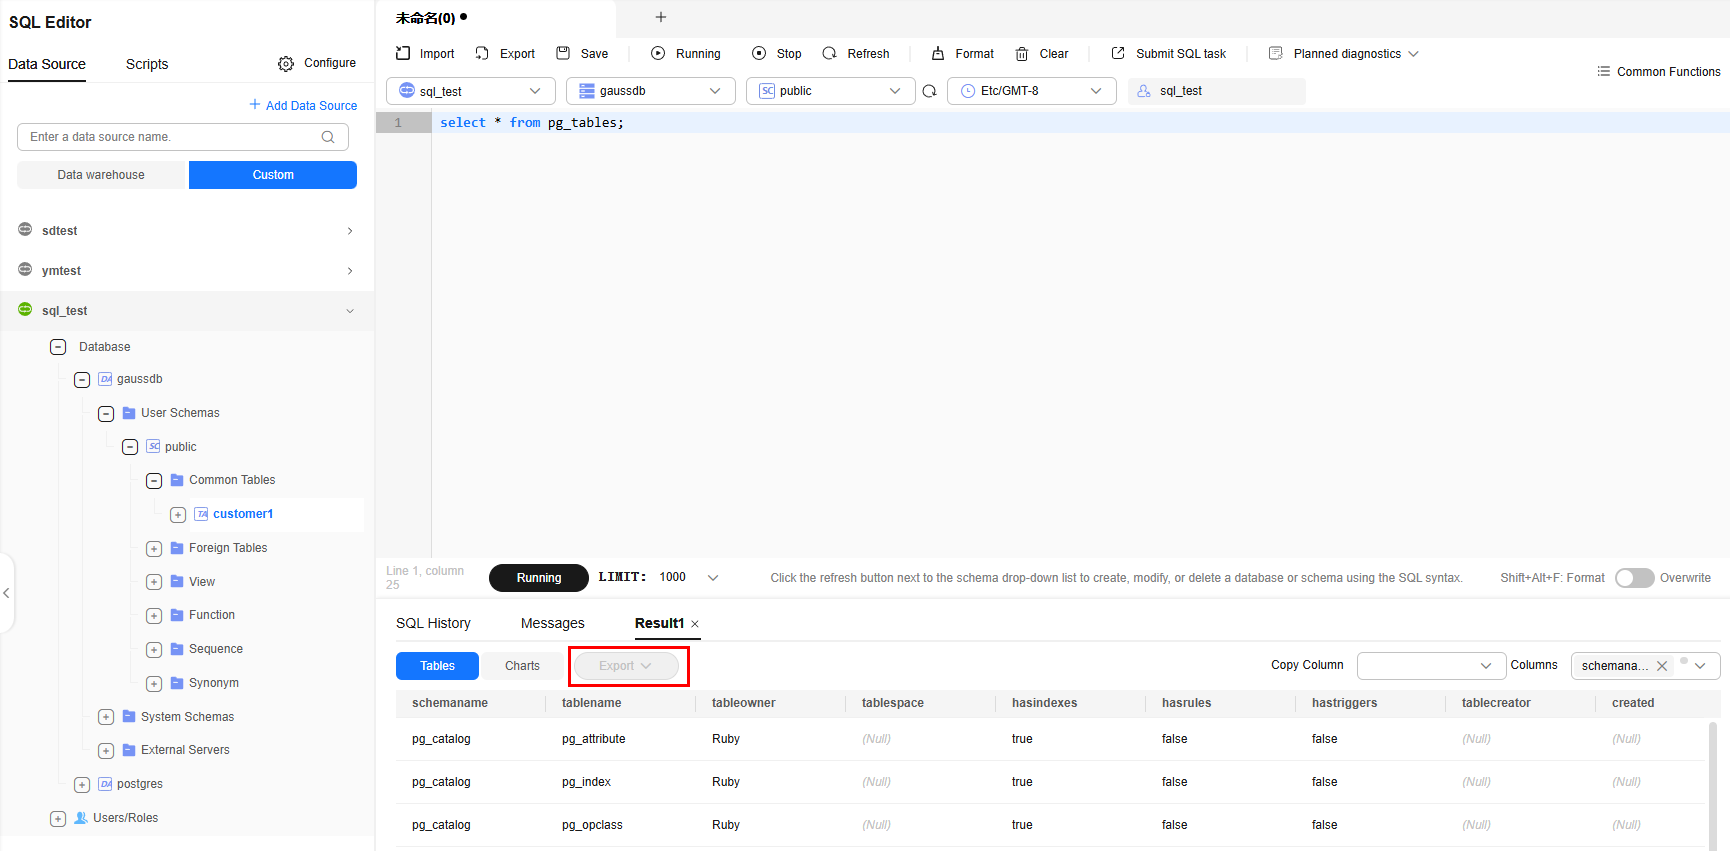
- Click OK. When you log in to the system as the IAM user for whom the export function is disabled, create a custom data source in the cluster, and query data, the Export button is unavailable.
Figure 22 Unavailable Export
Sharing a Custom Data Source with Other IAM Users of the Same Tenant
IAM users can share a custom data source with other IAM users of the same tenant. Other users can log in to the cluster database through the shared data source. If the shared data source does not contain a saved password, other users must enter the password when logging in to the database. In addition, the shared data source cannot be shared again.
- Log in to the DWS console.
- In the navigation tree, choose Data > SQL Editor.
- Click Data Source and click Custom to create a custom data source. Remember the password you set during the creation.
- Right-click the name of the custom data source to be shared and choose Shared datasource to view the list of IAM users with whom this data source has been shared.
- Click Add share to share the data source with other IAM users of the same tenant and set the sharing expiration time.
- To cancel the sharing, click Unshare in the Operation column of the row that contains the target IAM user.
- Click Modify in the Operation column of the row that contains the target IAM user to modify the sharing expiration time and change the username.
Figure 23 Sharing a data source
- IAM users can easily access the data sources shared with them by viewing the custom data source list and clicking the respective data source name to log in to the system.
Figure 24 Shared data source

Creating a Directory
- Log in to the DWS console.
- In the navigation tree, choose Data > SQL Editor to switch to the script panel.
- Click Create Directory.
- Save to Directory: Select a parent directory from the drop-down list box. If this parameter is left blank, a level-1 directory is created by default.
- Directory Name: Set the directory name. The value can contain only letters, digits, and underscores (_).
Figure 25 Creating a directory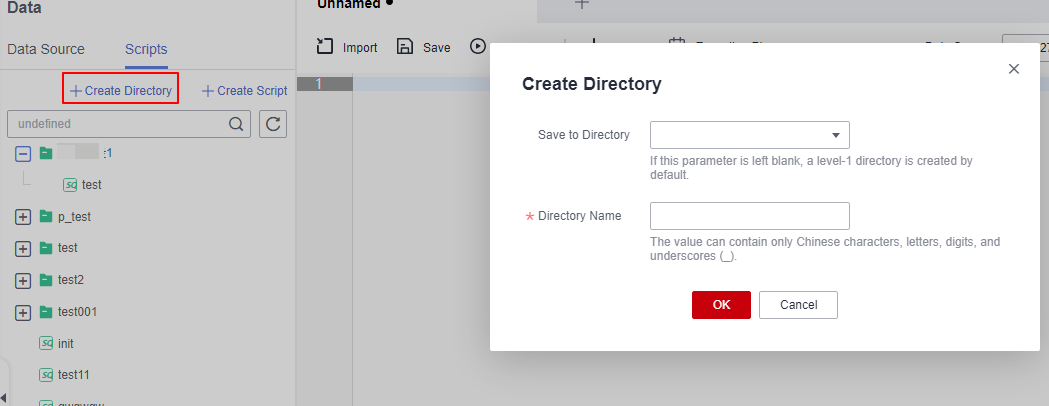
- Confirm the information and click OK.
Adding a Script
- Log in to the DWS console.
- In the navigation tree, choose Data > SQL Editor to switch to the script panel.
- Click Create Script.
- Save to Directory: Select the new directory from the drop-down list box. This option is optional.
- Script Name: Set the script name. Only letters, digits, and underscores (_) are supported.
- OBS Bucket: Name of the OBS bucket for storing script files. If no OBS bucket is available, click View OBS Bucket to access the OBS console and create one. For details, "Managing Buckets" > "Creating a Bucket" in Object Storage Service Console Operation Guide.
- Path: User-defined directory for storing script files on OBS. Multi-level directories can be separated by slashes (/). The value is a string containing 1 to 50 characters, which cannot start with a forward slash (/). If you do not set this parameter, the system automatically adds a path by default.
Figure 26 Adding a script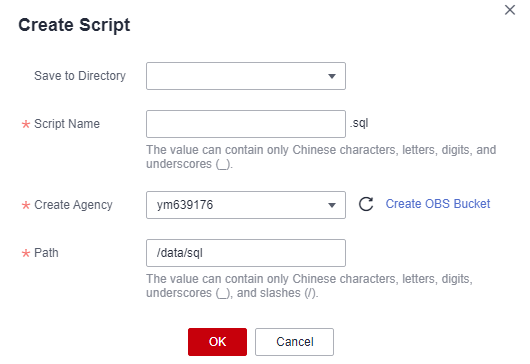
Reference Syntax
- Syntax reference for adding a database: CREATE DATABASE
- Syntax reference for adding a schema: CREATE SCHEMA
- Syntax reference for adding a common table: CREATE TABLE
Feedback
Was this page helpful?
Provide feedbackThank you very much for your feedback. We will continue working to improve the documentation.See the reply and handling status in My Cloud VOC.
For any further questions, feel free to contact us through the chatbot.
Chatbot


