Limiting Accesses Through Cookie Field Configuration
In some cases, it may be difficult for WAF to obtain real IP addresses of website visitors. For example, if a website uses proxies that do not use the X-Forwarded-For HTTP header field, WAF is unable to obtain the real access IP addresses. In this situation, the cookie field should be configured to identify visitors and All WAF instances should be enabled for precise user-based rate limiting.
Use Cases
Attackers may control several hosts and disguise as normal visitors to continuously send HTTP POST requests to website www.example.com through the same IP address or many different IP addresses. As a result, the website may respond slowly or even fails to respond to normal requests as the attackers exhausted website resources like connections and bandwidth.
Protective Measures
- Based on the access statistics, check whether a large number of requests are sent from a specific IP address. If yes, it is likely that the website was hit by CC attacks.
- Log in to the management console and route website traffic to WAF. For details about how to connect a domain name to WAF, see Adding a Domain Name.
- In the Policy column of the row containing the target domain name, click the number of enabled protection rules. On the displayed Policies page, keep the Status toggle on (
 ) for CC Attack Protection.
Figure 1 CC Attack Protection configuration area
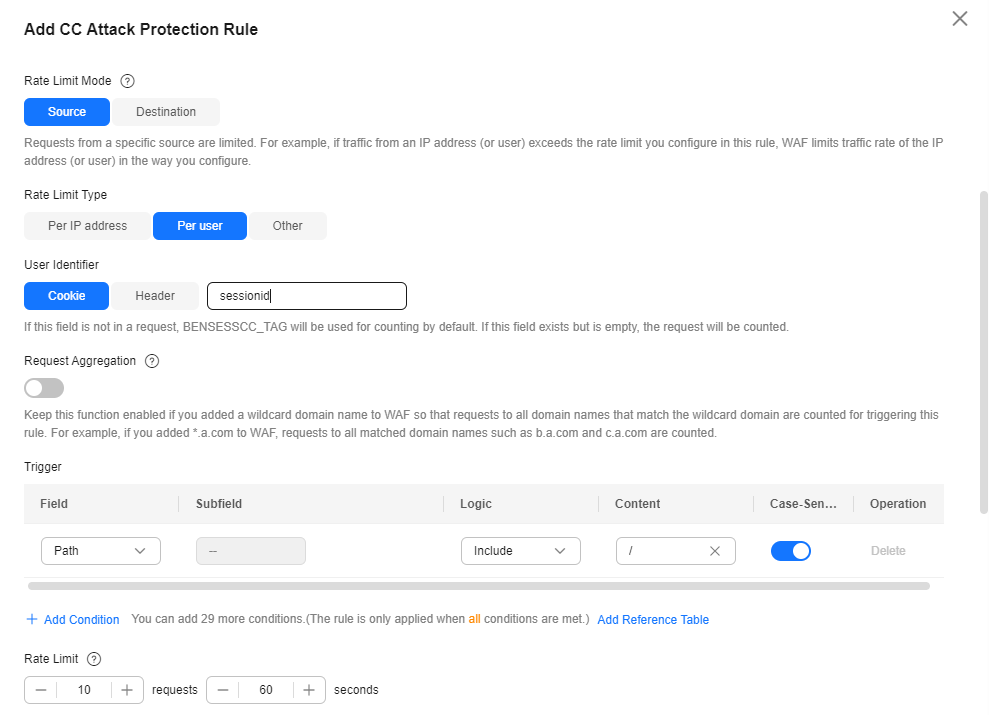
- Add a CC attack protection rule, as shown in Figure 2.
- Rate Limit Mode: Select Source and then Per user to distinguish a single web visitor based on cookies.
- User Identifier: To identify visitors more effectively, use sessionid or token.
- Rate Limit: Number of requests allowed from a web visitor in the rate limiting period. The visitor's access request is denied if the limit is reached.
- All WAF instances: Requests to on one or more WAF instances will be counted together according to the rate limit mode you select. By default, requests to each WAF instance are counted. If you enable this, WAF will count requests to all your WAF instances for triggering this rule. If you select Per user for Rate Limit Mode, requests may be forwarded to one or more WAF instances. So, All WAF instances must be enabled for triggering the rule precisely.
- Protective Action: Select Block. Then specify Block Duration. Once an attack is blocked, the attacker will be blocked until the block duration expires. These settings are recommended if your applications have high security requirements.
- Verification code: A verification code is required if your website visitor's requests reaches Rate Limit you configured. WAF allows requests that trigger the rule as long as the website visitors complete the required verification.
- Block: Requests are blocked if the number of requests exceeds the configured rate limit.
- Log only: Requests are logged only but not blocked if the number of requests exceeds the configured rate limit.
- Block Page: Select Default settings or Custom.
- In the navigation pane on the left, choose Events. You can view details about attack events.
Restricting Malicious Requests in Promotions by Using Cookies and HWWAFSESID
Restricting Malicious Requests in Promotions by Using Cookies and HWWAFSESID
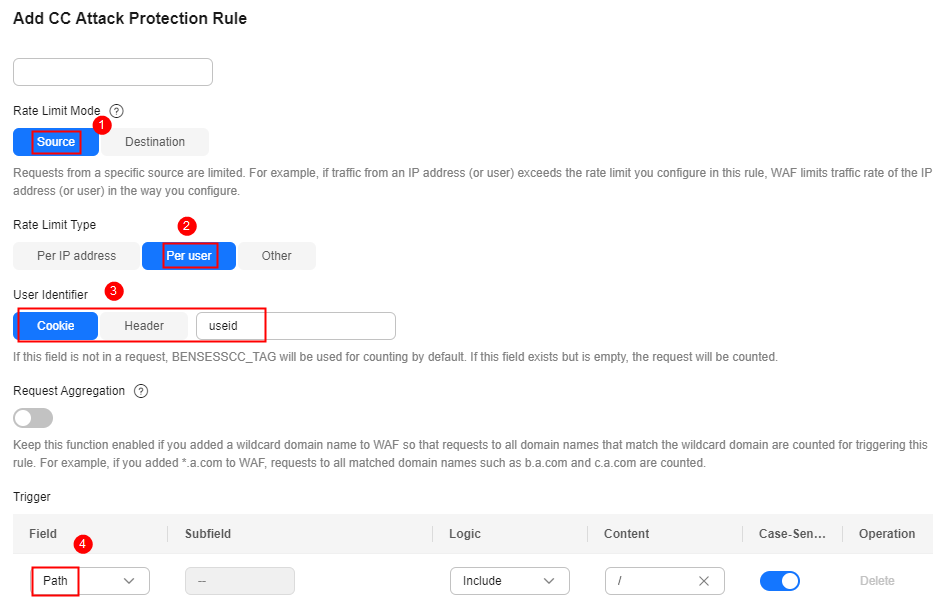
- Scenario 1: To steal extra bonus (such as goods in promotions or downloads), a malicious actor may use the same account to send requests to a website by changing IP addresses or terminals.
Protective measures: Scenario 1: Using Cookies (or User IDs) to Configure a Path-based CC Attack Protection Rule
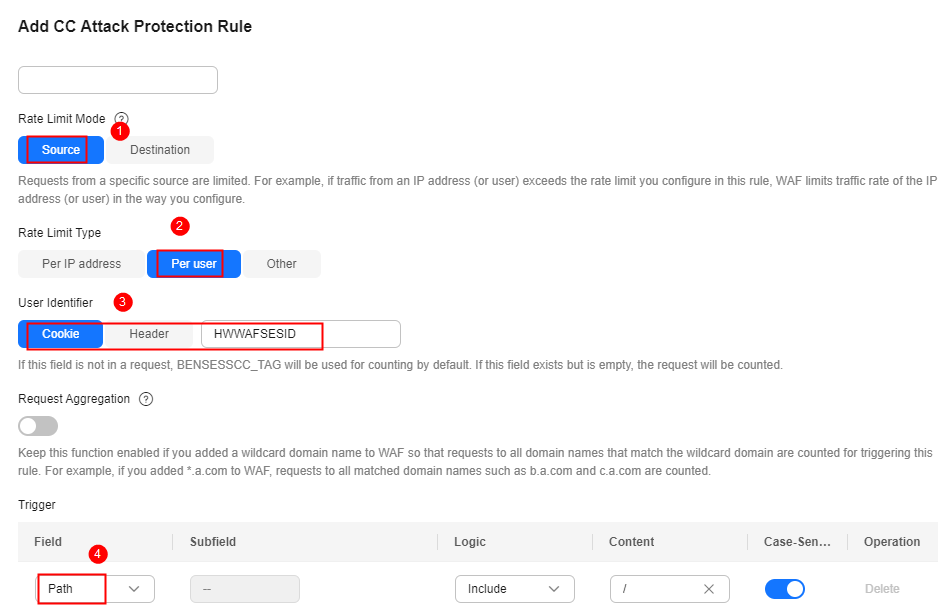
- Scenario 2: To steal extra bonus (such as goods in promotions or downloads), a malicious actor may use multiple accounts to send requests to a website through the same PC by frequently changing its IP address.
Protective measures: Scenario 2: Using HWWAFSESID to Configure a Path-based CC Attack Protection Rule
Feedback
Was this page helpful?
Provide feedbackThank you very much for your feedback. We will continue working to improve the documentation.See the reply and handling status in My Cloud VOC.
For any further questions, feel free to contact us through the chatbot.
Chatbot


