Restricting Malicious Requests in Promotions by Using Cookies and HWWAFSESID
This topic describes how to configure cookies and HWWAFSESID fields in CC attack protection rules to restrict malicious requests in promotions.
Application Scenarios
- Scenario 1: To steal extra bonus (such as goods in promotions or downloads), a malicious actor may use the same account to send requests to a website by changing IP addresses or terminals.
Protective measures: Using Cookies (or User IDs) to Configure a Path-based CC Attack Protection Rule
- Scenario 2: To steal extra bonus (such as goods in promotions or downloads), a malicious actor may use multiple accounts to send requests to a website through the same PC by frequently changing its IP address.
Protective measures: Using HWWAFSESID to Configure a CC Attack Protection Rule
Using Cookies (or User IDs) to Configure a Path-based CC Attack Protection Rule
- Log in to the management console and connect your website to WAF.
- Cloud WAF: Adding a Domain Name to WAF (Cloud Mode - CNAME Access)
- Dedicated WAF instances: Adding a Website to WAF (Dedicated Mode)
- In the Policy column of the row containing the domain name, click the number to go to the Policies page.
- In the CC Attack Protection configuration area, toggle CC Attack Protection on if needed.
Figure 1 CC Attack Protection configuration area

- In the upper left corner of the CC Attack Protection page, click Add Rule.
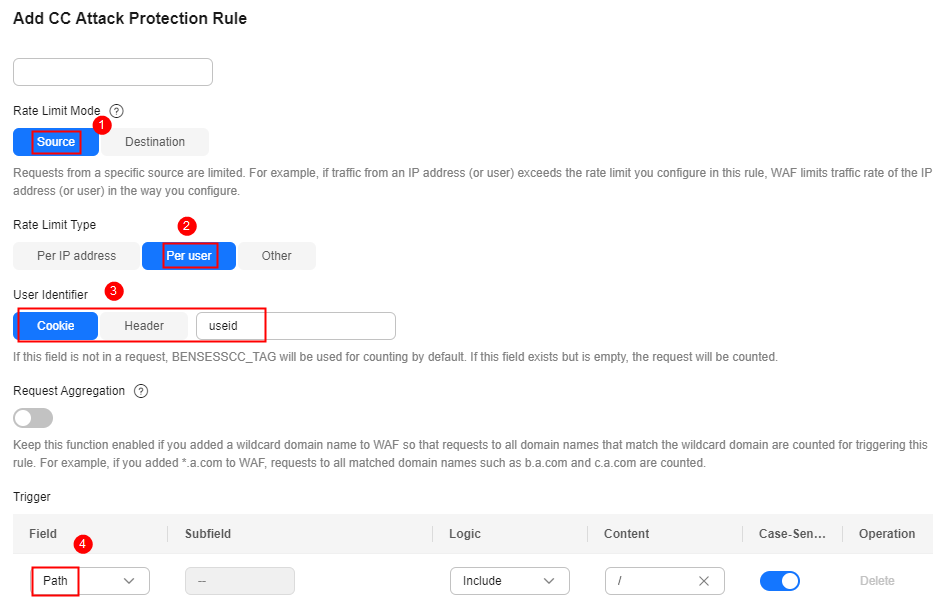
- Configure a CC attack protection rule using a cookie or user ID to limit traffic to the path. Figure 2 shows an example.
- Rate Limit Mode: Select Source and then Per user.
- User Identifier: Select Cooke and enter the User ID as the key value.
- Trigger: Set Field to Path, and set Logic and Content based on site requirements.
- Other parameters: Set them to meet your service requirements.
- Click Confirm.
Using HWWAFSESID to Configure a CC Attack Protection Rule
HWWAFSESID: session ID. WAF inserts HWWAFSESID (session ID) into the cookie of a customer request. WAF uses this field to count client requests. If the number of requests reaches the threshold, the CC attack protection rule will be triggered. Now, let's see how to use this field to configure a CC attack protection rule.
- Log in to the management console and connect your website to WAF.
- Cloud WAF: Adding a Domain Name to WAF (Cloud Mode - CNAME Access)
- Dedicated WAF instances: Adding a Website to WAF (Dedicated Mode)
- In the Policy column of the row containing the domain name, click the number to go to the Policies page.
- In the CC Attack Protection configuration area, toggle CC Attack Protection on (
 ) if needed.
Figure 3 CC Attack Protection configuration area
 Figure 4 CC Attack Protection configuration area
- In the upper left corner of the CC Attack Protection page, click Add Rule.
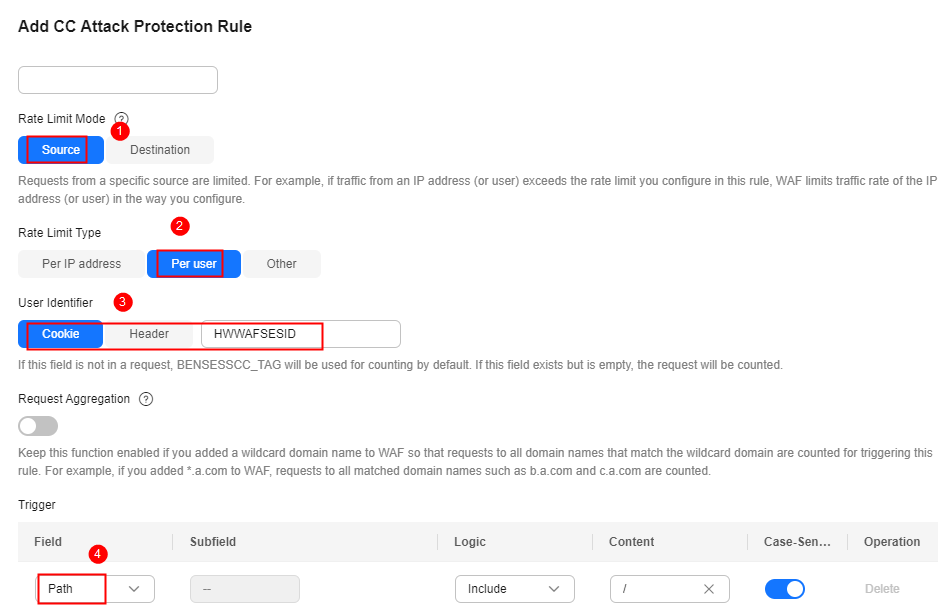
- Configure a CC attack protection rule using HWWAFSESID to limit traffic to the path. For details, see Figure 5.
- Rate Limit Mode: Select Source and then Per user.
- User Identifier: Select Cookie and set it to HWWAFSESID.
- Trigger: Set Field to Path, and set Logic and Content based on site requirements.
- Other parameters: Set them to meet your service requirements.
- Click OK.
Feedback
Was this page helpful?
Provide feedbackThank you very much for your feedback. We will continue working to improve the documentation.See the reply and handling status in My Cloud VOC.
For any further questions, feel free to contact us through the chatbot.
Chatbot


