File Upload
Overview
Devices can upload run logs, configuration files, and other files to the platform for log analysis, fault locating, and device data backup. When a device uploads files to Object Storage Service (OBS) using HTTPS, you can manage the uploaded files on OBS.
Service Flow

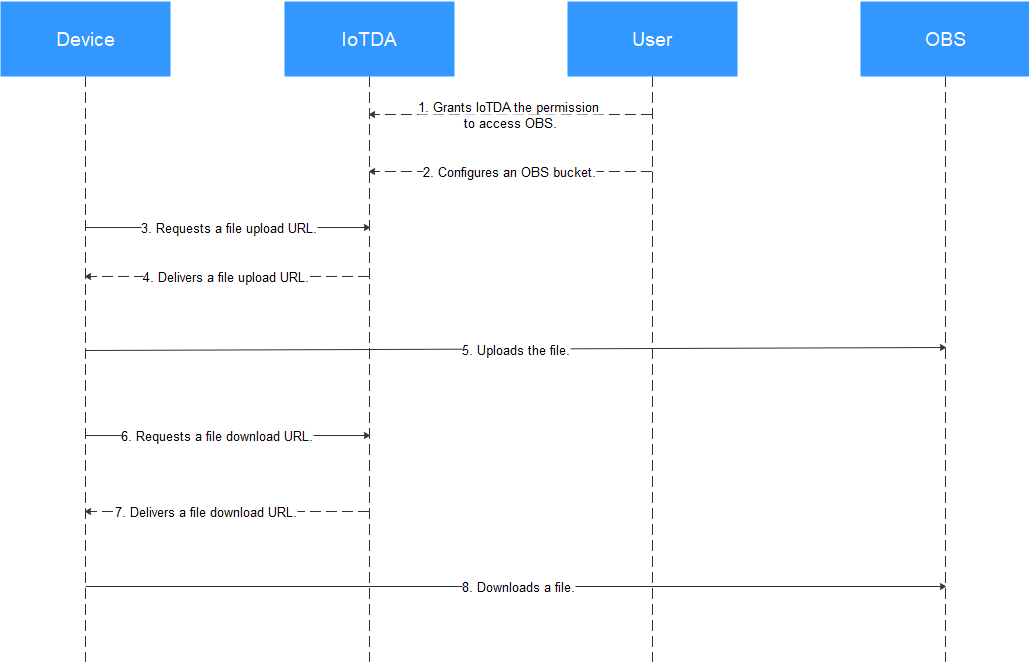
1. A user grants IoTDA the permission to access OBS.
2. The user configures an OBS bucket.
3–4. A device requests a file upload URL, and the platform delivers a URL. For details on the URL format, see Device Requesting a URL for File Upload.
- Method 1: Directly use the URL. Postman is used as an example.
Use the PUT method to call the URL, set the body to binary, and select the file to upload. The file name must be the same as the reported file name.
The header of the API does not need to contain Content-Type or Host. If carried, Content-Type must be set to text/plain and Host must be set to the domain name of the URL. Otherwise, the 403 status code SignatureDoesNotMatch is returned.


- Method 2: Integrate the OBS SDK to call the API.
Follow the instructions provided in Accessing OBS Using a Temporary URL to use a PUT request to upload an object's SDK to upload the file.
6–7. When the device requests to download a file stored in OBS, the platform delivers a file download URL. For details on the URL format, see Platform Delivering a Temporary URL for File Upload.
- Method 1: Use the GET method to call the URL. The header of the API does not need to contain Content-Type or Host. If carried, Content-Type must be set to text/plain and Host must be set to the domain name of the URL. Otherwise, the 403 status code SignatureDoesNotMatch is returned.
- Method 2: Integrate the OBS SDK to call the API and use the GET request to download the object's SDK to download the file.
Configuring File Upload
- Access the IoTDA service page and click Access Console. Click the target instance card.
- In the navigation pane, choose . On the displayed page, click File Uploads.
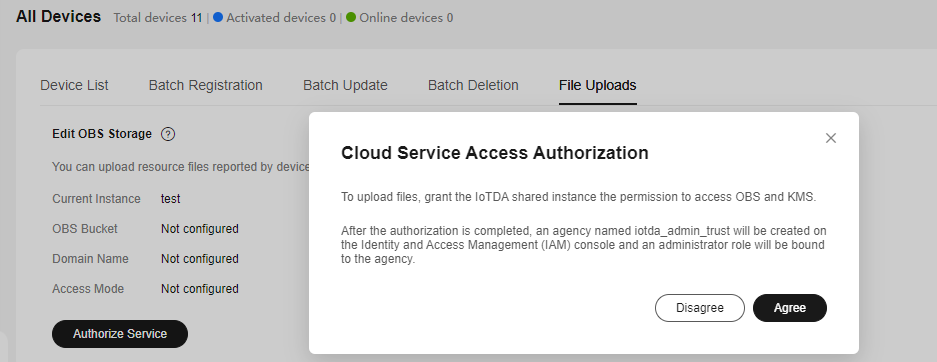
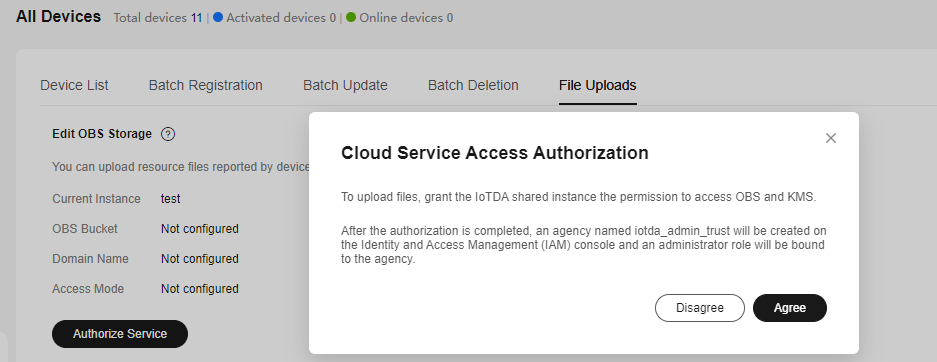
- Click Authorize Service. In the dialog box displayed, click Agree.
Figure 2 File uploading - Authorization

Note: If you have only granted IoTDA the permissions to access OBS, choose in the navigation pane, click the File Uploads tab, and click Authorize KMS to grant IoTDA the permissions to access Key Management Service (KMS).
- (Optional) Create a bucket on the OBS console if no bucket is available.
- Log in to the OBS console.
- Click Create Bucket in the upper right corner to create a bucket.

If you use OBS to manage files, you will be charged by OBS. IoTDA does not charge you for file storage. For details about OBS billing, see Billing.
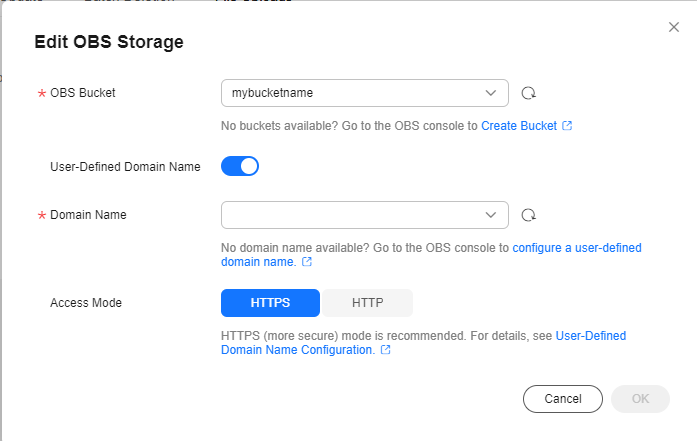
- Click Edit OBS Storage and select a bucket. All device files in the instance will be uploaded to this bucket. You can click Edit to select another bucket.
Figure 3 File uploading - Storage configuration


When you call the OBS API used for uploading device files, only one file can be uploaded at a time, and the file size cannot exceed 5 GB.
- If you want to use a custom domain name, enable User-Defined Domain Name, select the required domain name configured for the OBS bucket, select HTTPS or HTTP for Access Mode, and click OK.
Figure 4 File uploading - Configuring a custom domain name


The custom domain name is the temporary URL domain name delivered by the platform to the device for OBS file uploading or downloading.
Feedback
Was this page helpful?
Provide feedbackThank you very much for your feedback. We will continue working to improve the documentation.See the reply and handling status in My Cloud VOC.
For any further questions, feel free to contact us through the chatbot.
Chatbot


