Creating an OBS Masking Task
After creating an OBS masking task, you can mask sensitive information of OBS data.
This section describes how to create an OBS data masking task.
Prerequisites
- Access to cloud assets has been authorized. For details, see Allowing or Disallowing Access to Cloud Assets.
- OBS assets have been added. For details, see Adding OBS Assets.
- Sensitive data has been identified by referring to Creating an Identification Task.
Constraints
- DSC does not support the parallel file system of OBS.
- DSC supports files such as .txt, .log, .xml, .ini, .sql, .inf, .java and .json or files whose mime type starts with text.
Creating and Running an OBS Masking Task
- Log in to the management console.
- Click
 in the upper left corner and select a region or project.
 - In the navigation tree on the left, click
 . Choose .
 - In the navigation pane, choose Data Asset Protection > Data Masking and click the OBS tab. The OBS Masking page is displayed.
- Click
 and set Sensitive OBS Data Masking to
  to enable OBS masking.
 - Click Create Task. On the displayed Configure Data Source page, configure parameters according to Table 1.
Table 1 Parameter description Parameter
Description
Task Name
You can customize the name of a data masking task.
The task name must meet the following requirements:- Contain 1 to 255 characters.
- Consist of letters, digits, underscores (_), and hyphens (-).
Select Data Source
Select a data source. Only OBS is supported.
Data Source
OBS Bucket Name: Select an OBS bucket asset name from the drop-down list box.
OBS File Path: Select an OBS bucket file path from the drop-down list box.
File Type: Currently, only the text type is supported.
NOTE:Only assets with read and write permissions can use the masking function.
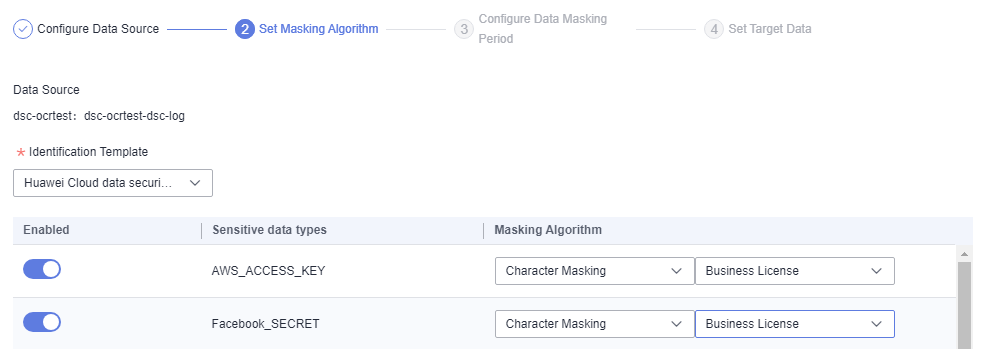
- Click Next. The Set Masking Algorithm page is displayed, as shown in Figure 1.
- Identification Template: Select an identification template from the drop-down list box.
If a sensitive data identification rule is disabled in the sensitive data identification template, the corresponding sensitive information is not displayed.
- Click the switch in the Status column to disable masking for the sensitive data type.
If the Status button is disabled, the identification rule is enabled but masking is not performed after identification.
- Data masking algorithms:
By default, Simulation Masking is enabled, ensuring that no information is lost and the data format remains unchanged after masking. For more information on the sensitive data types supported by simulation masking, refer to Simulation Masking. Additionally, you can choose one of the following masking algorithms from the drop-down list:
Hash: For details, see Hash.
Character coverage: For details, see Character Masking.
Keyword replacement: For details, see Keyword Replacement.
Deletion: For details, see Value Change.
- Identification Template: Select an identification template from the drop-down list box.
- Click Next. The Masking Configuration page is displayed.
- Traverse Subdirectories: If you enable Traverse subdirectories, the subdirectories in the source directory will be masked.
- File renaming: If you enable File renaming, masked files will be renamed.
- File Prefix/File Suffix: Enter a maximum of 16 characters. Only letters, digits, underscores (_), and hyphens (-) are allowed.
- Example of renaming a file: The original file name is Test.txt, the prefix is DSC_, and the suffix is 1. The renamed file is DSC_Test1.txt.
- Click Next. The Data Target Configuration page is displayed, as shown in Figure 2.
- OBS Bucket Name: Select a bucket after masking from the drop-down list box.
- OBS File Path: Click and select an OBS file path in the displayed dialog box.

The path of the target OBS bucket cannot be the same as that of the source OBS bucket or the subdirectory of the source OBS bucket.
- Click OK. The OBS masking task is created.
- Go to the OBS tab page, locate the target masking task, click Enable/Disable to enable the task, and click Run in the Operation column.
- After the task is executed, the system starts to perform masking based on the settings.
Viewing the Status of an OBS Data Masking Task
- On the OBS page, click
 to view the masking task status, as shown in Figure 3.
The task statuses are described as follows:
- Completed: The data masking task has been successfully executed.
- Running: The data masking task is being executed.
- Pending execution: The data masking task is not executed.
- Stopped: The data masking task has been manually stopped.
- Failed: The data masking task fails to be executed.
Editing and Deleting an OBS Data Masking Task
A masking task in the Waiting or Running status cannot be edited or deleted.
- In the OBS data masking task list, locate the row containing the target data masking task and click Edit in the Operation column to modify masking task information. For details, see Creating and Running an OBS Masking Task.
- In the OBS data masking task list, click Delete in the Operation column.

Deleted masking tasks cannot be restored. Exercise caution when performing this operation.
Feedback
Was this page helpful?
Provide feedbackThank you very much for your feedback. We will continue working to improve the documentation.See the reply and handling status in My Cloud VOC.
For any further questions, feel free to contact us through the chatbot.
Chatbot


