
Creating a DLI Masking Task
You can mask sensitive DLI data.
This section describes how to create a data masking task for DLI.
Prerequisites
- Access to cloud assets has been authorized. For details, see Allowing or Disallowing Access to Cloud Assets.
- A DLI database has been added. For details, see Authorizing Access to Big Data Assets.
- Sensitive data has been identified by referring to Creating an Identification Task.
Constraints
Currently, only the DLI data source is supported.
Creating and Running an HBase Masking Task
- Log in to the management console.
- Click
 in the upper left corner and select a region or project.
 - In the navigation tree on the left, click
 . Choose .
 - In the navigation pane, choose Data Asset Protection > Data Masking and click the DLI tab. The DLI Masking page is displayed.
- Click
 and set DLI Masking to
  to enable DLI masking.
 - Click Create Task. On the displayed Configure Data Source page, configure parameters according to Table 1.
Table 1 Parameter description Parameter
Description
Task Name
You can customize the name of a data masking task.
The task name must meet the following requirements:- Contain 1 to 255 characters.
- Consist of letters, digits, underscores (_), and hyphens (-).
Select Data Source
Select a data source. Only DLI is supported.
Data Source
If no database instance is available, click Add Database to add database assets. For details, see Authorizing Access to Big Data Assets.
Database Instance: Select the database instance for masking.
Database Name: Enter the name of the database for masking.
Data Table Name: Enter the name of the table for masking.
NOTE:Only assets with read and write permissions can use the masking function.
Select the columns to be masked. You can select multiple columns.
AK/SK
Enter an access key. For details, see Access Keys. You can obtain the AK from the access key list and SK from the downloaded CSV file.
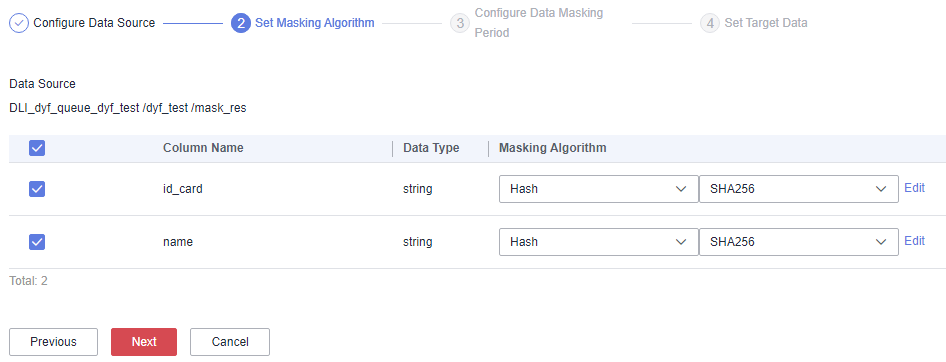
- Click Next. The Set Masking Algorithm page is displayed, as shown in Figure 1.
- Select the data columns you want to mask.
- Select a data masking algorithm. For details about data masking algorithms, see Configuring a Data Masking Rule.
- Click Next to switch to the Configure Data Masking Period page and configure the data masking period.
Select and set the execution period of a masking task.
- Manual: Manually enable a masking task and execute it based on masking rules.
- Hourly: Execute a data masking task every several hours.
Example: If the masking task needs to be executed every two hours, set this parameter to 02:00.
- Daily: Execute a data masking task at a specified time every day.
Example: If the masking task needs to be executed at 12:00 every day, set this parameter to 12:00:00.
- Weekly: Execute a data masking task at a specified time every week.
Example: If the masking task needs to be executed at 12:00 every Monday, set this parameter to 12:00:00 every Monday.
- Monthly: Execute a data masking task at a specified time on a specified day every month.
Example: If the masking task needs to be executed at 12:00 on the 12th day of each month, set this parameter to 12:00:00 12th day of every month.

If you want to execute a data masking task on the 31st day of each month, the system automatically executes the task on the last day of every month.
- Click Next. The Set Target Data page is displayed.
- Select a database instance and database name, and enter the database table name.
If the entered table name already exists, the system will update the data in the existing table.
If the table name is new, it will automatically create and name the table in the target database.

Do not fill in an existing service data table. Otherwise, services may be affected.
- Set the column name of the target data type.
By default, the system generates a name that is the same as the name of the data source column. You can retain the default name or change it as required.
- Select a database instance and database name, and enter the database table name.
- Click Finish.
- On the DLI page. In the Operation column of the target anonymization task, click Execute.
- The data masking task is executed as configured.
Checking the Running Status of a DLI Data Masking Task
- On the DLI page, click
 to view the masking task status.
The task statuses are described as follows:
- Completed: The data masking task has been successfully executed.
- Running: The data masking task is being executed.
- Pending execution: The data masking task is not executed.
- Stopped: The data masking task has been manually stopped.
- Failed: The data masking task fails to be executed.
Editing and Deleting a DLI Masking Task
A masking task in the Waiting or Running status cannot be edited or deleted.
- In the DLI data masking task list, locate the row containing the target data masking task and click Edit in the Operation column to modify masking task information.
- In the DLI data masking task list, click Delete in the Operation column.
Deleted masking tasks cannot be restored. Exercise caution when performing this operation.
Feedback
Was this page helpful?
Provide feedbackThank you very much for your feedback. We will continue working to improve the documentation.See the reply and handling status in My Cloud VOC.
For any further questions, feel free to contact us through the chatbot.
Chatbot


