
Quickly Opening and Calling APIs
This section describes how to quickly get started with APIG. The following uses simple authentication with an app as an example to describe how to quickly open and call APIs. Simple authentication supports API calling only in HTTPS or gRPCS mode.

- Preparations
Before using APIG, ensure you have configured a VPC, subnet, and security group.
- Create a gateway
Create a gateway with appropriate specifications.
- Open the API
Create an API that supports simple authentication with Mock backend. Debug the created API and publish it.
- Call the API
Create a credential and add an AppCode. Then use an API test tool to call the API with the AppCode.
Constraints
Security groups do not take effect after gateways are created in regions except LA-Mexico City1 and CN North-Beijing1. To disable access from specific IP addresses, see access control policy.
Step 1: Preparations
- Register with Huawei Cloud and complete real-name authentication.
If you already have a Huawei account, skip this step. If you do not have one, see Signing up for a HUAWEI ID and Enabling Huawei Cloud Services and Real-Name Authentication.
- Ensure that your account has sufficient balance before creating an APIG gateway.
To top up your account, see Topping Up an Account.
- Before creating an APIG gateway, ensure that your account has permissions to perform operations on APIG gateways.
- You must be assigned both the APIG Administrator and VPC Administrator roles so that you can create gateways.
- Alternatively, you must be attached the APIG FullAccess policy.
- To achieve fine-grained management of your cloud resources, create IAM user groups and users and grant specified permissions to the users. For details, see Creating a User and Granting APIG Permissions.
- Before creating an APIG gateway, ensure that a VPC and a subnet are available.
Configure a VPC and subnet for the APIG gateway as required. You can use the current account's existing VPC and subnet or create new ones.
For details about how to create a VPC and subnet, see Creating a VPC. Note: The VPC must be created in the same region as the APIG gateway.
- Before creating an APIG gateway, ensure that a security group is available.
Configure the security group for APIG gateways as required. You can use the current account's existing security groups, or create new ones. For details, see Creating a Security Group.
To connect to APIG gateways, add the security group rules described in Table 1. Other rules can be added based on site requirements.Table 1 Security group rule Direction
Protocol
Port
Source address
Description
Inbound
TCP
80/443
0.0.0.0/0
Intra-VPC Access

- After a security group is created, it has a default inbound rule that allows communication among ECSs within the security group and a default outbound rule that allows all outbound traffic. If you access your APIG gateway using the private network within a VPC, you do not need to add the rules described in Table 1.
- Security groups do not take effect after gateways are created in regions except LA-Mexico City1 and CN North-Beijing1. To disable access from specific IP addresses, see access control policy.
Step 2: Create a gateway
- Go to the Buy Gateway page.
- Configure the gateway according to the following table.
Table 2 Configuring the gateway Parameter
Description
Billing Mode
Billing mode of the gateway. Select Pay-per-use.
Region
The region to which the gateway belongs. Select CN-Hong Kong.
AZ
The AZ of the gateway. Select AZ1, AZ2, and AZ3.
Gateway Name
Enter the gateway name, for example, apig-test.
Edition
Gateway specifications. Select Basic.
Scheduled Maintenance
The period for gateway maintenance. Retain the default value.
Enterprise Project
Select default.
Public Inbound Access
Determine whether to allow the APIs created in the gateway to be called by external services using an EIP. Enable the Public Inbound Access.
VPC
Select the prepared VPC and subnet. vv
Security Group
Select the prepared security group.
- Click Next.
- Confirm the configuration, read and confirm your acceptance of the service agreement, and click Pay Now.
Step 3: Open the API
- Create an API.
- In the navigation pane, choose API Management > APIs.
- Click Create API > Create API and configure the frontend.
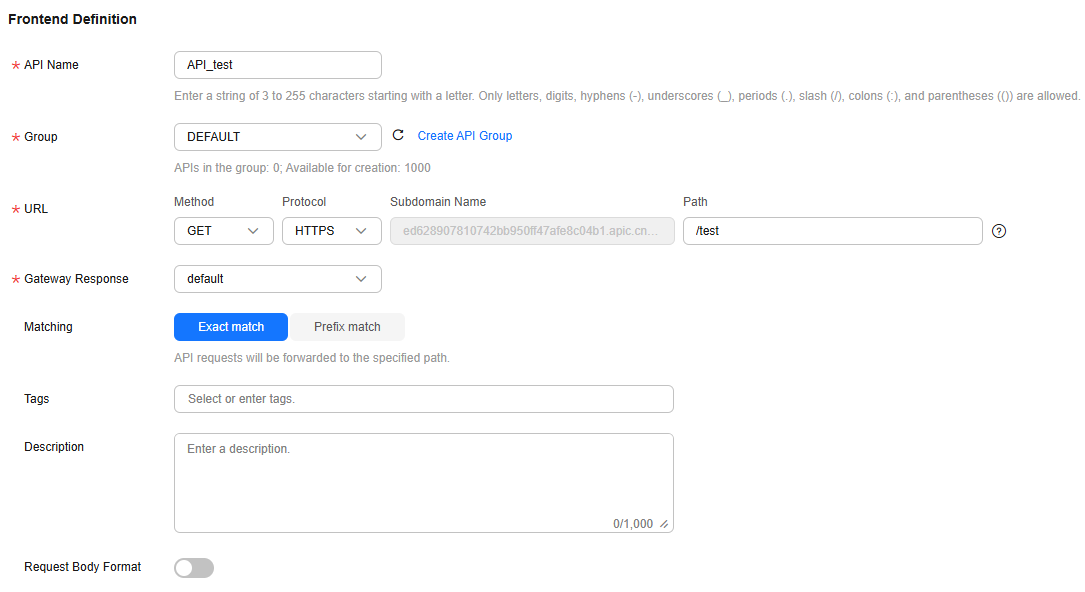
Table 3 Frontend definition Parameter
Description
API Name
Enter the API name, for example, API_test.
Group
Select the default group DEFAULT. To create a group, click Create API Group. For details about how to create an API, see Creating an API Group.
URL
Method: Request method of the API. Set this parameter to GET.
Protocol: Set this parameter to HTTPS.
Subdomain Name: The subdomain automatically allocated to the API group. The subdomain name of the default API group is used.
Path: path of the API request. Set this parameter to /test.
Gateway Response
The response to be displayed if APIG fails to process an API request. Default: default.
- Configure security settings based on the following table.
Table 4 API request definition Parameter
Description
Authentication Mode
API authentication mode. Set this parameter to App.
Simple Authentication
If you enable this option, API Gateway verifies only the AppCode and the request signature does not need to be verified. For this example, enable Simple Authentication.
- Click Next and configure the default backend information.
Table 5 Parameters for defining a Mock backend service Parameter
Description
Backend Type
Backend service type. Select Mock to prevent API requests from being forwarded to the backend service. This is useful if you need to debug APIs when the backend is unavailable. If a backend service is available, configure other backend service types as required. For details, see Creating an API.
Status Code
The HTTP status code returned by the API. Use the default 200 here.
Response
Expected result to the API caller for debugging and verification. Enter success here.
- Click Finish.
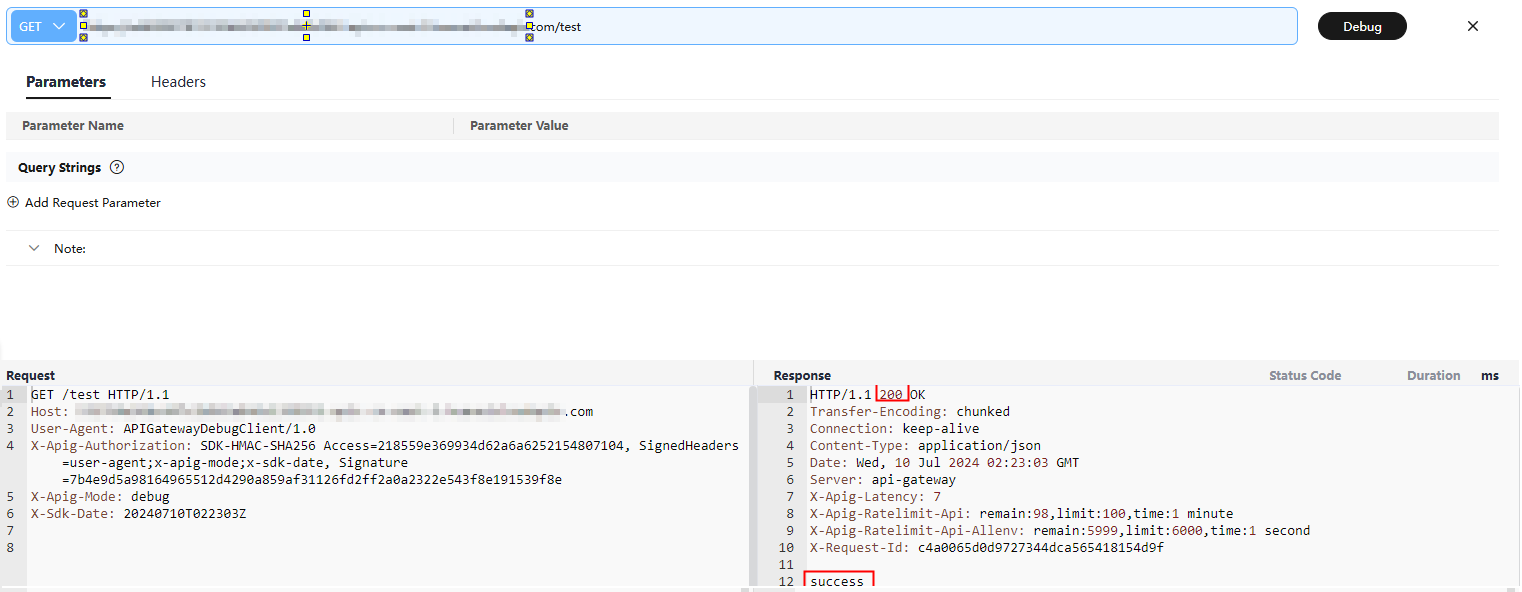
- Debug the API.
- On the APIs tab page, select an API and click Debug.
- Click Debug on the right of the URL. The API request and response information are displayed at the bottom of the page.
If the API is successfully called, the status code 200 is displayed, and success is returned for the Mock backend. Otherwise, rectify the fault by referring to Error Codes.
- Publish the API.
- On the APIs tab, click Publish Latest Version.
- Select the environment in which the API is to be published. Choose the default environment RELEASE. Or you can click Create Environment to create an environment. For details, see (Optional) Configuring the Environment and Environment Variables.
- Click OK.
Step 4: Call the API
- Create a credential.
- In the navigation pane, choose API Management > Credentials.
- Click Create Credential and enter the credential name. In this example, enter apptest.
- Click OK.
- Bind the credential to the API. Note that only APIs that use app authentication can be bound.
- In the Operation column of the created credential, click Bind to APIs.
- Select an environment, API group, and APIs.
- Click OK.
- Add an AppCode.
- In the credential list, click the created credential to go to the credential details page.
- Under AppCodes, click Add AppCode.
- Select Automatically generated.
- Click OK.
- Call the API.
Use the API test tool to configure the API request and authentication.
- Select GET as the request method. On the APIs page, copy the URL in the format of https://debugging domain name/path to the API test tool.
- Add the header parameter X-Apig-AppCode and set the parameter value to the generated AppCode.
- Send the request.
If the API is successfully called, the status code 200 is displayed, and success is returned for the Mock backend. Otherwise, rectify the fault by referring to Error Codes.

Related Documents
- For details about how to create an API, see Creating an API.
- For more information about API calling, see Calling an API.
- If an API fails to be called, refer to Error Codes.
- VPC owners can share the subnet in the VPC with one or multiple accounts through Resource Access Manager (RAM). Through VPC sharing, you can easily configure, operate, and manage multiple accounts' resources at low costs. For more information about VPC subnet sharing, see VPC Sharing Overview.
Feedback
Was this page helpful?
Provide feedbackThank you very much for your feedback. We will continue working to improve the documentation.See the reply and handling status in My Cloud VOC.
For any further questions, feel free to contact us through the chatbot.
Chatbot


