Python Demo Usage Guide
Overview
This topic uses Python as an example to describe how to connect a device to the platform over MQTTS or MQTT and how to use platform APIs to report properties and subscribe to a topic for receiving commands.

The code snippets in this document are only examples and are for trial use only. To put them into commercial use, obtain the IoT Device SDKs of the corresponding language for integration by referring to Obtaining Resources.
Prerequisites
- You have installed Python by following the instructions provided in Installing Python.
- You have installed a development tool (for example, PyCharm) by following the instructions provided in Installing PyCharm.
- You have obtained the device access address from the IoTDA console. For details about how to obtain the address, see Platform Connection Information.
- You have created a product and a device on the IoTDA console. For details, see Creating a Product, Registering an Individual Device, and Registering a Batch of Devices.
Preparations
- Installing Python
- Go to the Python website to download and install a desired version. (The following uses Windows OS as an example to describe how to install Python 3.8.2.)
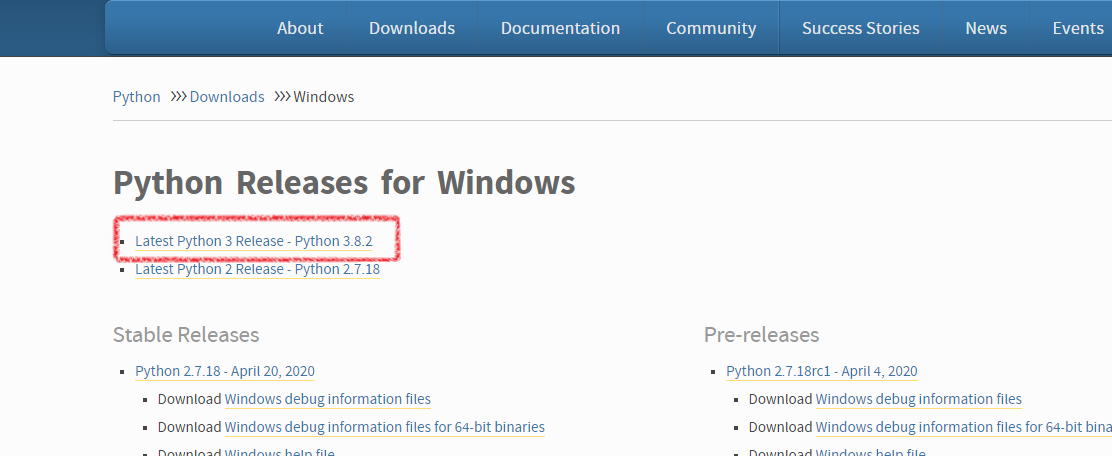
- After the download is complete, run the .exe file to install Python.
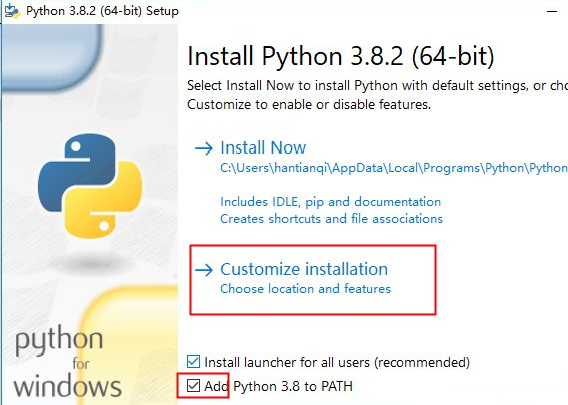
- Select Add Python 3.8 to PATH (if it is not selected, you need to manually configure environment variables), click Customize installation, and install Python as prompted.
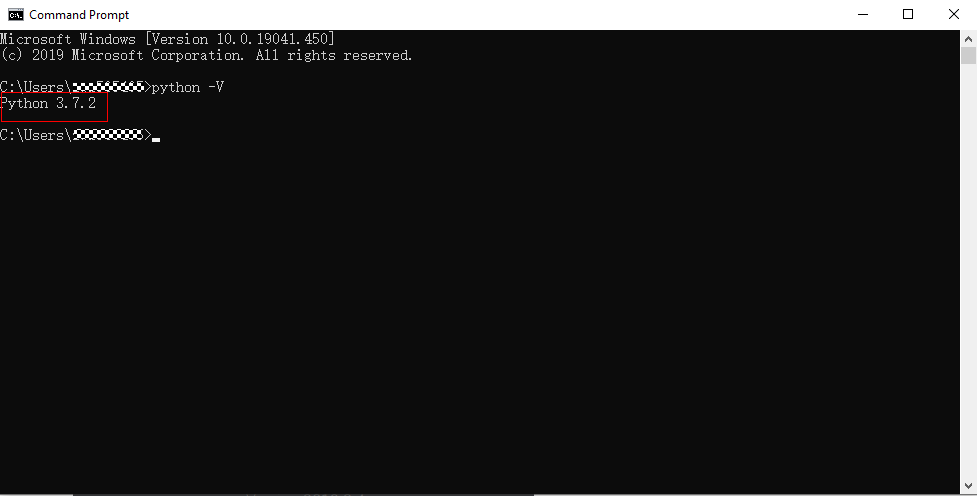
- Check whether Python is installed.
Press Win+R, enter cmd, and press Enter to open the CLI. In the CLI, enter python –V and press Enter. If the Python version is displayed, the installation is successful.
- Go to the Python website to download and install a desired version. (The following uses Windows OS as an example to describe how to install Python 3.8.2.)
- Installing PyCharm (If you have already installed PyCharm, skip this step.)
- Visit the PyCharm website, select a version, and click Download.
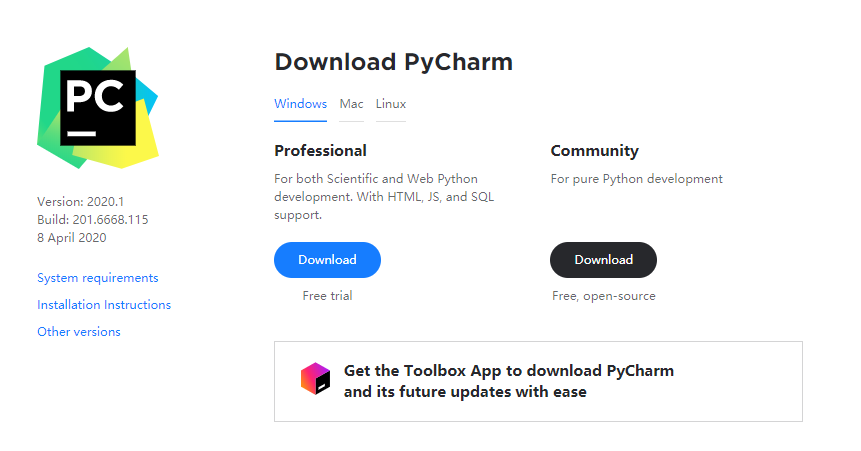
The professional edition is recommended.
- Run the .exe file and install PyCharm as prompted.
- Visit the PyCharm website, select a version, and click Download.
Importing Sample Code
- Download the QuickStart (Python).
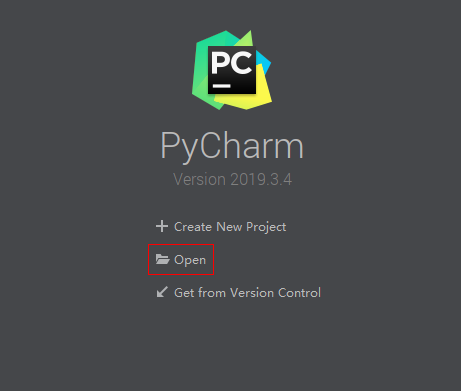
- Run PyCharm, click Open, and select the sample code downloaded.
- Import the sample code.
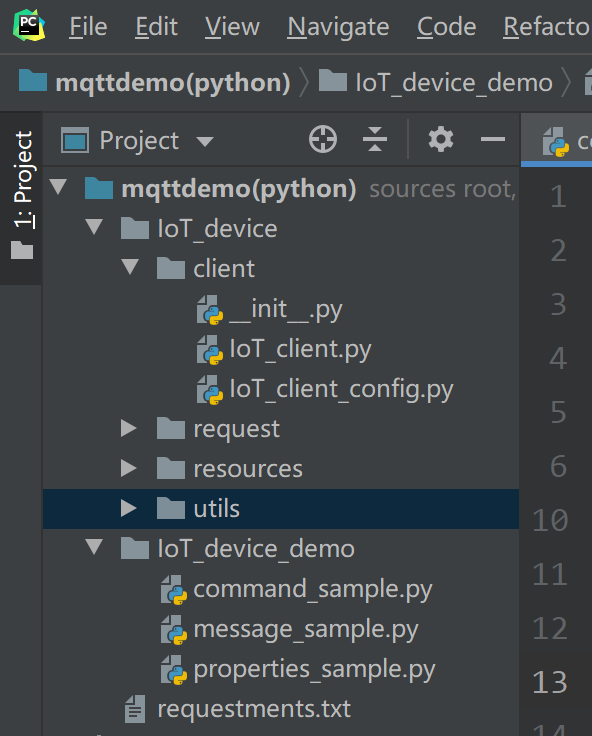
Description of the directories:
- IoT_device_demo: MQTT demo files
message_sample.py: Demo for devices to send and receive messages
command_sample.py: Demo for devices to respond to commands delivered by the platform
properties_sample.py: Demo for devices to report properties
- IoT_device/client: Used for paho-mqtt encapsulation.
IoT_client_config.py: client configurations, such as the device ID and secret
IoT_client.py: MQTT-related function configurations, such as connection, subscription, publish, and response
- IoT_device/Utils: utility methods, such as those for obtaining the timestamp and encrypting a secret
- IoT_device/resources: Stores certificates.
DigiCertGlobalRootCA.crt.pem is used by the device to verify the platform identity when the device connects to the platform. You can download the certificate file using the link provided in Certificates.
- IoT_device/request: Encapsulates device properties, such as commands, messages, and properties.
- IoT_device_demo: MQTT demo files
- (Optional) Install the paho-mqtt library, which is a third-party library that uses the MQTT protocol in Python. If the paho-mqtt library has already been installed, skip this step. You can install paho-mqtt using either of the following methods:
- Method 1: Use the pip tool to install paho-mqtt in the CLI. (The tool is already provided when installing Python.)
In the CLI, enter pip install paho-mqtt and press Enter. If the message Successfully installed paho-mqtt is displayed, the installation is successful. If a message is displayed indicating that the pip command is not an internal or external command, check the Python environment variables. See the figure below.

- Method 2: Install paho-mqtt using PyCharm.
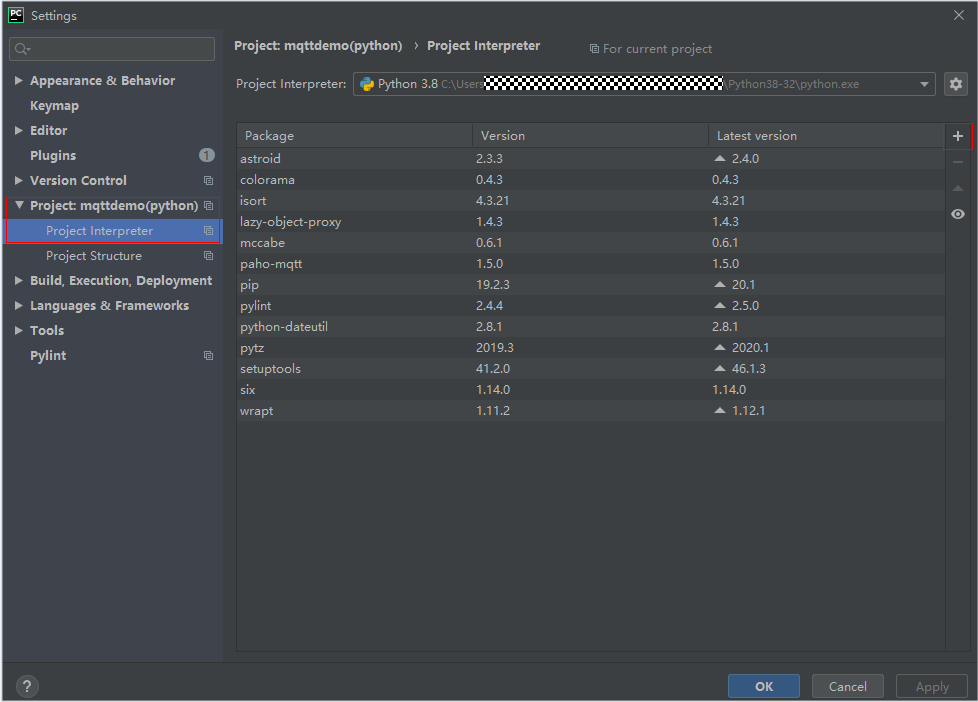
- Open PyCharm, choose , and click the plus icon (+) on the right side to search for paho-mqtt.
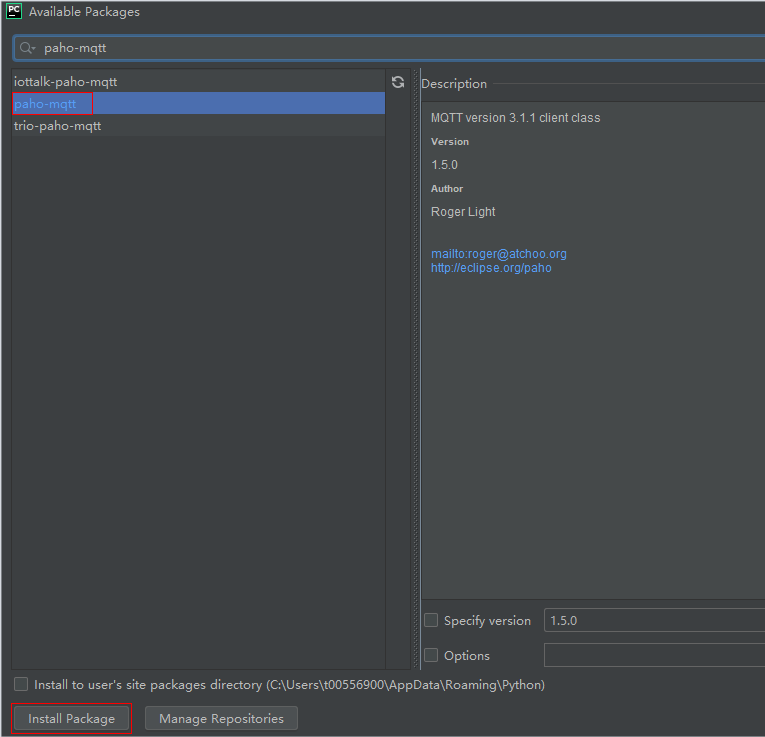
- Click Install Package in the lower left corner.
- Open PyCharm, choose , and click the plus icon (+) on the right side to search for paho-mqtt.
- Method 1: Use the pip tool to install paho-mqtt in the CLI. (The tool is already provided when installing Python.)
Establishing a Connection
To connect a device or gateway to the platform, upload the device information to bind the device or gateway to the platform.
- Before establishing a connection, modify the following parameters. The IoTClientConfig class is used to configure client information.
1
2
3
4
# Client configurations
client_cfg = IoTClientConfig(server_ip='iot-mqtts.cn-north-4.myhuaweicloud.com', device_id='5e85a55f60b7b804c51ce15c_py123', secret='******', is_ssl=True)
# Create a device.
iot_client = IotClient(client_cfg)
- server_ip indicates the device connection address of the platform. To obtain this address, see Platform Connection Information. (After obtaining the domain name, run the ping Domain name command in the CLI to obtain the corresponding IP address.)
- device_id and secret are returned after the device is registered.
- is_ssl: True means to establish an MQTTS connection and False means to establish an MQTT connection.
- Call the connect method to initiate a connection.
iot_client.connect()
If the connection is successful, the following information is displayed:
-----------------Connection successful !!!
If the connection fails, the retreat_reconnection function executes backoff reconnection. The example code is as follows:
# Backoff reconnection
def retreat_reconnection(self):
	print("---- Backoff reconnection")
	global retryTimes
	minBackoff = 1
	maxBackoff = 30
	defaultBackoff = 1
	low_bound = (int)(defaultBackoff * 0.8)
	high_bound = (int)(defaultBackoff * 1.2)
	random_backoff = random.randint(0, high_bound - low_bound)
	backoff_with_jitter = math.pow(2.0, retryTimes) * (random_backoff + low_bound)
	wait_time_until_next_retry = min(minBackoff + backoff_with_jitter, maxBackoff)
	print("the next retry time is ", wait_time_until_next_retry, " seconds")
	retryTimes += 1
	time.sleep(wait_time_until_next_retry)
	self.connect()
Subscribing to a Topic
Only devices that subscribe to a specific topic can receive messages about the topic published by the broker. For details on the preset topics, see Topics.
The message_sample.py file provides functions such as subscribing to topics, unsubscribing from topics, and reporting device messages.
To subscribe to a topic for receiving commands, do as follows:
1
|
iot_client.subscribe(r'$oc/devices/' + str(self.__device_id) + r'/sys/commands/#') |
If the subscription is successful, information similar to the following is displayed. (topic indicates a custom topic, for example, Topic_1.)
------You have subscribed: topic
Responding to a Command
The command_sample.py file provides the function of responding to commands delivered by the platform. For details about the API, see Platform Delivering a Command.
1 2 3 4 5 |
# Responding to commands delivered by the platform def command_callback(request_id, command): # If the value of result_code is 0, the command is delivered. If the value is 1, the command fails to be delivered. iot_client.respond_command(request_id, result_code=0) iot_client.set_command_callback(command_callback) |
Reporting Properties
Devices can report their properties to the platform. For details about the API, see Device Reporting Properties.
The properties_sample.py file provides the functions of reporting device properties, responding to platform settings, and querying device properties.
In the following code, the device reports properties to the platform every 10 seconds. service_property indicates a device property object. For details, see the services_properties.py file.
1 2 3 4 5 6 7 |
# Reporting properties periodically while True: # Set properties based on the product model. service_property = ServicesProperties() service_property.add_service_property(service_id="Battery", property='batteryLevel', value=1) iot_client.report_properties(service_properties=service_property.service_property, qos=1) time.sleep(10) |
If the reporting is successful, the reported device properties are displayed on the device details page.
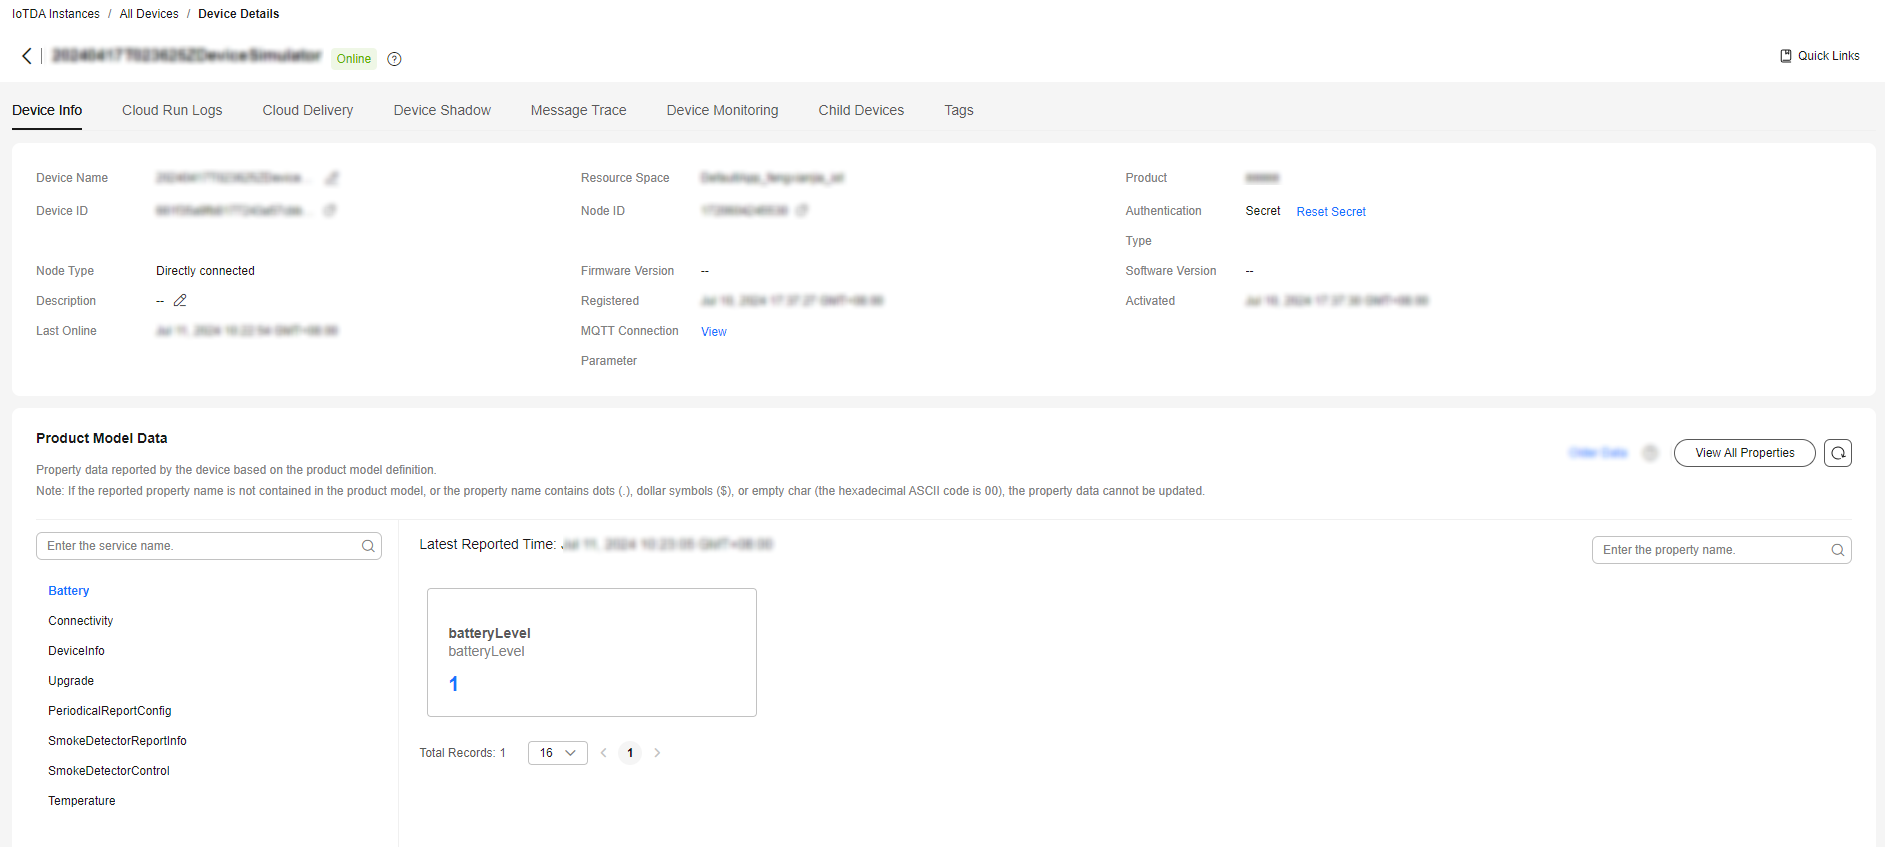

If the latest data is not displayed on the device details page, check whether the services and properties reported by the device are the same as those in the product model.
Reporting a Message
Message reporting is the process in which a device reports messages to the platform. The message_sample.py file provides the message reporting function.
1 2 |
# Sending a message to the platform using the default topic iot_client.publish_message('raw message: Hello Huawei cloud IoT') |
If the message is reported, the following information is displayed:
Publish success---mid = 1
Feedback
Was this page helpful?
Provide feedbackThank you very much for your feedback. We will continue working to improve the documentation.See the reply and handling status in My Cloud VOC.
For any further questions, feel free to contact us through the chatbot.
Chatbot


