The auto scaling function of MRS enables the task nodes of a cluster to be automatically scaled to match cluster loads. If the data volume changes periodically, you can configure an auto scaling rule so that the number of task nodes can be automatically adjusted in a fixed period of time before the data volume changes.
- Load-based auto scaling of Task nodes: The number of Task nodes is adjusted based on the real-time cluster load metrics or cluster resource pool metrics. When the data volume changes, scaling is triggered with a delay.
- Time-based Task node auto scaling: The number of Task nodes is adjusted based on the time ranges. If the data volume changes periodically, you can specify a resource plan to scale in or out the cluster before the data volume changes to avoid a scaling delay.
You can configure load-based or time-based auto scaling of Task nodes. You can also configure both of them, which is recommended in case of unexpected data peaks.
For more information about auto scaling policies, see Automatic Scaling of Task Nodes in an MRS Cluster.
Video Tutorial
This tutorial demonstrates how to configure AS when purchasing a cluster and how to add an AS policy to an existing cluster.
The UI may vary depending on the version. This tutorial is for reference only.
Configuring Auto Scaling During Cluster Creation
When you create an analysis, streaming, or hybrid cluster, you can configure auto scaling policies in advanced configuration parameters.
- Log in to the MRS console.
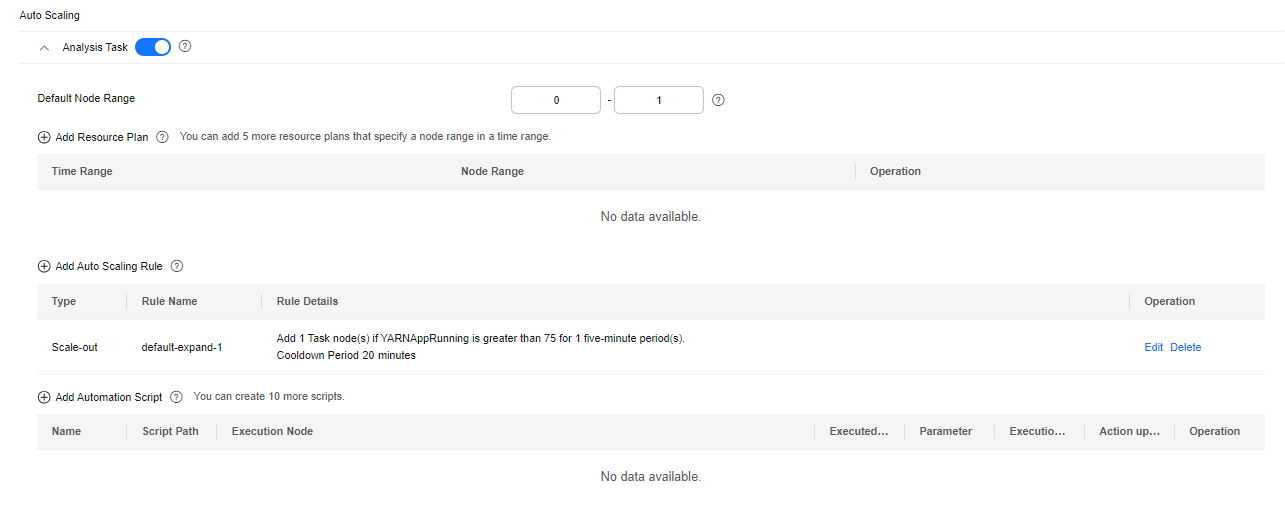
- When you buy a cluster containing task nodes, configure the cluster software and hardware information by referring to Buying a Custom MRS Cluster. Then, on the Set Advanced Options page, enable Analysis Task and configure or modify auto scaling rules and resource plans.
Figure 1 Configuring auto scaling rules when creating a cluster

Note that auto scaling adjusts the number of nodes as well as affects costs. Exercise caution when configuring auto scaling.
You can configure auto scaling in the following scenarios.
Scenario 1: Configuring Real-Time Load-based Auto Scaling
When it comes to adjusting the number of Task nodes based on the real-time cluster load or cluster resource pool metrics, you can use the MRS auto scaling rules.
Take the YARN service as an example. If the ratio of available YARN memory is less than 20%, five nodes will be added. If the ratio of available YARN memory is greater than 70%, five nodes will be reduced. The number of nodes in a task node group ranges from 1 to 10.
- Go to the Auto Scaling page to configure auto scaling rules.
- Configure the Default Range parameter.
Enter a task node range, in which auto scaling is performed. This constraint applies to all scale-in and scale-out rules. The maximum value range allowed is 0 to 500.
The value range in this example is 1 to 10.
- Configure an auto scaling rule.
To enable Auto Scaling, you must configure a scale-out or scale-in rule.
- Select Scale-Out or Scale-In.
- Click Add Rule.
- You can set a maximum of five rules for scaling out or in a cluster, respectively.
- The system determines the scale-out and then scale-in based on your configuration sequence. Add important policies first. This prevents repeated scale-out or scale-in operations in case a scale-out or scale-in cannot meet requirements.
- Set parameters as required.
Figure 2 Adding a rule
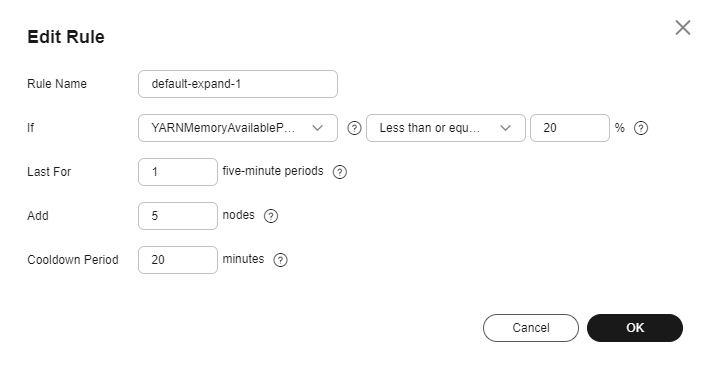
Table 1 Parameters for adding a scaling rule
|
Parameter |
Description |
Example Value |
|
Rule Name |
Name of an auto scaling rule |
default-expand-1 |
|
If |
The metric threshold of an auto scaling rule.
|
YARNMemoryAvailablePercentage
Less than or equal to
20% |
|
Last For |
The duration (5n) during which a cluster reaches the configured metric threshold for triggering a scale-out or scale-in. The default value of n is 1, indicating that the duration is five minutes. |
1 |
|
Add |
Number of Task nodes to be added or removed at a time. The value ranges from 1 to 100. |
5 |
|
Cooldown Period |
Interval between two auto scaling operations.
The default cooldown period is 20 minutes. The minimum value is 0. |
20 |
- Click OK.
You can view, edit, or delete the rules you configured in the Scale-out or Scale-in area on the Auto Scaling page. You can click Add Rule to configure multiple rules.
- Click OK.
- If you are configuring an auto scaling rule for an existing cluster, select I agree to authorize MRS to scale out or in nodes based on the above rule.
- After the configuration, system automatically scales in or out the Task node group as long as the auto scaling rules are met.
- You can click Operation Logs in the navigation pane to view the scaling details of a cluster.
Scenario 2: Configuring Time-based Auto Scaling
If the data volume changes regularly every day and you want to scale out or in a cluster before the data volume changes, you can create resource plans to adjust the number of Task nodes as planned in the specified time range.
For example: A real-time processing service sees a sharp increase in data volume from 7:00 to 13:00 on Monday, Tuesday, and Saturday. Assume that an MRS streaming cluster is used to process the service data. Five task nodes are required from 7:00 to 13:00 on Monday, Tuesday, and Saturday, while only two are required at other time.
- Go to the Auto Scaling page to configure a resource plan.
- For example, the Default Range of node quantity is set to 2-2, indicating that the number of task nodes is fixed at 2 except the time range specified in the resource plan.
- Click Configure Node Range for Specific Time Range under Default Range or Add Resource Plan.
- Configure Effective On, Time Range, and Node Range.
You can click Configure Node Range for Specific Time Range to configure multiple resource plans. A maximum of five resource plans are supported.
After a resource plan triggers a scale-out or scale-in, auto scaling will not be triggered again within 10 minutes.
Table 2 Scaling rule parameters
|
Parameter |
Description |
Example Value |
|
Effective On |
Effective On is set to Daily by default. You can also select one or more days from Monday to Sunday. |
Monday, Tuesday, and Saturday |
|
Time Range |
The start time must be at least 30 minutes earlier than the end time. Time ranges configured for different resource plans cannot overlap. |
07:00-13:00 |
|
Node Range |
- If you set both Node Range and Time Range, the node range you set will be used during the time range you set, and the default node range will be used beyond the time range you set.
- If you do not set Node Range, its default value will be used.
|
5-5 |
- Click OK.
- If you are configuring a resource plan for an existing cluster, select I agree to authorize MRS to scale out or in nodes based on the above rule.
- After the configuration, system automatically scales in or out the Task node group as long as the auto scaling rules are met.
- You can click Operation Logs in the navigation pane to view the scaling details of a cluster.
Scenario 3: Configuring Time-based and Load-based Auto Scaling
If the data volume is not stable and the expected fluctuation may occur, the fixed Task node range cannot guarantee that the requirements in some service scenarios are met. In this case, it is necessary to adjust the number of Task nodes based on the real-time loads and resource plans.
For example: A real-time processing service sees an unstable increase in data volume from 7:00 to 13:00 on Monday, Tuesday, and Saturday. In these time ranges, five to eight Task nodes are required. In other time ranges, two to four Task nodes are required. You can set an auto scaling rule based on a resource plan. When the data volume exceeds the expected value, the number of Task nodes changes with resource loads, without exceeding the node range specified in the resource plan. When a resource plan is triggered, the number of nodes is adjusted within the specified node range with minimum affect. That is, increase nodes to the upper limit and decrease nodes to the lower limit.
- Go to the Auto Scaling page to configure auto scaling rules.
An auto scaling rule adjusts the number of nodes, but also affects the actual price. Exercise caution when adding an auto scaling rule.
- Default Range
Enter a task node range, in which auto scaling is performed. This constraint applies to all scale-in and scale-out rules.
The number of task nodes in a cluster is limited to the configured default node range or the node range in the resource plan that takes effect in the current time range. The node quantity range in the resource plan has a higher priority.
For example, this parameter is set to 2-4 in this scenario.
- Configuring an Auto Scaling Rule
To enable Auto Scaling, you must configure a scale-out or scale-in rule.
- Select Scale-Out or Scale-In.
- Click Add Rule. The Add Rule page is displayed.
- You can set a maximum of five rules for scaling out or in a cluster, respectively.
- The system determines the scale-out and then scale-in based on your configuration sequence. Add important policies first. This prevents repeated scale-out or scale-in operations in case a scale-out or scale-in cannot meet requirements.
- Set parameters as required.
Figure 3 Adding a rule
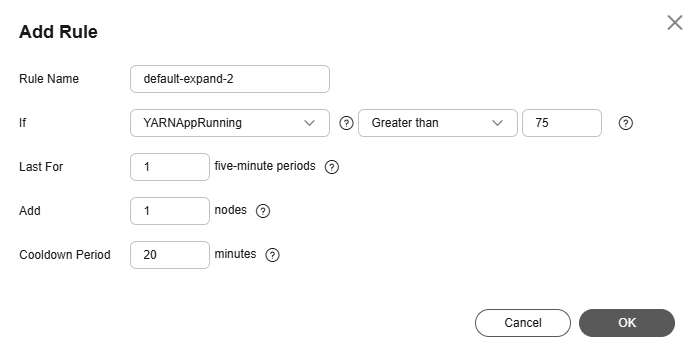
Table 3 Parameters for adding a rule
|
Parameter |
Description |
Example Value |
|
Rule Name |
Name of an auto scaling rule |
default-expand-2 |
|
If |
The metric threshold of an auto scaling rule.
|
YARNAppPending
Greater than
75 |
|
Last For |
The duration (5n) during which a cluster reaches the configured metric threshold for triggering a scale-out or scale-in. The default value of n is 1, indicating that the duration is five minutes. |
1 |
|
Add |
Number of Task nodes to be added or removed at a time. The value ranges from 1 to 100. |
1 |
|
Cooldown Period |
Interval between two auto scaling operations.
The default cooldown period is 20 minutes. The minimum value is 0. |
20 |
- Click OK.
You can view, edit, or delete the rules you configured in the Scale-out or Scale-in area on the Auto Scaling page.
- Configure a resource plan.
- Click Configure Node Range for Specific Time Range under Default Range or Add Resource Plan.
- Configure Effective On, Time Range, and Node Range.
Click Configure Node Range for Specific Time Range or Add Resource Plan to configure multiple resource plans.
After a resource plan triggers a scale-out or scale-in, auto scaling will not be triggered again within 10 minutes.
Table 4 Scaling rule parameters
|
Parameter |
Description |
Example Value |
|
Effective On |
Effective On is set to Daily by default. You can also select one or more days from Monday to Sunday. |
Monday, Tuesday, and Saturday |
|
Time Range |
The start time must be at least 30 minutes earlier than the end time. Time ranges configured for different resource plans cannot overlap. |
07:00-13:00 |
|
Node Range |
- If you set both Node Range and Time Range, the node range you set will be used during the time range you set, and the default node range will be used beyond the time range you set.
- If you do not set Node Range, its default value will be used.
|
5-8 |
- Click OK.
- If you are configuring a resource plan for an existing cluster, select I agree to authorize MRS to scale out or in nodes based on the above rule.
- After the configuration, system automatically scales in or out the Task node group as long as the auto scaling rules are met.
- You can click Operation Logs in the navigation pane to view the scaling details of a cluster.
Adding an Auto Scaling Policy for a Cluster
After a cluster is created, you can configure rules for the task node group in a cluster by node group or resource pool.
The node group policy and resource pool policy are mutually exclusive. You can configure either of them as needed.
You can specify auto scaling policies by resource pool in MRS 3.1.5 or later.
|
Item |
By Node Group |
By Resource Pool |
|
Auto scaling object |
All nodes in the task node group |
Task nodes in the resource pool specified by an auto scaling policy |
|
Resource pool ownership of added nodes |
Default resource pool |
Resource pool specified by the auto scaling policy |
|
Scale-in object |
Random scale-in of nodes in the task node group |
Random scale-in of nodes in a resource pool specified by an auto scaling policy |
Notes and Constraints
- Auto scaling policies can be enabled for only one node group.
- Only the following versions support auto scaling by resource pool:
- Common MRS: MRS 3.1.5 or later
- LTS MRS: MRS 3.3.0-LTS or later
Prerequisites
Procedure
- Log in to the MRS console.
- On the Active Clusters page, click the name of the target cluster. The cluster details page is displayed.
- On the page that is displayed, click the Auto Scaling tab.
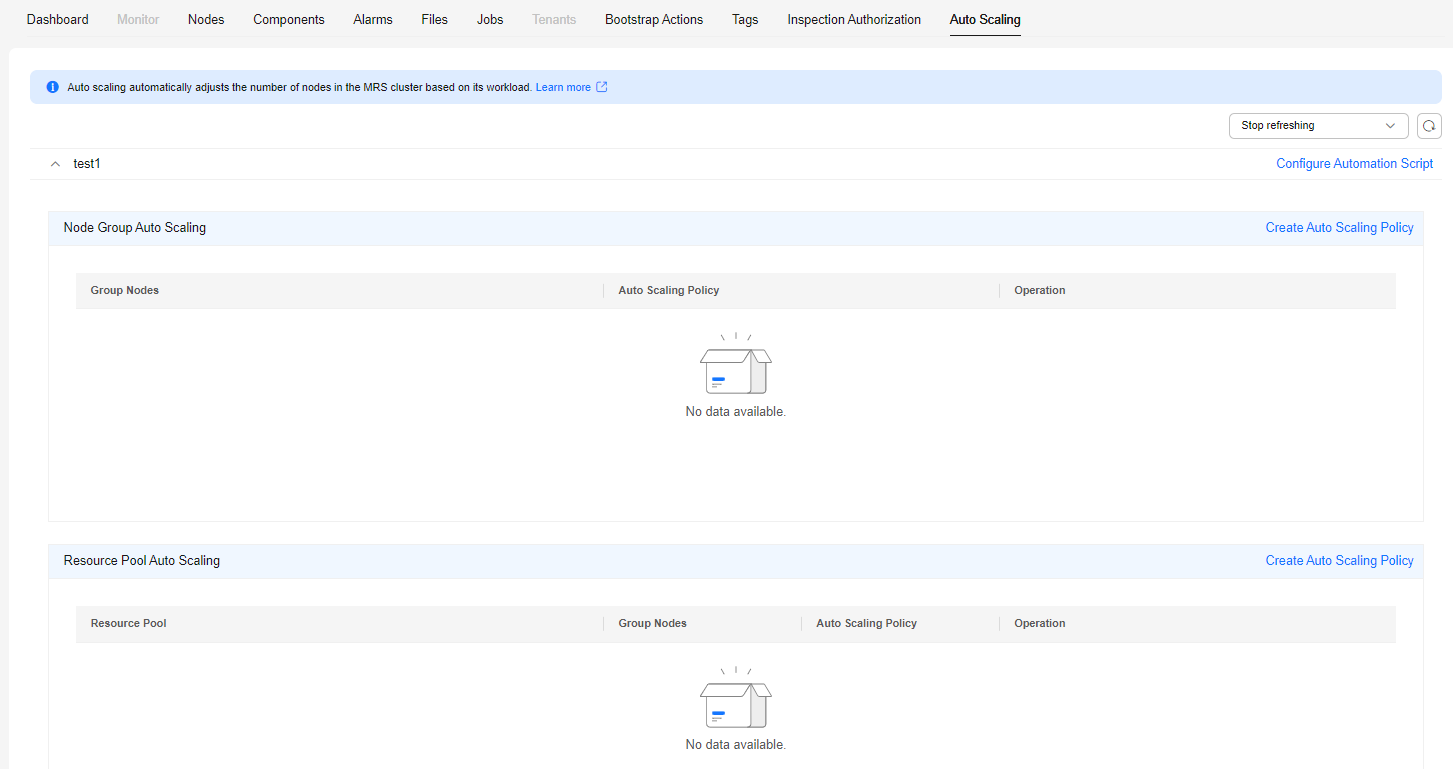
You can configure policies by resource pool or node group as needed.
Figure 4 Selecting an auto scaling dimension
- Click Create Auto Scaling Policy to create an auto scaling policy.
Figure 5 Adding an auto scaling policy (by node group)
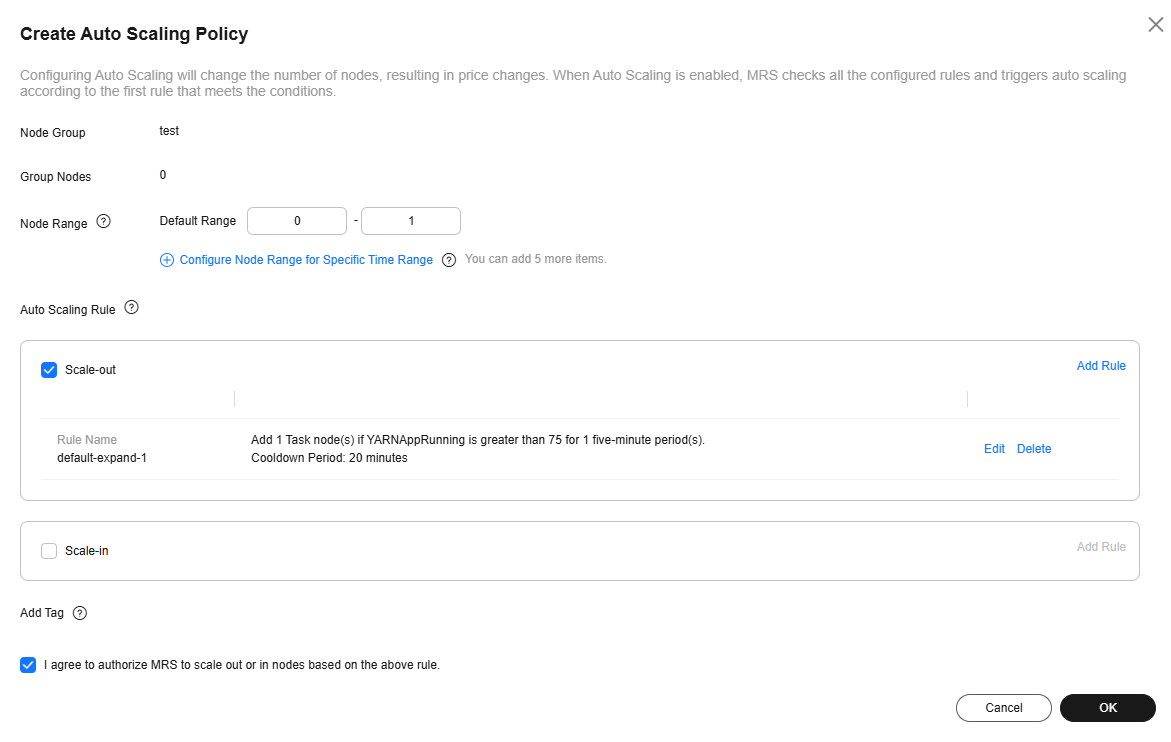
You can configure auto scaling in the following scenarios.
Scenario 1: Configuring Real-Time Load-based Auto Scaling
When it comes to adjusting the number of Task nodes based on the real-time cluster load or cluster resource pool metrics, you can use the MRS auto scaling rules.
Take the YARN service as an example. If the ratio of available YARN memory is less than 20%, five nodes will be added. If the ratio of available YARN memory is greater than 70%, five nodes will be reduced. The number of nodes in a task node group ranges from 1 to 10.
- Go to the Auto Scaling page to configure auto scaling rules.
- Configure the Default Range parameter.
Enter a task node range, in which auto scaling is performed. This constraint applies to all scale-in and scale-out rules. The maximum value range allowed is 0 to 500.
The value range in this example is 1 to 10.
- Configure an auto scaling rule.
To enable Auto Scaling, you must configure a scale-out or scale-in rule.
- Select Scale-Out or Scale-In.
- Click Add Rule.
- You can set a maximum of five rules for scaling out or in a cluster, respectively.
- The system determines the scale-out and then scale-in based on your configuration sequence. Add important policies first. This prevents repeated scale-out or scale-in operations in case a scale-out or scale-in cannot meet requirements.
- Set parameters as required.
Figure 6 Adding a rule

Table 5 Parameters for adding a scaling rule
|
Parameter |
Description |
Example Value |
|
Rule Name |
Name of an auto scaling rule |
default-expand-1 |
|
If |
The metric threshold of an auto scaling rule.
|
YARNMemoryAvailablePercentage
Less than or equal to
20% |
|
Last For |
The duration (5n) during which a cluster reaches the configured metric threshold for triggering a scale-out or scale-in. The default value of n is 1, indicating that the duration is five minutes. |
1 |
|
Add |
Number of Task nodes to be added or removed at a time. The value ranges from 1 to 100. |
5 |
|
Cooldown Period |
Interval between two auto scaling operations.
The default cooldown period is 20 minutes. The minimum value is 0. |
20 |
- Click OK.
You can view, edit, or delete the rules you configured in the Scale-out or Scale-in area on the Auto Scaling page. You can click Add Rule to configure multiple rules.
- Click OK.
- If you are configuring an auto scaling rule for an existing cluster, select I agree to authorize MRS to scale out or in nodes based on the above rule.
- After the configuration, system automatically scales in or out the Task node group as long as the auto scaling rules are met.
- You can click Operation Logs in the navigation pane to view the scaling details of a cluster.
Scenario 2: Configuring Time-based Auto Scaling
If the data volume changes regularly every day and you want to scale out or in a cluster before the data volume changes, you can create resource plans to adjust the number of Task nodes as planned in the specified time range.
For example: A real-time processing service sees a sharp increase in data volume from 7:00 to 13:00 on Monday, Tuesday, and Saturday. Assume that an MRS streaming cluster is used to process the service data. Five task nodes are required from 7:00 to 13:00 on Monday, Tuesday, and Saturday, while only two are required at other time.
- Go to the Auto Scaling page to configure a resource plan.
- For example, the Default Range of node quantity is set to 2-2, indicating that the number of task nodes is fixed at 2 except the time range specified in the resource plan.
- Click Configure Node Range for Specific Time Range under Default Range or Add Resource Plan.
- Configure Effective On, Time Range, and Node Range.
You can click Configure Node Range for Specific Time Range to configure multiple resource plans. A maximum of five resource plans are supported.
After a resource plan triggers a scale-out or scale-in, auto scaling will not be triggered again within 10 minutes.
Table 6 Scaling rule parameters
|
Parameter |
Description |
Example Value |
|
Effective On |
Effective On is set to Daily by default. You can also select one or more days from Monday to Sunday. |
Monday, Tuesday, and Saturday |
|
Time Range |
The start time must be at least 30 minutes earlier than the end time. Time ranges configured for different resource plans cannot overlap. |
07:00-13:00 |
|
Node Range |
- If you set both Node Range and Time Range, the node range you set will be used during the time range you set, and the default node range will be used beyond the time range you set.
- If you do not set Node Range, its default value will be used.
|
5-5 |
- Click OK.
- If you are configuring a resource plan for an existing cluster, select I agree to authorize MRS to scale out or in nodes based on the above rule.
- After the configuration, system automatically scales in or out the Task node group as long as the auto scaling rules are met.
- You can click Operation Logs in the navigation pane to view the scaling details of a cluster.
Scenario 3: Configuring Time-based and Load-based Auto Scaling
If the data volume is not stable and the expected fluctuation may occur, the fixed Task node range cannot guarantee that the requirements in some service scenarios are met. In this case, it is necessary to adjust the number of Task nodes based on the real-time loads and resource plans.
For example: A real-time processing service sees an unstable increase in data volume from 7:00 to 13:00 on Monday, Tuesday, and Saturday. In these time ranges, five to eight Task nodes are required. In other time ranges, two to four Task nodes are required. You can set an auto scaling rule based on a resource plan. When the data volume exceeds the expected value, the number of Task nodes changes with resource loads, without exceeding the node range specified in the resource plan. When a resource plan is triggered, the number of nodes is adjusted within the specified node range with minimum affect. That is, increase nodes to the upper limit and decrease nodes to the lower limit.
- Go to the Auto Scaling page to configure auto scaling rules.
An auto scaling rule adjusts the number of nodes, but also affects the actual price. Exercise caution when adding an auto scaling rule.
- Default Range
Enter a task node range, in which auto scaling is performed. This constraint applies to all scale-in and scale-out rules.
The number of task nodes in a cluster is limited to the configured default node range or the node range in the resource plan that takes effect in the current time range. The node quantity range in the resource plan has a higher priority.
For example, this parameter is set to 2-4 in this scenario.
- Configuring an Auto Scaling Rule
To enable Auto Scaling, you must configure a scale-out or scale-in rule.
- Select Scale-Out or Scale-In.
- Click Add Rule. The Add Rule page is displayed.
- You can set a maximum of five rules for scaling out or in a cluster, respectively.
- The system determines the scale-out and then scale-in based on your configuration sequence. Add important policies first. This prevents repeated scale-out or scale-in operations in case a scale-out or scale-in cannot meet requirements.
- Set parameters as required.
Figure 7 Adding a rule

Table 7 Parameters for adding a rule
|
Parameter |
Description |
Example Value |
|
Rule Name |
Name of an auto scaling rule |
default-expand-2 |
|
If |
The metric threshold of an auto scaling rule.
|
YARNAppPending
Greater than
75 |
|
Last For |
The duration (5n) during which a cluster reaches the configured metric threshold for triggering a scale-out or scale-in. The default value of n is 1, indicating that the duration is five minutes. |
1 |
|
Add |
Number of Task nodes to be added or removed at a time. The value ranges from 1 to 100. |
1 |
|
Cooldown Period |
Interval between two auto scaling operations.
The default cooldown period is 20 minutes. The minimum value is 0. |
20 |
- Click OK.
You can view, edit, or delete the rules you configured in the Scale-out or Scale-in area on the Auto Scaling page.
- Configure a resource plan.
- Click Configure Node Range for Specific Time Range under Default Range or Add Resource Plan.
- Configure Effective On, Time Range, and Node Range.
Click Configure Node Range for Specific Time Range or Add Resource Plan to configure multiple resource plans.
After a resource plan triggers a scale-out or scale-in, auto scaling will not be triggered again within 10 minutes.
Table 8 Scaling rule parameters
|
Parameter |
Description |
Example Value |
|
Effective On |
Effective On is set to Daily by default. You can also select one or more days from Monday to Sunday. |
Monday, Tuesday, and Saturday |
|
Time Range |
The start time must be at least 30 minutes earlier than the end time. Time ranges configured for different resource plans cannot overlap. |
07:00-13:00 |
|
Node Range |
- If you set both Node Range and Time Range, the node range you set will be used during the time range you set, and the default node range will be used beyond the time range you set.
- If you do not set Node Range, its default value will be used.
|
5-8 |
- Click OK.
- If you are configuring a resource plan for an existing cluster, select I agree to authorize MRS to scale out or in nodes based on the above rule.
- After the configuration, system automatically scales in or out the Task node group as long as the auto scaling rules are met.
- You can click Operation Logs in the navigation pane to view the scaling details of a cluster.


