Scaling Out an MRS Cluster
The rapid business growth demands a larger storage capacity, a better computing capability, or a higher performance of a cluster. To prevent service interruptions or low efficiency, you can scale out the cluster.
You can scale out an MRS cluster by adding nodes without changing the system architecture, thereby reducing O&M costs.
|
Type |
Applicable Scenario |
Solution Description |
|---|---|---|
|
Adding a service |
You intend to manually add components after an MRS cluster is created. |
|
|
Scaling out an existing service |
You intend to add nodes to an MRS cluster when the resources in the cluster are insufficient for existing components. |
|
|
Scaling out node data disks |
You intend to expand data disks of each node in a node group when there is insufficient data disk space in an MRS cluster. |
Expand data disks of a specified node group. For details, see Expanding a Data Disk of an MRS Cluster Node. |
Prerequisites
- The MRS cluster is in the running state.
- Before scaling out the cluster, ensure that there is an inbound security group rule in which Protocol & Port is set to All, and Source is set to a trusted accessible IP address range.
- You can manually add a node group only for a custom cluster of MRS 3.x.
Notes and Constraints
- When you add nodes to a node group where the HBase is installed:
If automatic DNS registration is not enabled for a node in the cluster, do not start HBase when you expand the node group. Then, update the HBase client configuration by referring to Updating the MRS Cluster Client After the Server Configuration Expires and start the HBase instances on the node to be expanded.
Automatic DNS registration is enabled by default in the following versions:
MRS 1.9.3, MRS 3.1.0, MRS 3.1.2-LTS, MRS 3.1.5, MRS 3.2.0-LTS, and later versions.
You can check whether the DNS function is supported by checking whether the features field in the response body contains register_dns_server. For details, see Querying the Metadata of a Cluster Version.
- After a scale-out, the clients installed on nodes in the cluster do not need to be updated. For details about how to update the client installed on nodes outside the cluster, see Updating the MRS Cluster Client After the Server Configuration Expires.
- The default password of user root for the added nodes is the one you set when creating the MRS cluster.
Video Tutorial
This video shows how to scale out or scale in an MRS cluster on MRS console.
The UI may vary depending on the version. This tutorial is for reference only.
Adding Nodes to a Node Group
- Log in to the MRS console.
- Choose , select a running cluster, and click its name to switch to the cluster details page.
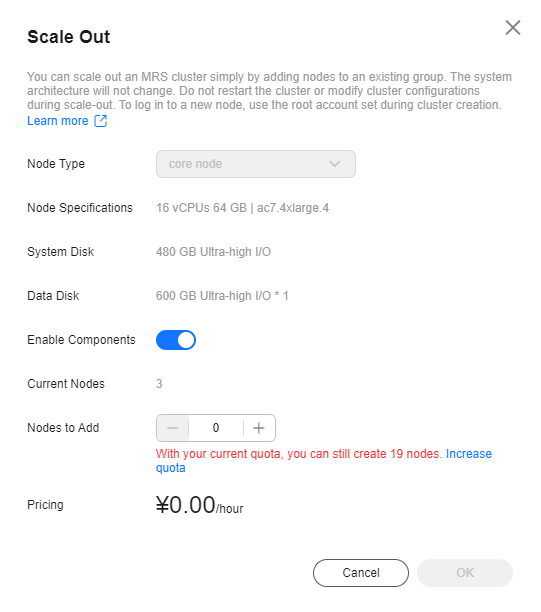
- Click the Nodes tab. In the Operation column of the node group, click Scale Out. The Scale Out page is displayed.
- Set the type of System Disk and Data Disk, Scale-Out Nodes, Enable Components and Run Bootstrap Action, and click OK.
Figure 1 Scaling Out an MRS Cluster

- The Enable Components and Run Bootstrap Action parameters may not be supported by clusters of some versions. The operations are subject to the UI.
- If a bootstrap action is added during cluster creation, the Run Bootstrap Action parameter is valid. If this function is enabled, the bootstrap actions added during cluster creation will be run on all the scaled out nodes.
- Enabling Apply New Specifications parameter indicates that the specifications of the original nodes have been sold out or discontinued. The new nodes will be added based on the new node specifications.
- In the Add Node dialog box, click OK.
If the cluster is billed yearly/monthly, select the billing cycle at your request.
- A dialog box is displayed in the upper right corner of the page, indicating that the scale-out task is submitted successfully.
The following parameters explain the cluster scale-out process:
- During scale-out: If a cluster is being scaled out, its status is Scaling out. The submitted jobs will be executed and you can submit new jobs. You are not allowed to continue to scale out or delete the cluster. You are advised not to restart the cluster or modify the cluster configuration.
- Successful scale-out: The cluster status is Running. The resources used in the old nodes and expanded nodes are charged.
- Failed scale-out: The cluster status is Running. You can execute jobs and scale out the cluster again.
After the cluster is scaled out, you can view the node information of the cluster on the Nodes page.
Adding a Node Group
- Log in to the MRS console.
- On the Active Clusters page, select a running cluster and click its name to switch to the cluster details page.
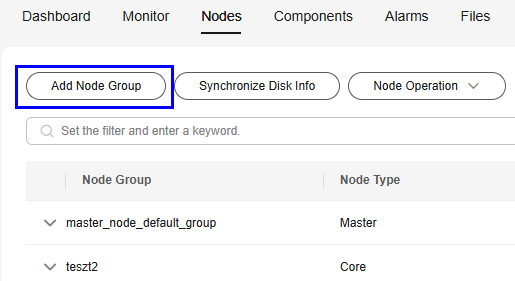
- On the cluster details page, click the Nodes tab and click Add Node Group. The Add Node Group page is displayed.
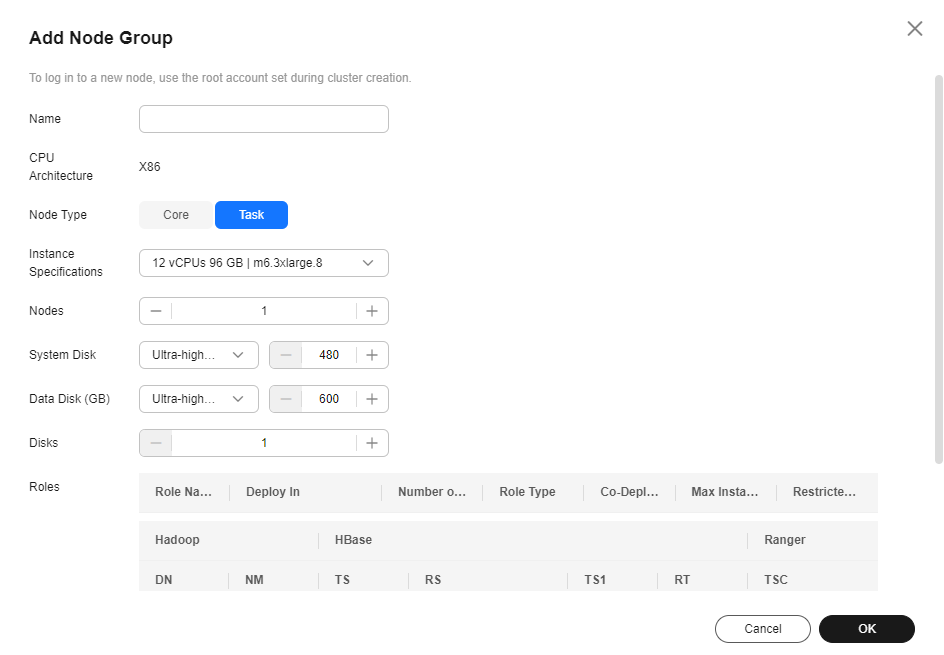
Figure 2 Add Node Group

- Set the parameters as required.
Table 2 Parameters for adding a node group Parameter
Description
Name
The node group name must be unique.
CPU Architecture
CPU architecture of an MRS cluster node. The value can be x86 or Kunpeng.
Node Type
- Task: A Task node processes data but does not store cluster data. Task nodes support elastic scaling based on service workloads. Data roles that do not store data, such as NodeManager, are deployed on Task nodes. Auto scaling rules can be configured a Task node group.
- Core: A Core node is an instance that processes and stores data. Component's data storage roles, such as DataNode and Broker, are deployed on Core nodes.
Instance Specifications
Select the instance specifications of the nodes in the current node group. Higher specifications provide stronger data processing and analysis capabilities, but also increase the overall cluster costs.
For details about the MRS cluster node specifications, see MRS Cluster Node Specifications.
Nodes
Number of nodes in the current node group.
System Disk
Storage type and space of the system disk on a node. You can adjust them as required. For details about the MRS cluster storage, see Cluster Node Disk Types.
Data Disk
Storage type and space of data disks on a node. A maximum of 10 disks can be added to each Core or Task node. For details about MRS cluster storage, see Cluster Node Disk Types.
Disks
Number of data disks on each node in the node group.
Roles
Component roles to be deployed on nodes in the current node group. Only role instances of components that have been installed in the current cluster can be added.
Billing Mode
Billing mode of the current cluster.
Pricing
Price of the node group to be added.
- Click OK.
After the node group is added, you can view it on the node management page.
Adding a Task Node Group
You can scale out an MRS cluster by manually adding task nodes.
- Log in to the MRS console.
- In the area, click the name of the target cluster to go to the cluster details page.
- On the Dashboard page, the cluster type is displayed.
- Add Task nodes for a Custom cluster.
- Click the Nodes tab then Add Node Group. The Add Node Group page is displayed.
- Set Node Type to Task. Retain the default value NM for Roles to deploy the NodeManager role. Set other parameters as required.
Figure 3 Adding a task node group

- Click OK and wait until the node is added. No further action is required.
- Add Task nodes for a non-custom cluster.
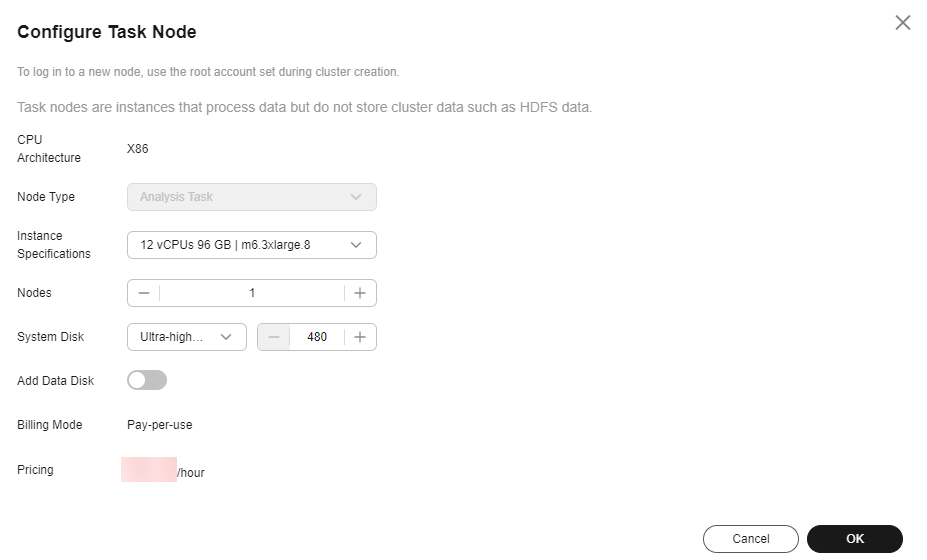
- Click the Nodes tab and then Configure Task Node.
- On the Configure Task Node page, set Node Type, Instance Specifications, Nodes and System Disk. In addition, if Add Data Disk is enabled, configure the storage type, size, and number of data disks.
The following figure shows how to configure a Task node for an analytics cluster. The actual web UI may vary.
Figure 4 Configuring a Task node for an analytics cluster
- Click OK and wait until the node is added.
Helpful Links
- To update the client installed on a node outside the cluster after the scale-out, see Updating the MRS Cluster Client After the Server Configuration Expires.
- To balance HDFS data after the scale-out, see Configuring HDFS DataNode Data Balancing. To balance Kafka data, see Configuring the Kafka Data Balancing Tool.
- The added Core nodes may cause high CPU usage, and the Master node may not meet service requirements. To upgrade the Master node specifications, see Scaling Up Master Node Specifications in an MRS Cluster.
- To expand the data disks, see Expanding a Data Disk of an MRS Cluster Node.
- If the Core nodes have been added but some instances fail to be started on the nodes, rectify the fault by referring to Some Instances Fail to Be Started After Core Nodes Are Added to the MRS Cluster.
- For details about how to add bootstrap actions, see Configuring Bootstrap Actions for an MRS Cluster Node.
- For more information about scaling, see Cluster Scaling.
Feedback
Was this page helpful?
Provide feedbackThank you very much for your feedback. We will continue working to improve the documentation.See the reply and handling status in My Cloud VOC.
For any further questions, feel free to contact us through the chatbot.
Chatbot


