
Accessing MRS Manager
MRS is a one-stop management platform tailored for enterprise-scale big data. By deeply integrating open-source big data components (such as Hadoop, Spark, and Flink), it simplifies deployment and boosts O&M efficiency by providing a standardized O&M system and visualized management and control capabilities. This helps businesses unlock valuable insights from their data faster than ever before.
- Visualized monitoring system
Displays the cluster health status, resource usage (CPU, memory, and disk), and service running metrics in real time. You can customize monitoring panels and alarm policies to dynamically obtain key system information.
- Operations with a few clicks
Provides a graphical user interface for cluster, service, and role instance management, and supports operations such as starting, stopping, and configuration adjustment, greatly improving O&M efficiency.
- Enhanced data security
Integrates fine-grained permission control (such as user- or role-based access control) and operation audit logs to accurately record data access and cluster management operations, meeting enterprise-level data security and compliance requirements.
Currently, you can choose any of the following methods to access MRS Manager of an MRS cluster as required.
|
Access Methods |
Description |
Application Scenario |
Constraint |
|---|---|---|---|
|
Bind an EIP to the MRS cluster so that external users can directly access MRS Manager. |
This method is simple and easy to use. You can quickly configure it when creating an MRS cluster. It is recommended. |
You need to obtain an EIP and bind it to the cluster. |
|
|
Access MRS Manager using a Direct Connect connection. |
After a Direct Connect connection has been set up to connect your local network and the MRS cluster network, you can use this method to access MRS Manager. For details, see What Is Direct Connect? |
You need to ensure that Direct Connect is available, and a Direct Connect connection has been established between your local data center and the VPC on the cloud. You can switch between the EIP and Direct Connect access modes on the MRS console. |
|
|
Access MRS Manager using a browser on an ECS that can communicate with the MRS cluster network. |
Use this method to access MRS Manager when EIPs are not supported. |
To use this method, you need to create an ECS in the same VPC and security group as the MRS cluster. |
|
|
Create an SSH tunnel connection to send user access requests to the MRS cluster and dynamically forward the requests to the corresponding site. |
Use this method to access MRS Manager when the local PC and the MRS cluster are on different networks. |
The configurations are complex, and there are high requirements on network bandwidth and connection stability. macOS does not support this method. |
Prerequisites
- Make sure the cluster is not in the starting, stopping, stopped, deleting, deleted, or frozen state before accessing MRS Manager.
- You have obtained the user information for logging in to MRS Manager from the cluster administrator.
You can log in to MRS Manager as the default admin user or a user created by the administrator with the required login permission.
Video Tutorial
This tutorial demonstrates how to bind an EIP to an MRS cluster and access MRS Manager of the cluster.
The UI may vary depending on the version. This tutorial is for reference only.
Accessing MRS Manager of a Cluster
You can access MRS Manager of a cluster using any of the following methods based on your actual requirements and network environment.
- Log in to the MRS console.
- In the navigation pane, choose Active Clusters. Click the target cluster name to access the cluster details page.
- Click Access Manager next to MRS Manager. In the displayed dialog box, select EIP and configure the EIP information.
Figure 1 Accessing MRS Manager

- If no EIP is bound when the MRS cluster is created, select an available EIP from the EIP drop-down list. Otherwise, go to the next step.
- If no available EIPs are displayed, click Manage EIP to create one. An EIP can be bound to only one MRS cluster.
- To unbind or release an EIP, log in to the EIPs page, locate the row containing the target EIP, and click Unbind or choose More > Release in the Operation column.
- In Security Group, select the security group to which the current cluster belongs. The security group is configured during cluster creation or is automatically created by the cluster.
If you want to view, modify, or delete a security group rule, click Manage Security Group Rule.
- "MRS Manager public ip access control rule" is automatically added to the Description column of the added inbound rule of the security group for easy identification.
- It is normal that the automatically generated public IP address is different from your local IP address and no action is required.
- Port 9022 is the Knox port of the MRS cluster. Therefore, you need to obtain the permission on this port for accessing MRS Manager.
- Select the information to be confirmed and click OK. The MRS Manager login page is displayed.
- If no EIP is bound when the MRS cluster is created, select an available EIP from the EIP drop-down list. Otherwise, go to the next step.
- Enter the login information and click Log In.
You can log in to MRS Manager as user admin or a user created by the administrator with the required login permission.
The password of user admin is the custom password set during MRS cluster creation.
Figure 2 Logging in to MRS Manager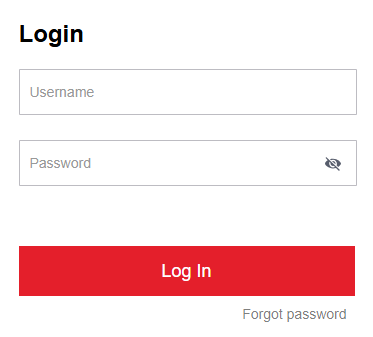
- (Optional) To grant users in other network segments the permission to access MRS Manager, you can modify the security group and add the IP address range of the users.
- On the cluster details page, click Add Security Group Rule next to EIP.
Figure 3 Cluster details page
- In the displayed Add Security Group Rule dialog box, add the IP address segment required for authorized users to access the public network, and select the check box.
Figure 4 Adding a security group rule

By default, the IP address segment used for accessing the public network is filled. You can change the IP address segment as required. To view, modify, or delete security group rules, click Manage Security Group Rule.
- Click OK.
- On the cluster details page, click Add Security Group Rule next to EIP.
- Log in to the MRS console.
- Click the name of a cluster to enter its details page.
- On the Dashboard page of the cluster details page, click Access Manager next to MRS Manager.
- Set Access Mode to Direct Connect and confirm that you understand the impact of the operation.
The floating IP address is automatically allocated by MRS to access MRS Manager. Before using Direct Connect to access MRS Manager, ensure that the connection between the local data center and the VPC has been established.
For information about how to configure a Direct Connect connection, see Direct Connect User Guide.
- Click OK. The MRS Manager login page is displayed.
- Enter the login information and click Log In.
You can log in to MRS Manager as user admin or a user created by the administrator with the required login permission.
The password of user admin is the custom password set during MRS cluster creation.
Figure 5 Logging in to MRS Manager
- Log in to the MRS console.
- On the Active Clusters page, click the name of the specified cluster.
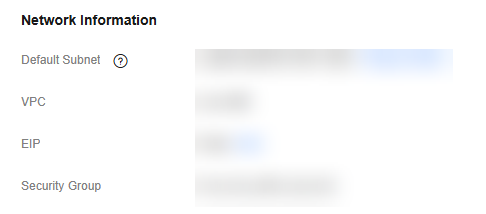
Record the AZ, VPC, and Security Group of the cluster.
- On the homepage of the management console, choose Service List > Elastic Cloud Server to switch to the ECS management console and create an ECS.
- The AZ, VPC, and Security Group of the ECS must be the same as those of the cluster to be accessed.
- Select a Windows public image.
For example, a standard image Windows Server 2012 R2 Standard 64bit(40GB).
- For details about other parameters, see Purchasing an ECS in Custom Config Mode.
If the security group of the ECS is different from Default Security Group of the Master node, you can modify the configuration using either of the following methods:
- Change the security group of the ECS to the default Master node security group. For details, see Changing a Security Group.
- Add two security group rules to the security groups of the Master and Core nodes to enable the ECS to access the cluster. Set Protocol to TCP, Ports of the two security group rules to 28443 and 20009, respectively. For details, see Creating a Security Group.
If "Failed to add security group rules." is displayed, check whether the security group quota is sufficient. If more quotas are needed, increase the quotas or delete security group rules that are no longer used.
- On the EIP console, apply for an EIP and bind it to the ECS.
For details, see Assigning an EIP.
- Log in to the ECS.
The Windows system account, password, EIP, and security group rules are required for logging in to the ECS. For details, see Logging In to a Windows ECS.
- On the Windows remote desktop, use your browser to access Manager.
The Manager access address is in the https://OMS floating IP address:28443/web format.
To query the OMS floating IP address, perform the following steps:
- Remotely log in to the Master1 node.
For details about how to log in to a node in the MRS cluster, see Logging In to an MRS Cluster Node.
- Run the following command. In the command output, eth0:wsom indicates the OMS floating IP address. Record the value of inet.
ifconfig
If the OMS floating IP address cannot be obtained on the Master1 node, switch to the Master2 node to query and record the floating IP address. If there is only one Master node, query and record the IP address on this node.
- Remotely log in to the Master1 node.
- Enter the login information and click Log In.
You can log in to MRS Manager as user admin or a user created by the administrator with the required login permission.
The password of user admin is the custom password set during MRS cluster creation.
Figure 6 Logging in to MRS Manager
- Ensure that you have made the following preparations:
- You have prepared an SSH client for creating the SSH tunnel, for example, the Git open source SSH client.
- You have created an MRS cluster and prepared a key file in PEM format or obtained the password of user root used during cluster creation.
- Your local environment can access the Internet.
- Log in to the MRS console.
- Choose Active Clusters and click a specified MRS cluster.
Record information about the security group of the cluster.
- Add an inbound rule to the security group of the master node to allow data access to the IP address of the MRS cluster through port 22.
For details, see Adding a Security Group Rule.
- Query the primary management node of the cluster by referring to Checking MRS Active/Standby Management Nodes.
- Bind an EIP to the active management node of the cluster.
For details, see Assigning an EIP.
- Start Git Bash locally and run the following command to log in to the active management node of the cluster:
ssh root@EIPAlternatively, run the following command:
ssh -i Key file path root@EIP
- View data forwarding configurations.
cat /etc/sysctl.conf | grep net.ipv4.ip_forward
- If net.ipv4.ip_forward=1 is displayed, the forwarding function has been configured. Go to Step 10.
- If net.ipv4.ip_forward=0 is displayed, the forwarding function has not been configured. Go to Step 9.
- If net.ipv4.ip_forward fails to be queried, this parameter has not been configured. Run the following command and then go to Step 10:
echo "net.ipv4.ip_forward = 1" >> /etc/sysctl.conf
- Modify forwarding configurations on the node.
- Switch to user root.
sudo su - root
- Modify forwarding configurations.
echo 1 > /proc/sys/net/ipv4/ip_forward
sed -i "s/net.ipv4.ip_forward=0/net.ipv4.ip_forward = 1/g" /etc/sysctl.conf
sysctl -w net.ipv4.ip_forward=1
- Modify the sshd configuration file.
vi /etc/ssh/sshd_config
Press I to enter editing mode. Locate AllowTcpForwarding and GatewayPorts and delete comment tags. Modify them as follows. Save the changes and exit.
For example, the changes are as follows:
AllowTcpForwarding yes
GatewayPorts yes
- Restart the sshd service.
service sshd restart
- Switch to user root.
- View the floating IP address.
ifconfig
In the command output, eth0:FI_HUE indicates the floating IP address of Hue, and eth0:wsom indicates the floating IP address of Manager. Record the value of inet.
Run the command to exit.
exit
- Run the following command on the local host to create an SSH tunnel that supports dynamic port forwarding:
ssh -i Path of the key file -v -ND Local port root@EIP
Alternatively, run the following command:
ssh -v -ND Local port root@EIP
Enter the password of user root used during cluster creation as prompted.
In the command, set Local port to the user's local port that is not occupied. Port 8157 is recommended.
After the SSH tunnel is created, use -D to enable the dynamic port forwarding function.
By default, the dynamic port forwarding function enables a SOCKS proxy process and monitors the user's local port. Port data will be forwarded to the primary management node using the SSH tunnel.
- Configure the browser proxy.
- Go to the Google Chrome client installation directory on the local PC.
- Press Shift and right-click the blank area, choose Open Command Window Here and enter the following command:
chrome --proxy-server="socks5://localhost:8157" --host-resolver-rules="MAP * 0.0.0.0 , EXCLUDE localhost" --user-data-dir=c:/tmppath --proxy-bypass-list="*google*com,*gstatic.com,*gvt*.com,*:80"
- In the preceding command, 8157 is the local proxy port configured in Step 11.
- If the local OS is Windows 10, start the Windows OS, click Start and enter cmd. In the displayed CLI, run the preceding command.
If this method fails, click Start, enter the command in the search box, and run the command.
- In the address box of the browser, enter the address for accessing Manager.
The Manager access address is in the https://Manager floating IP address:28443/web format.
For the first access, add the site to the trusted site list as prompted to continue to open the page.
- Enter the login information and click Log In.
You can log in to MRS Manager as user admin or a user created by the administrator with the required login permission.
The password of user admin is the custom password set during MRS cluster creation.
Figure 7 Logging in to MRS Manager
- When logging out of Manager, terminate and close the SSH tunnel.
Helpful Links
- After logging in to MRS Manager, you can view the cluster running status, start or stop the cluster, and synchronize cluster configurations. For details, see Managing an MRS Cluster.
- After logging in to MRS Manager, you can view the component running status, start or stop components, and modify component configurations. For details, see Managing MRS Cluster Components.
- After logging in to MRS Manager, you can view the cluster monitoring metrics and alarm information. For details, see Viewing MRS Cluster Monitoring Metrics and Viewing and Configuring MRS Alarm Events.
- After logging in to MRS Manager, you can create and manage MRS cluster users. For details, see Managing MRS Cluster Users.
- On MRS Manager, you can access the open-source web UIs of components such as Hadoop and Spark in the MRS cluster. For details, see Accessing Web UIs of Open-Source Components Managed in MRS Clusters.
- You can use a browser on macOS to access MRS Manager by referring to Using Google Chrome to Access MRS Manager on macOS.
- If you cannot access MRS Manager of an MRS cluster through an ECS in the same VPC as the cluster, rectify the fault by referring to Failed to Access Manager of an MRS Cluster.
- For more troubleshooting methods for MRS Manager login errors, see Common Exceptions in Logging In to the Cluster Manager.
Feedback
Was this page helpful?
Provide feedbackThank you very much for your feedback. We will continue working to improve the documentation.See the reply and handling status in My Cloud VOC.
For any further questions, feel free to contact us through the chatbot.
Chatbot


