Sharing a Backup
Scenarios
As cross-departmental collaboration within enterprises and multi-party cooperation across organizations become increasingly common, the need for secure data sharing between different accounts and organizations grows significantly. Traditional backup solutions are typically designed for single-tenant environments and fall short of meeting data sharing demands in complex service scenarios. To address this challenge, the backup sharing feature enables organizations to maximize data utilization and enhance collaboration efficiency by allowing authorized access to backups across accounts or organizations. You can share public data backups across accounts to implement information exchange. The recipients can use the shared backups to quickly create resources, such as disks and servers, for deploying services.
Backup sharing is suitable for various service scenarios where backup data needs to be securely and efficiently shared across accounts or organizations. The typical scenarios are as follows:
- Data sharing across subsidiaries of a corporation: The headquarters needs to share the backups of core service data with subsidiaries. After receiving the backups, subsidiaries can quickly set up local service systems. Data sharing avoids repeated data upload and configuration and shortens the service rollout period.
- Data sharing among partners: When two parties cooperate on a project, Party A can share the backups of basic project data with Party B. After receiving the backups, Party B can use them for system deployment.
- Cross-department collaboration: The R&D department of an enterprise needs to share the backups of test environment data with the O&M department. The O&M department can quickly reproduce problems from the backups, improving troubleshooting efficiency.
How Backup Sharing Works
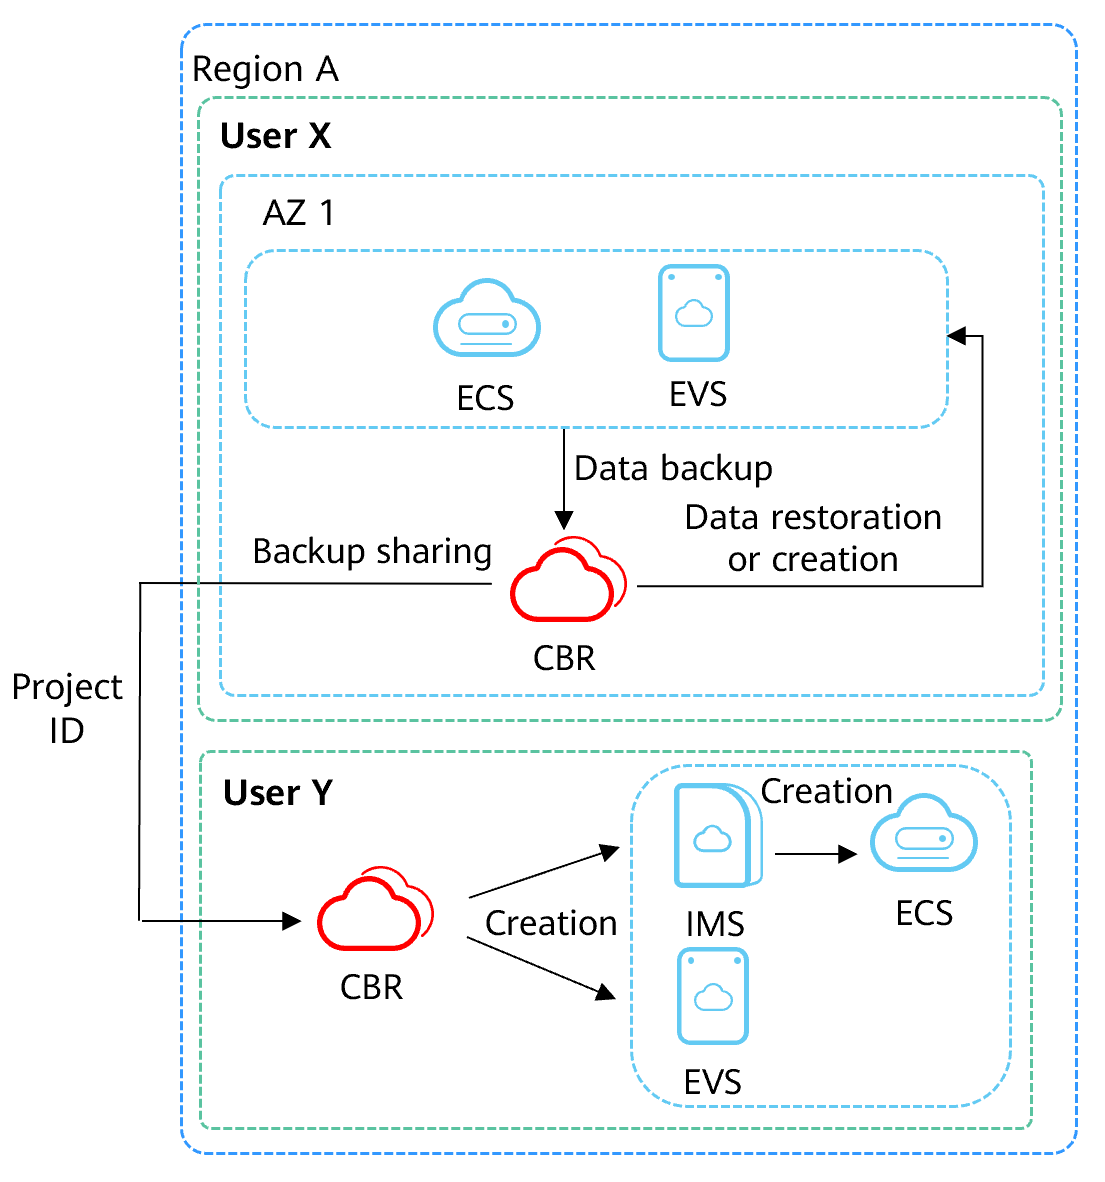
The backup data owner selects the backups to be shared on the CBR console, configures the recipient's project ID in the same region, and initiates the sharing. After the recipient accepts the backup sharing request, the backup data is transmitted to the recipient vault through an encrypted channel. The recipient needs to provide at least one vault whose capacity has not reached the upper limit. Shared backups do not occupy the capacity of the recipient's vault. After the shared backups are stored in the vault, they inherit the retention rules (such as the expiration time and deletion rules) of the original backups to ensure data lifecycle consistency. After accepting the backups, the recipient can quickly create resources such as disks and servers from the backups. In this way, data can be securely and efficiently shared across accounts.

As shown in the figure, user X in region A can share backups with user Y by using the backup sharing function of CBR. User Y can create disks or images using the shared backups in region A and then create ECSs from the images. In this way, services can be quickly deployed across accounts.
- For details about how to share an encryption key, see creating a grant of Data Encryption Workshop (DEW) or creating a resource share of Resource Access Manager (RAM). To obtain the recipient Account ID, hover over the username and choose My Credentials to check the Account ID on the API Credentials page.
- Cloud disk backup encryption depends on an agency that grants KMS access permissions to EVS. If the disk to be backed up is encrypted, the disk backup will be encrypted. The encryption attribute of backups cannot be changed.
When a shared backup is deleted by the sharer, the backup is also deleted from the recipient's account. However, any disks or servers previously created from that backup remain unaffected.
Constraints
For sharers:
- Only cloud server backups and cloud disk backups can be shared.
- Backups can only be shared among projects of accounts in the same region. Backups cannot be shared across regions.
For recipients:
- A recipient must have at least one backup vault to store the accepted shared backup, and the vault's remaining space must be greater than the size of the backup to be accepted.
- A recipient can choose to accept or reject a backup sharing request. After accepting the backup, the recipient can use the backup to create servers or disks.
Billing
- The recipient needs to purchase vaults of the same type in the same region. The recipient will be charged for the vault storage.
- No other fees are incurred when you share a backup.
- For details about billed items, see CBR Billing. For details about pricing, see CBR pricing details.
Initiating Backup Sharing
- Log in to the CBR console.
- Log in to the management console.
- In the upper left corner, click
 and select a region.
 - Click
 and choose Storage > Cloud Backup and Recovery. Select the corresponding backup type from the navigation pane.
- Click the Backups tab and set filter criteria to view the backups.
- Locate the target backup and choose More > Share Backup in the Operation column.
The backup name, server or disk name, backup ID, and backup type are displayed.

- Click the Share Backup tab.
- Enter the project ID of the recipient. For details about how to obtain a project ID, see Obtaining a Project ID.
- Click Add. The project ID to be added is displayed in the list. You can continue to add project IDs. A backup can be shared to a maximum of 10 projects.
- Click OK.
Go back to the backup list, click the backup name to go to the backup details page, and click the Share List tab to view the shared backup.
Accepting the Shared Backup
- Log in to the CBR console.
- Log in to the management console.
- In the upper left corner, click
 and select a region.
 - Click
 and choose Storage > Cloud Backup and Recovery. Select the corresponding backup type from the navigation pane.
- Click the Backups tab on the cloud server or disk backup vault page and then click Backups Shared with Me.
- Ensure that the recipient has at least one backup vault before accepting the shared backup. For how to purchase a backup vault, see Creating a Server Backup.
- Click Accept. On the displayed page, select the vault used to store the shared backup. Ensure that the vault's remaining capacity is greater than the backup size.
Automatic Association: Determines whether to enable automatic association for the vault. If you select Configure, the vault automatically scans for and associates servers that have not been backed up and performs backup in the next backup period.Figure 1 Accepting a shared backup

- View the shared backup you accepted in the backup list.
Figure 2 Shared backup accepted

Canceling Backup Sharing
- Log in to the CBR console.
- Log in to the management console.
- In the upper left corner, click
 and select a region.
 - Click
 and choose Storage > Cloud Backup and Recovery. Select the corresponding backup type from the navigation pane.
- On the cloud server backup page or cloud disk backup page, click the Backups tab and set filter criteria to view the backups.
- Locate the target backup and choose More > Share Backup in the Operation column.
The backup name, server or disk name, backup ID, and backup type are displayed.
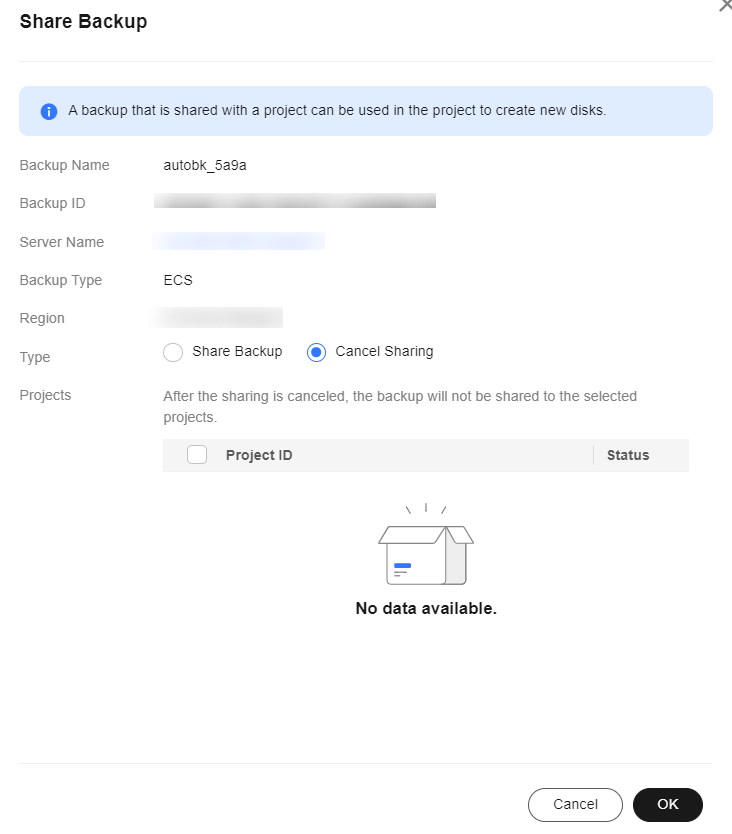
- Select Cancel Sharing, select the projects you want to cancel sharing, and click OK.
Figure 3 Cancel Sharing

Return to the backup list, click the backup name to go to the backup details page, and click the Share List tab to view the unshared backups.

If the system displays a message indicating that the backup sharing fails to be canceled, rectify the faults by referring to Failed to Cancel Backup Sharing.
Helpful Links
Recipients can quickly create disks and servers from the shared backups.
Feedback
Was this page helpful?
Provide feedbackThank you very much for your feedback. We will continue working to improve the documentation.See the reply and handling status in My Cloud VOC.
For any further questions, feel free to contact us through the chatbot.
Chatbot


