
Creating and Developing a Custom Widget
Scenario
If the preset widgets cannot meet your needs, you can upload custom widgets. Before developing a custom widget, read Custom Widget Development Specifications to understand the development specifications. The following example demonstrates how to create a custom widget using a common bar chart (Vue 2 + ECharts).
The frontend development framework Vue and widget library ECharts are used in this example.

Developing a Custom Widget
- Download the chart template.
- Log in to Huawei Cloud Astro Canvas by referring to Logging In to Huawei Cloud Astro Canvas.
- Click Resource Management in the upper right corner of the page. The management page is displayed.
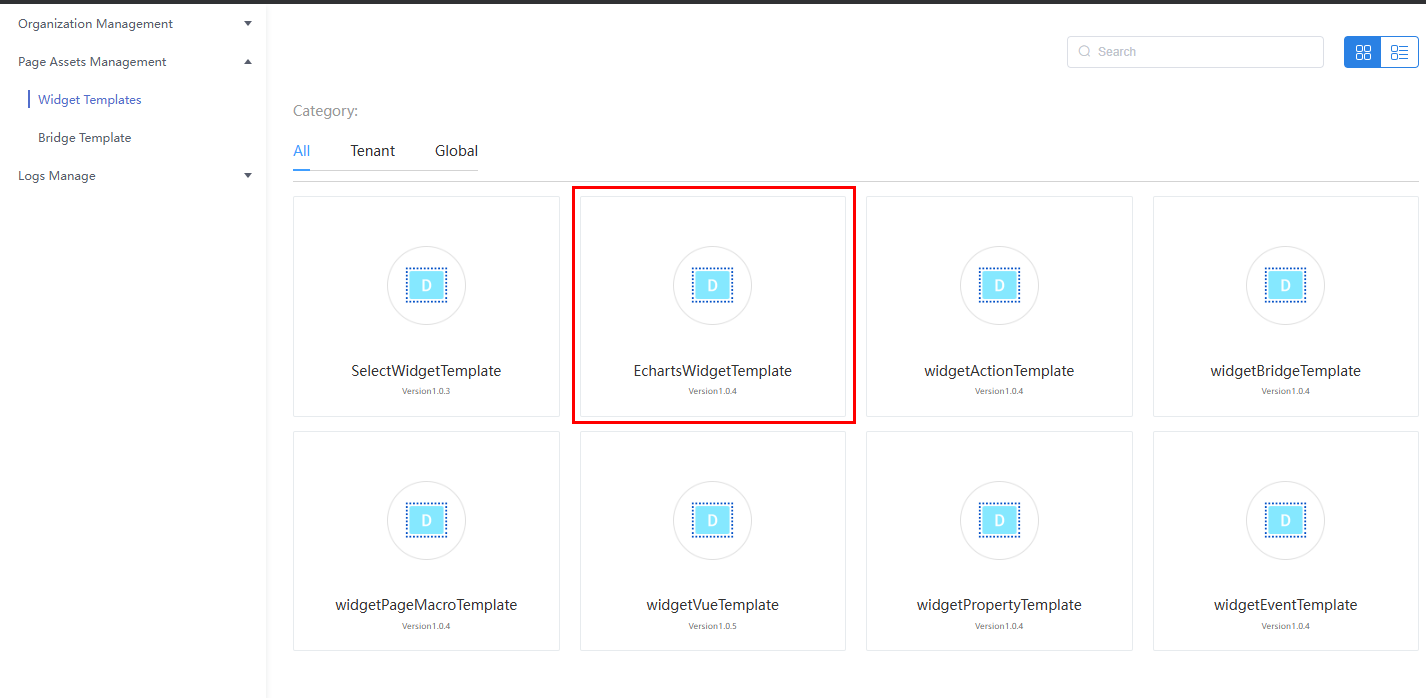
- In the navigation pane, choose Page Assets > Widget Templates.
Table 1 Widget templates Name
Function
EchartsWidgetTemplate
A bar chart widget template implemented based on ECharts, including basic configuration items, click event interaction, and data interconnection.
SelectWidgetTemplate
A common drop-down list box widget template is implemented based on Element UI and Vue 2, including basic configuration items, interaction, and data interconnection.
widgetVueTemplate
Select this template when you need to use the Vue library.
widgetPropertyTemplate
Select this template when you need to configure custom properties for a widget. The custom properties will be displayed on the property panel of the widget.
widgetActionTemplate
Select this template when you need to configure actions for a custom widget.
Events and actions are used to implement interactions between widgets. For example, if you wish that when you click a button in a widget, the data in another widget will be updated or you will be redirected to another page in the same application, use the widgetEventTemplate template to develop the widget that will be configured with the clicking event, and use the widgetActionTemplate template to develop the widget that will be configured with the action of data update or page redirection.
widgetEventTemplate
Select this template when you need to configure events for a custom widget.
widgetBridgeTemplate
Select this template when you need to use bridges to retrieve backend data.
widgetPageMacroTemplate
Select this template when you store variables through the page macro to customize a widget.
- In the widget template list, click EchartsWidgetTemplate. The template details page is displayed.
Figure 2 Selecting the EchartsWidgetTemplate template
- Click Download to download the EchartsWidgetTemplate widget template package to the local PC.
- Decompress the downloaded widget template package and understand the widget structure.
Table 2 Widget file structure File Name
File Description
EchartsWidgetTemplate.js
JavaScript file of the core rendering logic. It is loaded and executed during widget editing and page publishing and running. For details about the preset APIs, see Table 3.
EchartsWidgetTemplate.editor.js
Widget property definition file, which is responsible for the GUI and logic to be rendered when the widget is in the editing status. The *.editor.js file is loaded only when the widget is in the editing status. This file includes:
- The propertiesConfig method defines the configuration logic of properties displayed on the property panel of widgets.
- The create method is called only once to create the widget.
EchartsWidgetTemplate.css
A CSS file which defines the widget style.
EchartsWidgetTemplate.ftl
Widget DOM structure file. The part that needs to be rendered on the server in advance can be written in this file, which is equivalent to an HTML file and is responsible for style display.
packageinfo.json
Metadata description file of a widget.
- widgetApi name: widget name.
- widgetDescription: widget description.
- authorName: widget author.
- localFileBasePath: local debugging path of the widget.
- (Not included in this example) i18n: internationalization resource file of the specified widget.
- requires: name and version of the dependency library.
- (Not included in this example) width: default widget width when the widget is added to an advance page with an absolute layout. The unit is pixel. If this parameter is not specified, the default value 200 pixels is used.
- (Not included in this example) height: default widget height when the widget is added to an advance page with an absolute layout. The unit is pixel. If this parameter is not specified, the default value 200 pixels is used.
messages-zh/messages-en.json
(Not included in this example) Resource file for internationalization, which is used to configure multiple languages.
Table 3 Description of preconfigured APIs in the Widget name.js file Category
API Description
Preset APIs for widget instances
- The init method includes the entry-point function for initializing data during widget rendering.
- The render method is used to render widgets.
- getConnectorProperties: obtains bridge attribute values.
- Obtains bridge instances based on bridge variable names. APIConnector is a string that indicates the bridge variable name.
- ConnectorIns.process(renderCbk, errCbk): calls the process function using a bridge instance to initiate service calling requests and process returned results.
- Before initiating a request using the process function, set the requestParams attribute of a bridge instance to the request parameter, for example, ConnectorIns.requestParams = param.
- renderCbk: processes the returned information. This parameter is of the function type.
- errCbk: processes errors. This parameter is of the function type.
- ConnectorIns.query(param): calls the process function using a bridge instance to initiate service calling requests and process returned results. The parameters are described as follows:
- param: request parameter.
- The returned result is the Promise object.
- getProperties: returns the customized property values of a widget.
When developing a widget, you can customize properties for the widget and configure the properties on the development page. The getProperties method can be used to return the customized properties values, for example, var properties = thisObj.getProperties().
- getContainer: returns the DOM node of the container that renders the widget.
A code example is as follows: var elem = thisObj.getContainer (). When jQuery is used to query a DOM node in a widget, the $("#id", elem) method can be used to obtain the DOM node.
- getWidgetBasePath: returns the root path that stores static resources of a widget.
For example, if the static resource path of a widget is https://10.10.10.1:12900/default/0000000000NABzEjpNIH/assets/bundle/widget/172a6056501-a6f8ce1f-2ed9-4a9a-b883-251aaac14e0a/v1591923270914/test0609.js, https://10.10.10.1:12900/default/0000000000NABzEjpNIH/assets/bundle/widget/172a6056501-a6f8ce1f-2ed9-4a9a-b883-251aaac14e0a/v1591923270914 is returned after thisObj.getWidgetBasePath() is executed.
- getMessages: returns the internationalization file content defined in the internationalization configuration file of a widget. Vue and VueI18n need to be configured.
For example, the messages-en.json and messages-zh.json internationalization files are defined during widget development. thisObj.getMessages() returns the internationalization content defined in the two files.
- hideWidget: hides the DOM structure of a widget. This method can be invoked in the preview state to hide a widget.
For example, execute the thisObj.hideWidget() method to hide the DOM structure of a widget.
- showWidget: displays the DOM structure of a widget. This method can be called in the preview status to display a widget.
For example, execute the thisObj.showWidget() method to display the DOM structure of a widget.
- SITE_ROOT_PATH: obtains the root path of the URL of the current site. This is a preset parameter in the platform. One site corresponds to one app. When an application is created, the system creates and allocates a site by default.
If the URL of a page is https://10.10.10.1:12900/magno/render/cool__app_0000000000NABzEjpNIH/page1, the root path obtained using SITE_ROOT_PATH is /magno/render/cool__app_0000000000NABzEjpNIH.
- triggerEvent: triggers an event. The parameters are described as follows:
- eventName: name of the event to be triggered.
- {}: assigns values to the parameters passed when the event is triggered, for example, {param: value}.
Preset APIs for Studio objects
- Studio.registerWidget: defines a widget.
- Studio.registerConnector: defines a bridge.
- Studio.registerEvents: registers an event. Only the events registered using this API are displayed in the event list of a widget. Description
- thisObj: current widget, indicating registering an event for the current widget.
- eventName: event name, which must be the same as the first parameter in the event triggering API.
- Event Label: event label, which will be displayed in the event list.
- []: parameter model passed when the event is triggered, for example, [{"name": "param"}].
- Studio.registerAction: registers an action. Only events registered using this API are displayed in the action list of the widget. Description
- thisObj: current widget, indicating registering an action for the current widget.
- actionName: action name.
- Action Label: action label, which will be displayed in the action list.
- [] indicates the parameters that will be passed in when the event is triggered.
- $.proxy(this.receiveActionCbk, this): callback function that defines the execution logic of an action.
- []: Leave this parameter blank.
- Studio.registerRouter: defines a route.
- Studio.inReader: determines whether the current advanced page is in the development or preview mode. true indicates the page is in preview mode (runtime environment); false indicates it is in development mode.
- StudioToolkit.getCatalogProperties(): obtains metadata of the current site.
Preset APIs for the HttpUtils tool class
The platform provides the HttpUtils tool class. Preset APIs are as follows:
- HttpUtils.getCookie: obtains the value of a cookie.
Code example: HttpUtils.getCookie()
- HttpUtils.setCookie: sets a cookie value.
Code example: HttpUtils.setCookie("key","value")
- HttpUtils.getI18n: returns a Vue18n instance, which is used together with Vue and VueI18n. The Vue18n instance can be assigned an i18n parameter when a new Vue instance is created.
Code example: HttpUtils.getI18n({locale: HttpUtils.getLocale(), messages: thisObj.getMessages()})
- HttpUtils.getCsrfToken: used when an API of the platform is called in AJAX mode. If the platform bridge is used, the platform adds the csfr-token header to the request header.
HttpUtils.getCsrfToken(function(csrfToken) { $.ajax({ …. headers: { CSRF-Token: csrfToken }, }) }) - HttpUtils.refreshToken: manually refreshes the page's access token. Typically used when executing exit logic.
- HttpUtils.getUrlParam: obtains parameters in the query string.
For example, if the URL of a page is https://10.10.10.1:12900/magno/render/cool__app_0000000000NABzEjpNIH/page1?param=1, the value 1 is returned after HttpUtils.getUrlParam("param") is executed.
- HttpUtils.getLocalStorage: obtains the value of a localStorage.
Code example: HttpUtils.getLocalStorage("key")
- HttpUtils.setLocalStorage: sets the value of a localStorage.
Code example: HttpUtils.setLocalStorage("key","value")
- Understand the core logic code.
- EchartsWidgetTemplate.js
init() function: Widget initialization entry API, which initializes the general capabilities of the widget and registers widget events and actions.
  /*
   * Widget initialization entry API, which initializes the general capabilities of the widget and registers widget events and actions.
   */
  init() {
    this._super.apply(this, arguments); // Construct widget common capabilities. Mandatory when the parent class constructor is called.
    this.getWidgetI18n().then(() => this.render()); // Render widget.
  },
render() function: Widget core rendering API, which is used to instantiate widgets, call data, and implement events and actions./** * Widget core rendering API, which is used to instantiate widgets, call data, and implement events and actions. */ render() { const widgetContainer = this.getContainer(); if (!widgetContainer) return; this.initI18n(); this.initReaderVm(this.getProps(), widgetContainer); this.registerWidgetActionAndEvent(); this.registerResizeEvent(() => this?.readerVm?.echartsInst?.resize()); },beforeDestroy() function: Widget destroy and callback, which is used to implement the memory release logic during widget destroy. Some dom events bound to the widget and global references need to be destroyed.
  /**
   * Widget destroy and callback, which is used to implement the memory release logic during widget destroy. Some dom events bound to the widget and global references need to be destroyed.
   */
  beforeDestroy() {
    $(window).off('resize');
    this.readerVm && this.readerVm.$destroy && this.readerVm.$destroy();
  },
initReaderVm() function: Used to initialize the widget VM instance in the runtime.
  /**
   * Used to initialize the widget VM instance in the runtime.
   * @param {*} props widget configuration item
   * @param {*} widgetContainer widget container
   */
  initReaderVm(props, widgetContainer) {
    const { commonProps } = props;
    const thisObj = this;
    thisObj.readerVm = new window.Vue(...)
  },
registerWidgetActionAndEvent() function: Used to register the widget events and actions.
/** * Used to register the widget events and actions. */ registerWidgetActionAndEvent() { if (!window.Studio) { return; } window.Studio.registerEvents(this, 'clickSeries', { en_US: 'Click Series' }); window.Studio.registerAction( this, 'highlightSeries', { en_US: 'Highlight Series' }, [], (...args) => this.readerVm.highlightSeries(...args), ); }, - EchartsWidgetTemplate.ftl
- EchartsWidgetTemplate.js
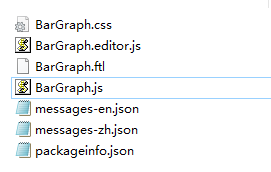
- Rename the downloaded template. In this example, the template name is changed to BarGraph.
- Go to the directory generated after the decompression and change the file names. That is, change EchartsWidgetTemplate.css to BarGraph.css and EchartsWidgetTemplate.editor.js to BarGraph.editor.js, change EchartsWidgetTemplate.ftl to BarGraph.ftl and EchartsWidgetTemplate.js to BarGraph.js.
Figure 3 Effect after the modification
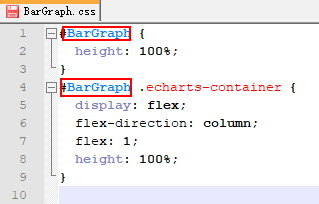
- Open the BarGraph.css file and replace the widget ID with BarGraph. You can search for EchartsWidgetTemplate to replace the widget IDs in batches.
Figure 4 Changing the widget ID
- Repeat the preceding steps to replace the widget IDs in the BarGraph.editor.js, BarGraph.ftl, BarGraph.js, and packageinfo.json files.
If custom widgets need to be used in different language environments, replace EchartsWidgetTemplate in the messages-zh.json and messages-en.json files with BarGraph.
- Go to the directory generated after the decompression and change the file names. That is, change EchartsWidgetTemplate.css to BarGraph.css and EchartsWidgetTemplate.editor.js to BarGraph.editor.js, change EchartsWidgetTemplate.ftl to BarGraph.ftl and EchartsWidgetTemplate.js to BarGraph.js.
- After the preceding operations are complete, compress all files into a .zip package named BarGraph.zip.
Feedback
Was this page helpful?
Provide feedbackThank you very much for your feedback. We will continue working to improve the documentation.See the reply and handling status in My Cloud VOC.
For any further questions, feel free to contact us through the chatbot.
Chatbot


