Updated on 2025-08-01 GMT+08:00

Collaborating on R&D Requirements

The system supports collaborative management of requirements in each project. After assignment is configured, the assigned and received requirements are displayed on the Collaboration Requirements page.

Prerequisites

  • You have created a project. For details, see Creating a CodeArts Project.
  • An R&D requirement has been created.
  • Other projects exist in the system.
  • In the collaborative assignment scenario, you have the permission to assign/cancel assignment of IPD R&D requirements.

    In the collaborative receiving scenario, you have the permission to receive/reject/turn back/transfer IPD R&D requirements.

    For details about how to set permissions, see Managing Project Permissions.

Assigning Requirements

Only completed requirements cannot be assigned.

  1. In the R&D requirement list, select the requirements to be assigned.

    • Select the check boxes of the requirements to be assigned and click Deliver in the lower part of the page.

      You can select one or more requirements.

    • Go to the details page of the requirement to be assigned, click in the upper right corner, and select Deliver.

  2. Select a downstream project in the displayed dialog box.

    If there is no value in the drop-down list, perform the following operations to add a value:
    1. Click Configure downstream project to go to the R&D collaboration configuration page.
    2. Click Add Downstream Project.
    3. Select a desired project.
    4. Click Add.

      Repeat Step 1 to Step 2 to select the added downstream project.

      • If you access the requirement details page, set downstream project, To, and Expected Received. Click Assign to assign the task to a maximum of 10 projects.
      • To collaborate requirements by selecting check boxes, select a downstream project from the drop-down list in the Deliver dialog box, and set To and Expected Received.

        One selected requirement can be assigned to a maximum of 10 projects. Multiple selected requirements can be assigned to only one project.

  3. Click OK.

    In the R&D requirement list, the Collaboration Status of the assigned requirement is Assign.

    Click Receive in the downstream project. The assignment is complete only after the requirement is successfully received.

    If the assignment fails, view the failure details.

Operations Related to Requirement Assignment

After requirements are assigned, you can view, reassign, cancel the assignment of, and export these requirements.

Table 1 Related operations

Operation

Procedure

Query

On the Collaboration Requirements > Deliver page, query the required assigned requirement data based on the set criteria. You can also select the fields to be displayed in the table header.

  • By adding filters

    Select specific query criteria. The assigned requirements that meet the query criteria are displayed in the list. You can select one or more criteria to query requirements as required. Click on the right of the search bar to clear all filtering criteria. The default fields are displayed.

  • By using a saved view
    1. Click on the right of the search bar.

      This icon is displayed only when you select other filter criteria than All next to Collaborative Reception.

    2. Set View Name.
    3. Click OK.

      The created view is displayed next to Collaborative Reception.

    4. You can select the name of the created view to query the assigned requirements that meet the search criteria.

      Views can be shared with others, renamed, and deleted.

Reassign

  1. In the assigned requirement list, click in the row where the requirement to be reassigned is located. The Deliver dialog box is displayed.
  2. Set downstream project, To, and Expected Received, and click OK. You can view the newly assigned requirements in the list.

Cancel assignment

Cancellation cannot be performed on a requirement whose Receiving Status is Received or Rejected.

Select the requirements to be canceled in the assigned requirement list.

  • Canceling one requirement: Click in the row where the desired requirement is located. The cancellation dialog box is displayed.
  • Canceling one or more requirements: Select the check boxes of the desired requirements. The cancellation dialog box is displayed.

Click OK.

Export

Select one or more requirements to be exported and click Export Selected in the lower part of the page. The export progress dialog box is displayed. When the export progress reaches 100%, click Download.

The assigned requirement file is downloaded to the local PC. The file format is .xlsx.

Receive

  1. Select the collaborative requirements to receive.

    • Receiving a single requirement: Click in the row where the desired requirement is located. The Receive Collaboration Requirement dialog box is displayed.
    • Receiving one or more requirements: Select the requirements to be received and click Receive in the lower part of the page. The Receive Collaboration Requirement dialog box is displayed.

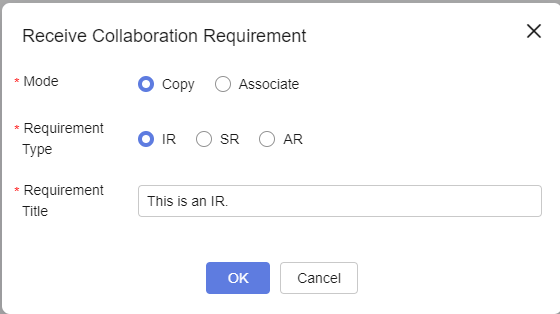
  2. Specify the receiving mode and requirement type, and enter a requirement title.

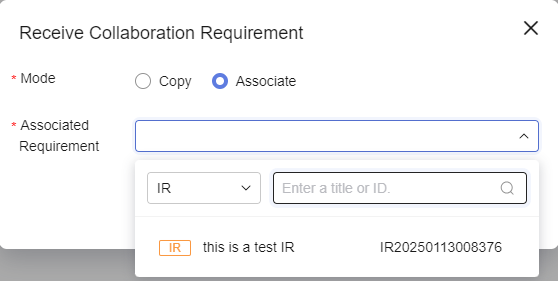
    • When Mode is set to Associate, you only need to select Associated Requirement. The value of Associated Requirement comes from all R&D requirements created in the project.
    • When Mode is set to Copy, the received requirement information is displayed in the R&D requirement list, and the copied requirement information can be viewed in Related Items > Related Upstream Requirements of the requirement details.
  3. Click OK. The received requirements turn to Received. The received requirements are displayed in the collaborative requirement list.

Operations Related to Receiving Requirements

On the Collaborative Requirements > Deliver page, you can query, receive, reject, and transfer requirements. When upstream requirements change, dependent downstream requirements will automatically trigger change notifications. You can view comparison and synchronize updates with one click.

Table 2 Operations related to receiving requirements

Operation

Procedure

Querying received requirements

On the Collaborative Requirements > Collaborative Reception page, query received requirement data based on the set criteria. You can also select the fields to be displayed in the table header.

  • By adding filters

    Select specific query criteria. The received requirements that meet the query criteria are displayed in the list. You can select one or more criteria to query requirements as required. Click on the right of the search bar to clear all filtering criteria. The default fields are displayed.

  • By using a saved view
    1. Click on the right of the search bar.

      This icon is displayed only when you select other filter criteria than All next to Collaborative Reception.

    2. Set View Name.
    3. Click OK.

      The created view is displayed next to Collaborative Reception.

    4. You can select the name of the created view to query the received requirements that meet the search criteria.

      Views can be shared with others, renamed, and deleted.

Rejecting received requirements

Rejection cannot be performed on a requirement whose Acceptance Status is Rejected or Received.

Select the collaborative requirements to reject.

  • Rejecting a single requirement: Click in the row where the desired requirement is located. The Reject Reason dialog box is displayed.
  • Rejecting one or more requirements: Select the requirements to be rejected. The Reject Reason dialog box is displayed.

Set Rejection Reason and click OK.

Transferring received requirements to others

Select the requirements to be transferred to others in the list of received requirements.

  • Transferring a single requirement to others: Click in the row where the desired requirement is located. The Transfer Collaboration Requirement dialog box is displayed.
  • Transferring one or more received requirements to others: Select the desired requirements. The Transfer Collaboration Requirement dialog box is displayed.

Set Transfer and click OK.

Exporting received requirements

Select one or more requirements to be exported and click Export Selected in the lower part of the page. The export progress dialog box is displayed. When the export progress reaches 100%, click Download.

The received requirement file is downloaded to the local PC. The file format is .xlsx.

Setting and viewing change notifications

If the title or description of an upstream requirement is changed, a notification will display in the downstream project.

  • By default, the downstream project will receive a direct message or email notification. To disable this function, choose Work Item > Notifications > R&D Requirements.
  • On the Collaborative Reception page of the downstream project, a yellow reminder icon is displayed next to the title of the received requirement. When you move the pointer over the requirement, a pop-up message is displayed.
    Figure 1 Change notification of upstream requirements

  • Downstream R&D requirement: A change notification will display in the received requirement. Click View Comparison to view the changes.

Viewing comparison

After the title and description of the upstream requirement are modified, you can view the comparison of the requirements received by the downstream project before and after the modification.

  • When you hover the pointer over the yellow reminder icon, a pop-up message is displayed. Click View Comparison. The View Comparison dialog box is displayed, showing the changes in the upstream requirement.

  • Click the View Comparison icon on the operation bar. The View Comparison dialog box is displayed. You can view the changes in the upstream requirement.

    The View Comparison page displays the content of the upstream requirements before and after the modification. The differences are marked in blue.

    Figure 2 Changes in upstream requirements

One-click synchronization

NOTICE:
  • Forbidden scenarios:

    You do not have the permission to edit the work item or are not the owner of the requirement.

    The changes have been synchronized and cannot be synchronized again.

  • If the field to be synchronized in one-click mode is baselined in the downstream project, the system prompts you to go through the change review process when you modify this field. After you click OK in the prompt box, the CR creation page is displayed. (After a change is initiated, the upstream modification reminder disappears.) Fill in the change review. After the review is approved, the synchronization is successful.

After the upstream project is changed, you can synchronize the changes to the received requirement. Perform the following operations:

Click View Comparison to go to the View Comparison page.

Click Modification. A confirmation dialog box is displayed. Click Cancel or the close icon to cancel the synchronization. If you click No synchronization required, a confirmation dialog box is displayed.

Click OK. The synchronization is successful and a synchronization message is displayed. After one-click synchronization is performed or ignored, the yellow reminder icon disappears.