How to Buy and Use SecMaster Professional Edition
Scenario
SecMaster is a next-generation cloud native security operations center Huawei Cloud provides for you. With SecMaster, you can enjoy one-stop cloud security management. You can centrally manage cloud assets, security posture, security information, and incidents, improving security operations efficiency and responding to threats faster.
The following describes how to buy SecMaster in the AP-Bangkok region for the first time and how to use the first workspace for security operations.
- Billing mode: yearly/monthly
- Edition: Professional edition
- ECS quota: 50
- Value-added package: large screen, log audit, security analysis, and security orchestration
The following shows the operation process in this scenario.

Operation Process
|
Procedure |
Description |
|---|---|
|
Sign up for a Huawei account (HUAWEI ID), enable Huawei Cloud services, and assign SecMaster permissions to the account. |
|
|
Select a SecMaster edition, configure the ECS quota, and complete the purchase. (The professional edition is used as an example in this topic.) |
|
|
Create the first workspace for security operations. |
|
|
You can enable security data access to SecMaster and manage all security data in SecMaster.
|
|
|
You can enable alert models, activate playbooks, start baseline inspections, and configure security policies. SecMaster will help check all your resources comprehensively.
|
|
|
You can specify how you would like SecMaster to automatically send security operations reports. |
|
|
You can now start security operations, such as asset management, threat detection, and alert investigation, based on the integrated data. |
Preparations
- Before purchasing SecMaster, sign up for a Huawei ID and enable Huawei Cloud services. For details, see Signing up for a HUAWEI ID and Enabling Huawei Cloud Services.
If you have enabled Huawei Cloud, skip this step.
- Ensure that the SecMaster FullAccess permission has been assigned to the account.
When purchasing SecMaster, you also need to grant the BSS Administrator permission to the account.
Step 1: Buy SecMaster Professional Edition
SecMaster provides basic, standard, and professional editions. Each edition has situation awareness, baseline inspection, query and analysis, and security orchestration functions.
This step shows how to configure parameters for buying SecMaster professional edition. For details about how to buy other SecMaster editions, see Buying SecMaster.
- Log in to the SecMaster console.
- In the upper part of the page, select a region and choose from the service list.
- On the overview page, click Buy SecMaster. On the access authorization panel displayed, select Agree and click OK.
- On the purchase page, configure required parameters.
Table 1 Parameters for buying SecMaster Parameter
Example Value
Description
Billing Mode
Yearly/Monthly
Billing mode of your SecMaster.
- Yearly/Monthly is a prepaid billing mode. You pay in advance for a subscription term. The longer you use the service, the more discounts you got.
- Pay-per-use billing is a postpaid mode in which you pay for what you use. You are billed by second based on the actual usage. Your bill is settled by the hour. With the pay-per-use billing mode, you can easily adapt to resource requirement changes, reducing the risk of over-provisioning of resources or lacking capacity. In this mode, there are no upfront commitments required.
Region
AP-Bangkok
Select the region based on where your cloud resources are located.
Edition
Professional
SecMaster provides basic, standard, and professional editions for your choice. For details about their differences, see Edition Differences.
Quota
50
The maximum number of ECSs you want to protect. The quota must be greater than or equal to the total number of ECSs within your account. This value cannot be changed to a smaller one after your purchase is complete.
- The maximum quota is 10,000.
- If some of your ECSs are not protected by SecMaster, threats to them cannot be detected in a timely manner, which may result in security risks, such as data leakage. To prevent this, increase the quota upon an increase of your host quantity.
Large Screen
Enabled
Large Screen, Log Audit, Security Analysis, and Security Orchestration are optional functions. To buy them, set the purchase quantity as required.
For details about the value-added package and recommended configurations, see Value-Added Package Description.
Log Audit
Buy now and set the specifications based on the number of logs generated each day.
Security Analysis
Buy now and set the daily quota for each server as needed.
Security Orchestration
Buy now and set the data collection and retention quotas.
Tag
- Tag key: test
- Tag value: 01
Tags attached to SecMaster to identify resources. For details about tags, see Tag Management Service.
Required Duration
1 month
Select the required duration as required. You do not need to configure this parameter in pay-per-use mode.
The Auto-renew option enables the system to renew your service by the purchased period when the service is about to expire.
- Confirm the product details and click Next.
- After confirming that the order details are correct, read the SecMaster Disclaimer, select "I have read and agree to the SecMaster Disclaimer", and click Pay Now.
- On the payment page, select a payment method and complete the payment.
- Return to the SecMaster console.
Step 2: Create a Workspace
Workspaces are top-level workbenches in SecMaster. Before using SecMaster, you need to create a workspace first.
- In the navigation pane on the left, choose Workspaces > Management.
Figure 2 Workspaces > Management

- On the displayed page for assigning permissions, select all required permissions (which are selected by default), select Agree to authorize, and click Confirm.
SecMaster depends on some other cloud services, so to better use SecMaster, you can authorize SecMaster to perform some operations on certain cloud services on your behalf. For example, you can allow SecMaster to execute scheduling tasks and manage resources.
Your authorization is required first time you try to use SecMaster.
- On the workspace management page, click Create and set workspace parameters.
This example only introduces mandatory parameters. Configure other parameters as needed.
Table 2 Parameters for creating a workspace Parameter
Example Value
Description
Region
AP-Bangkok
Select the region based on where your cloud resources are deployed.
Project Type
Common Project
Project that the workspace belongs to.
Workspace Name
SecMaster
Name of the workspace used for security operations.
- Click OK
Step 3: Access Security Data
Security data in SecMaster comes from other cloud services. So, after creating a workspace, you need to enable security data access to SecMaster for centralized management.
- Enabling asset subscription
SecMaster manages assets such as websites, ECSs, databases, IP addresses, and VPCs, and associates them with corresponding security services. During network protection and KEA, SecMaster aspires to build an overall network protection architecture from multiple aspects, such as the network layer, application layer, host layer, and data layer, to ensure the security and stability of user service systems.
The first workspace in each region automatically loads all assets in the corresponding region. The non-first workspaces do not load assets automatically. You need to manually configure asset subscriptions based on your security operations needs.
This part describes how to manually access asset data.
- In the navigation pane on the left, choose Workspaces > Management. In the workspace list, click the name of the target workspace.
Figure 3 Workspace management page

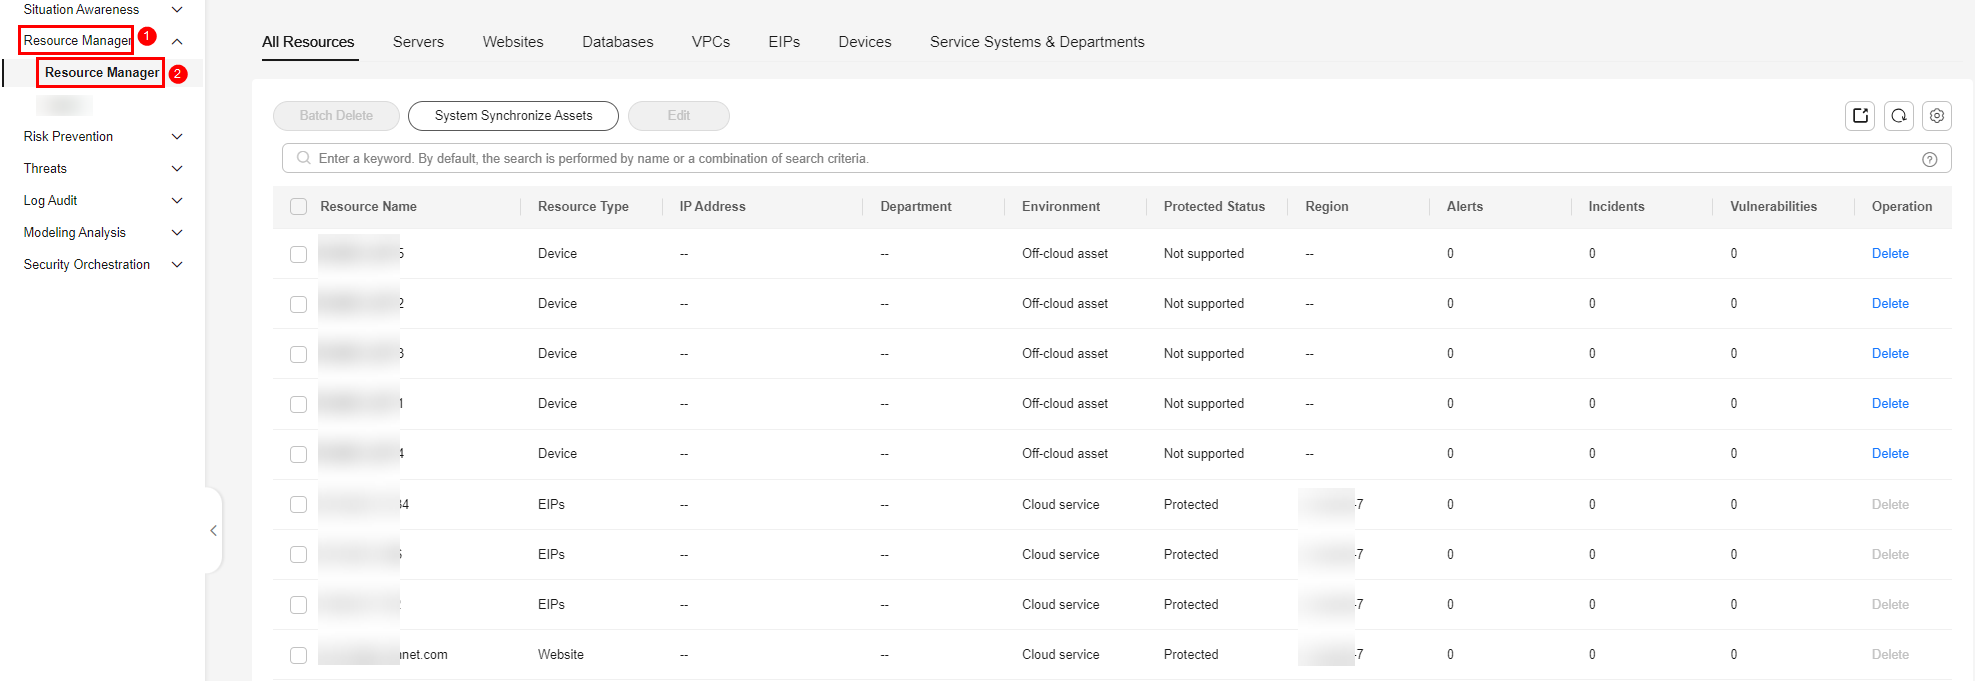
- In the navigation pane on the left, choose Resource Manager > Resource Manager.
Figure 4 Resource Manager
- On the Resource Manager page, click Asset Subscription in the upper right corner.
- On the Asset Subscription page sliding from the right, locate the row that contains the region where the target resource is located, and enable subscription.
- Click OK.
If you enable asset subscription, SecMaster updates asset information within one minute. Then, SecMaster updates asset information automatically every night.
- In the navigation pane on the left, choose Workspaces > Management. In the workspace list, click the name of the target workspace.
- Aggregation of logs from other cloud services
Logs are important security data for secure operations. In SecMaster, you can quickly enable access to logs of many cloud services, such as WAF and HSS. After you enable the access, you can manage logs centrally and search and analyze all collected logs.
For the first workspace in each region, SecMaster automatically enables access to logs of most cloud services. For non-first workspaces, you need to manually configure log data access based on your security operations needs.

You are advised to enable access to asset details, asset alerts, baseline inspection results, vulnerability data, and logs in one workspace. This will make it easier for centralized security operations and association analysis.
This part describes how to manually enable access to cloud service logs you may need.
- In the navigation pane on the left, choose .
Figure 5 Cloud Service Access
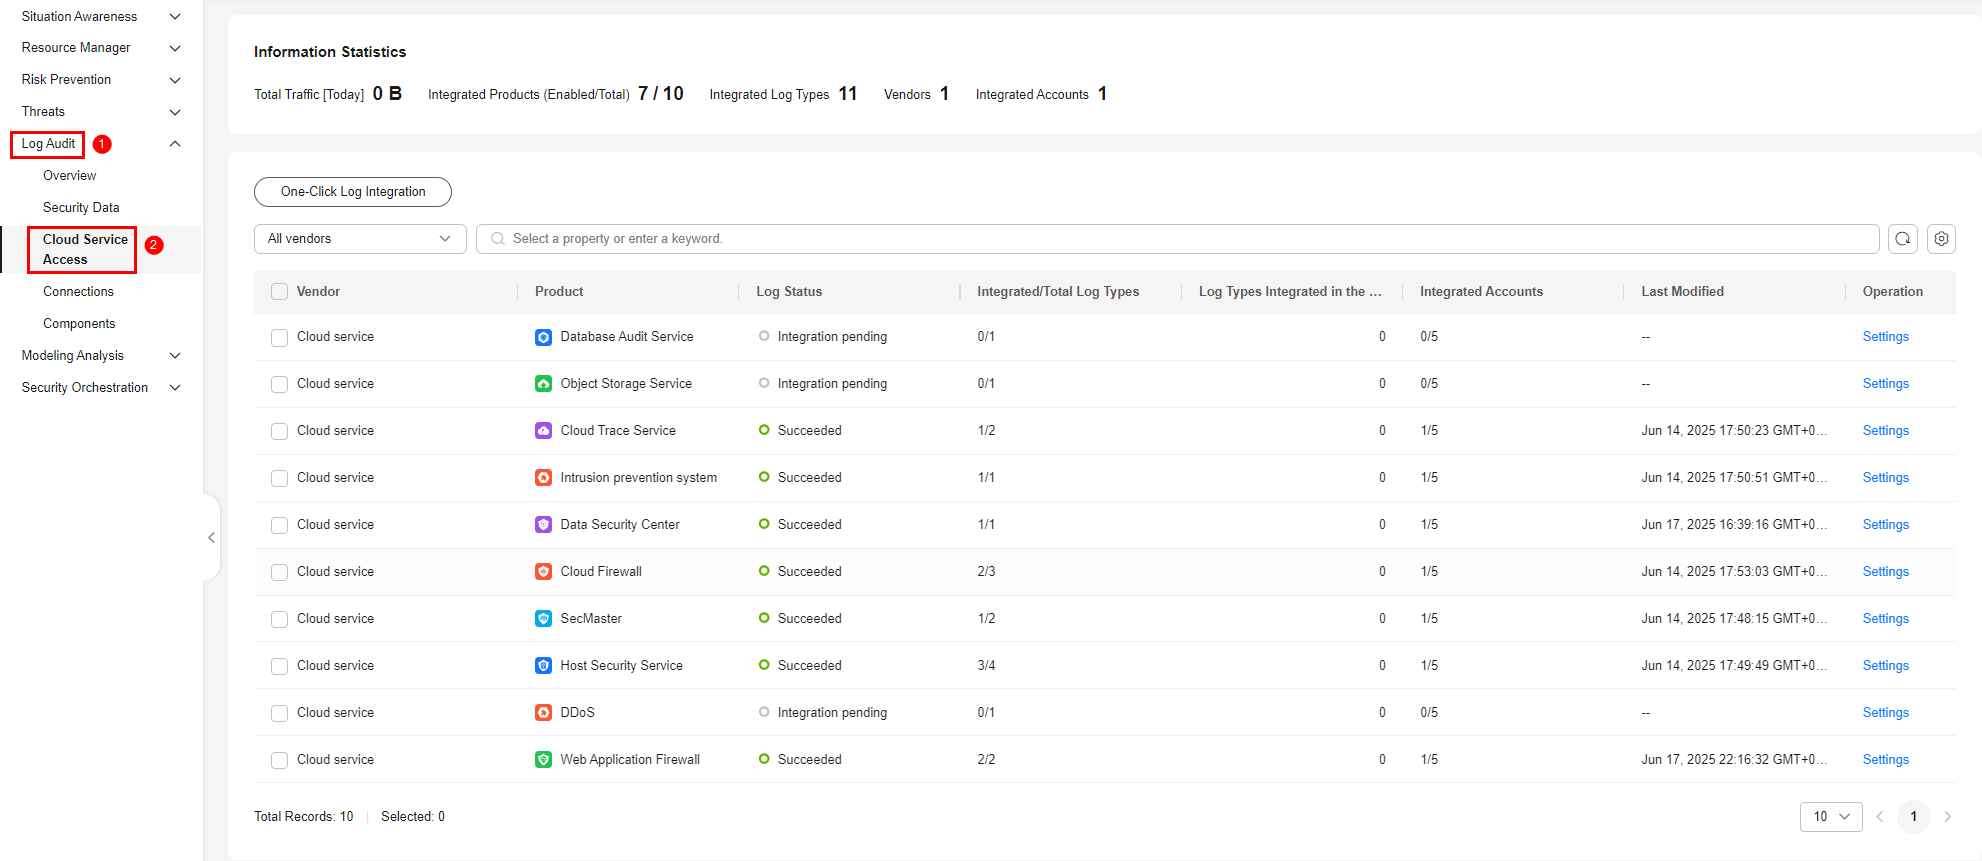
- On the Cloud Service Access page, configure log integration. Enable log integration based on the cloud services you have enabled in the current region.
Enable one-click log integration of multiple cloud service products: Click One-Click Log Integration. On the One-Click Log Integration page, select the data source region from the Region drop-down list and select the cloud service log types you need to integrate. After completing the configuration, click OK.
Figure 6 Log integration settings page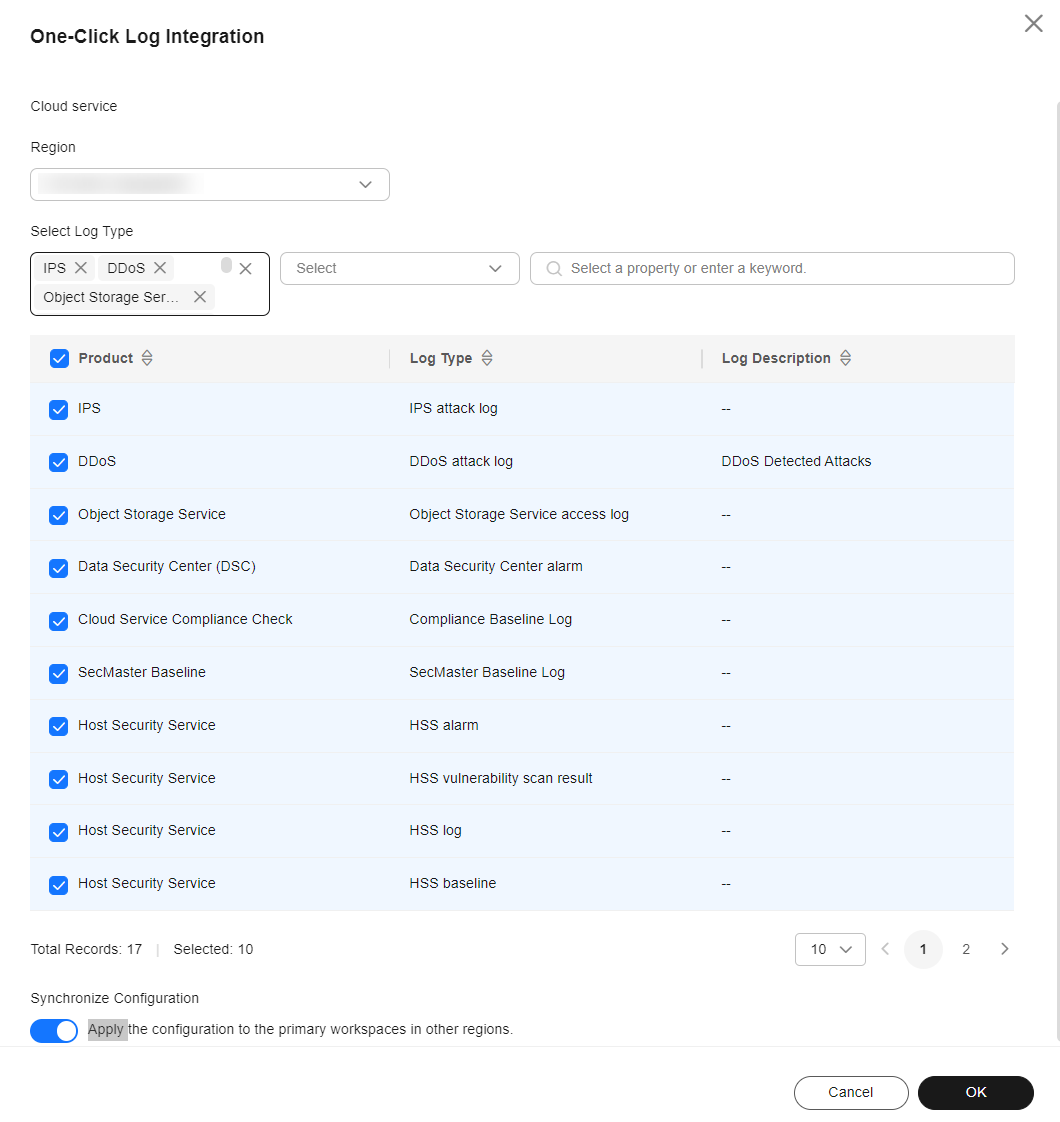
-
Enable log integration of a cloud service product: click Settings in the Operation column of the cloud service product.
On the settings page, enable log types of products based on your needs.
Table 3 Parameters on the log integration settings page Parameter
Description
Log Type
Log type.
Enable Log Integration
Whether to enable log integration. If this button is toggled on, logs will be integrated into SecMaster.
Auto Alert Conversion
In the Auto Alert Conversion column, click
 to enable the function. After that, if cloud service logs meet certain alert rules, SecMaster will automatically convert them into alerts. Those alerts will be displayed on the Alerts page.
Lifecycle
Log retention duration after integration.
Log Status
Log integration status.
- Succeeded: Logs have been integrated and the integration is successful.
- Integration pending: Logs have not been integrated.
- Failed: Logs failed to be integrated.
Last Active
Last log integration time.
Operation
You can Edit the lifecycle of the log type, in days. Lifecycle indicates the retention duration of integrated logs.
If the account has been managed by an operation account, you can modify the log lifecycle only in the primary workspace of the operation account.
- In the navigation pane on the left, choose .
- (Optional) Enabling access to logs from non-Huawei Cloud services
You can aggregate security logs from third-party (non-Huawei Cloud) services to SecMaster. For details, see Data Collection.
Step 4: Configure and Enable Related Checks
- Creating and enabling an alert model
SecMaster provides preconfigured security analysis models based on application, network, and host security data to automatically aggregate, analyze, and report alerts.
Aggregating and analyzing alerts through models cut the false positive rate and make on-duty personnel respond more efficiently. You can also adjust models in different scenarios to filter out false alerts as many as possible.
For the first workspace in each region, SecMaster automatically enables some preconfigured models. For non-first workspaces in each region, you need to enable preconfigured models manually and create custom alert models to meet your operations needs.
To use preconfigured models that have not been enabled by SecMaster, you can create custom models from model templates by referring to the following steps:
- In the navigation pane on the left, choose and select the Model Templates tab.
Figure 7 Model Templates tab

- In the model template list, locate the target model template and click Details in the Operation column. On the template details panel displayed on the right, click Create Model in the lower right corner.
- On the Create Alert Model page, configure basic information.
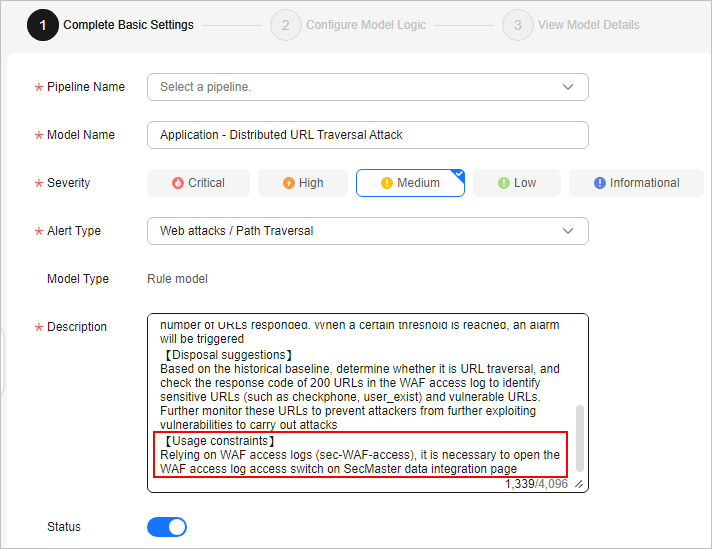
- Pipeline Name: Select a pipeline for the alert model. You can select a pipeline based on the Usage constraints in the description.
Figure 8 Obtaining a pipeline name
- Retain default values of other parameters.
- Pipeline Name: Select a pipeline for the alert model. You can select a pipeline based on the Usage constraints in the description.
- Complete all settings and click Next in the lower right corner of the page. The page for setting the model logic is displayed.
- Set the model logic. You are advised to retain the default value.
- Complete all settings and click Next in the lower right corner of the page.
- Review all settings and click OK in the lower right corner of the page.
- Repeat 2 to 7 to create alert models with other templates.
- In the navigation pane on the left, choose and select the Model Templates tab.
- Enabling a playbook
SecMaster provides response playbooks for cloud security incidents. You can use playbooks to implement efficient and automatic response to security incidents.
For the first workspace in each region, SecMaster enables preconfigured workflows as well as the most commonly used playbooks. You can use them directly. For non-first workspaces in each region, you need to manually enable playbooks to meet your security operations needs.
You can perform the following procedure to enable other playbooks:
- In the navigation pane on the left, choose Security Orchestration > Playbooks.
Figure 9 Accessing the Playbooks tab

- On the Playbooks tab, locate the target playbook and click Enable in the Operation column.
- In the displayed dialog box, select version v1 and click OK.
- In the navigation pane on the left, choose Security Orchestration > Playbooks.
- Conducting a baseline inspection
After enabling access to security data, you can check key configuration items of cloud assets in accordance with applicable baseline inspection standards. SecMaster can scan cloud services for risks in key configuration items, report scan results by category, generate alerts for risky settings, and provide hardening suggestions and guidelines. The baseline inspection supports periodic and immediate checks.
- Periodic check: SecMaster periodically executes the default check plan or the check plans you configure.
- Immediate check: You can start check items in all security standards or a specific check plan anytime.
The following describes how to start an immediate check for check items in a compliance pack.
- In the navigation pane on the left, choose Risk Prevention > Baseline Inspection.
Figure 10 Accessing the check result page
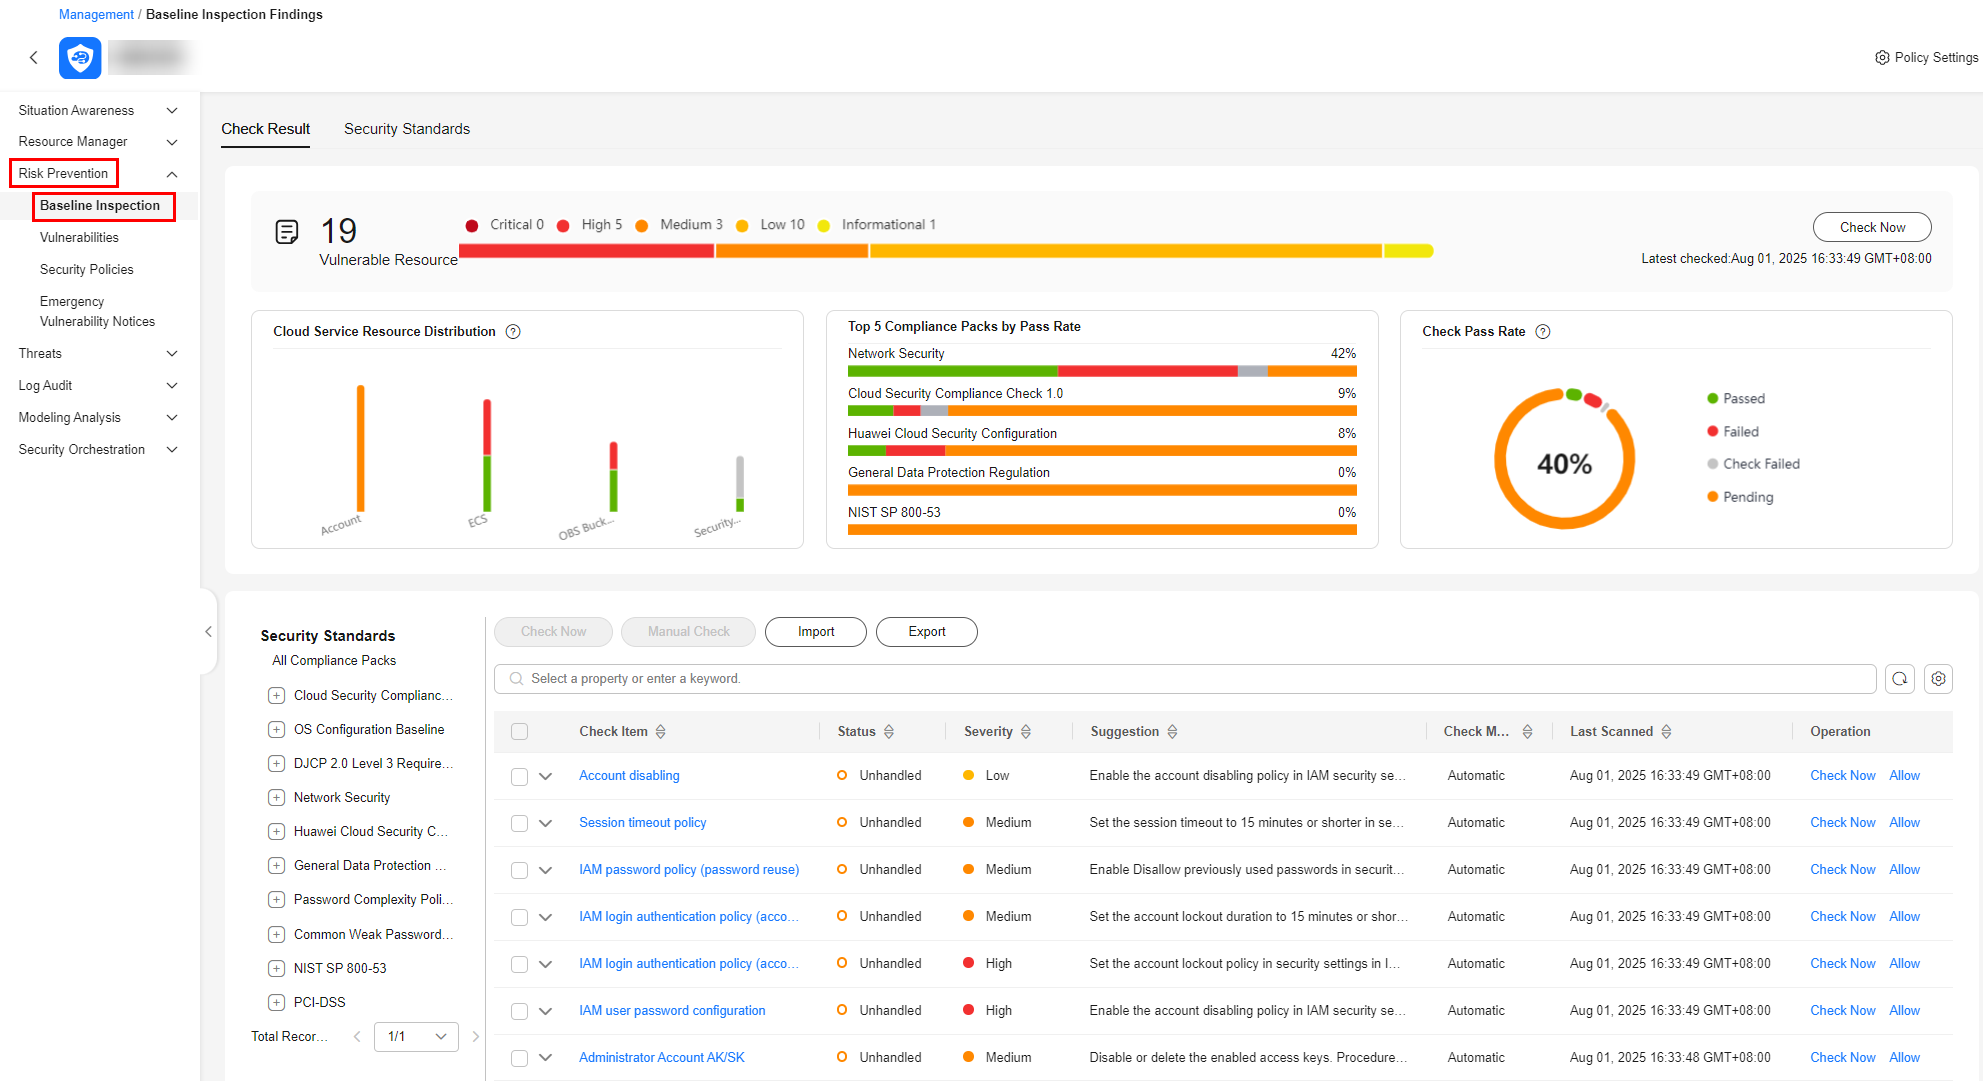
- On the Check Result page, click Check Now. In the dialog box displayed, click OK.
Refresh the page. To check whether the displayed result is the latest, click View Details in the Operation column and check the time in Latest Check.
- (Optional) Configuring defense policies and emergency policies
You can enable, configure, and apply protection policies for seven layers of defense and enjoy comprehensive protection. You can configure emergency policies to control security risks in a timely manner.
- Configuring defense policies.
This part walks you through how to configure a protection policy in WAF at the application defense layer.
- In the navigation pane on the left, choose .
Figure 11 Defense Layer Policies

- Click the name of the application defense line. The cloud product information corresponding to the application defense line is displayed on the right.
- On the WAF tab, click Protection Policy. The WAF protection policy configuration page is displayed.
If you have not purchased WAF, click WAF. On the WAF console page displayed, click Buy WAF. On the purchase page, enable WAF by referring to Buying WAF.
- On the WAF protection policy configuration page, click the Policy Management tab. On the displayed page, click Add Policy in the upper left corner of the list.
- In the displayed dialog box, enter the policy name and click Confirm. The added policy will be displayed in the policy list.
- In the row containing the target policy, click the policy name. On the displayed page, add rules to the policy by referring to Configuring Protection Rules.
- In the navigation pane on the left, choose .
- Configuring an emergency policy
- In the navigation pane on the left, choose . On the displayed page, select the Emergency Policies tab to go to the emergency policy management page.
Figure 12 Emergency Policies
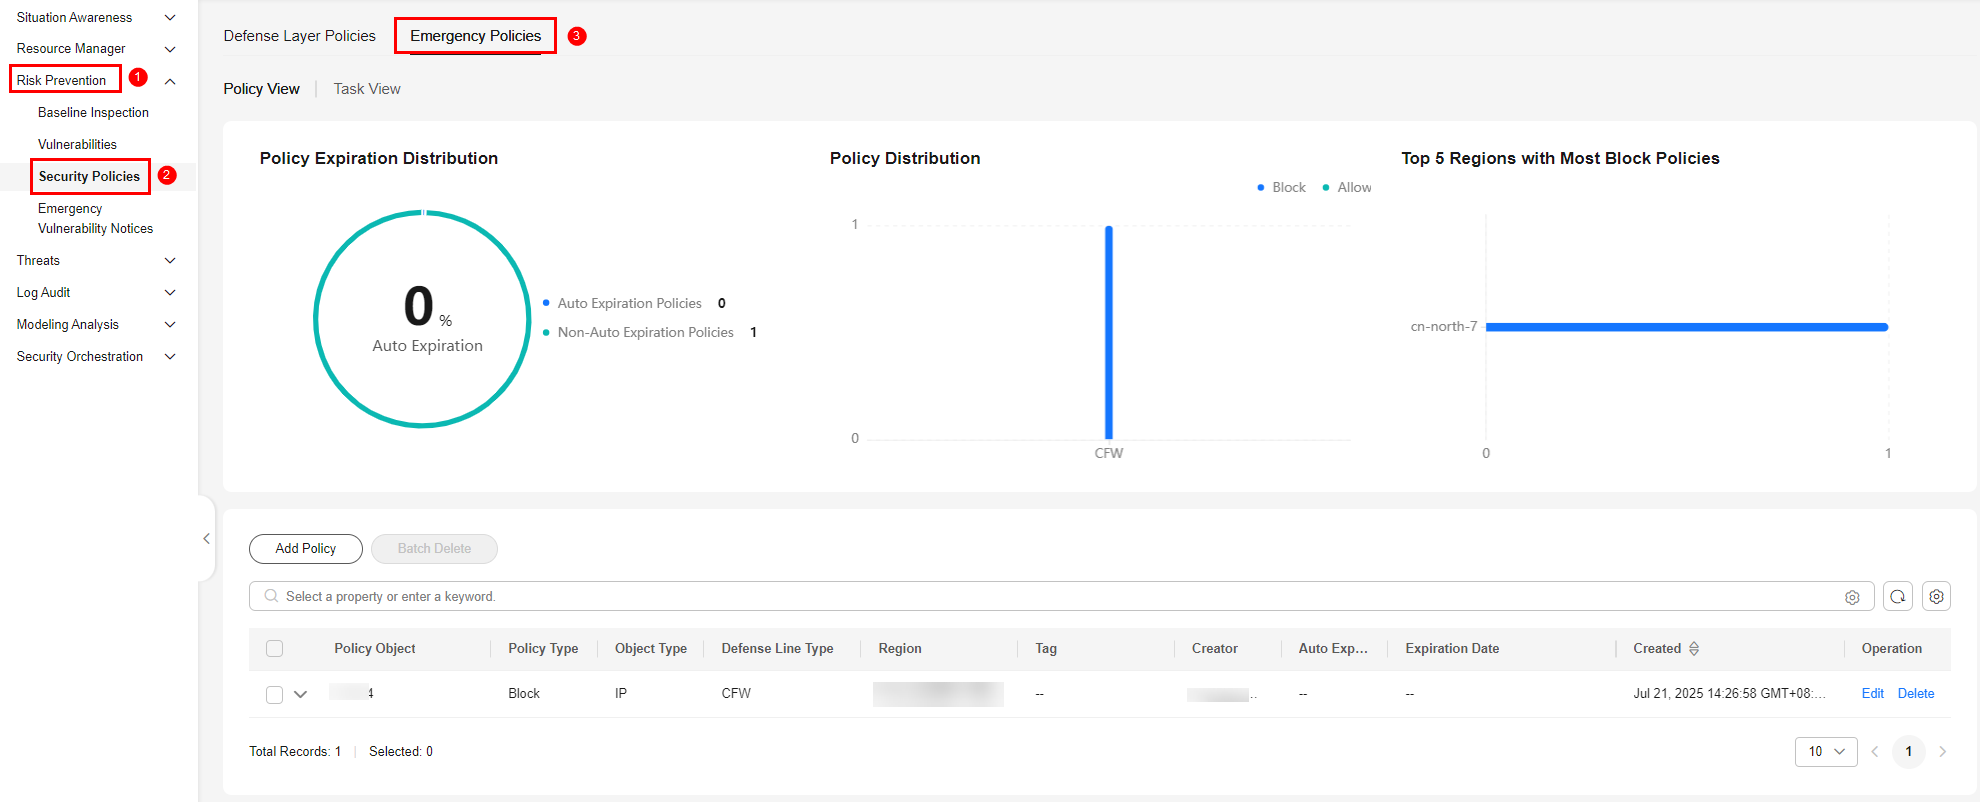
- On the Emergency Policies tab, click Add. The page for adding policies slides out from the right of the page.
- On the page for adding a policy, configure the policy details.
Table 4 Policy parameters Parameter
Description
Policy Type
Type of the policy. You can select Block or Allow.
- If Block is selected, the access from the policy object will be denied.
- Allow: The access from the policy object will be allowed.
Object Type
If Policy Type is set to Block, Object Type can be set to IP, Account, or Domain name.
If Policy Type is set to Allow, Object Type can be set to IP or Domain name.
Select an object type based on your needs.
- If IP is selected, the operation object of the policy is an IP address or IP address range.
- If Domain name is selected, the operation object of the policy is a domain name.
- If Account is selected, the policy is applied to a cloud service account (IAM user).
Policy Object
Enter one or more policy objects.
- If Object Type is set to IP, enter IP addresses or IP address ranges. Enter one or more IP addresses or IP address ranges and separate them with commas (,).
Example: IPv4: 192.168.0.0 or 192.168.0.0/12; IPv6: 0:0:0:0:0:0:0:0 or 0:0:0:0:0:0:0:0/128.
- If Object Type is set to Domain name, enter domain names. Enter one or more domain names. If there are multiple domain names, separate them with commas (,). Enter a maximum of 63 characters. Only letters, digits, hyphens (-), underscores (_), and periods (.) are allowed.
- If Policy type is set to Block and Object Type is set to Account, set Policy Object to the cloud service account (IAM user). Enter one or more cloud service accounts (IAM usernames). If there are multiple cloud service accounts (IAM usernames), separate them with commas (,).
Policy Application Scope
Select Current region and enterprise project or All regions and enterprise projects based on your needs.
Operation Connection
Operation connections associated with the emergency policy process. Select the operation connection of the policy based on your needs.
- If Policy Type is set to Block and Object Type is set to IP, you can select CFW, VPC, and WAF operation connections.
- If Policy Type is set to Block and Object Type is set to Account, you can select IAM operation connections.
- If Policy Type is set to Block and Object Type is set to Domain name, you can select CFW operation connections.
- If Policy Type is set to Allow and Object Type is set to IP, you can select WAF operation connections.
- If Policy Type is set to Allow and Object Type is set to Domain name, you can select CFW operation connections.
Auto Expiration
Auto expiration configured for the policy.
- If you select Yes, set the policy expiration time.
- If you select No, the policy is always valid.
Tag (Optional)
Tag of the custom emergency policy.
Policy Description (Optional)
Description of the custom policy.
- Click OK
- In the navigation pane on the left, choose . On the displayed page, select the Emergency Policies tab to go to the emergency policy management page.
- Configuring defense policies.
Step 5: Create a Security Report
Security reports are sent by SecMaster automatically. You will see security scores, baseline check results, security vulnerabilities, and policy coverage in a security report. This helps you learn about asset security status in a timely manner.
This step describes how to create a daily security operations report.
- In the navigation pane on the left, choose .
Figure 13 Security Reports

- On the security report page, click
 . On the displayed page, configure basic report information.
Table 5 Report parameters Parameter
Description
Report Name
Mandatory. Name of the custom report.
- The report name can contain letters, digits, underscores (_), and hyphens (-) only.
- Enter 1 to 30 characters.
Schedule
Select a report type.
- Daily: SecMaster collects security information from 00:00:00 to 23:59:59 of the previous day by default.
- Weekly: SecMaster collects statistics on security information from 00:00:00 on Monday to 23:59:59 on Sunday of the previous week.
- Monthly: SecMaster collects statistics on security information from 00:00:00 on the first day to 23:59:59 on the last day of the previous month.
- Custom: Customize a time range.
Data Scope
This field displays the data scope based on Schedule you specified. You do not need to manually configure this parameter.
If you select Daily, Weekly, or Monthly for Schedule, the system displays the report data scope accordingly.
Schedule
If you select Daily, Weekly, or Monthly for Schedule, you still need to set when you want SecMaster to send reports.
- Daily: By default, SecMaster sends a report that includes security information generated from 00:00:00 to 23:59:59 on the previous day every day at the time you specify.
- Weekly: Set the time when the weekly report is sent. By default, the system sends a report for the data from 00:00:00 last Monday to 23:59:59 last Sunday.
- Monthly: By default, the system sends a report that includes the security information for the previous month on a monthly basis at the time you specify.
Report Format
Format of the security report. The options are HTML, JPG, WORD, and PDF.
Email Subject
Set the subject of the email for sending the report.
Recipient Email
Add the email address of each recipient.
- You can add up to 100 email addresses.
- Separate multiple email addresses with semicolons (;). Example: test01@example.com;test02@example.com
(Optional) Copy To
Add the email address of each recipient you want to copy the report to.
- You can add up to 100 email addresses.
- Separate multiple email addresses with semicolons (;). Example: test03@example.com;test04@example.com
(Optional) Remarks
Remarks for the security report.
- Click Next: Select Report Template in the lower right corner.
- On the Select Report Template page, select a report template from the left. Then, you can preview the report layout in the right pane.
If Schedule is set to Daily, select the Daily Report layout.
If Schedule is set to Weekly, select the Weekly Report layout.
If Schedule is set to Monthly, select the Monthly Report layout.
In this example, Daily is selected.
- Click Finish in the lower right corner. Go back to the Security Reports page and view the created security report.
Step 6: Start Security Operations
After the first workspace is created, SecMaster automatically initializes it. After the initialization completes, you can start managing assets, checking for threats, investigating alerts, handling threats, as well as other security operations activities. You can also view the security situation on the situation overview page and large screens.

- Manage assets and risks.
The essence of security operations is security risk management. According to the definition of ISO, there are three elements, assets, vulnerabilities, and threats, during security operations. Sorting the assets you want to protect is the starting point of the security operations service flow.
- Asset management
SecMaster helps you enable cross-region, cross-account, and cross-environment aggregation of assets. For assets from other environments, SecMaster will mark the environments these assets belong to. After the aggregation, SecMaster marks asset security status to show whether there are unsafe settings, OS or application vulnerabilities, suspicious intrusions, or unprotected cloud services. For example, all ECSs must be protected with HSS, and all domain names must be protected with WAF. This makes it possible for you to view security of all your assets in one place.
For details, see Managing Assets.
- Detecting and clearing unsafe settings
During security operations, the most common vulnerabilities are unsafe settings. Based on security compliance experience, SecMaster forms a baseline for automatic checks and provides baseline check packages based on common specifications and standards in the industry.
- SecMaster can automatically check cloud service settings. For example, SecMaster can check whether permissions are assigned by role in IAM, whether security groups allow all inbound access in VPC, and whether WAF protection policies are enabled. You can harden the configuration based on the recommended methods.
For details, see Baseline Inspection.
- Discovering and fixing vulnerabilities
SecMaster can also help you detect and fix security vulnerabilities. You can use SecMaster to centrally manage Linux, Windows, Web-CMS, application, and website vulnerabilities. You will have an overview of vulnerabilities in real time, including vulnerability scan details, vulnerability statistics, vulnerability types and distribution, top 5 vulnerabilities, and top 5 risky servers.
For details, see Vulnerability Management.
- Asset management
- Detect threats.
As data sources have been connected to SecMaster, assets we need to protect have been counted, and unsafe settings and vulnerabilities have been fixed. So the next move is to identify suspicious activities and threats.
SecMaster provides many preconfigured threat detection models. These models were designed by security experts and analysis teams based on known threats, common attack media, and suspicious activities. You will receive notifications once suspicious activities trigger those models. These models automatically search the entire environment for suspicious activities. You can also create custom threat detection models to meet your needs.
SecMaster also provides the log data query function to help you discover threats.
For details, see Managing Model Templates and Security Analysis.
- Investigate alerts and incidents.
- Investigating alerts
Threat detection models analyze security cloud service logs to find suspected intrusion behaviors and generate alerts. An alert in SecMaster contains the following fields: name, severity, asset/threat that initiates suspicious activities, and compromised assets. Security operations engineers need to analyze and investigate alerts to find out real threats. If the risk is low, they will close the alert (such as repeated alerts and O&M operations). If the risk is high, they will convert the alert into an incident.
For more details, see Viewing Alerts and Converting an Alert into an Incident.
- Investigating incidents
After an alert is converted into an incident, you can view incident in the incident management module. You can investigate the incident and take emergency response to it. You can associate an incident with entities related to suspicious activities. The entities include assets (such as VMs), indicators (such as attack source IP addresses), accounts (such as leaked accounts), and processes (such as Trojans). You can also associate an incident with similar historical alerts or incidents.
For details, see Viewing an Incident and Editing an Incident.
- Investigating alerts
- Respond to threats.
You can use playbooks to enable automated alert and incident responses.
For details, see Security Orchestration.
- Use Security Overview, Large Screen, and Security Reports.
- Security Overview
This page displays the security scores of resources in the current workspace, so you can quickly learn about the security status.
- Large Screen
You can view the real-time situation of resources and handle attack incidents. This function helps security operations teams monitor and analyze security threats and incidents in real time and quickly respond to them.
- Security reports
Security reports are sent by SecMaster automatically. You will see security scores, baseline check results, security vulnerabilities, and policy coverage in a security report. This helps you learn about asset security status in a timely manner.
For more details, see Situation Overview, Large Screen, and Security Reports.
- Security Overview
Feedback
Was this page helpful?
Provide feedbackThank you very much for your feedback. We will continue working to improve the documentation.See the reply and handling status in My Cloud VOC.
For any further questions, feel free to contact us through the chatbot.
Chatbot


