Usage
Introduction
MQTT(S) certificate authentication requires you to upload a CA certificate on the console first. Then, you can either use the API for creating a device or register the device on the console to get the device ID. When the device accesses the IoT platform, it carries the X.509 certificate for authentication, which is a digital certificate used to authenticate the communication entity.
Constraints
- Only MQTT(S) devices can use X.509 certificates for identity authentication.
- You can upload up to 100 device CA certificates. Multiple devices can share one CA certificate.
Process

- A user uploads a CA certificate on the IoTDA console.
- An application calls the API for registering a device. Alternatively, a user uses the IoTDA console to register a device.

During registration, use the MAC address, serial number, or IMEI of the device as the node ID.
The platform allocates a globally unique device ID to the device.
- During login, the device sends a connection request carrying the X.509 certificate to the platform.
- If the authentication is successful, the platform returns a success message, and the device is connected to the platform.
Uploading a CA certificate
- In the navigation pane, choose Devices > Device Certificates > CA Certificates. Select a resource space and click Upload Certificate.
- In the displayed dialog box, click Select File to add a file, and then click OK.
Figure 2 CA certificate - Uploading a certificate


- CA certificates are provided by device vendors. You can prepare a commissioning certificate during commissioning. For security reasons, you are advised to replace the commissioning certificate with a commercial certificate during commercial use.
- CA certificates can no longer be used to verify server certificates upon expiration. Replace CA certificates before they expire to ensure that devices can connect to the IoT platform properly.
Creating a Device CA Commissioning Certificate
This section uses the Windows operating system as an example to describe how to use OpenSSL to make a commissioning certificate. The generated certificate is in PEM format.
- Download and install OpenSSL.
- Open the CLI as user admin.
- Run cd c:\openssl\bin (replace c:\openssl\bin with the actual OpenSSL installation directory) to access the OpenSSL view.
- Generate a public/private key pair.
openssl genrsa -out rootCA.key 2048
- Use the private key in the key pair to generate a CA certificate.
openssl req -x509 -new -nodes -key rootCA.key -sha256 -days 1024 -out rootCA.pem
Figure 3 Generating a CA certificate
Enter the following information as prompted. All parameters can be customized.
-
State or Province Name (full name) []: state or province, for example, GD
-
Organization Name (for example, company) []: organization, for example, Huawei
-
Organizational Unit Name (for example, section) []: organization unit, for example, IoT
-
Common Name (e.g. server FQDN or YOUR name) []: common name, for example, zhangsan
-
Email Address []: email address, for example, 1234567@163.com
Obtain the generated CA certificate rootCA.pem from the bin folder in the OpenSSL installation directory.
Uploading a Verification Certificate
If the uploaded certificate is a commissioning certificate, the certificate status is Unverified. In this case, upload a verification certificate to verify that you have the CA certificate.

The verification certificate is created based on the private key of the CA certificate. Perform the following operations to create a verification certificate:
- Obtain the verification code to verify the certificate.
Figure 5 CA certificate - Verified certificate
 Figure 6 CA certificate - Obtaining the verification code
- Generate a key pair for the verification certificate.
openssl genrsa -out verificationCert.key 2048
- Create a certificate signing request (CSR) for the verification certificate.
openssl req -new -key verificationCert.key -out verificationCert.csr
The system prompts you to enter the following information. Set Common Name to the verification code and set other parameters as required.
-
State or Province Name (full name) []: state or province, for example, GD
-
Organization Name (for example, company) []: organization, for example, Huawei
-
Organizational Unit Name (for example, section) []: organization unit, for example, IoT
-
Common Name (e.g. server FQDN or YOUR name) []: verification code for verifying the certificate. For details on how to obtain the verification code, see 1.
-
Email Address []: email address, for example, 1234567@163.com
- Password[]: password
- Optional Company Name[]: company name, for example, Huawei
- Use the CSR to create a verification certificate.
openssl x509 -req -in verificationCert.csr -CA rootCA.pem -CAkey rootCA.key -CAcreateserial -out verificationCert.pem -days 500 -sha256
Obtain the generated verification certificate verificationCert.pem from the bin folder of the OpenSSL installation directory.
- Select the corresponding certificate, click
 , and click Upload Verification Certificate.
Figure 7 CA certificate - Verified certificate
- In the displayed dialog box, click Select File to add a file, and then click OK.
Figure 8 CA certificate - Uploading a verified certificate

After the verification certificate is uploaded, the certificate status changes to Verified, indicating that you have the CA certificate.
Presetting an X.509 Certificate
Before registering an X.509 device, preset the X.509 certificate issued by the CA on the device.

The X.509 certificate is issued by the CA. If no commercial certificate issued by the CA is available, you can create a device CA commissioning certificate.
Creating an X.509 Commissioning Certificate
- Run cmd as user admin to open the CLI and run cd c:\openssl\bin (replace c:\openssl\bin with the actual OpenSSL installation directory) to access the OpenSSL view.
- Generate a public/private key pair.
openssl genrsa -out deviceCert.key 2048
- Create a CSR for the device certificate.
openssl req -new -key deviceCert.key -out deviceCert.csr
Enter the following information as prompted. All parameters can be customized.
-
State or Province Name (full name) []: state or province, for example, GD
-
Organization Name (for example, company) []: organization, for example, Huawei
-
Organizational Unit Name (for example, section) []: organization unit, for example, IoT
-
Common Name (e.g. server FQDN or YOUR name) []: common name, for example, zhangsan
-
Email Address []: email address, for example, 1234567@163.com
- Password[]: password
- Optional Company Name[]: company name, for example, Huawei
- Create a device certificate using CSR.
openssl x509 -req -in deviceCert.csr -CA rootCA.pem -CAkey rootCA.key -CAcreateserial -out deviceCert.pem -days 500 -sha256
Obtain the generated device certificate deviceCert.pem from the bin folder in the OpenSSL installation directory.
Registering a Device Authenticated by an X.509 Certificate
- Log in to the IoTDA console.
- In the navigation pane, choose Devices > All Devices. On the displayed page, click Register Device, set parameters based on the table below, and click OK.
Figure 9 Device - Registering an X.509 device
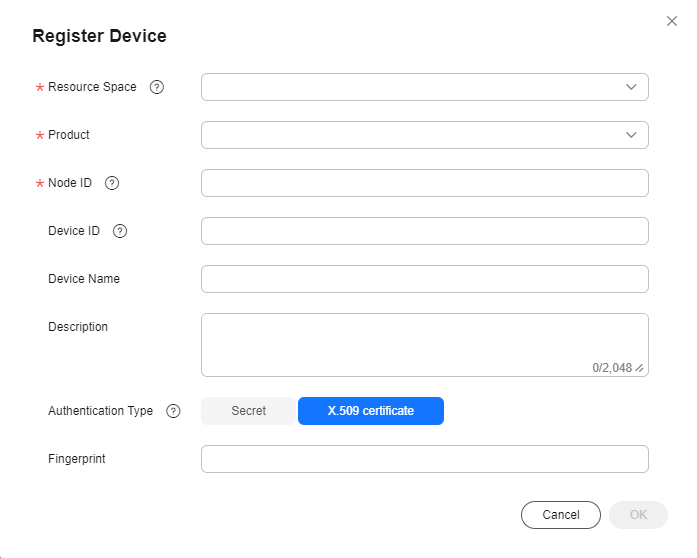
Parameter
Description
Resource Space
Select the resource space to which a device belongs.
Product
Select the product to which the device belongs.
Node ID
Set this parameter to the IMEI, MAC address, or serial number of the device. If the device is not a physical one, set this parameter to a custom character string that contains letters and digits.
Device Name
Customize the device name.
Authentication Type
X.509 certificate: The device uses an X.509 certificate for identity verification.
Fingerprint
This parameter is displayed when Authentication Type is set to X.509 certificate. Import the fingerprint corresponding to the preset device certificate on the device side. You can run openssl x509 -fingerprint -sha256 -in deviceCert.pem in the OpenSSL view to query the fingerprint. Note: Delete the colons (:) from the obtained fingerprint when filling it.
Figure 10 OpenSSL execution example
Performing Connection Authentication
You can activate the device registered with the platform by using MQTT.fx. For details, see Device Connection Authentication.
- Download MQTT.fx (64-bit OS) or MQTT.fx (32-bit OS) and install it.

- Install the latest MQTT.fx.
- MQTT.fx 1.7.0 and earlier versions have problems in processing topics containing $. Use the latest version for test.
- Go to the device details page, click MQTT Connection Parameters, and check the device connection information (ClientId, Username, and Password).
Figure 11 Device - Connection parameters

Parameter
Mandatory
Type
Description
ClientId
Yes
String(256)
The value of this parameter consists of a device ID, device type, password signature type, and timestamp. They are separated by underscores (_).
- Device ID: A device ID uniquely identifies a device and is generated when the device is registered with IoTDA. The value usually consists of a device's product ID and node ID which are separated by an underscore (_).
- Device type: The value is fixed at 0, indicating a device ID.
- Password signature type: The length is 1 byte, and the value can be 0 or 1.
- 0: The timestamp is not verified using the HMAC-SHA256 algorithm.
- 1: The timestamp is verified using the HMAC-SHA256 algorithm.
- Timestamp: The UTC time when the device was connected to IoTDA. The format is YYYYMMDDHH. For example, if the UTC time is 2018/7/24 17:56:20, the timestamp is 2018072417.
Username
Yes
String(256)
Device ID.
Each device performs authentication using the MQTT CONNECT message, which must contain all information of the client ID. After receiving a CONNECT message, the platform checks the authentication type and password digest algorithm of the device.
The generated client ID is in the format Device ID_0_0_Timestamp. By default, the timestamp is not verified.
- If the timestamp needs to be verified, the platform checks whether the message timestamp is consistent with the platform time and then checks whether the password is correct.
- If the timestamp does not need to be verified, the timestamp must also be contained in the CONNECT message, but the platform does not check whether the time is correct. In this case, only the password is checked.
If the authentication fails, the platform returns an error message and automatically disconnects the MQTT connections.
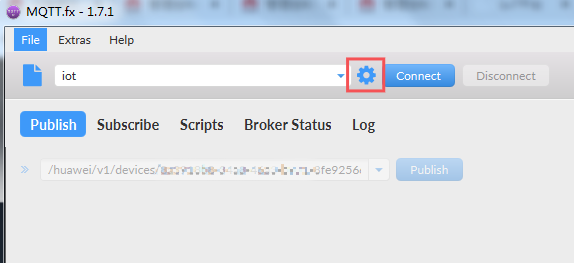
- Open MQTT.fx and click the setting icon.
Figure 12 MQTT.fx - Settings
- Enter Connection Profile information.
Figure 13 Using default settings for parameters on the General tab page
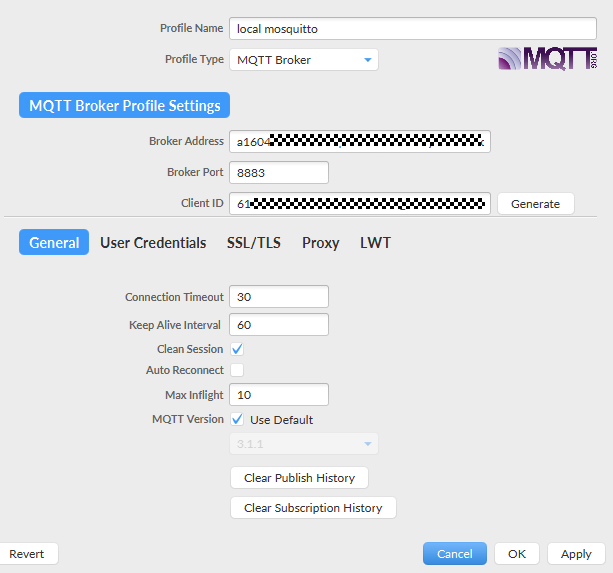
Parameter
Description
Broker Address
Enter the device access address (domain name) obtained from the IoTDA console. For devices that cannot be connected to the platform using a domain name, run the ping Domain name command in the CLI to obtain the IP address. The IP address is variable and needs to be set using a configuration item.
Broker Port
Enter 8883.
Client ID
Enter the device client ID obtained in 2.
- Click User Credentials and specify User Name.
Figure 14 Entering the device ID
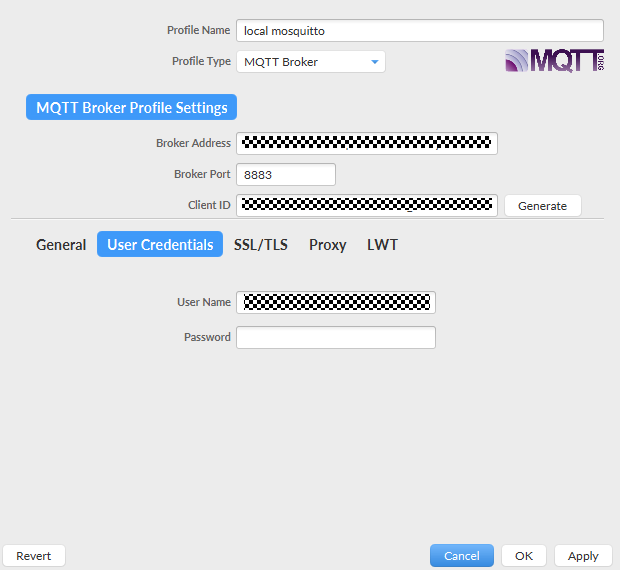
Parameter
Description
User Name
Enter the device ID obtained in 2.
Password
Leave it blank when the X.509 certificate is used for authentication.
- Click SSL/TLS, set authentication parameters, and click Apply. Select Enable SSL/TLS, select Self signed certificates, and enter the certificate information.
Figure 15 Setting SSL/TLS parameters
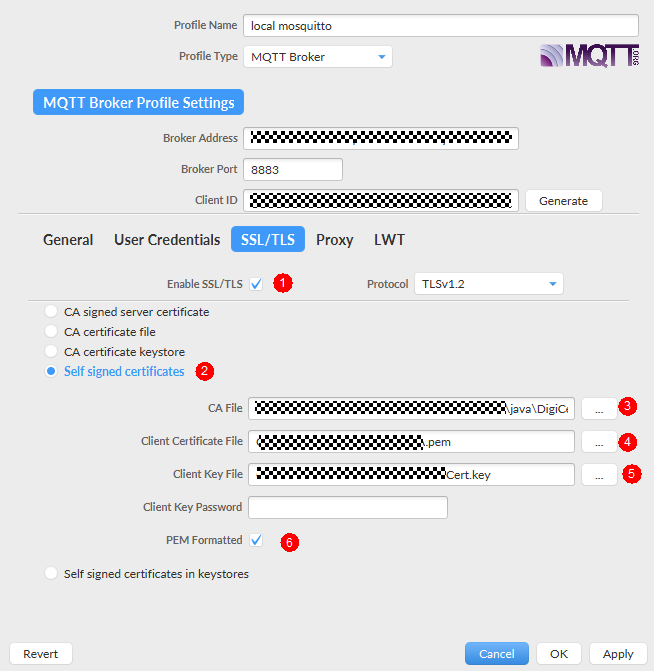

- CA File: corresponding CA certificate. Download the certificate from Obtaining Resources and load the PEM certificate.
- Client Certificate File: device certificate (deviceCert.pem).
- Client Key File: private key (deviceCert.key) of the device.
- Click Connect. If the device authentication is successful, the device is displayed online on the platform.
Figure 16 Device list - Device online status

APIs
Feedback
Was this page helpful?
Provide feedbackThank you very much for your feedback. We will continue working to improve the documentation.See the reply and handling status in My Cloud VOC.
For any further questions, feel free to contact us through the chatbot.
Chatbot


