Device SDK Access
Huawei Cloud IoTDA, a platform for access and management of a large number of devices, allows you to connect your physical devices to the cloud, where you can collect device data and deliver commands to devices for remote control. It can also work with other Huawei Cloud services to help you quickly develop IoT solutions.
This section describes how to efficiently connect devices to IoTDA using the Java SDK, with a custom gas meter product model as an example. It covers developing SDK code for reporting device data (messages and properties) and delivering commands for remote configuration and control, as well as integrating the code into devices.

Device SDKs are not exclusive to a specific product model. You can customize the code based on the site requirements.
Device SDKs
|
Resource Package |
Description |
Download Link |
|---|---|---|
|
IoT Device Java SDK |
The demo provides the code sample for calling the SDK APIs. For details, see |
|
|
IoT Device C SDK for Linux/Windows |
The demo provides the code sample for calling the SDK APIs. For details, see |
|
|
IoT Device C# SDK |
The demo provides the code sample for calling the SDK APIs. For details, see |
|
|
IoT Device Android SDK |
The demo provides the code sample for calling the SDK APIs. |
|
|
IoT Device Go SDK (Community Edition) |
The demo provides the code sample for calling the SDK APIs. |
|
|
IoT Device Python SDK |
The demo provides the code sample for calling the SDK APIs. |
|
|
IoT Device Tiny C SDK for Linux/Windows |
The demo provides the code sample for calling the SDK APIs. |
|
|
IoT Device ArkTS (OpenHarmony) SDK |
The demo provides the code sample for calling the SDK APIs. |
|
Function |
C |
Java |
C# |
Android |
Go |
Python |
C Tiny |
ArkTS |
|---|---|---|---|---|---|---|---|---|
|
Property reporting |
√ |
√ |
√ |
√ |
√ |
√ |
√ |
√ |
|
Message reporting and delivery |
√ |
√ |
√ |
√ |
√ |
√ |
√ |
√ |
|
Event reporting and delivery |
√ |
√ |
√ |
√ |
√ |
√ |
√ |
× |
|
Command delivery and response |
√ |
√ |
√ |
√ |
√ |
√ |
√ |
√ |
|
Device shadow |
√ |
√ |
√ |
√ |
√ |
√ |
√ |
√ |
|
OTA upgrade |
√ |
√ |
√ |
√ |
√ |
√ |
√ |
× |
|
Bootstrap |
√ |
√ |
√ |
√ |
√ |
√ |
√ |
× |
|
Time synchronization |
√ |
√ |
√ |
√ |
√ |
√ |
√ |
× |
|
Gateway and child device management |
√ |
√ |
√ |
√ |
√ |
√ |
√ |
× |
|
Device-side rule engine |
√ |
× |
√ |
× |
× |
× |
√ |
× |
|
Remote secure shell (SSH) |
√ |
× |
√ |
× |
× |
× |
× |
× |
|
Anomaly detection |
√ |
× |
√ |
× |
× |
× |
× |
× |
|
Device-cloud secure communication (soft bus) |
√ |
× |
√ |
× |
× |
× |
× |
× |
|
Machine-to-machine (M2M) function |
√ |
× |
√ |
× |
× |
× |
× |
× |
|
Generic-protocol access |
√ |
√ |
√ |
√ |
× |
√ |
× |
× |
Prerequisites
- Development environment: The integrated environment (IntelliJ IDEA) of Java has been installed, and the environment such as Maven has been configured.
- This example uses the MQTTS protocol on the device.
- You have registered a Huawei Cloud account and completed real-name authentication.
- You have subscribed to IoTDA on the console.
Service Flow
Use the IoT Device Java SDK to connect devices to IoTDA and report data and deliver commands.
- Product creation: Create an MQTT product.
- Product model development: Create a product model for a gas meter on the platform that allows for remote reporting of readings and the delivery of configurations and commands.
- Device registration: Register a device using the MQTT protocol.
- Access to Huawei Cloud via Java SDK: Download the SDK, adapt the code, and use the Java SDK to activate the device registered on the platform.
- Message reporting: Adapt the code and use the Java SDK to report messages to the platform.
- Property reporting: Adapt the code and use the Java SDK to report device properties to the platform.
- Command delivery: Adapt the code and deliver commands on the console to set device properties remotely.
- Java SDK integration and running: Package the adapted SDK into a runnable file, import the file to the IoT device, and run the file to connect the device to IoTDA.
Creating a Product
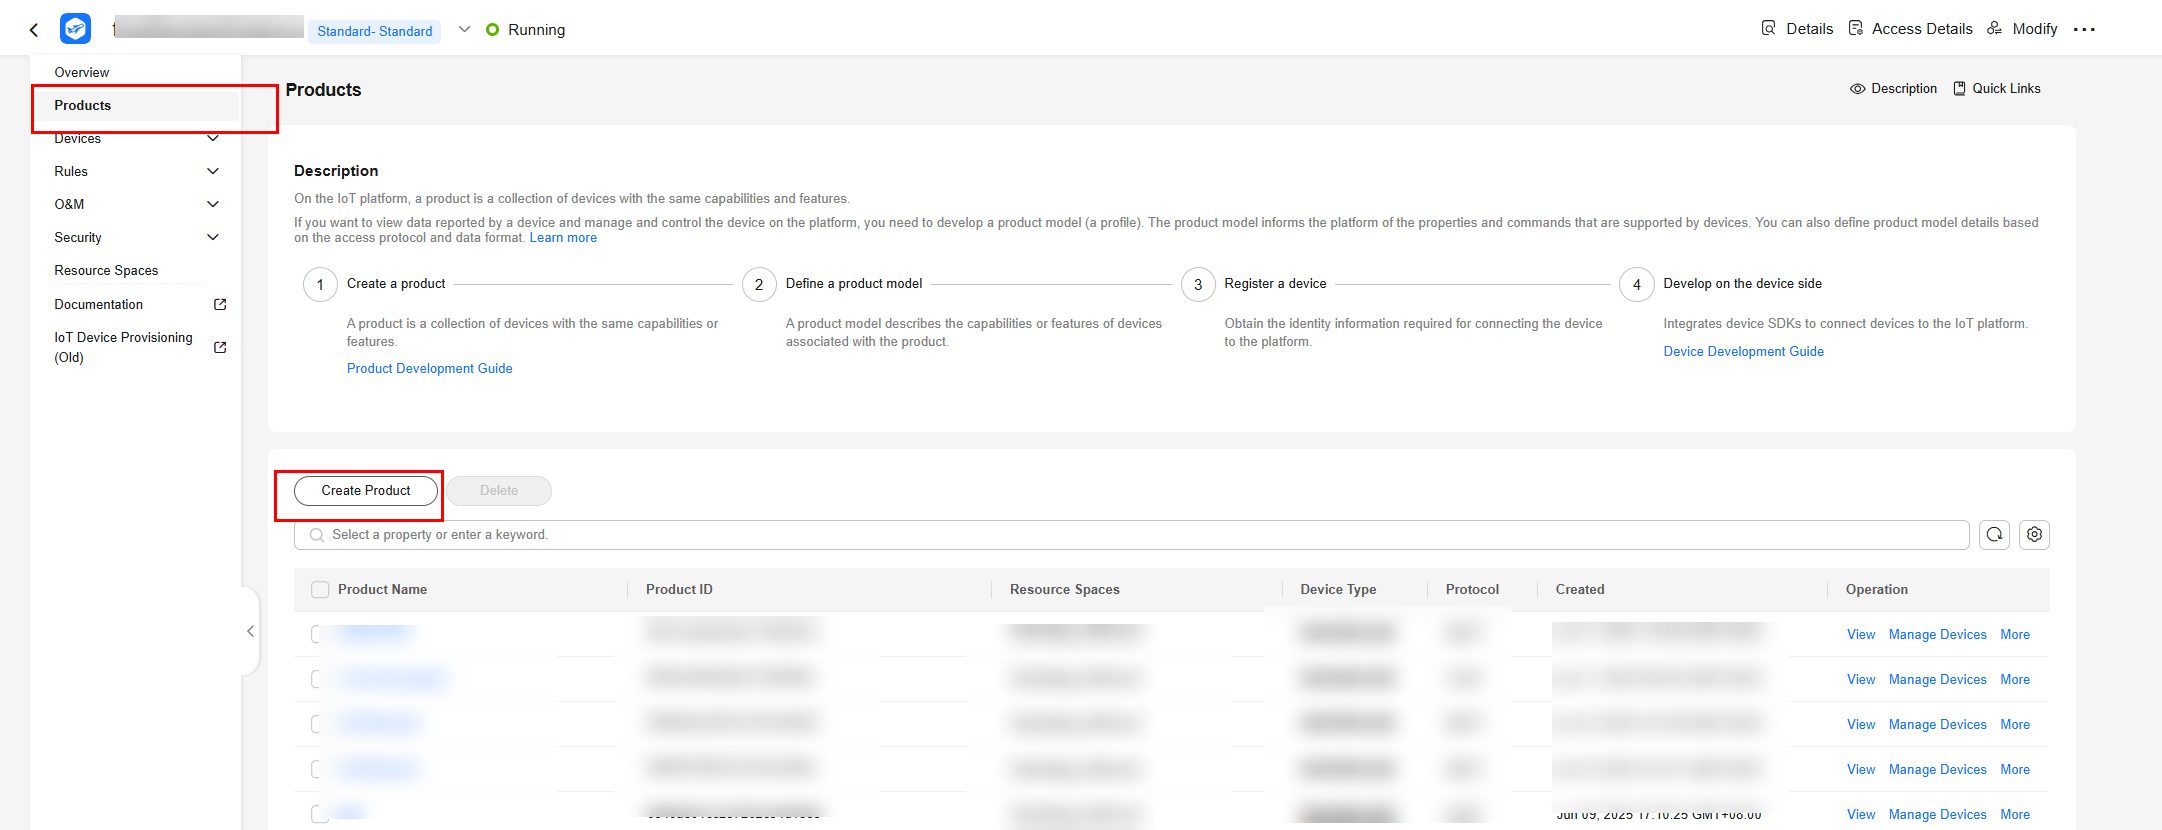
- Access the IoTDA service page and click Access Console. Click the target instance card. Choose Products in the navigation pane and click Create Product.
Figure 1 Creating a product
- Create a product whose protocol type is MQTT and device type is custom gas meter. Set parameters by referring to the following table and click OK.
Table 3 Parameters for creating a product Resource Space
Select the default resource space.
Product Name
Customize a product name, for example, Gas Meter.
Protocol
Select MQTT.
Data Type
Select JSON.
Device Type Selection
Select Custom.
Device Type
Customize a device type, for example, Custom Gas Meter.
Figure 2 Creating an MQTT product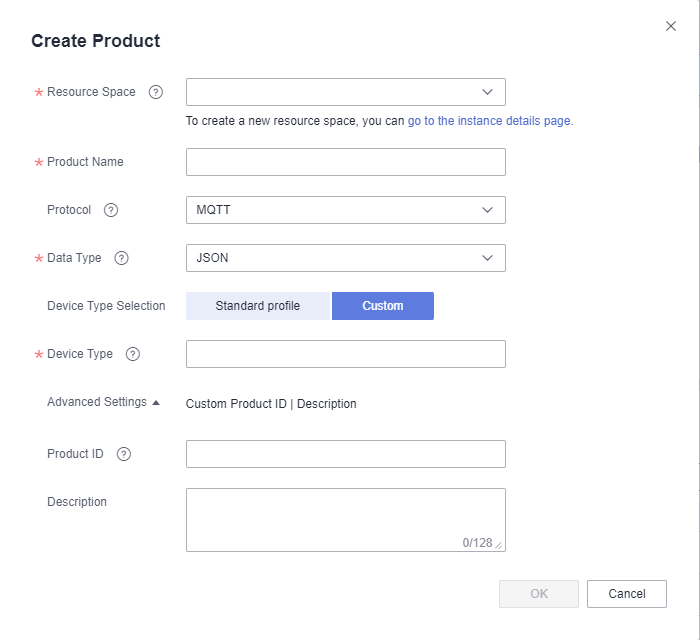
Developing a Product Model
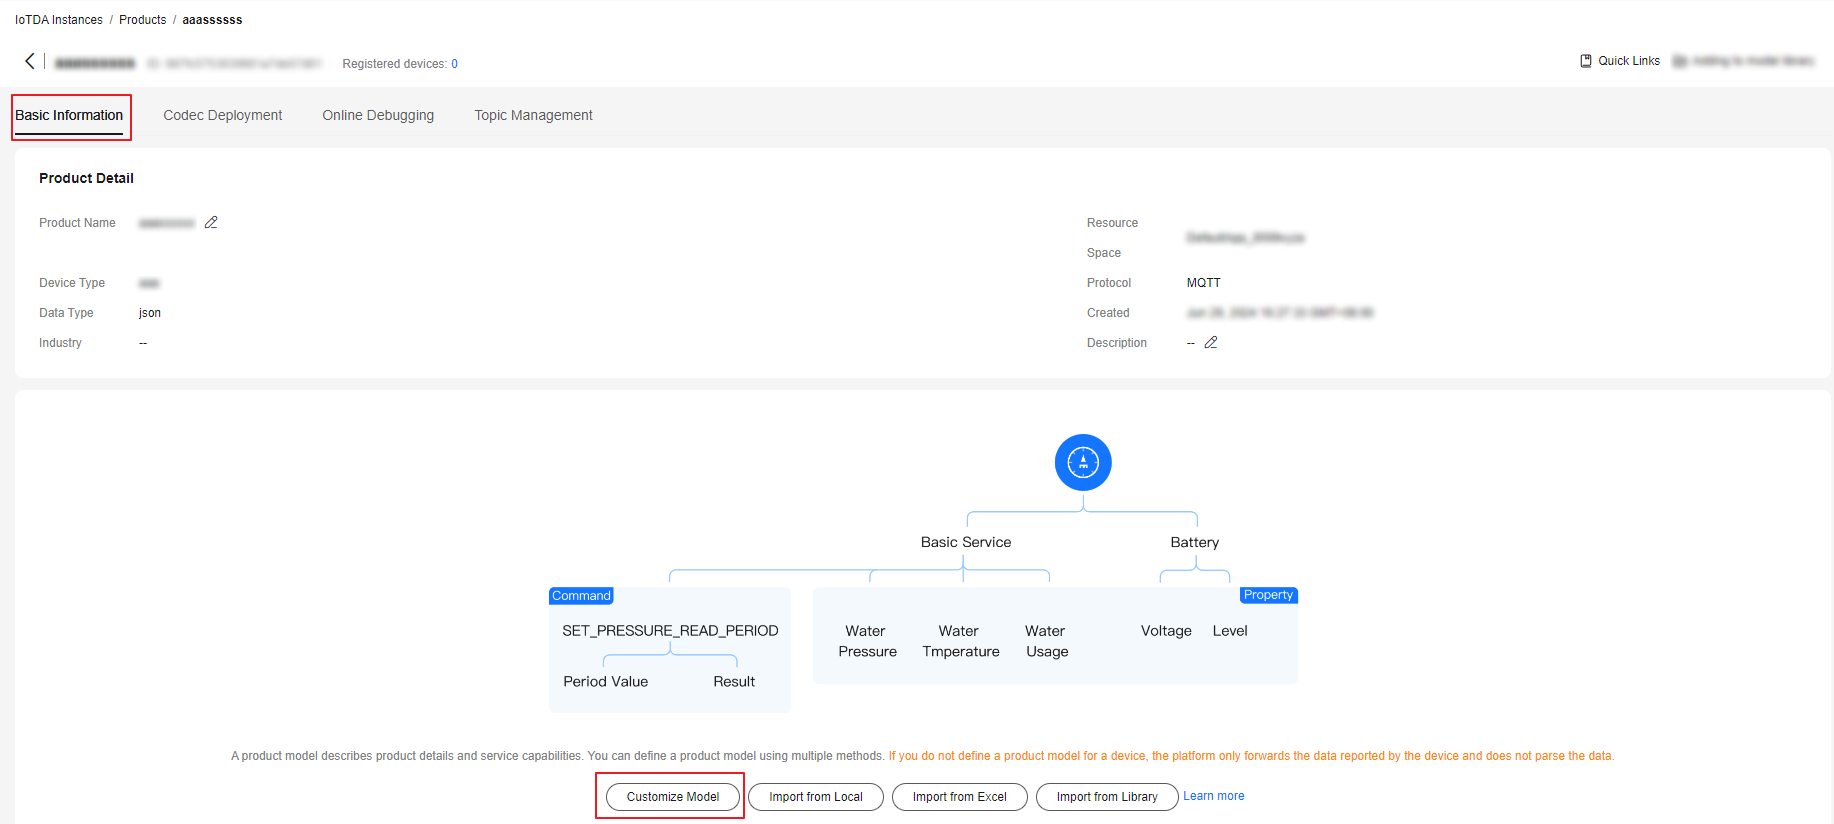
- Click the created product to access its details page.
- On the Basic Information tab page, click Customize Model to add services of the product.
Figure 3 Custom model - MQTT
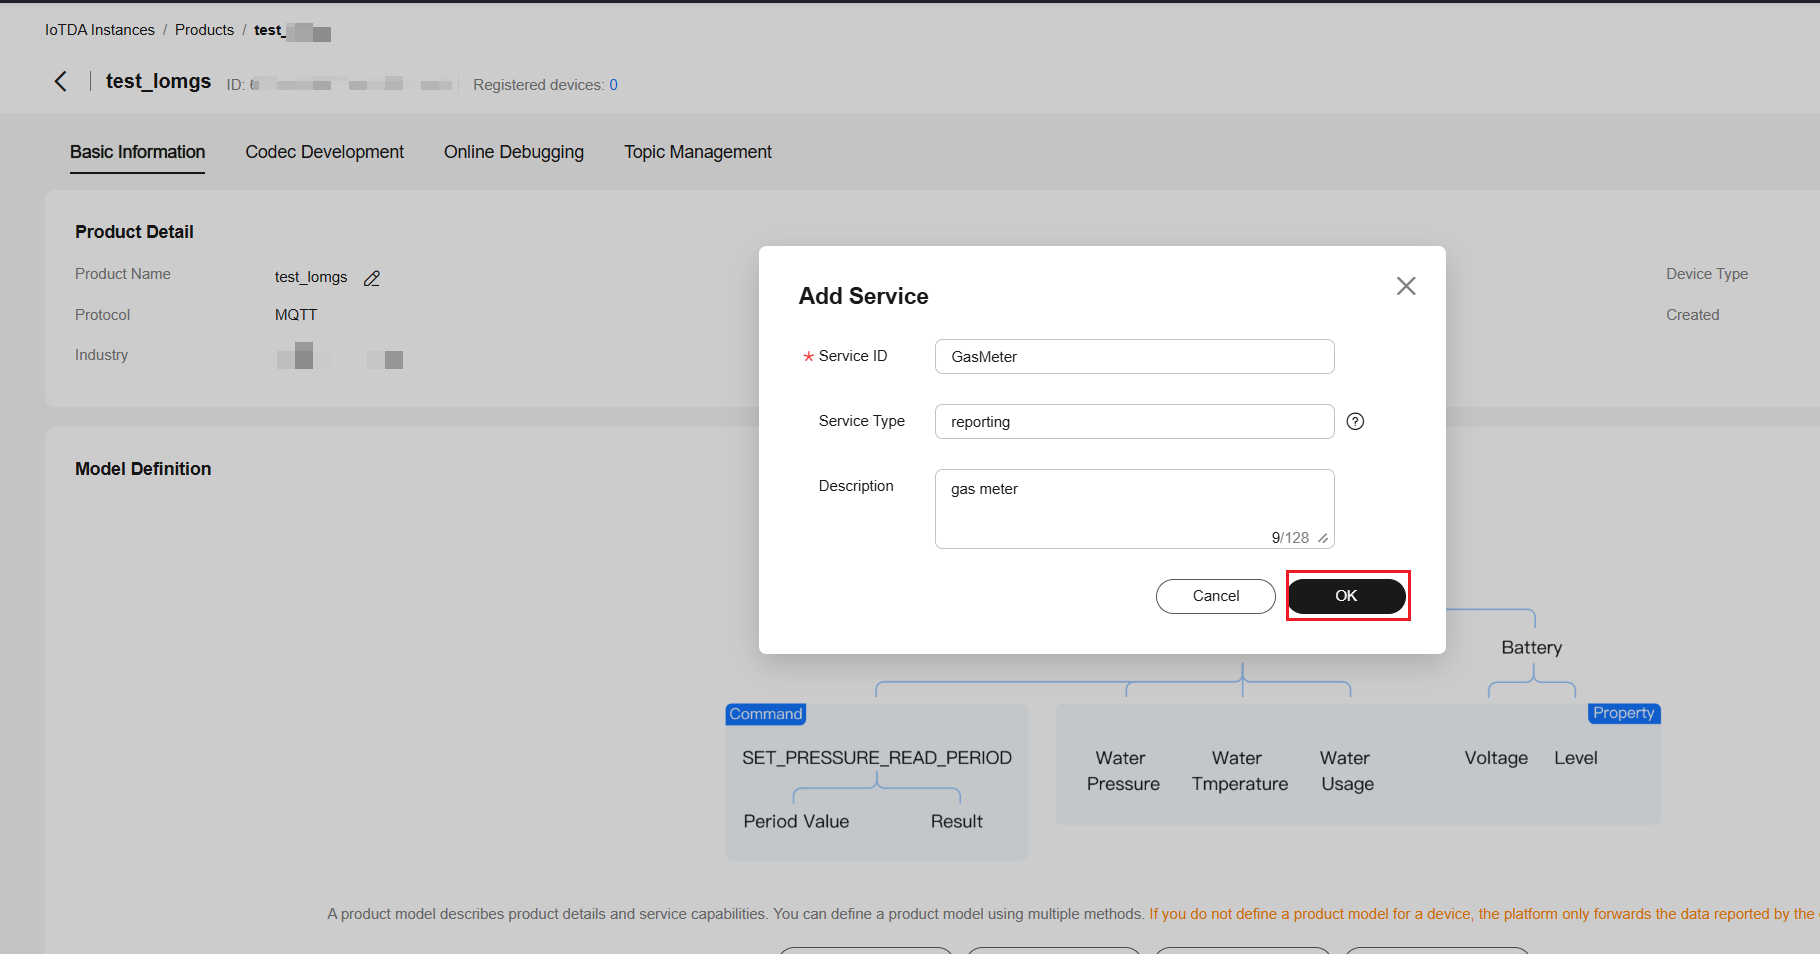
- Add the service type GasMeter. On the displayed Add Service page, enter the service ID, service type, and service description, and click OK.
Figure 4 Adding a service - GasMeter
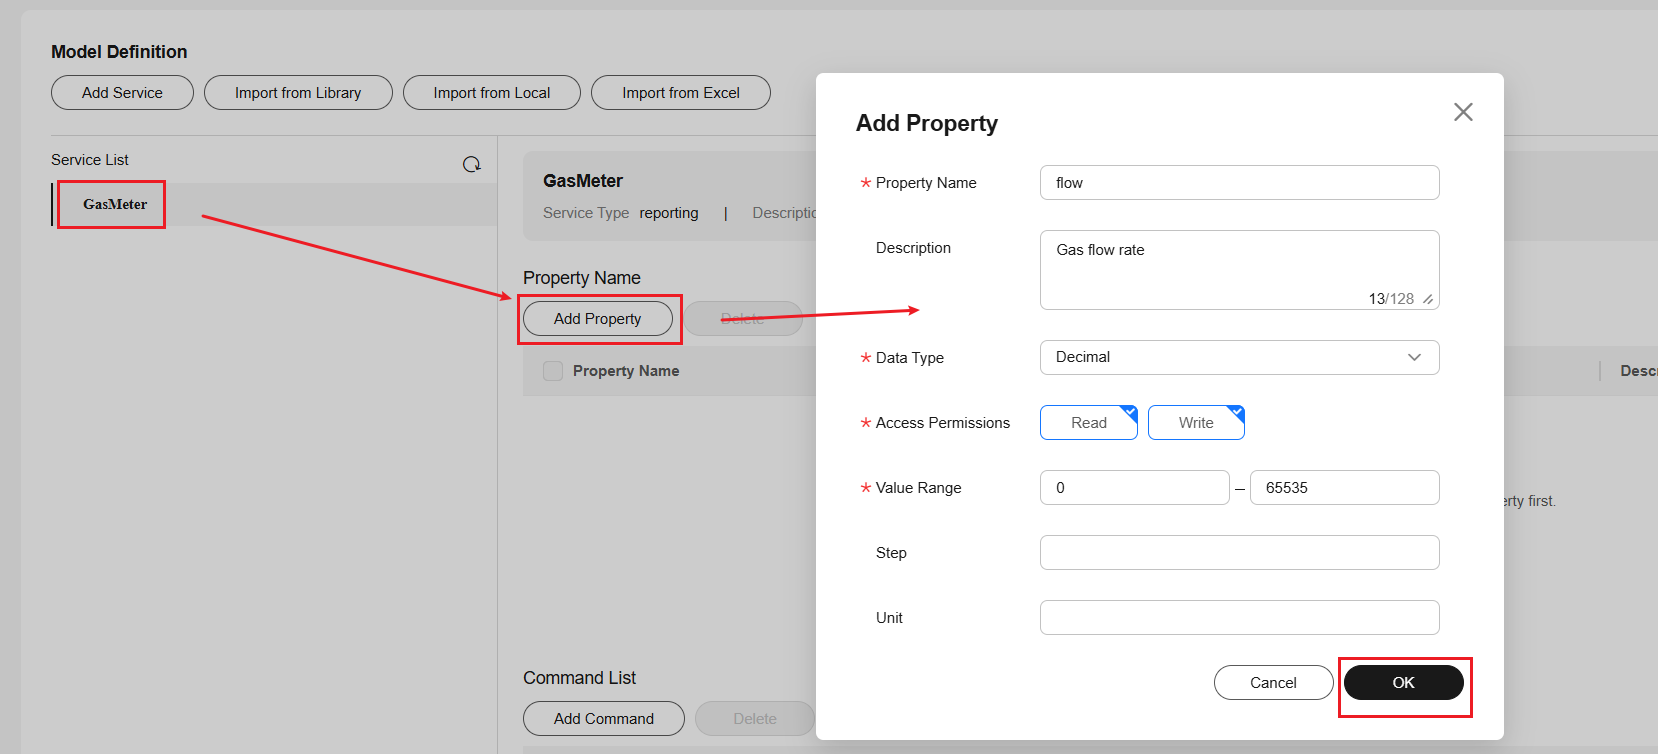
- Choose GasMeter in the service list, click Add Property, set parameters according to the following figure, and click OK.
Figure 5 Adding a property - flow
- Add a command model.
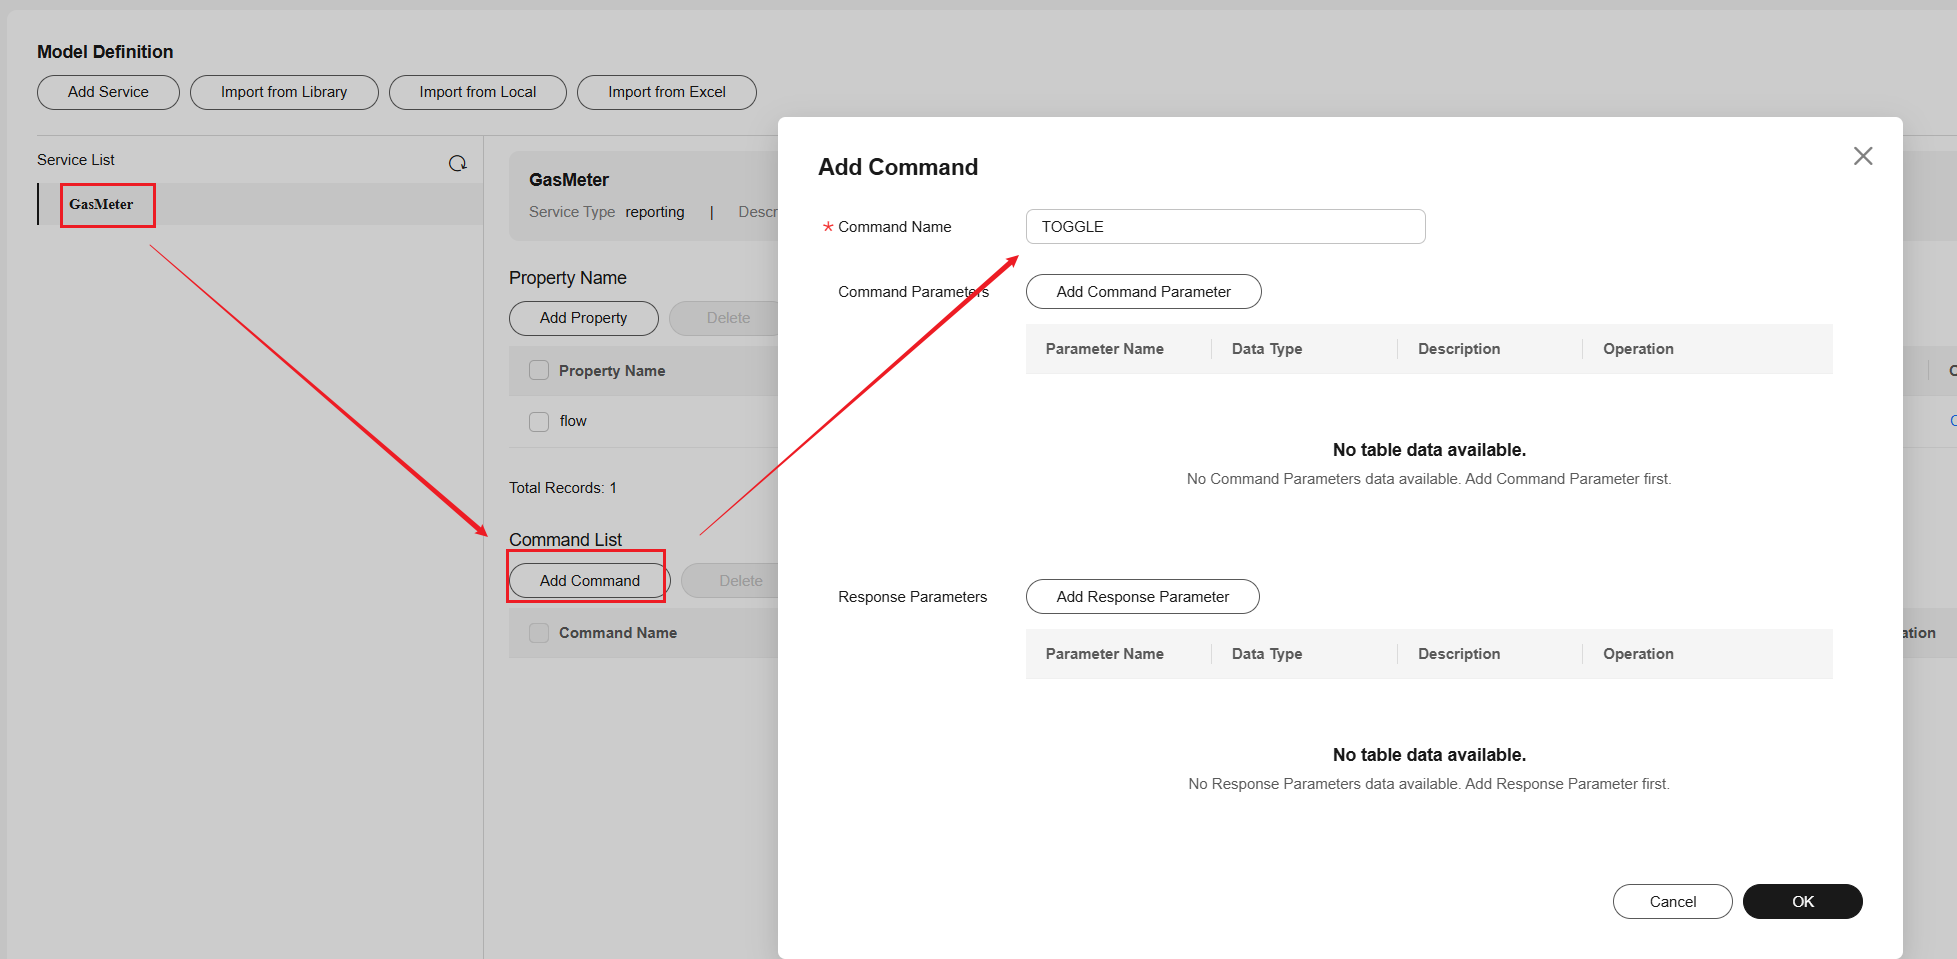
- Choose GasMeter in the service list, click Add Command, and set the command name to TOGGLE.
Figure 6 Adding a command - TOGGLE
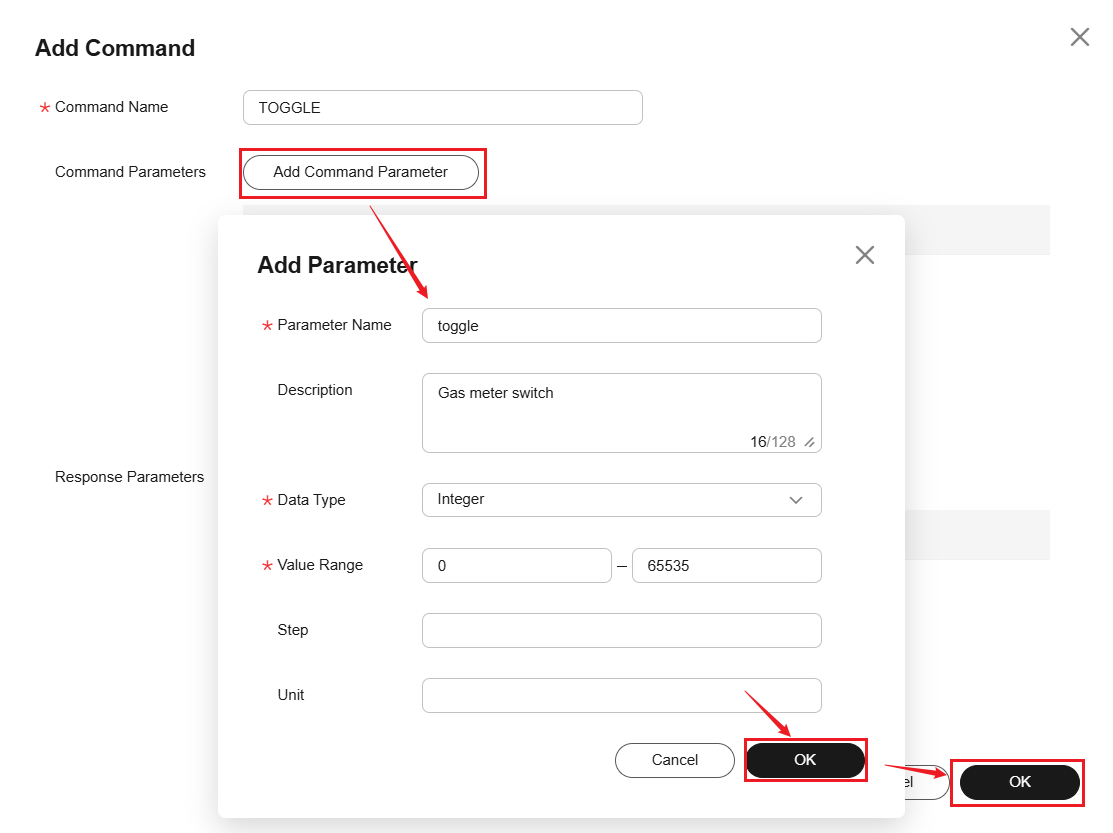
- On the displayed page, click Add Command Parameter, set parameters according to the following figure, and click OK.
Figure 7 Adding a command - toggle
- Choose GasMeter in the service list, click Add Command, and set the command name to TOGGLE.
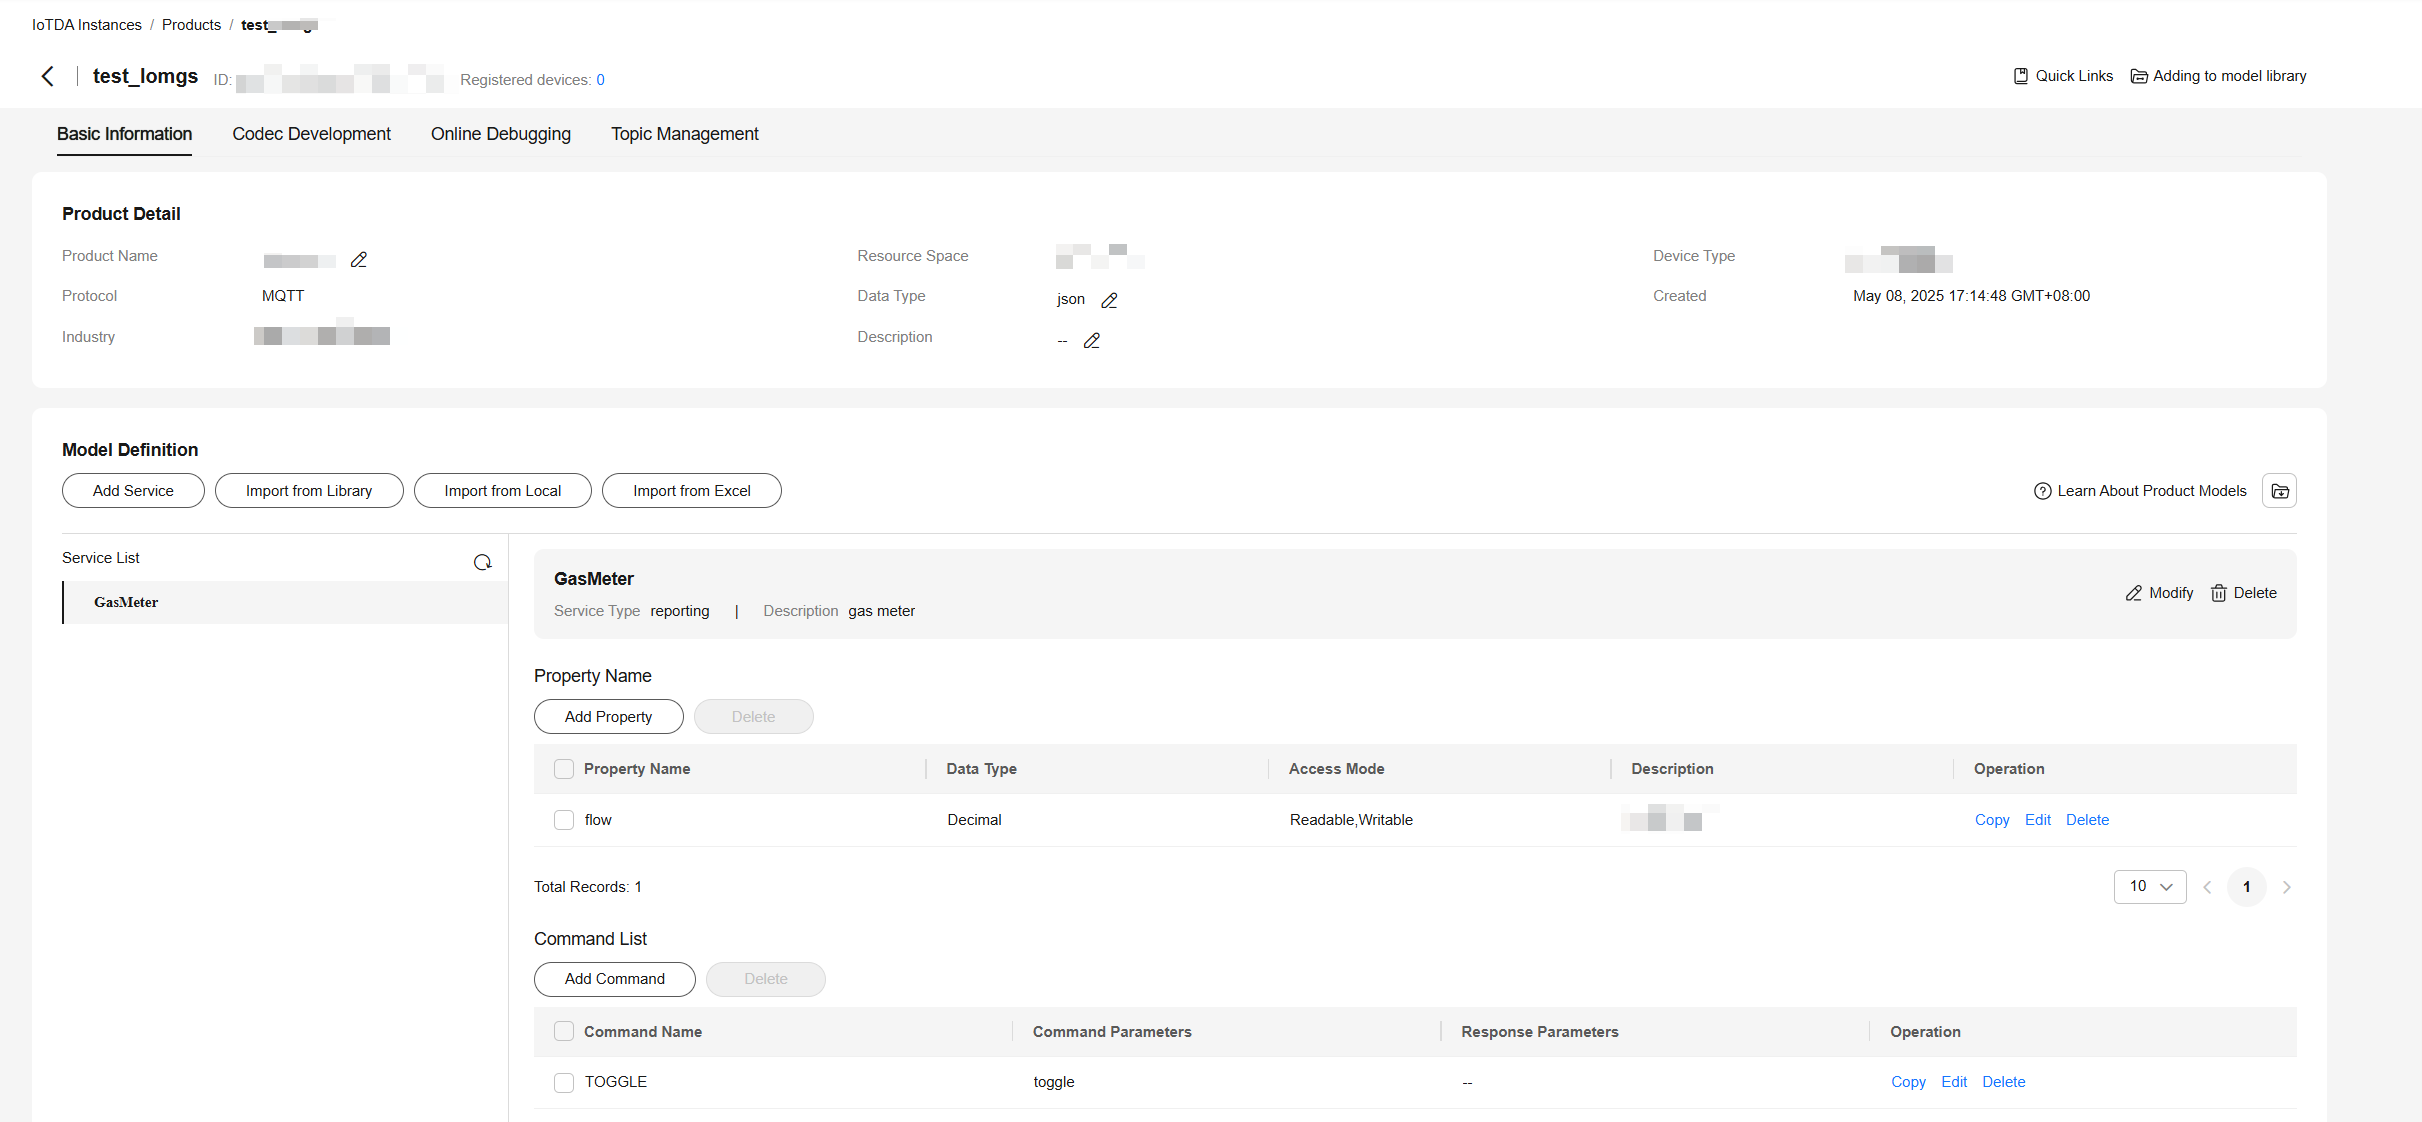
- Check the product model details.
Figure 8 Product model - gas meters
Registering a Device
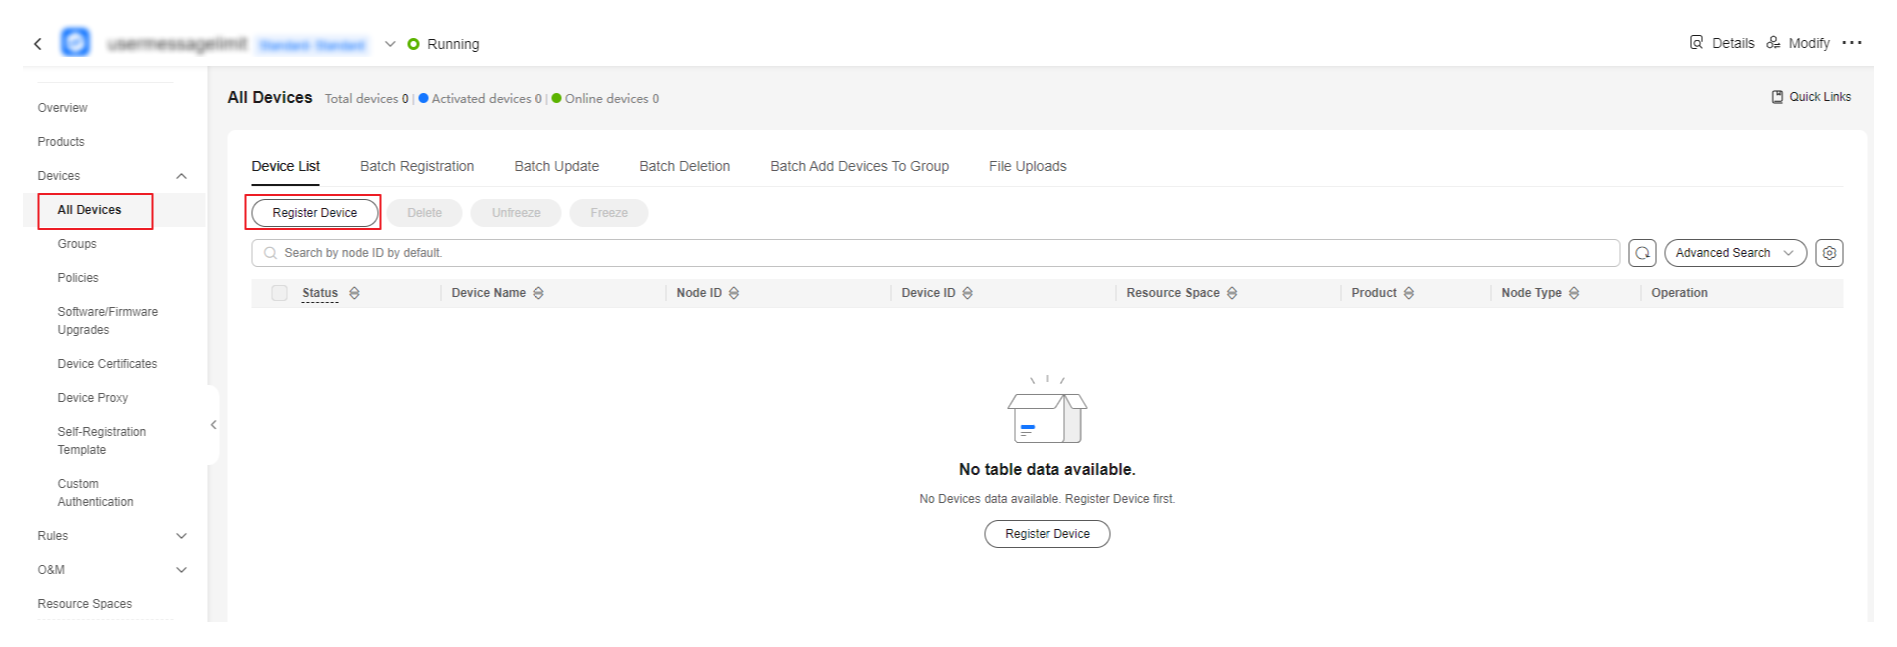
- On the IoTDA console, click the target instance card. In the navigation pane, choose Devices > All Devices. Click Register Device.
Figure 9 Registering a device
- Set the parameters as prompted and click OK.
Parameter
Description
Resource Space
Ensure that the device and its associated product belong to the same resource space.
Product
Select a corresponding product.
Node ID
Customize a unique physical identifier for the device. Enter 4 to 64 characters. Use only letters, digits, underscores (_), and hyphens (-).
Device Name
Customize the device name.
Authentication Type
Select Secret.
Secret
If you do not set this parameter, IoTDA automatically generates a value.
Figure 10 Registering a device - MQTT
- After the device is registered, the platform automatically generates a device ID and secret. Save the device ID and secret for device access.
Figure 11 Device - Device registered

Accessing Huawei Cloud Using Java SDK
You can use IntelliJ IDEA (IntelliJ IDEA 2023 Community Edition is used as an example) to write and debug code. Ensure that the IDEA environment is normal and Maven is available. For details about the Java SDK usage and APIs, see README.

You are advised to adapt the SDK code and activate the device on the computer, and then import the modified code to the device for integration.
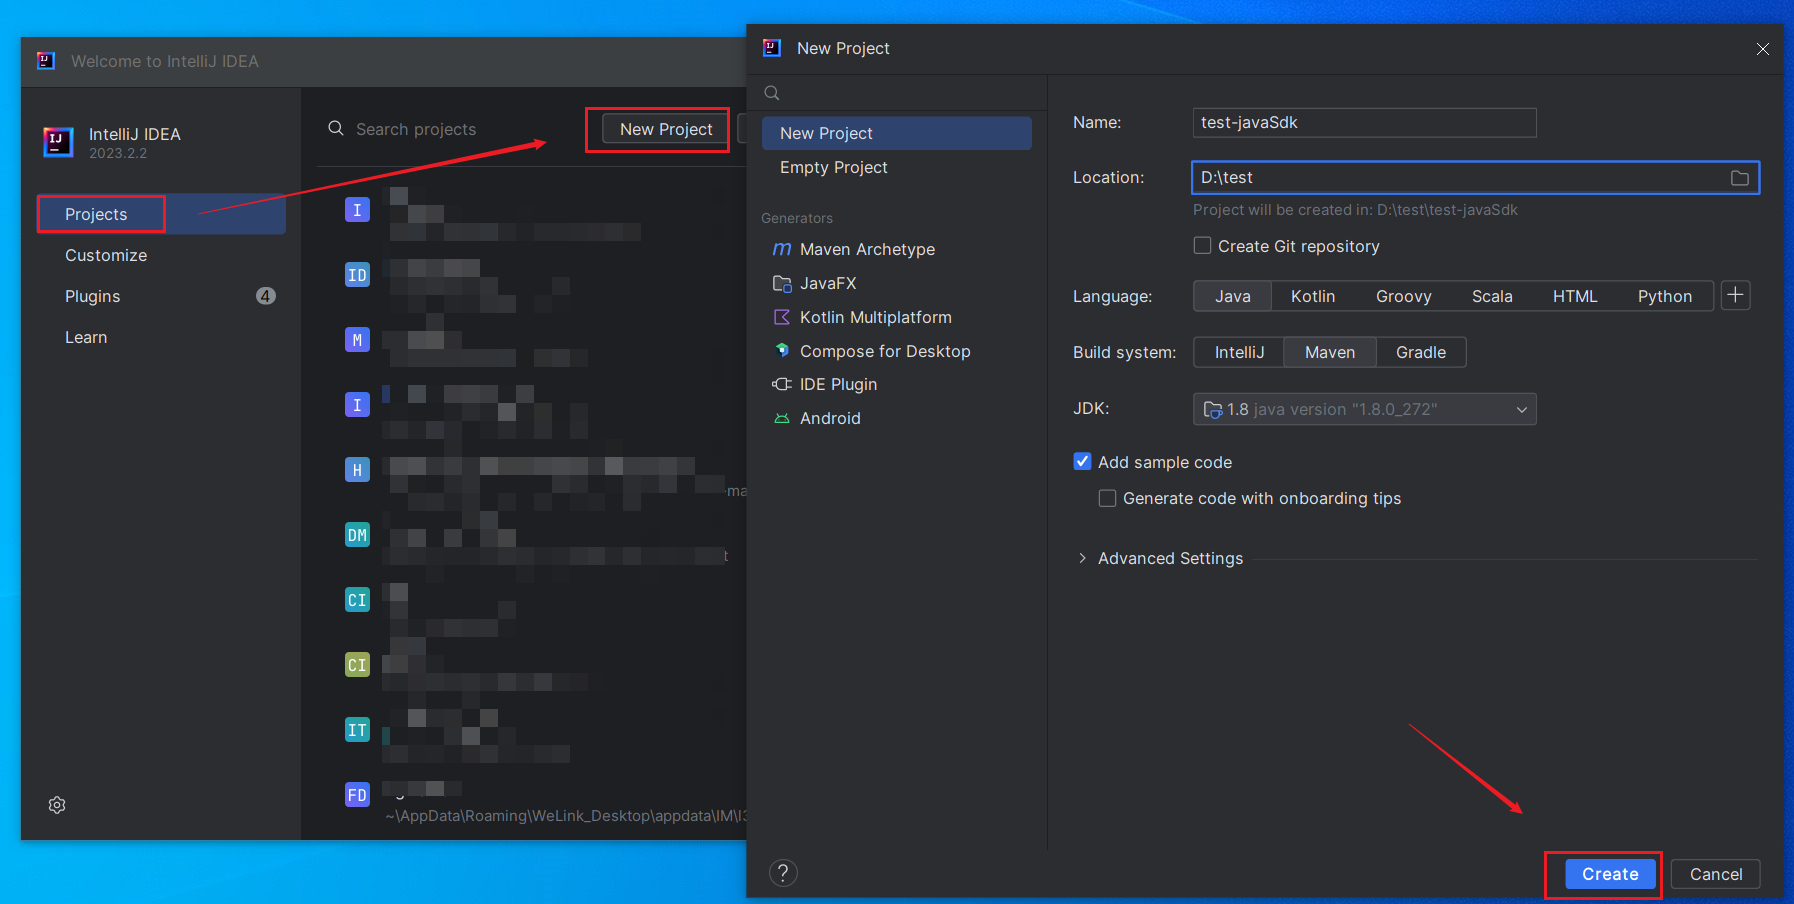
- Create a project. Open IntelliJ IDEA and click New Project. On the displayed page, enter the project name and project path, set Language to Java, set Build System to Maven, and click Create.
Figure 12 Creating a Java project
- Add the Maven reference. After the project is created, the pom.xml and Main.java files are automatically generated in the project. Open the pom.xml file and add the Maven reference of the Java SDK.
<dependencies>
    <dependency>
        <groupId>com.huaweicloud</groupId>
        <artifactId>iot-device-sdk-java</artifactId>
        <version>LATEST</version>
    </dependency>
</dependencies>
Figure 13 Adding the Maven reference of the Java SDK
- Write the reference code to establish a connection with the device.
- Open the Main.java file and copy the following code to the file:
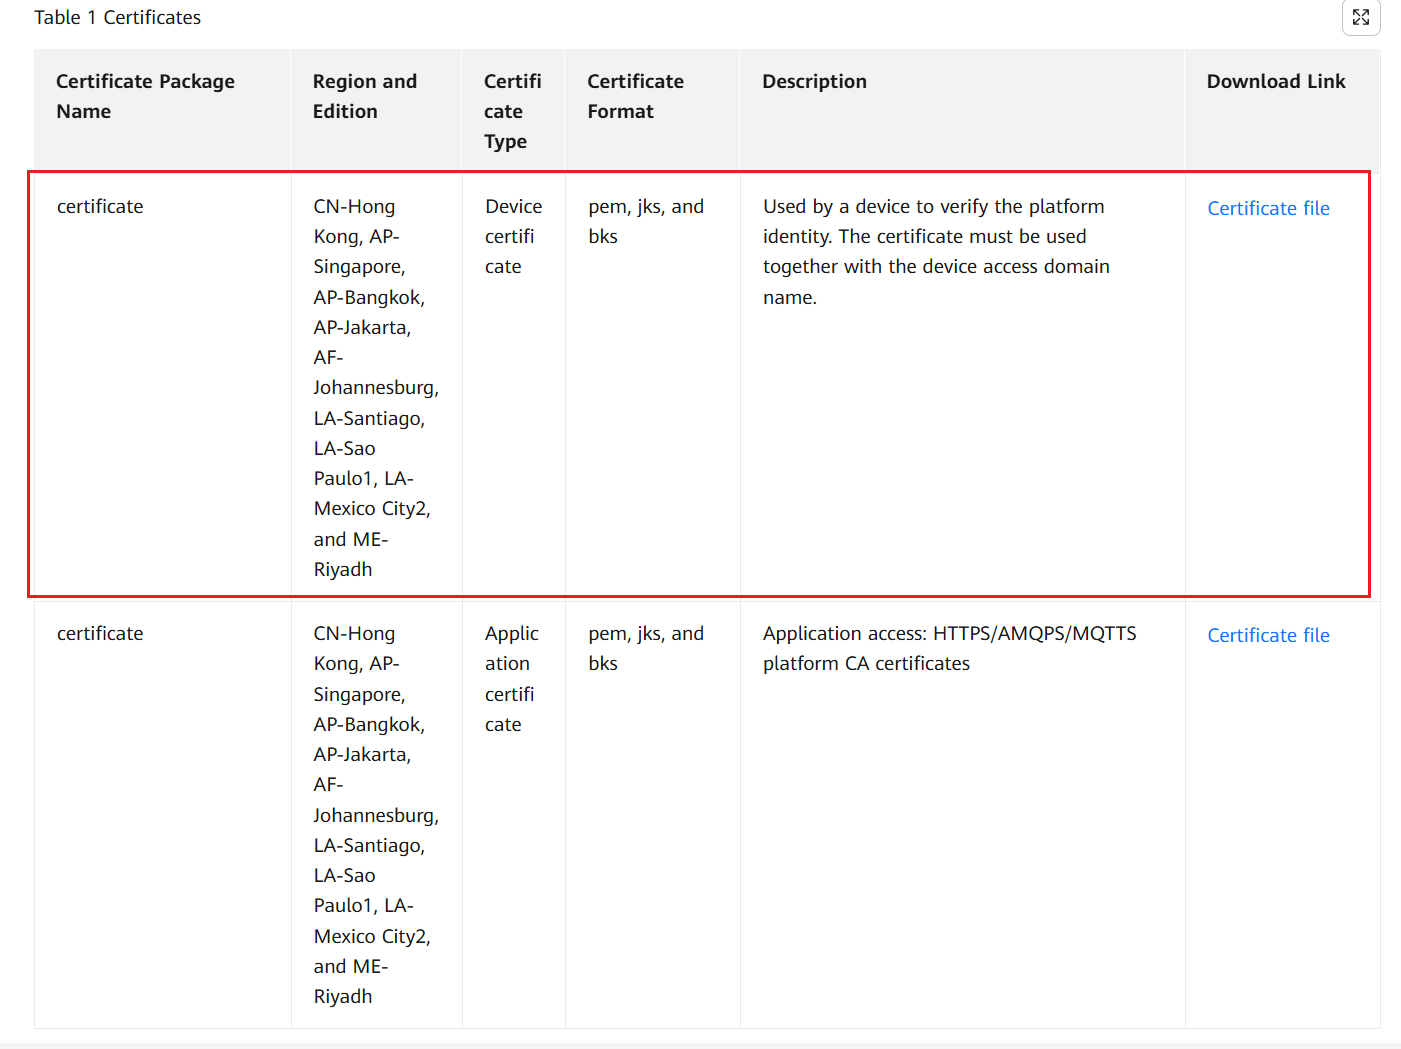
import com.huaweicloud.sdk.iot.device.IoTDevice; import java.io.File; import java.io.IOException; import java.io.InputStream; import java.nio.file.Files; import static java.nio.file.StandardCopyOption.REPLACE_EXISTING; public class Main { private static final String IOT_ROOT_CA_RES_PATH = "ca.jks"; private static final String IOT_ROOT_CA_TMP_PATH = "huaweicloud-iotda-tmp-" + IOT_ROOT_CA_RES_PATH; public static void main(String[] args) throws InterruptedException, IOException { // Load the CA certificate of the IoT platform for server verification. File tmpCAFile = new File(IOT_ROOT_CA_TMP_PATH); try (InputStream resource = Main.class.getClassLoader().getResourceAsStream(IOT_ROOT_CA_RES_PATH)) { Files.copy(resource, tmpCAFile.toPath(), REPLACE_EXISTING); } // Create a device and initialize it. Replace the access address with your own address. IoTDevice device = new IoTDevice("ssl://xxx.st1.iotda-device.cn-north-4.myhuaweicloud.com:8883", "5e06bfee334dd4f33759f5b3_demo", "mysecret", tmpCAFile); if (device.init() != 0) { return; } } } - Add a certificate file. Obtain the CA certificate on the device side based on your region and change the certificate name to ca.jks. Save the certificate to the resources directory of the project.
Figure 14 Obtaining the CA file on the device side
- Modify access information. Change the device access address, device ID, and device secret to those obtained in Registering a Device.
Figure 15 Modifying device connection parameters
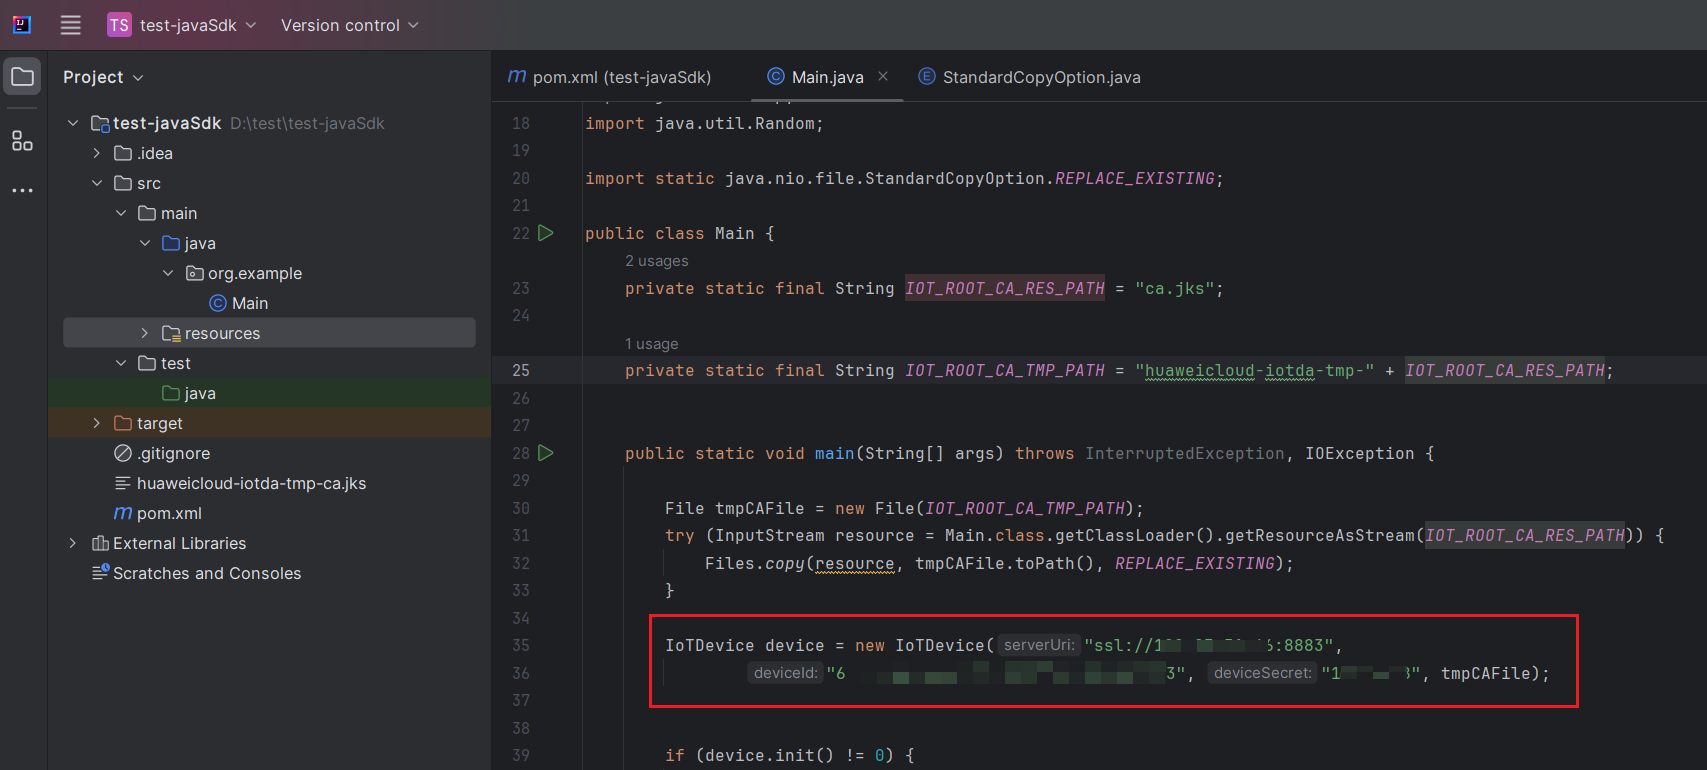 Figure 16 Obtaining access information
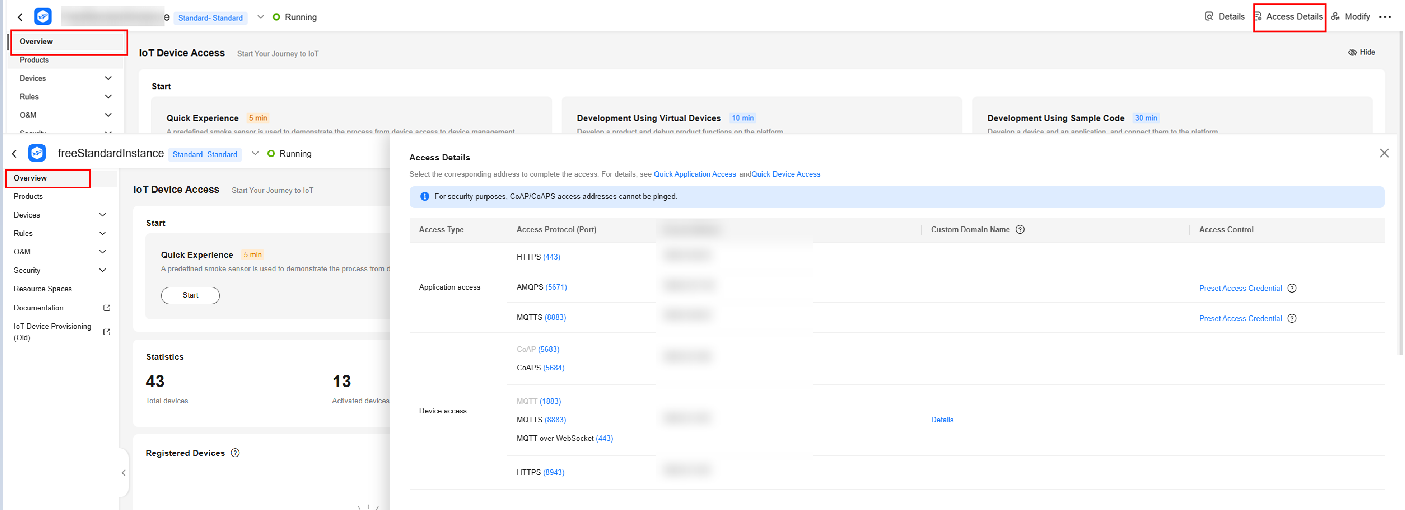

- Select the MQTTS access address and copy it to the code. To use the MQTT protocol, change ssl://xxx.st1.iotda-device.cn-north-4.myhuaweicloud.com:8883 to tcp://xxx.st1.iotda-device.cn-north-4.myhuaweicloud.com:1883.
- When you create a device, the system displays a dialog box asking you whether to save the device ID and key. If you choose to save, the device ID and key are saved as a file on your computer.
- Open the Main.java file and copy the following code to the file:
- Write and run the code. Click the run button in IDEA. The device is online on the platform.
Figure 17 Running code in IDEA
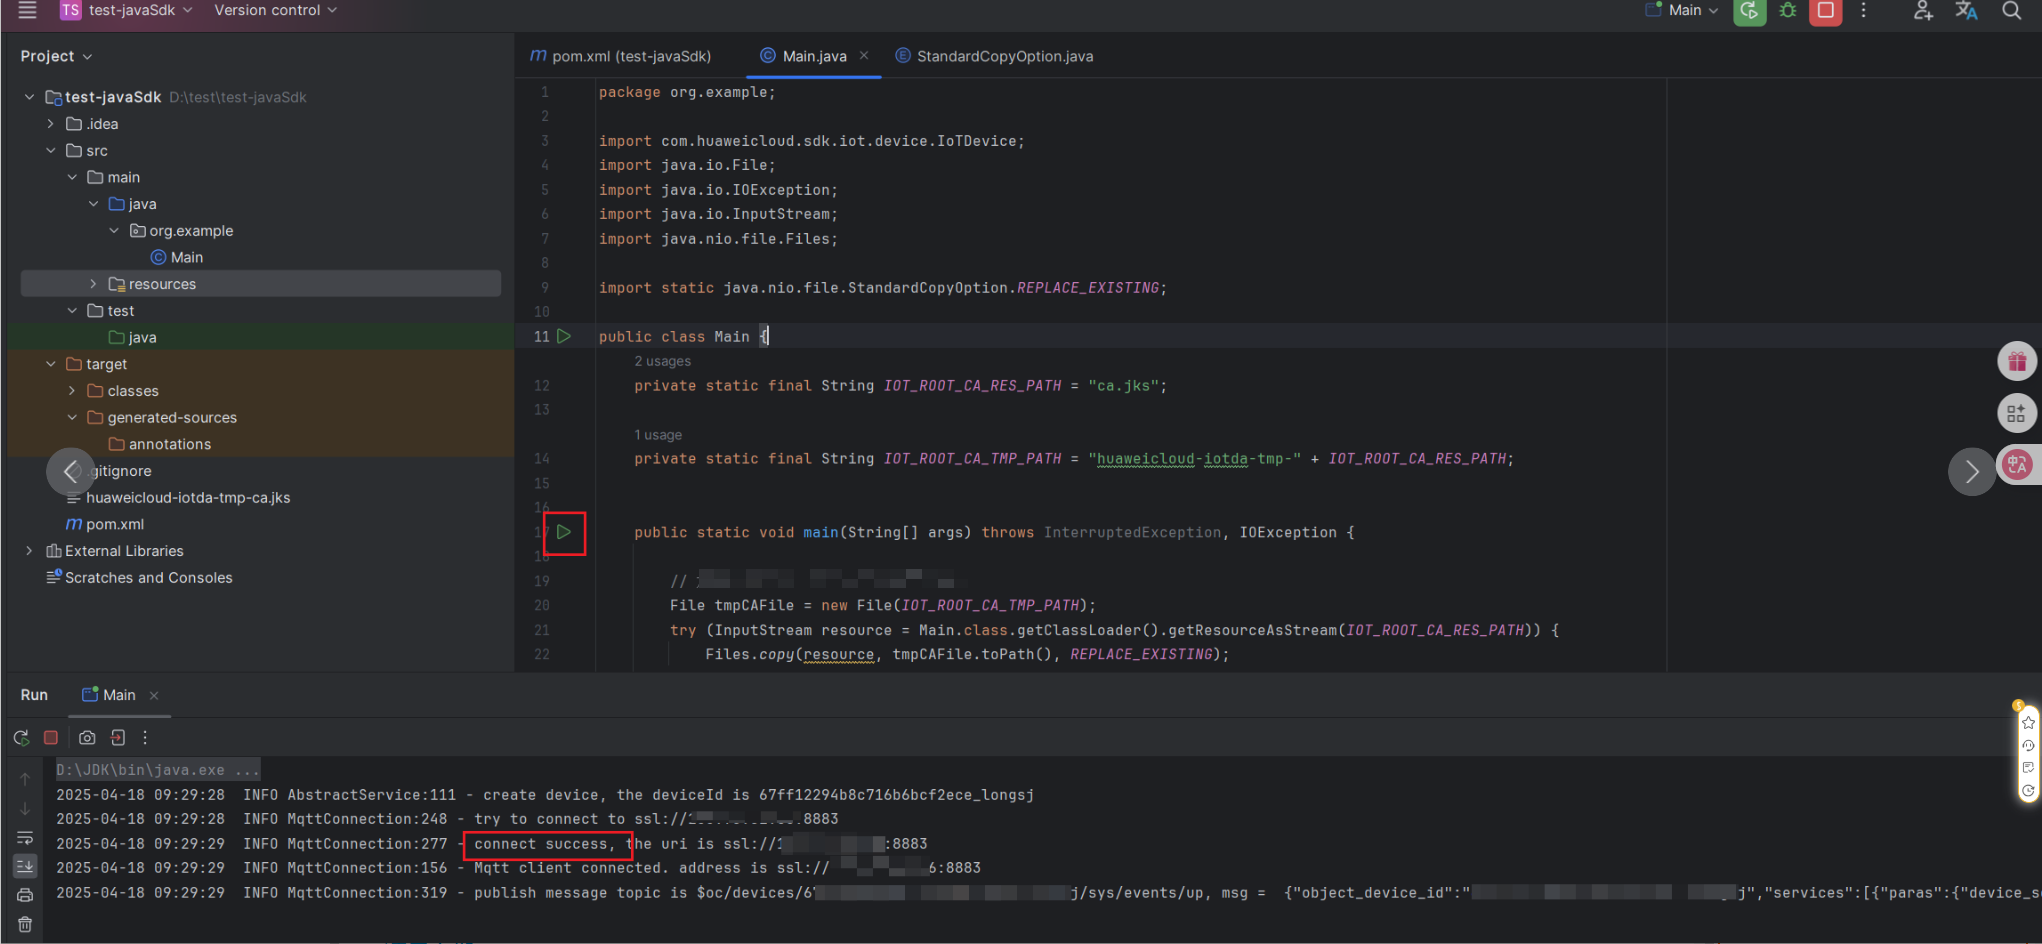 Figure 18 Device online status

The SDK automatically reconnects to the device if the device is disconnected due to network problems.
Reporting a Message
Develop the message reporting function by referring to the guide for message reporting and delivery.
- Copy the following code to the Main.java file of the new project. Put the code after the device.init() method, which indicates that the connection is successfully established.
// pubBody indicates the message to be reported. It will be edited into the standard format for reporting data.
// The default topic reported by the reportDeviceMessage method is $oc/devices/{device_id}/sys/messages/up.
String pubBody = "hello";
device.getClient().reportDeviceMessage(new DeviceMessage(pubBody), new ActionListener() {
    @Override
    public void onSuccess(Object context) {
        System.out.println("reportDeviceMessage ok");
    }
    @Override
    public void onFailure(Object context, Throwable var2) {
        System.out.println("reportDeviceMessage fail: " + var2);
    }
});
Figure 19 Reporting messages - IDEA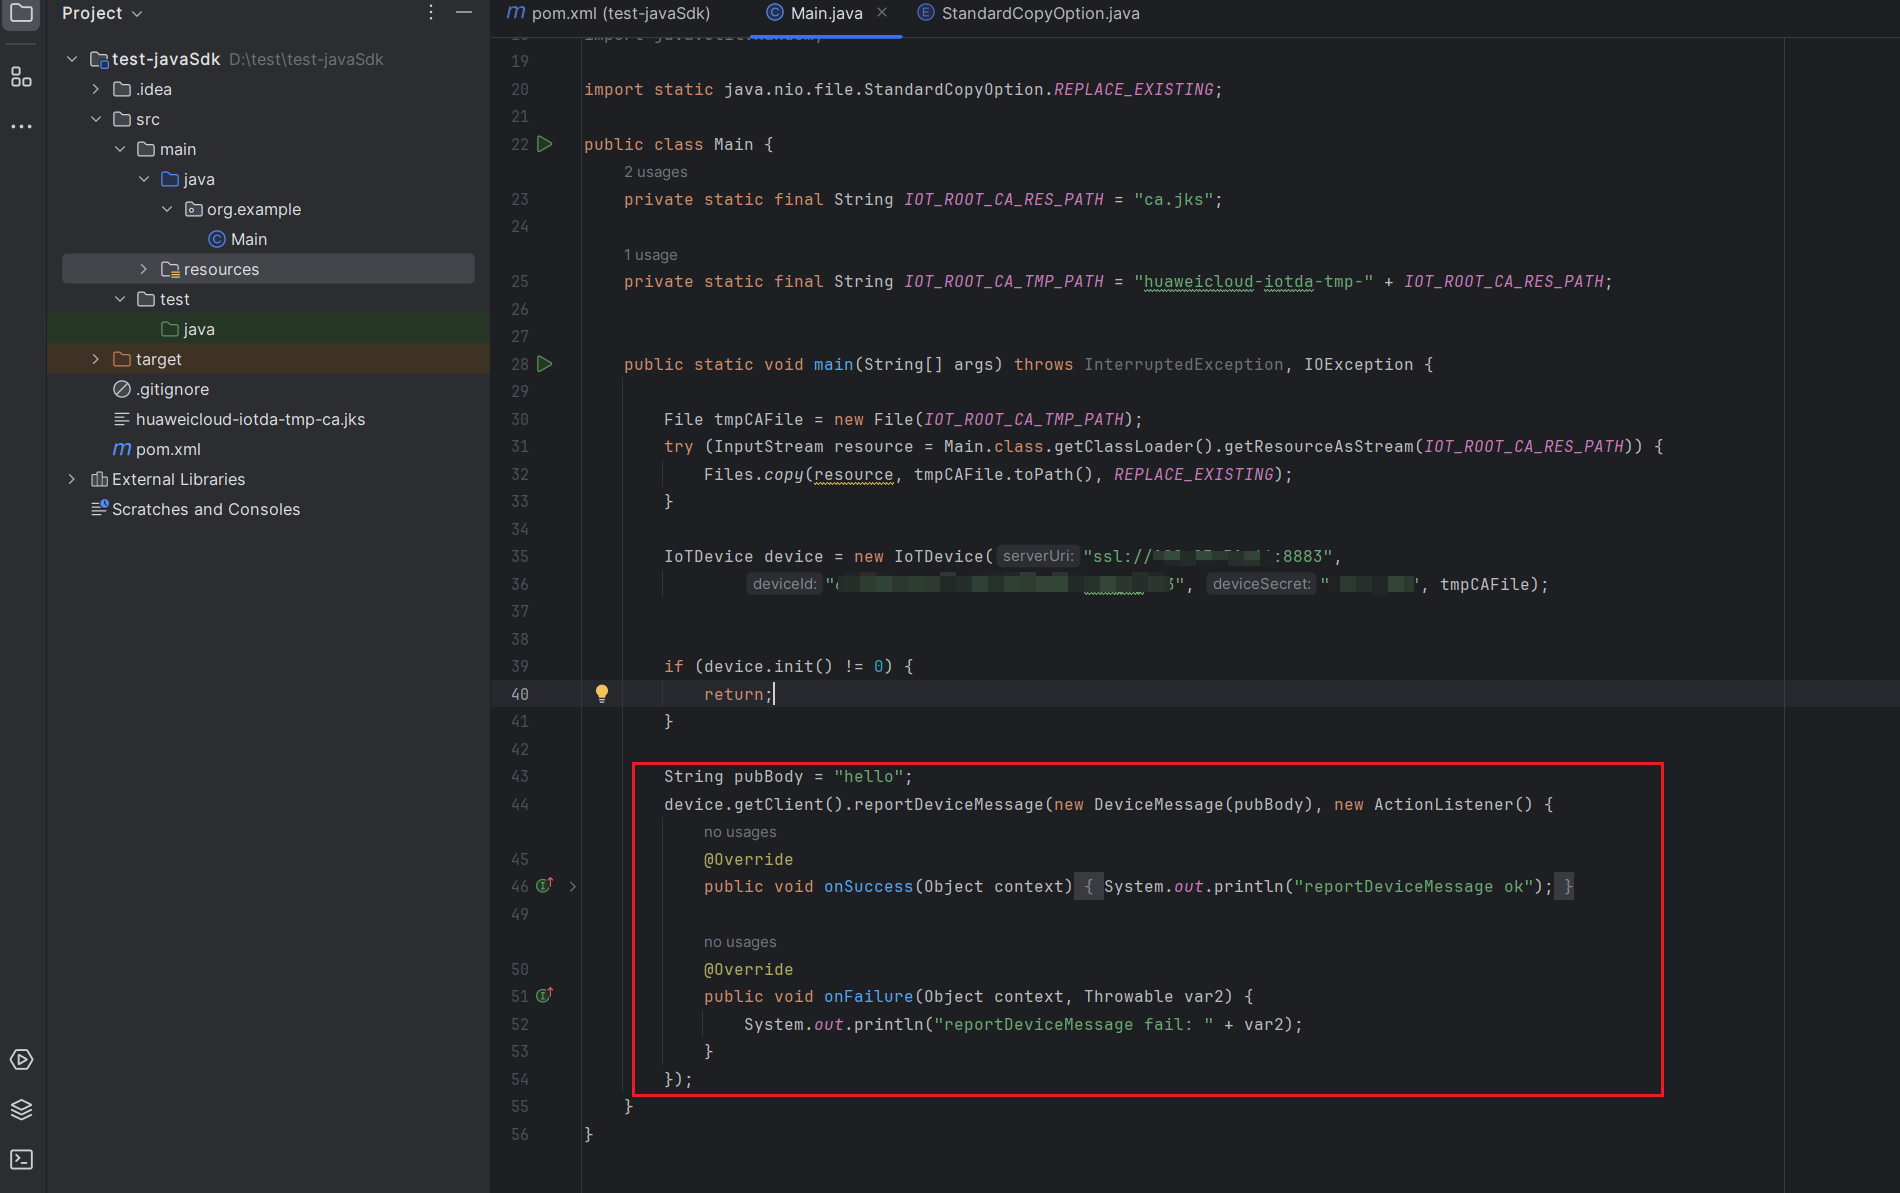
- Enable device message tracing to check message records. Locate the device on the Huawei Cloud console, go to device details page, and choose Message Trace > Start Trace. Run the code again to check the reported messages.
Figure 20 Device list - Viewing details
 Figure 21 Message tracing - Viewing device_sdk_java tracing result
Reporting Properties
Develop the property reporting function by referring to the guide for property reporting.
- Copy the following code to the Main.java file. Put the code after the device.init() method, which indicates that the connection is successfully established.
// Report properties.
Map<String, Object> json = new HashMap<>();
Random rand = new SecureRandom();
// Set properties based on the product model.
json.put("flow", rand.nextFloat() * 100.0f);
ServiceProperty serviceProperty = new ServiceProperty();
serviceProperty.setProperties(json);
serviceProperty.setServiceId("GasMeter"); // serviceId must be the same as that in the product model.

device.getClient().reportProperties(Arrays.asList(serviceProperty), new ActionListener() {
    @Override
    public void onSuccess(Object context) {
        System.out.println("pubMessage success");
    }
    @Override
    public void onFailure(Object context, Throwable var2) {
        System.out.println("reportProperties failed" + var2.toString());
    }
});
Figure 22 Reporting properties - IDEA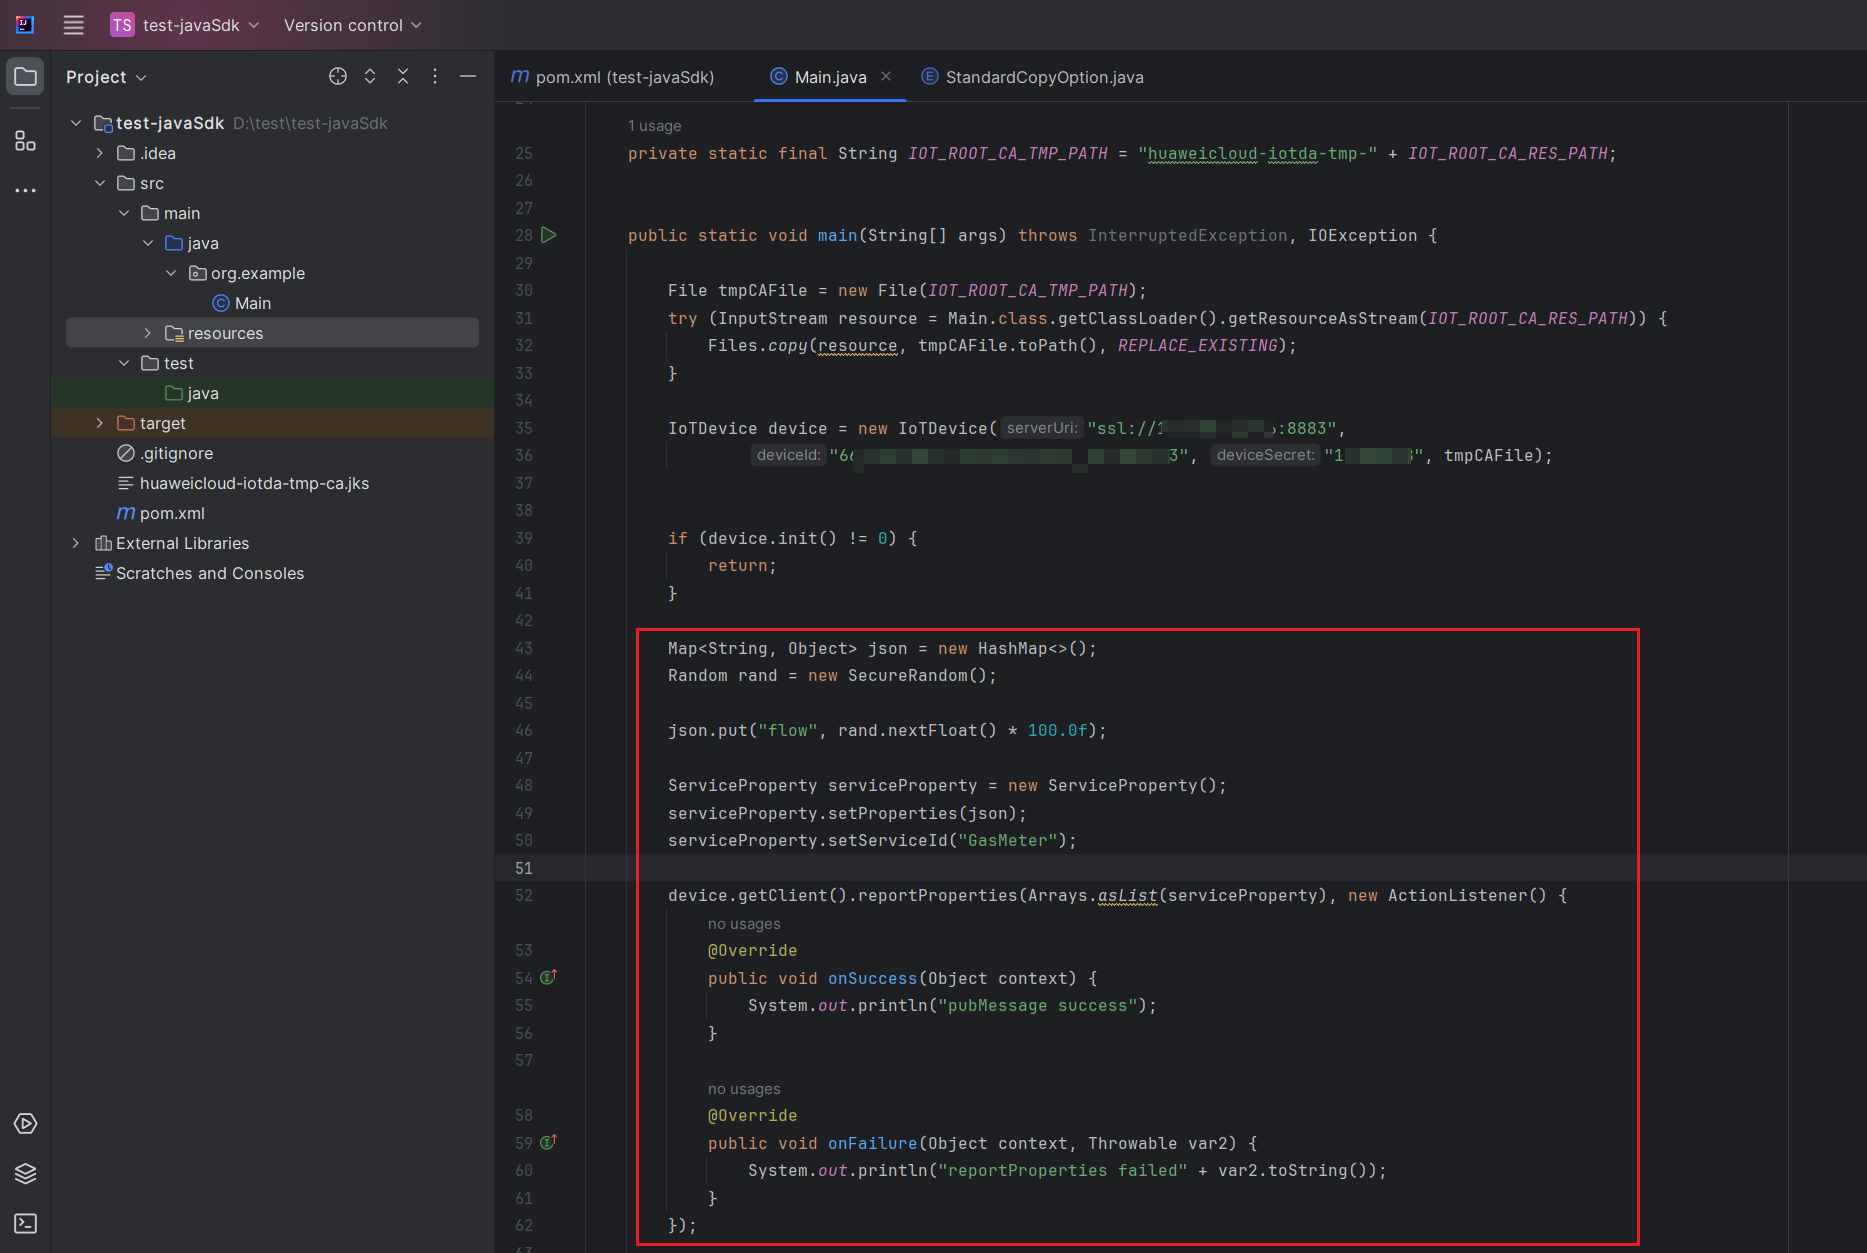

The gas meter is used as an example. You can adapt the code as required.
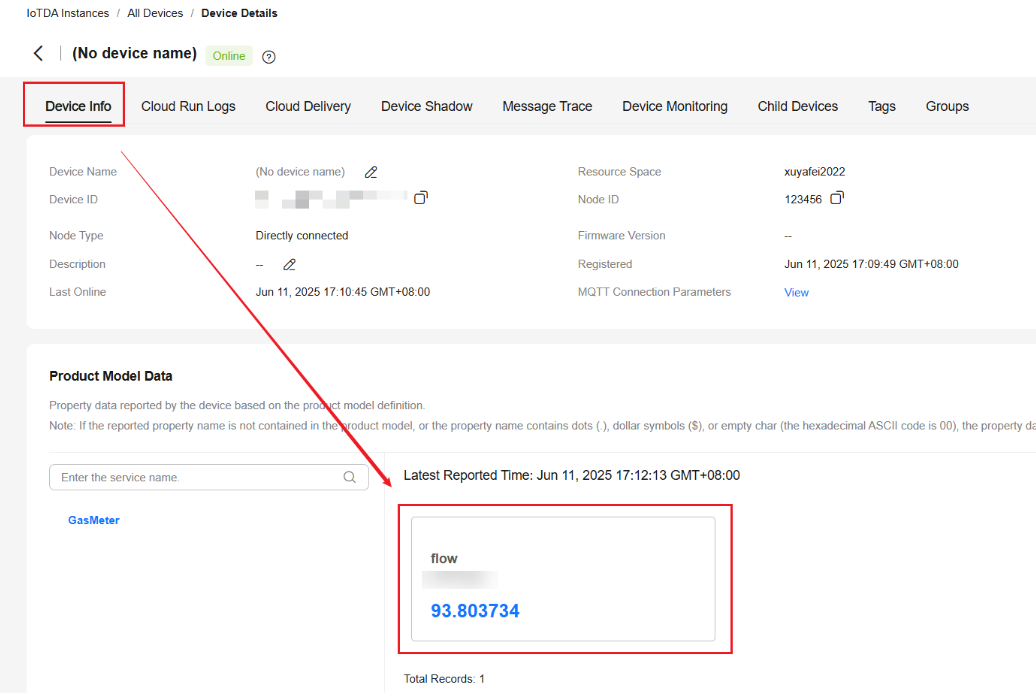
- Check the reported property value on the platform. On the Huawei Cloud console, locate the target device to access its details page, click the Device Info tab, and run the code again. The reported property value is displayed.
Figure 23 Device list - Viewing details
 Figure 24 Viewing reported data - Flow
Delivering Commands
Develop the delivery function by referring to the guide for command delivery.
- Copy the following code to the Main.java file. Put the code before the device.init() method, which is used to establish a link connection.
// Set the listener to receive downstream data.
device.getClient().setCommandListener(new CommandListener() {
    @Override
    public void onCommand(String requestId, String serviceId, String commandName, Map<String, Object> paras) {
        System.out.println("onCommand, serviceId = " + serviceId);
        System.out.println("onCommand , name = " + commandName);
        System.out.println("onCommand, paras = " + paras.toString());
        // Process the command.

        // Send the command response.
        device.getClient().respondCommand(requestId, new CommandRsp(0));
    }
});
Figure 25 Command delivery - IDEA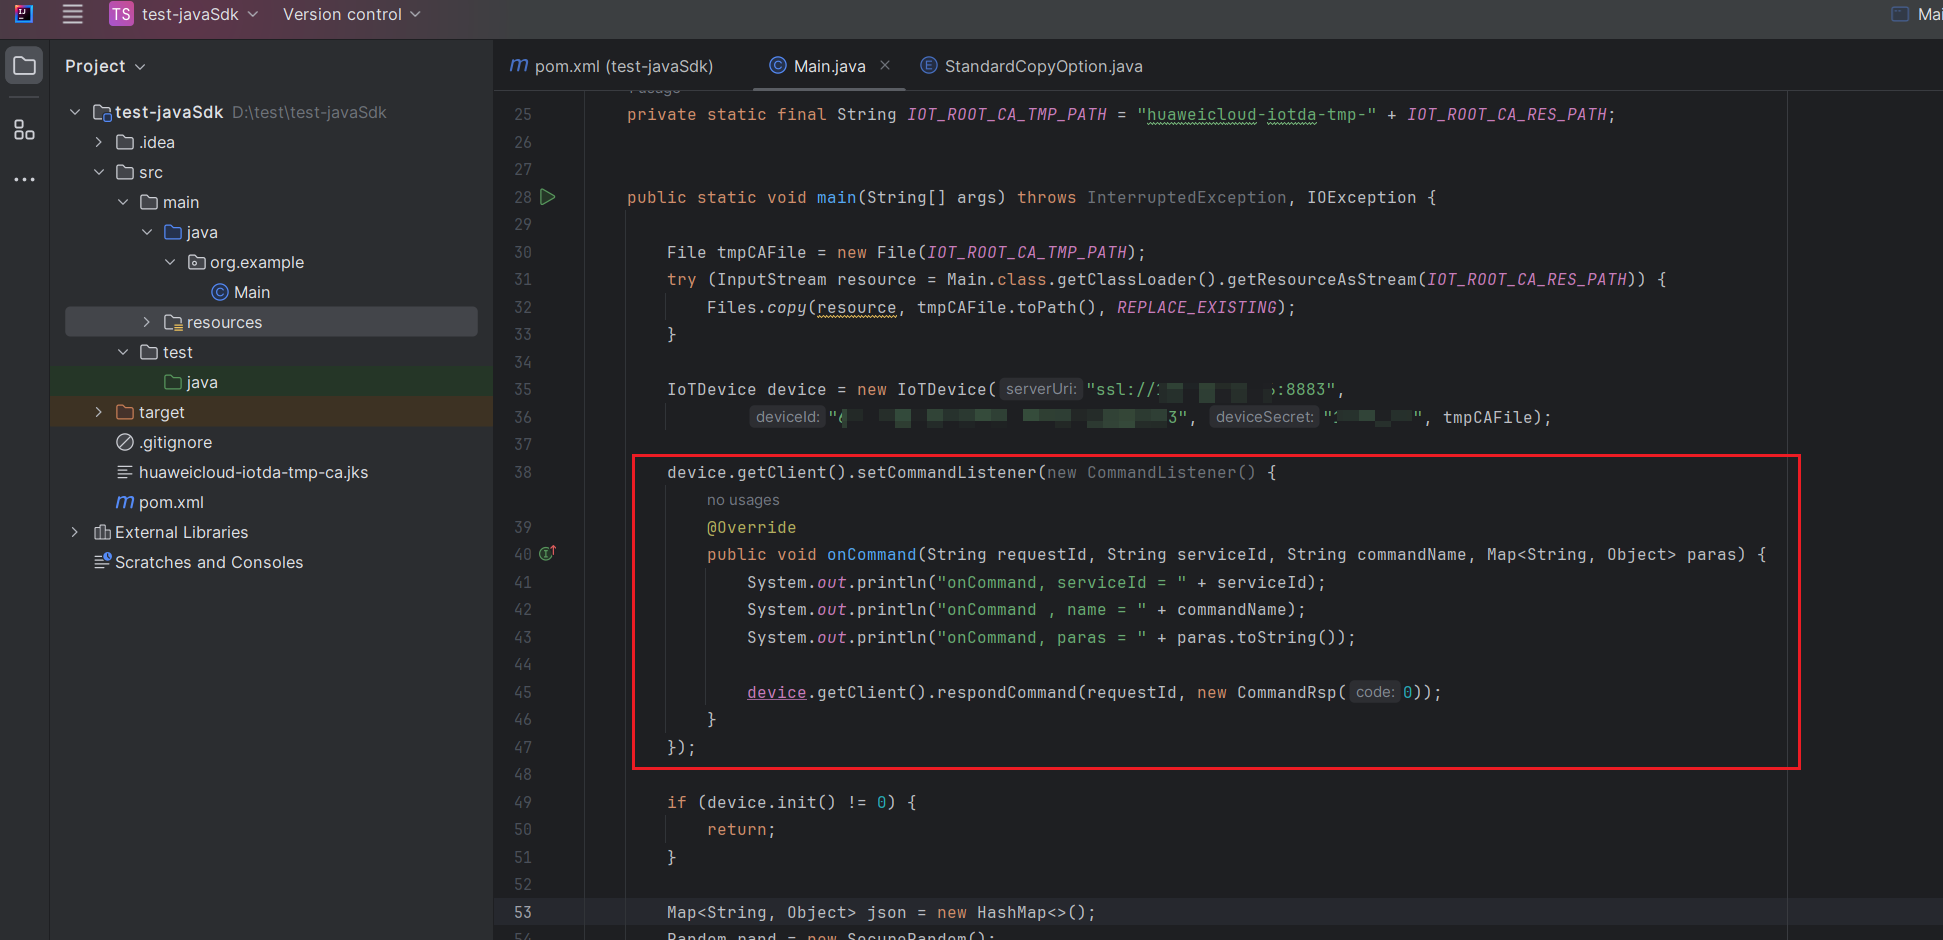
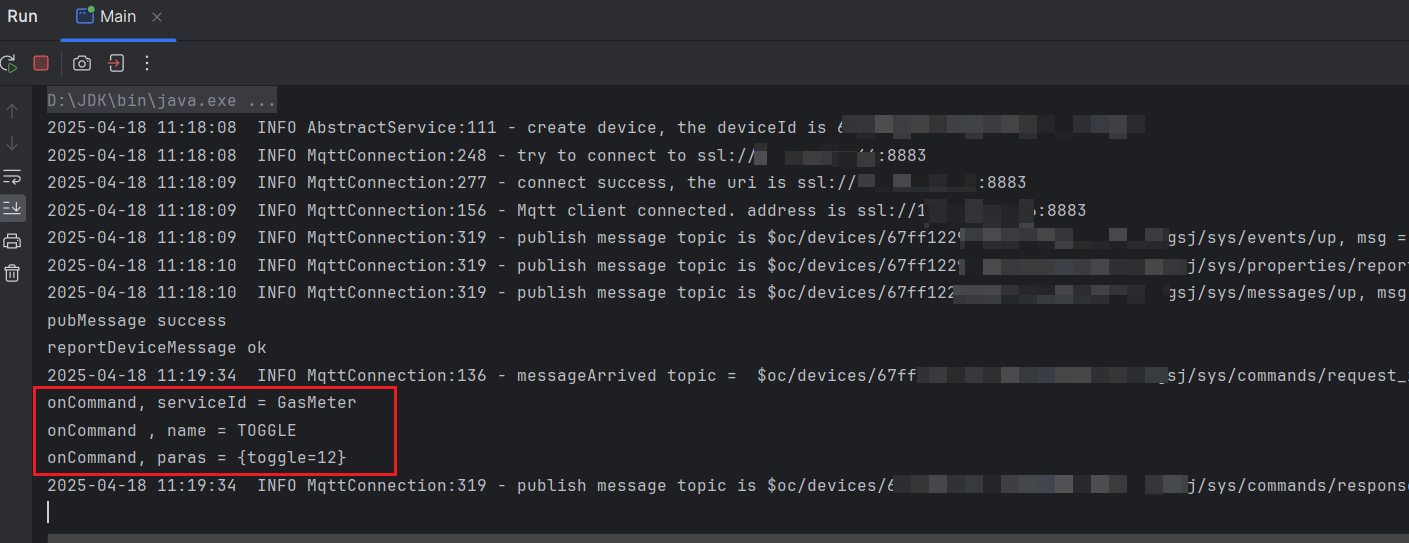
- Deliver a command on the platform. Run the SDK code. On the Huawei Cloud console, locate the target device to access its details page, click the Cloud Delivery tab and then the Command Delivery tab, click Deliver Command, and click OK. The delivered value is received on the IDEA console.
Figure 26 Device list - Viewing details
 Figure 27 Checking the IDEA command delivery structure
Integrating and Running the Device Java SDK
Huawei Cloud IoT device SDKs seamlessly integrate with IoT devices, as demonstrated in this section using a Linux-based IoT device and the Java SDK. By debugging and transferring the Java SDK-generated JAR package from IDEA to the Linux device, you can efficiently connect the device to IoTDA.
Prerequisites
The device runs Linux and JDK has been installed.
Procedure
- Copy the configuration below to the pom.xml file in the root directory.
<build>
    <plugins>
        <plugin>
            <groupId>org.apache.maven.plugins</groupId>
            <artifactId>maven-assembly-plugin</artifactId>
            <executions>
                <execution>
                    <phase>package</phase>
                    <goals>
                        <goal>single</goal>
                    </goals>
                    <configuration>
                        <archive>
                            <manifest>
                                <mainClass>org.example.Main</mainClass>
                            </manifest>
                        </archive>
                        <descriptorRefs>
                            <descriptorRef>jar-with-dependencies</descriptorRef>
                        </descriptorRefs>
                        <appendAssemblyId>false</appendAssemblyId>
                    </configuration>
                </execution>
            </executions>
        </plugin>
    </plugins>
</build>
Figure 28 IDEA - Adding the package parameter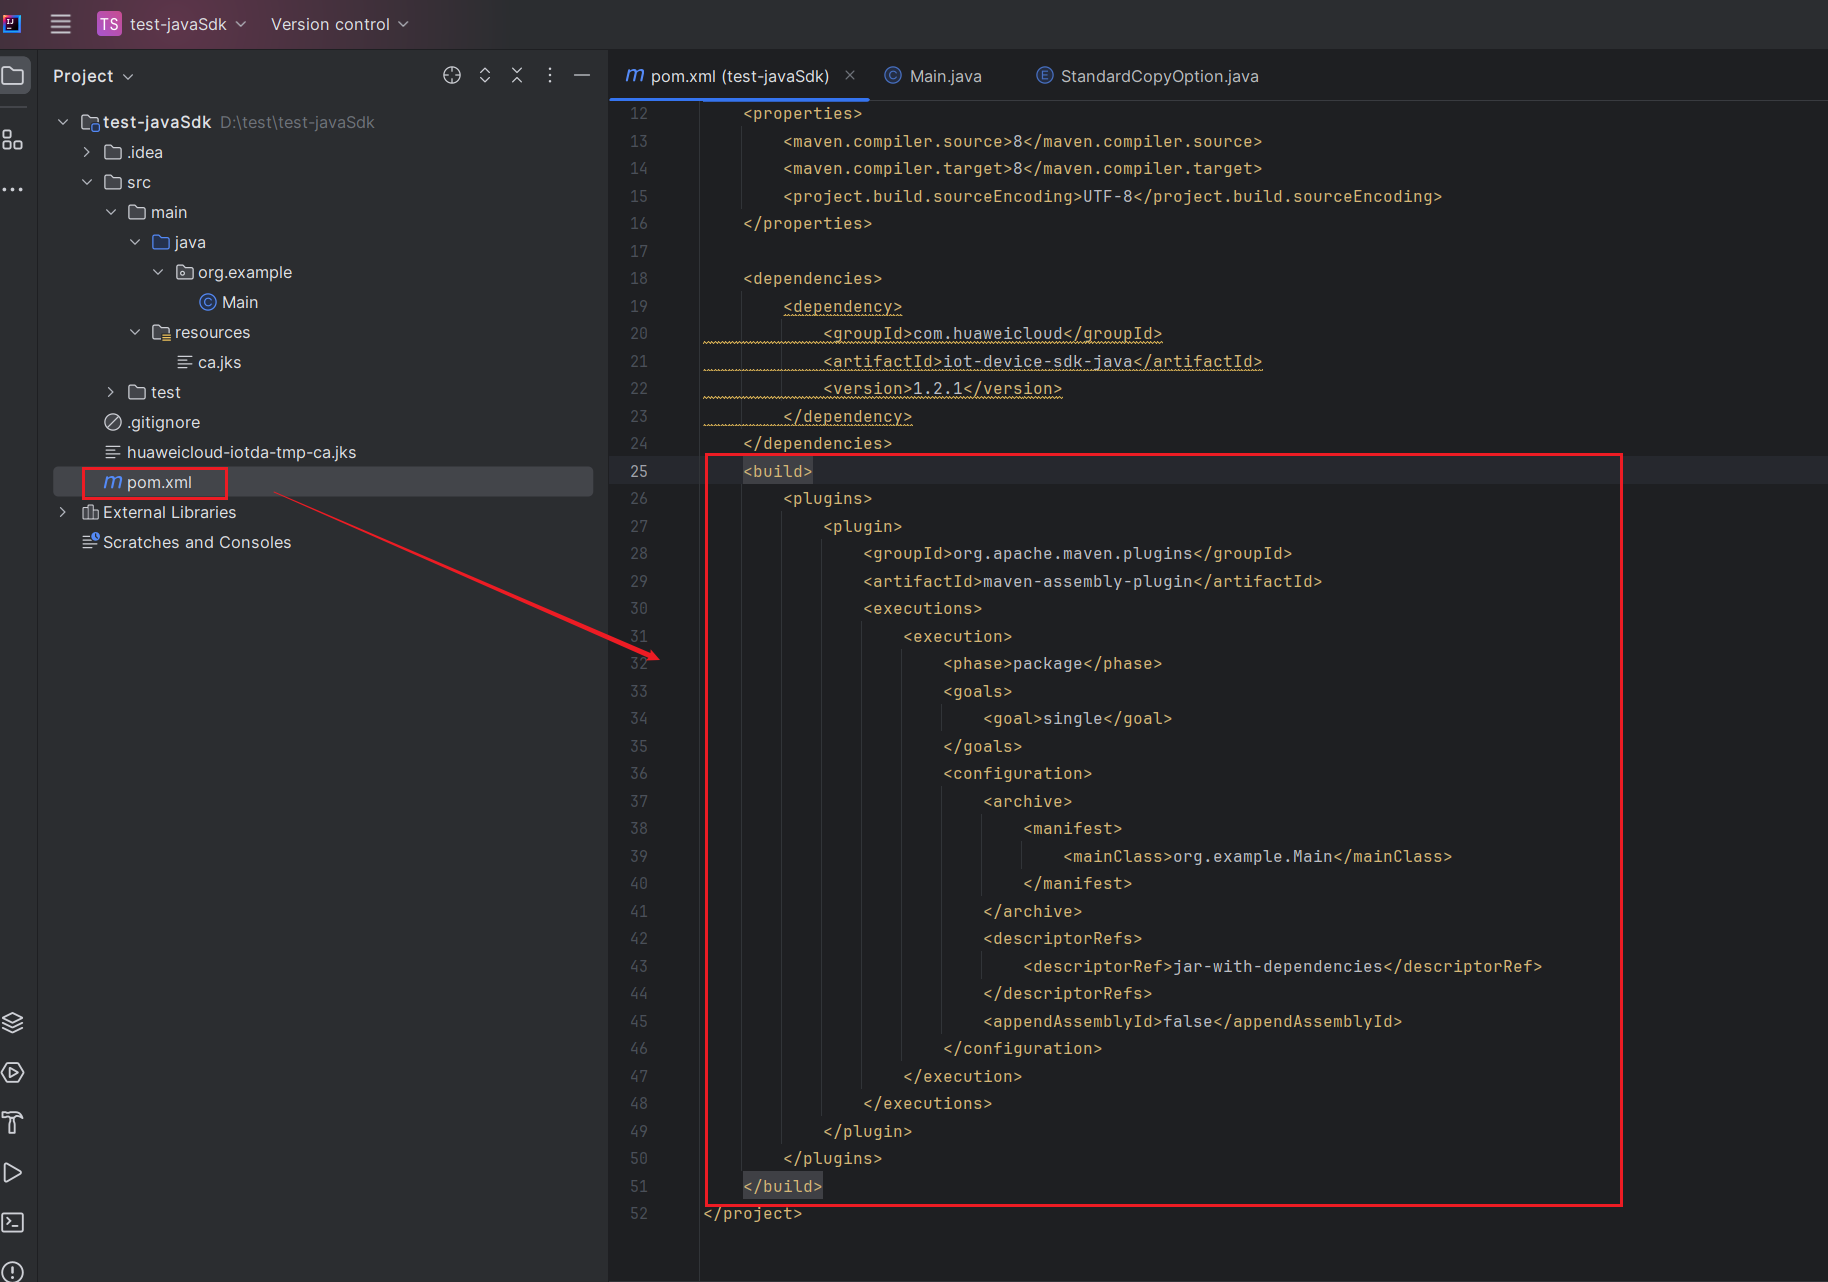
- Open Maven in IDEA and click package to generate a JAR package in the directory.
Figure 29 IDEA - Generating a JAR package
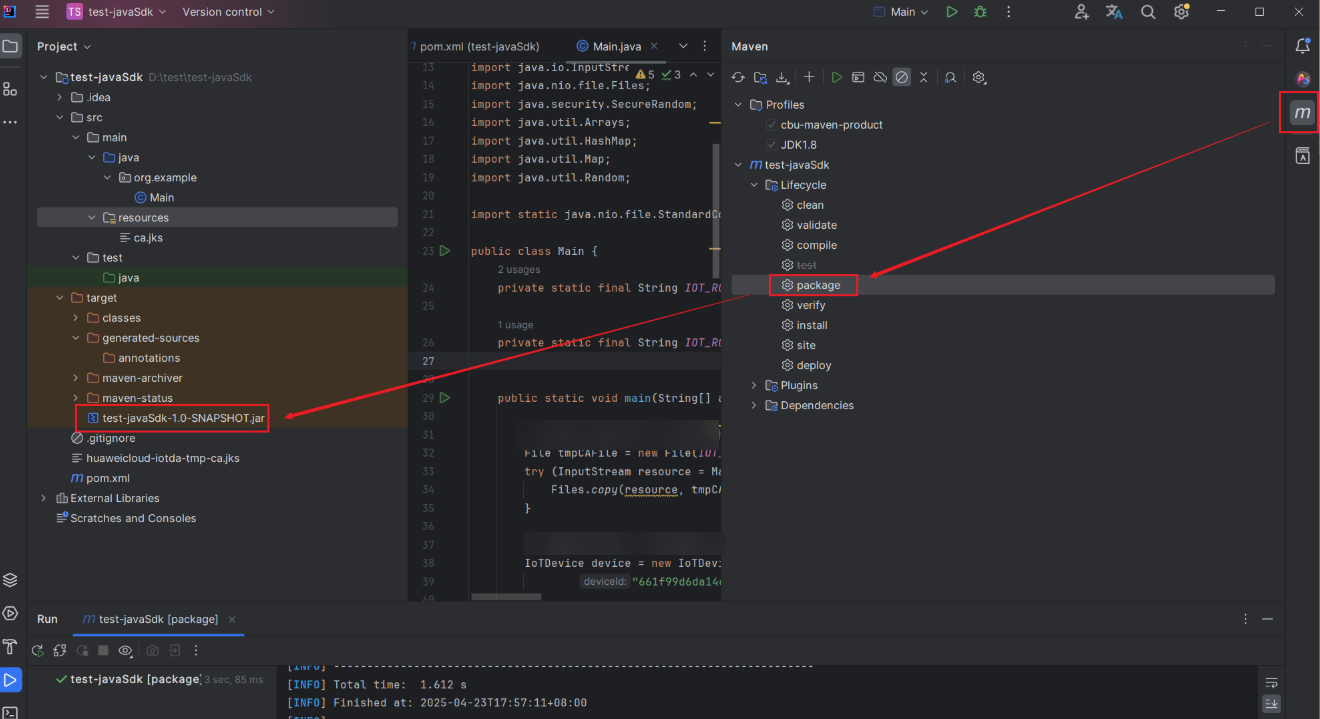
- Copy the JAR package to the Linux device and enter java -jar test-javaSdk-1.0-SNAPSHOT. If the code is successfully executed, the device is successfully connected to IoTDA.
Figure 30 Running the JAR package in Linux


If no Java command is displayed, run the java -version command to check whether JDK is installed and the JDK version.
Feedback
Was this page helpful?
Provide feedbackThank you very much for your feedback. We will continue working to improve the documentation.See the reply and handling status in My Cloud VOC.
For any further questions, feel free to contact us through the chatbot.
Chatbot


