
Building Highly Available Web Server Clusters with Keepalived
Scenarios
Virtual IP addresses are used for active and standby switchover of ECSs to achieve high availability. This way if one ECS goes down for some reason, the other one can take over and services continue uninterrupted.
This document uses CentOS 7.4 (64-bit) ECSs as an example to describe how to set up highly available web server clusters using Keepalived and Nginx.
Background
A web cluster consists of multiple web servers and a load balancer. Access requests will first be received by the load balancer, which then distributes the requests to backend web servers based on the load balancing policy.
In this document, Nginx is used to implement load balancing.
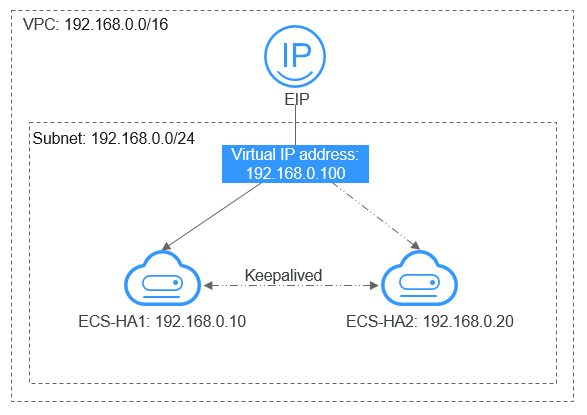
Network Topology
The data planning is as follows:
No. |
Item |
Quantity |
Specification |
|---|---|---|---|
1 |
VPC |
1 |
192.168.0.0/16 |
Subnet |
1 |
192.168.0.0/24 |
|
2 |
ECS |
2 |
1 vCPU, 1 GB, CentOS 7.4 64bit |
IP address |
2 |
ecs-HA1: 192.168.0.10 ecs-HA2: 192.168.0.20 |
|
3 |
EIP |
1 |
122.xx.xx.189 |
Virtual IP address |
1 |
192.168.0.100 |
- Configure the two ECSs in the same subnet to work in the active/standby mode using Keepalived.
- Bind a single virtual IP address to the two ECSs.
- Bind the virtual IP address to an EIP, then you can access the active and standby ECSs bound with the virtual IP address from the Internet.

- Select a region based on your service requirements.
- All cloud resources must be in the same region.
Procedure
The overall operation process is as follows:

- Create a VPC and a subnet.
- Log in to the management console.
- Click Service List. Under Networking, click Virtual Private Cloud.
- Click Create VPC.
Set required parameters as prompted based on Table 2.
- Click Create Now.
- Apply for required cloud resources.
- Buy ECSs.
- Log in to the management console.
- Click Service List. Under Compute, click Elastic Cloud Server.
- Click Buy ECS.
- On the Buy ECS page, set parameters as prompted. For details, see Table 1.
- Set the ECS name to ecs-HA1 and ecs-HA2.
In this example, no data disk is purchased. You can buy data disks based on service requirements and ensure their service data consistency.
- (Optional) Configure security group rules to ensure that the two ECSs can communicate with each other.
In this example, the two ECSs are in the same security group and can communicate with each other through the internal network by default. In this case, you do not need to configure rules.
If two ECSs are in different security groups, you need to add inbound security group rules for the two ECSs. For details, see Enabling ECSs in Different Security Groups to Communicate with Each Other Through an Internal Network.
- Buy an EIP.
- Log in to the management console.
- Click Service List. Under Networking, click Elastic IP.
- Click Buy EIP and set parameters as prompted. For details, see Table 1.
- Assign a virtual IP address.
- Log in to the management console.
- Click Service List. Under Networking, click Virtual Private Cloud.
- In the navigation pane on the left, click Subnets.
- In the subnet list, locate the target subnet and click its name.
- On the IP Addresses tab page, click Assign Virtual IP Address and set parameters as prompted.
- Buy ECSs.
- Configure the ECSs.
- Configure the ecs-HA1.
- Bind EIP (122.xx.xx.189) to ecs-HA1.
- Log in to the management console.
- Click Service List. Under Compute, click Elastic Cloud Server.
- In the ECS list, click the name of ecs-HA1.
- Click the EIPs tab and then Bind EIP.
- On the Bind EIP page, select a NIC and an EIP, and click OK.
- Connect to ecs-HA1 using SSH and run the following command to install the Nginx and Keepalived packages and related dependency packages:
- Run the following command to edit the nginx configuration file and save it:
vim /etc/nginx/nginx.conf
An example is provided as follows:
user root; worker_processes 1; #error_log logs/error.log; #error_log logs/error.log notice; #error_log logs/error.log info; #pid logs/nginx.pid; events { worker_connections 1024; } http { include mime.types; default_type application/octet-stream; #log_format main '$remote_addr - $remote_user [$time_local] "$request" ' # '$status $body_bytes_sent "$http_referer" ' # '"$http_user_agent" "$http_x_forwarded_for"'; #access_log logs/access.log main; sendfile on; #tcp_nopush on; #keepalive_timeout 0; keepalive_timeout 65; #gzip on; server { listen 80; server_name localhost; #charset koi8-r; #access_log logs/host.access.log main; location / { root html; index index.html index.html; } #error_page 404 /404.html; # redirect server error pages to the static page /50x.html error_page 500 502 503 504 /50x.html; location = /50x.html { root html; } } } - Run the following command to edit the index.html file and save the file:
vim /usr/share/nginx/html/index.html
An example is provided as follows:
Welcome to ECS-HA1
- Run the following commands to set the automatic startup of Nginx upon ECS startup:
systemctl start nginx.service
- Verify the access to a single Nginx node.
Figure 3 ECS-HA1 access verification

- Run the following command to edit the keepalived configuration file and save it:
vim /etc/keepalived/keepalived.conf
An example is provided as follows:
! Configuration File for keepalived global_defs { router_id master-node } vrrp_script chk_http_port { script "/etc/keepalived/chk_nginx.sh" interval 2 weight -5 fall 2 rise 1 } vrrp_instance VI_1 { state MASTER interface eth0 mcast_src_ip 192.168.0.10 virtual_router_id 51 priority 101 advert_int 1 authentication { auth_type PASS auth_pass 1111 } unicast_src_ip 192.168.0.10 virtual_ipaddress { 192.168.0.100 } track_script { chk_http_port } } - Run the following command to edit the nginx monitoring script and save it:
vim /etc/keepalived/chk_nginx.sh
An example is provided as follows:
#!/bin/bash
counter=$(ps -C nginx --no-heading|wc -l)
if [ "${counter}" = "0"  ]; then
  systemctl start nginx.service
   sleep 2
   counter=$(ps -C nginx  --no-heading|wc -l)
   if [ "${counter}" =  "0" ]; then
      systemctl stop keepalived.service
   fi
fi
chmod +x /etc/keepalived/chk_nginx.sh
- Run the following commands to set the automatic startup of Keepalived upon ECS startup:
systemctl start keepalived.service
- Bind EIP (122.xx.xx.189) to ecs-HA1.
- Configure the ecs-HA2.
- Unbind EIP (122.xx.xx.189) from ecs-HA1.
- Log in to the management console.
- Click Service List. Under Compute, click Elastic Cloud Server.
- In the ECS list, click the name of ecs-HA1.
- Click the EIPs tab.
- Locate the row that contains the EIP (122.xx.xx.189), and click Unbind.
- Bind EIP (122.xx.xx.189) to ecs-HA2.
- Log in to the management console.
- Click Service List. Under Compute, click Elastic Cloud Server.
- In the ECS list, click the name of ecs-HA2.
- Click the EIPs tab.
- Click Bind EIP.
- Select a NIC and an EIP and click OK.
- Connect to ecs-HA2 using SSH and run the following command to install the Nginx and Keepalived packages and related dependency packages:
- Run the following command to edit the nginx.conf configuration file:
vim /etc/nginx/nginx.conf
An example is provided as follows:
user root; worker_processes 1; #error_log logs/error.log; #error_log logs/error.log notice; #error_log logs/error.log info; #pid logs/nginx.pid; events { worker_connections 1024; } http { include mime.types; default_type application/octet-stream; #log_format main '$remote_addr - $remote_user [$time_local] "$request" ' # '$status $body_bytes_sent "$http_referer" ' # '"$http_user_agent" "$http_x_forwarded_for"'; #access_log logs/access.log main; sendfile on; #tcp_nopush on; #keepalive_timeout 0; keepalive_timeout 65; #gzip on; server { listen 80; server_name localhost; #charset koi8-r; #access_log logs/host.access.log main; location / { root html; index index.html index.htm; } #error_page 404 /404.html; # redirect server error pages to the static page /50x.html error_page 500 502 503 504 /50x.html; location = /50x.html { root html; } } } - Run the following command to edit the index.html file:
vim /usr/share/nginx/html/index.html
An example is provided as follows:
Welcome to ECS-HA2
- Run the following commands to set the automatic startup of Nginx upon ECS startup:
systemctl start nginx.service
- Test the access to a single Nginx node.
Figure 4 ECS-HA2 verification result

- Run the following command to edit the Keepalived configuration file:
vim /etc/keepalived/keepalived.conf
An example is provided as follows:
! Configuration File for keepalived global_defs { router_id master-node } vrrp_script chk_http_port { script "/etc/keepalived/chk_nginx.sh" interval 2 weight -5 fall 2 rise 1 } vrrp_instance VI_1 { state BACKUP interface eth0 mcast_src_ip 192.168.0.20 virtual_router_id 51 priority 100 advert_int 1 authentication { auth_type PASS auth_pass 1111 } unicast_src_ip 192.168.0.20 virtual_ipaddress { 192.168.0.100 } track_script { chk_http_port } } - Run the following command to edit the nginx monitoring script and add execute permissions:
vim /etc/keepalived/chk_nginx.sh
An example is provided as follows:
#!/bin/bash
counter=$(ps -C nginx --no-heading|wc -l)
if [ "${counter}" = "0"  ]; then
     systemctl start nginx.service
     sleep 2
     counter=$(ps -C nginx  --no-heading|wc -l)
     if [ "${counter}" =  "0" ]; then
          systemctl stop keepalived.service
     fi
fi
chmod +x /etc/keepalived/chk_nginx.sh
- Run the following commands to set the automatic startup of Keepalived upon ECS startup:
systemctl start keepalived
- Unbind EIP (122.xx.xx.189) from ecs-HA1.
- Configure the ecs-HA1.
- Bind a virtual IP address to an ECS.
- Unbind EIP (122.xx.xx.189) from ecs-HA2.
- Bind the virtual IP address to ecs-HA1.
- Log in to the management console.
- Click Service List. Under Networking, click Virtual Private Cloud.
- In the navigation pane on the left, click Subnets.
- In the subnet list, locate the target subnet and click its name.
- Click the IP Addresses tab, locate the row that contains the target virtual IP address, and click Bind to Server in the Operation column.
- On the page that is displayed, select ecs HA1.
- Bind the virtual IP address to ecs-HA2 by referring to 2.
- Bind the virtual IP address to the EIP 122.xx.xx.189.
- Log in to the management console.
- Click Service List. Under Networking, click Virtual Private Cloud.
- In the navigation pane on the left, click Subnets.
- In the subnet list, locate the target subnet and click its name.
- Click the IP Addresses tab, locate the row that contains the target virtual IP address, and click Bind to EIP in the Operation column.
- On the page that is displayed, select the EIP (122.xx.xx.189).
- Click OK.
Verification
- Run the reboot command to restart ecs-HA1 and ecs-HA2.
- Remotely log in to ecs-HA1 through the management console.
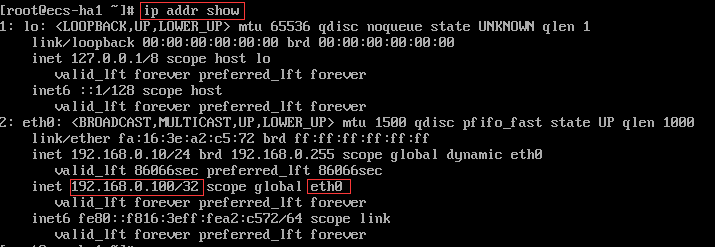
- Run the following command to check whether the virtual IP address is bound to the eth0 NIC of ecs-HA1:
As shown in Figure 5, the virtual IP address has been bound to the eth0 NIC of ecs-HA1.
- Use a browser to access the EIP and check whether the web page on ecs-HA1 can be accessed.
If the information shown in Figure 6 is displayed, the access is normal.
- Run the following command to disable Keepalived on ecs-HA1:
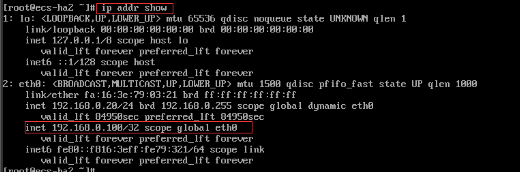
- Run the following command to check whether ecs-HA2 has taken over the virtual IP address:
Figure 7 Virtual IP address of ecs-HA2
- Use a browser to access the EIP and check whether the web page on ecs-HA2 can be accessed.
If the information shown in Figure 8 is displayed, the access is normal.


Feedback
Was this page helpful?
Provide feedbackThank you very much for your feedback. We will continue working to improve the documentation.See the reply and handling status in My Cloud VOC.
For any further questions, feel free to contact us through the chatbot.
Chatbot


