Using Kmesh on Huawei Cloud CCE
Kmesh is a high-performance service mesh data plane software built on eBPF and programmable kernels. By offloading traffic management to the kernel, Kmesh eliminates the need for proxy software during service communication within the meshes. This approach significantly shortens the traffic forwarding path and enhances the forwarding performance of service access.

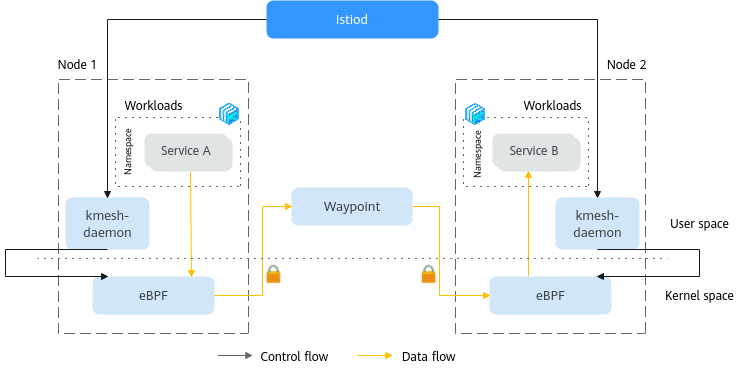
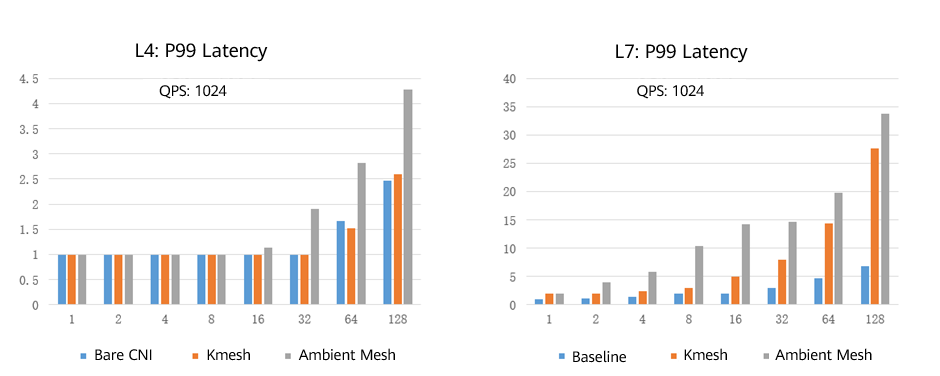
Kmesh's dual-engine mode leverages eBPF for traffic interception in the kernel space and uses waypoint proxies to manage complex Layer 7 traffic. This design separates Layer 4 and Layer 7 governance between the kernel space (eBPF) and the user space (Waypoint). The dual-engine mode reduces latency by 30% compared to Istio ambient mesh. Additionally, unlike the kernel-native mode, it does not require kernel enhancements, making it more flexible and broadly applicable.

This section describes how to deploy the Kmesh dual-engine mode in a CCE cluster to meet your requirements for using Kmesh on CCE.
Prerequisites
- A CCE cluster of v1.28 or later is added, and there are nodes in the cluster. For details about how to buy a cluster and create nodes in it, see Buying a CCE Standard/Turbo Cluster and Creating a Node.
A CCE standard cluster using a VPC or tunnel network is used as an example. The kernel of a newly created node must be 5.10 or later, so Ubuntu 22.04 is used in this example.
- You have a VM that can access the Internet. It can access the cluster using kubectl and has Helm installed.
Step 1: Install the Service Mesh Control Plane
Kmesh serves as the data plane for service meshes and communicates with the control plane using the xDS protocol. Istiod is used as the Kmesh control plane, though any control plane supporting the xDS protocol can theoretically function as Kmesh's control plane. For details, see Kmesh Quick Start Guide.
- Log in to the VM where kubectl is installed and add an Istio repository.
helm repo add istio https://istio-release.storage.googleapis.com/charts
helm repo update
- Install the Istio base chart.
kubectl create namespace istio-system
helm install istio-base istio/base -n istio-system
- Install the Istiod chart.
helm install istiod istio/istiod --namespace istio-system --set pilot.env.PILOT_ENABLE_AMBIENT=true

The pilot.env.PILOT_ENABLE_AMBIENT=true parameter is required to enable Kmesh to establish a gRPC connection with Istiod.
Check the result.kubectl get svc -n istio-system | grep istiod
Information similar to the following is displayed:istiod ClusterIP 10.247.51.34 <none> 15010/TCP,15012/TCP,443/TCP,15014/TCP 4h8m
- Install the Kubernetes Gateway API CRD.
kubectl get crd gateways.gateway.networking.k8s.io &> /dev/null || \
  { kubectl kustomize "github.com/kubernetes-sigs/gateway-api/config/crd/experimental?ref=444631bfe06f3bcca5d0eadf1857eac1d369421d" | kubectl apply -f -; }
Step 2: Install Kmesh
- Download the Kmesh Helm package and kmeshctl to a local PC.
# download helm package
curl -L -o kmesh-pakcage.tgz https://github.com/kmesh-net/kmesh/releases/download/v1.0.0/kmesh-helm-v1.0.0.tgz
tar -zxvf kmesh-pakcage.tgz

# download kmeshctl
curl -L -o kmeshctl https://github.com/kmesh-net/kmesh/releases/download/v1.0.0/kmeshctl-linux-amd64
- Install Kmesh using Helm.
helm install kmesh ./kmesh-helm -n kmesh-system --create-namespace
- After the installation command is executed, check the Kmesh startup status.
kubectl get pod -A | grep kmesh
Information similar to the following is displayed:
kmesh-system kmesh-dc5l8 1/1 Running 0 4h25m
- Check the Kmesh running status.
kubectl logs -n kmesh-system kmesh-dc5l8
Information similar to the following is displayed:
time="2025-04-15T13:17:12Z" level=info msg="FLAG: --bpf-fs-path=\"/sys/fs/bpf\"" subsys=manager
time="2025-04-15T13:17:12Z" level=info msg="FLAG: --cgroup2-path=\"/mnt/kmesh_cgroup2\"" subsys=manager
time="2025-04-15T13:17:12Z" level=info msg="FLAG: --cni-etc-path=\"/etc/cni/net.d\"" subsys=manager
time="2025-04-15T13:17:12Z" level=info msg="FLAG: --conflist-name=\"\"" subsys=manager
time="2025-04-15T13:17:12Z" level=info msg="FLAG: --enable-bypass=\"false\"" subsys=manager
time="2025-04-15T13:17:12Z" level=info msg="FLAG: --enable-ipsec=\"false\"" subsys=manager
time="2025-04-15T13:17:12Z" level=info msg="FLAG: --enable-mda=\"false\"" subsys=manager
time="2025-04-15T13:17:12Z" level=info msg="FLAG: --enable-secret-manager=\"false\"" subsys=manager
time="2025-04-15T13:17:12Z" level=info msg="FLAG: --help=\"false\"" subsys=manager
time="2025-04-15T13:17:12Z" level=info msg="FLAG: --mode=\"dual-engine\"" subsys=manager
time="2025-04-15T13:17:12Z" level=info msg="FLAG: --monitoring=\"true\"" subsys=manager
time="2025-04-15T13:17:12Z" level=info msg="FLAG: --plugin-cni-chained=\"true\"" subsys=manager
time="2025-04-15T13:17:12Z" level=info msg="FLAG: --profiling=\"false\"" subsys=manager
time="2025-04-15T13:17:12Z" level=info msg="kmesh start with Normal" subsys=bpf
time="2025-04-15T13:17:14Z" level=info msg="bpf loader start successfully" subsys=manager
time="2025-04-15T13:17:14Z" level=info msg="start kmesh manage controller successfully" subsys=controller
time="2025-04-15T13:17:14Z" level=info msg="proxy ztunnel~192.168.1.174~kmesh-dc5l8.kmesh-system~kmesh-system.svc.cluster.local connect to discovery address istiod.istio-system.svc:15012" subsys=controller/config
time="2025-04-15T13:17:14Z" level=info msg="controller start successfully" subsys=manager
time="2025-04-15T13:17:14Z" level=info msg="start write CNI config" subsys="cni installer"
time="2025-04-15T13:17:14Z" level=info msg="kmesh cni use chained\n" subsys="cni installer"
time="2025-04-15T13:17:14Z" level=info msg="reload authz config from last epoch" subsys=workload_controller
time="2025-04-15T13:17:14Z" level=info msg="Copied /usr/bin/kmesh-cni to /opt/cni/bin." subsys="cni installer"
time="2025-04-15T13:17:14Z" level=info msg="wrote kubeconfig file /etc/cni/net.d/kmesh-cni-kubeconfig" subsys="cni installer"
time="2025-04-15T13:17:14Z" level=info msg="cni config file: /etc/cni/net.d/10-kindnet.conflist" subsys="cni installer"
time="2025-04-15T13:17:14Z" level=info msg="start cni successfully" subsys=manager
time="2025-04-15T13:17:14Z" level=info msg="start watching file /var/run/secrets/kubernetes.io/serviceaccount/token" subsys="cni installer"
Step 3: Use Kmesh
- To use Kmesh to manage namespaces, add the istio.io/dataplane-mode=Kmesh label to the default namespace.
kubectl label namespace default istio.io/dataplane-mode=Kmesh
- View the namespaces managed by Kmesh.
kubectl get namespace -L istio.io/dataplane-mode
Information similar to the following is displayed:
NAME       STATUS   AGE   DATAPLANE-MODE
default    Active   92d   Kmesh
...
- Deploy the Bookinfo sample application.
kubectl apply -f https://raw.githubusercontent.com/istio/istio/release-1.21/samples/bookinfo/platform/kube/bookinfo.yaml
- Deploy the sleep application as the cURL client.
kubectl apply -f https://raw.githubusercontent.com/istio/istio/release-1.21/samples/sleep/sleep.yaml
- Install a waypoint. Waypoints can be applied to namespaces, Services, and pods, offering flexibility in their configuration. It is possible to install multiple waypoints at different granularity within a single namespace. To use a waypoint, you must add the istio.io/use-waypoint label and set its value to the name of the waypoint. Additionally, you can specify a custom waypoint image using the --image option, with the default image being ghcr.io/kmesh-net/waypoint:{VERSION}. In this example, a waypoint is configured for a namespace. For details, see Install Waypoint.
kmeshctl waypoint apply -n default --enroll-namespace --image ghcr.io/kmesh-net/waypoint:latest
Information similar to the following is displayed:
waypoint default/waypoint applied
namespace default labels with "istio.io/use-waypoint: waypoint"
- View the pods.
kubectl get pod
Information similar to the following is displayed:
NAME                                  READY   STATUS    RESTARTS   AGE
details-v1-86545f5dfb-p6kgw           1/1     Running   0          22m
productpage-v1-7c74cbdbcc-tnk7w       1/1     Running   0          22m
ratings-v1-57544668d4-vx9h2           1/1     Running   0          22m
reviews-v1-5f58978c56-xqjtz           1/1     Running   0          22m
reviews-v2-7bd564ffc6-pdskr           1/1     Running   0          22m
reviews-v3-7dfb7c4b64-bzjm8           1/1     Running   0          22m
sleep-5fcd8fd6c8-9wj7l                1/1     Running   0          18m
waypoint-75686498f6-ksrnh             1/1     Running   0          9m15s
- Verify that Bookinfo works as expected.
kubectl exec deploy/sleep -- curl -s http://productpage:9080/ | grep -o "<title>.*</title>"
Information similar to the following is displayed:
<title>Simple Bookstore App</title>
Step 4: Configure Weight-based Routing
- Configure weight-based routing to direct 90% of requests to reviews-v1 and 10% to reviews-v2.
kubectl apply -f -<<EOF apiVersion: networking.istio.io/v1alpha3 kind: VirtualService metadata: name: reviews spec: hosts: - reviews http: - route: - destination: host: reviews subset: v1 weight: 90 - destination: host: reviews subset: v2 weight: 10 --- apiVersion: networking.istio.io/v1alpha3 kind: DestinationRule metadata: name: reviews spec: host: reviews trafficPolicy: loadBalancer: simple: RANDOM subsets: - name: v1 labels: version: v1 - name: v2 labels: version: v2 - name: v3 labels: version: v3 EOF - Verify that approximately 90% of the traffic is routed to reviews-v1.
kubectl exec deploy/sleep -- sh -c "for i in \$(seq 1 100); do curl -s http://productpage:9080/productpage | grep reviews-v.-; done"
Information similar to the following is displayed:
<u>reviews-v1-5f58978c56-xqjtz</u>
<u>reviews-v1-5f58978c56-xqjtz</u>
<u>reviews-v1-5f58978c56-xqjtz</u>
<u>reviews-v1-5f58978c56-xqjtz</u>
<u>reviews-v1-5f58978c56-xqjtz</u>
<u>reviews-v1-5f58978c56-xqjtz</u>
<u>reviews-v1-5f58978c56-xqjtz</u>
<u>reviews-v1-5f58978c56-xqjtz</u>
<u>reviews-v1-5f58978c56-xqjtz</u>
<u>reviews-v1-5f58978c56-xqjtz</u>
<u>reviews-v1-5f58978c56-xqjtz</u>
<u>reviews-v2-7bd564ffc6-pdskr</u>
<u>reviews-v1-5f58978c56-xqjtz</u>
<u>reviews-v1-5f58978c56-xqjtz</u>
<u>reviews-v1-5f58978c56-xqjtz</u>
<u>reviews-v1-5f58978c56-xqjtz</u>
<u>reviews-v2-7bd564ffc6-pdskr</u>
<u>reviews-v1-5f58978c56-xqjtz</u>
<u>reviews-v1-5f58978c56-xqjtz</u>
<u>reviews-v1-5f58978c56-xqjtz</u>
In this configuration, the default namespace is managed by Kmesh, with a waypoint proxy deployed for the namespace. All traffic sent to the reviews service is forwarded by Kmesh to the waypoint, which routes 90% of the requests to reviews-v1 and 10% to reviews-v2 based on the configured weights.
Feedback
Was this page helpful?
Provide feedbackThank you very much for your feedback. We will continue working to improve the documentation.See the reply and handling status in My Cloud VOC.
For any further questions, feel free to contact us through the chatbot.
Chatbot


