Creating a Form Filling Page for a Form
You can create a data entry page for users to vote, answer surveys, or clock in/out. You can also set the following rules:
- Whether the form can be filled in for multiple times.
- Title content and style of the form.
- Form background.
- Whether only some fields need to be disclosed for data collection.
- Whether to set a validity period for the form. The form cannot be submitted after the validity period expires.
- Distribute multiple information filling pages based on different conditions.
Procedure
- Log in to the no-code workbench by referring to Logging In to the No-Code Workbench.
- In All Apps, hover over the target application's … and choose Edit.
- On the left of the displayed page, select the form to be edited and click
 .
. - On the Form tab page, click + next to Form Template in the upper left corner of the page to create a form filling page.
- Drag the widgets you need (like the title) from the Common Widgets area to the form. Then set the title's content, size, position, and color.
To hide a widget on the form, delete it by clicking the delete button above it. Deleted widgets can be found in the unpublished field area.
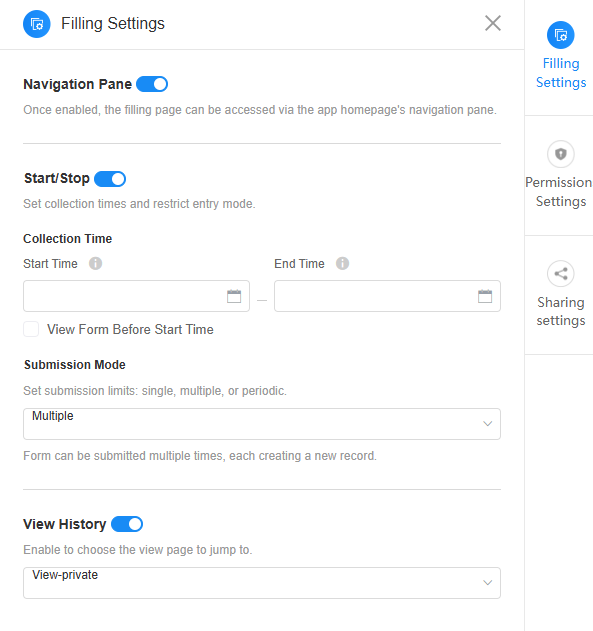
- Click Filling Settings on the right.
Figure 1 Form filling page settings

Table 1 Parameters Parameter
Description
Navigation Pane
Once enabled, you can access the filling page from the application homepage's navigation menu.
Start/Stop
Once enabled, you can set the data collection time and restrict the entry mode.- Start Time: Set the time when data can be submitted on the data entry page. If the start time is not set, the data takes effect immediately by default.
- End Time: Set the end time when the data submission is stopped on the data entry page. If the end time is not set, the page can be operated continuously by default.
- Submission Mode: Specify the number of submission times on the filling page. For example, data cannot be submitted repeatedly or data needs to be submitted periodically in a specified period.
- Single: Form can be submitted once or edited later, but no new records allowed. When you set a single entry, you can modify the original submission record before the deadline.
- Multiple: Forms can be submitted multiple times. Each submission creates a new record.
- Periodic: Forms can be submitted once per set period, such as daily check-ins. When Periodic is selected, you can specify either the daily start time or the repetition period.
Set daily start time: Set the daily time period when forms can be submitted. Forms can only be submitted during this period.
Set repeat cycle: Set the repetition period. If Day is selected, the period starts from 00:00. If Hour is selected, the period starts from the Start Time.
View History
Once this function is enabled, you can choose the view page to jump to.
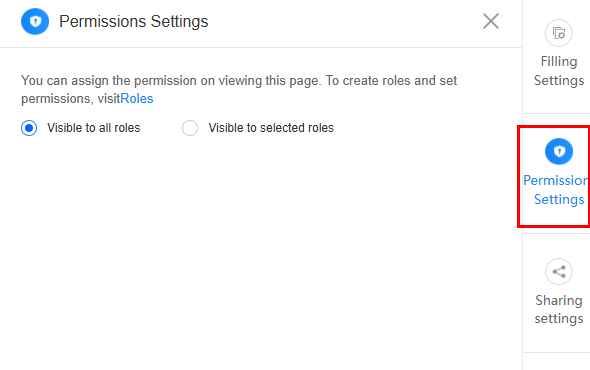
- Click Permission Settings on the right to choose who can see this page. You can let everyone view it or pick specific roles.
Figure 2 Setting permissions

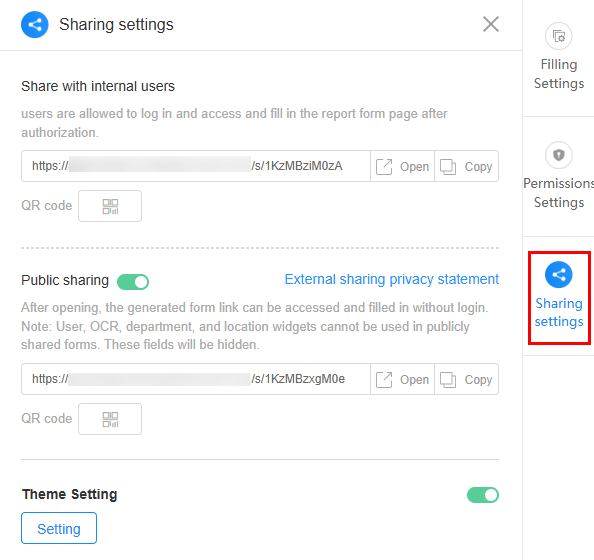
- Click Share Settings on the right to set the sharing mode and theme background.
Figure 3 Sharing settings

Table 2 Parameters for sharing settings Parameter
Description
Internal Sharing
Share the form with internal users. When this is enabled, internal users can log in to the system and fill in the form.
Click Generate Poster in the QR code to create a poster for this form. For details, see Generating a Poster from a Form.
Public
Share the form with external users. Anonymous users can access and fill in the form without login.
Click Generate Poster in the QR code to create a poster for this form. For details, see Generating a Poster from a Form.
Theme
Set the theme background of the form filling page.
Once enabled, click the button to set the background. On the displayed page, select a background theme and click the confirm button. If you do not want to show the background when opening this form on a mobile device, deselect Mobile. This option is selected by default.
Feedback
Was this page helpful?
Provide feedbackThank you very much for your feedback. We will continue working to improve the documentation.See the reply and handling status in My Cloud VOC.
For any further questions, feel free to contact us through the chatbot.
Chatbot


