
Logging In to the No-Code Workbench
Once your instance is ready, log in to the no-code workbench and create applications.
- Go to the Huawei Cloud Astro Zero console.
- On the homepage, click Access Homepage. The application development page is displayed.
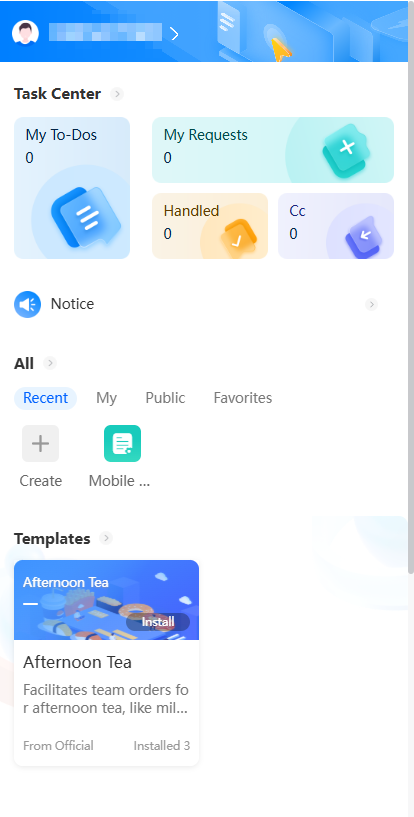
- On the top menu bar, click Workbench. Figure 1 Workbench

The workbench has four modules: one for tasks, one for notices, one for applications, and one for templates. See Table 1.
Table 1 Workbench introduction Module
Description
Task center
The task center includes My To-Dos, My Applications, Handled, and Copied to Me.
Notices
The bulletin board for the no-code workbench displays both tenant-level and system-level announcements, ensuring comprehensive information management at all levels.
You can post notices, news, and activities. Additionally, you can edit, delete, and batch delete tenant-level bulletins. However, system-level notices can only be deleted one by one and cannot be edited or deleted in batches.
All Apps
View what you made, last used, starred, or shared with everyone.
Quick Notes
A quick scratchpad for key points and reminders. Each note can be up to 500 characters.
This module is hidden by default. Click Customize to show it. See Figure 2.
Shortcuts
Add up to 18 of your most-used pages and views here to skip searching across applications and reach them with one click.
This module is hidden by default. Click Customize to show it. See Figure 2.
Top-right toolbar
- Customize: Click to change the layout and pick the widgets you want on your workbench.
- English: System language.
 : Check system messages.
 : Check upgrade notices.
 : Check the help document.
- Service Ticket: Create and check service tickets.
- Username: shows who is logged in. Click it to see the system version or sign out.

You can create and share no-code applications on WeLink (blue version) and WeCom. The following uses WeLink (blue version) to show how to log in to the no-code workbench.
- (Optional) Register a WeLink account.
If you already have a WeLink account, skip this step. This step uses a WeLink account registered in the Huawei Cloud Astro Zero environment as an example.
- Go to the Huawei Cloud Astro Zero console.
- On the instance page, click Access Homepage. The application development page is displayed.
- On the top menu bar, click Workbench. The no-code workbench is displayed.
- Click
 in the upper left corner of the page and choose Environments > Environment Configuration.
 - In the navigation pane, choose Integrated Connection > Identity Authentication.
- On the displayed page, click the WeLink icon. The page for binding WeLink is displayed. Figure 3 Clicking the WeLink icon

- Click Register to register a WeLink account. Figure 4 WeLink registration page

- Enter your mobile number and the verification code, and click Next. Figure 5 WeLink login page

- Choose a role for the WeLink account. In this example, set the role to administrator.
- If the registered mobile number has been added to an enterprise or organization, Figure 6 is not displayed.
- In the current version, only WeLink administrators can search for AppCube on the PC to access the no-code workbench.
- On the page for creating enterprises or organizations, set the following parameters and click the create button. Figure 7 Creating an enterprise or organization
 After a WeLink account is registered, you can log in to the enterprise management background or download the WeLink client to the local PC.Figure 8 Logging in to the enterprise management background or downloading the WeLink client to the local PC
- (Optional) Download and install the WeLink PC client.
Once installed, Huawei Cloud Astro Zero can bind to WeLink. After that, WeLink administrators can create and manage no-code applications from WeLink.
- Log in to the development environment as a tenant, bind WeLink, and synchronize WeLink information.
- In the navigation pane of the environment configuration page, choose Integrated Connection > Identity Authentication, and click WeLink.
- In the WeLink Binding area, click Bind.
- In the displayed dialog box, open WeLink on the mobile client, click + in the upper right corner, and scan the QR code shown in Figure 9.
- Select the WeLink department where the user is located, then click the synchronization button.
After you scan the QR code for authentication, Huawei Cloud Astro Zero is automatically bound to WeLink. WeLink users are added as portal users. The number of users is not counted in the license until they log in to the current Huawei Cloud Astro Zero environment. You can view the WeLink user information in the Configuration Center > Organizations & Users > Users.
When Huawei Cloud Astro Zero is bound to WeLink, the bound WeLink user is added as a developer and portal user.
- Give the no-code developer permission to the WeLink user.
This lets the user log in to WeLink to develop and publish no-code applications.
- Return to the no-code workbench, click
 in the upper left corner of the page, and choose Environments > Configuration Center.
 - In the navigation pane, choose Users.
You can view the added users.
- Click the username. The user details page is displayed. Figure 11 Clicking a username

- In the Role Information area, click Edit. Choose No-code developer under Roles, click
 , and click Save. After adding the developer permission, the user can log in to WeLink to develop and release no-code applications.Figure 12 Giving the no-code developer permission to a user
- Return to the no-code workbench, click
- On WeLink, enter AppCube and tap the search result.
- On the displayed page, tap the button to access the no-code workbench. Figure 13 Huawei Cloud Astro Zero no-code workbench for mobile devices


FAQs
When I log in to the no-code workbench on the phone, I click Skip for syncing the user information (as shown in Figure 10). How do I sync the user information after binding the WeLink account?
Go to the environment configuration page, choose Integrated Connection > Identity Authentication, click WeLink, and click Sync Now in the User Synchronization area. User information will be synchronized.
Feedback
Was this page helpful?
Provide feedbackThank you very much for your feedback. We will continue working to improve the documentation.See the reply and handling status in My Cloud VOC.
For any further questions, feel free to contact us through the chatbot.
Chatbot


