Creating a Process
Tasks like trip requests or service ticket assignments need several roles to act in order. Create a process to guide them.
This example shows a trip request, using these roles:
- Trip applicant: fills in the trip form and sends it to the approver.
- Approver: approves or rejects the form. If rejected, the form returns to the applicant for changes. If approved, the applicant is notified by email.
- CC recipient: receives a copy of the approval email and takes no action.
Prerequisites
You have created a no-code application. If not, see Creating a No-Code Application.
Creating a Process
- Log in to the no-code workbench by referring to Logging In to the No-Code Workbench.
- In All Apps, hover over the target application's ... and choose Edit.
- In the list on the left of the application editing page, click Create and choose Create Process.
- Design a form.
- In the upper middle of the page, click Select Layout to select the desired form layout.
Figure 1 Selecting a layout

- In the upper middle area, select a terminal view type.
Choose PC or mobile view so the process works best on each device.
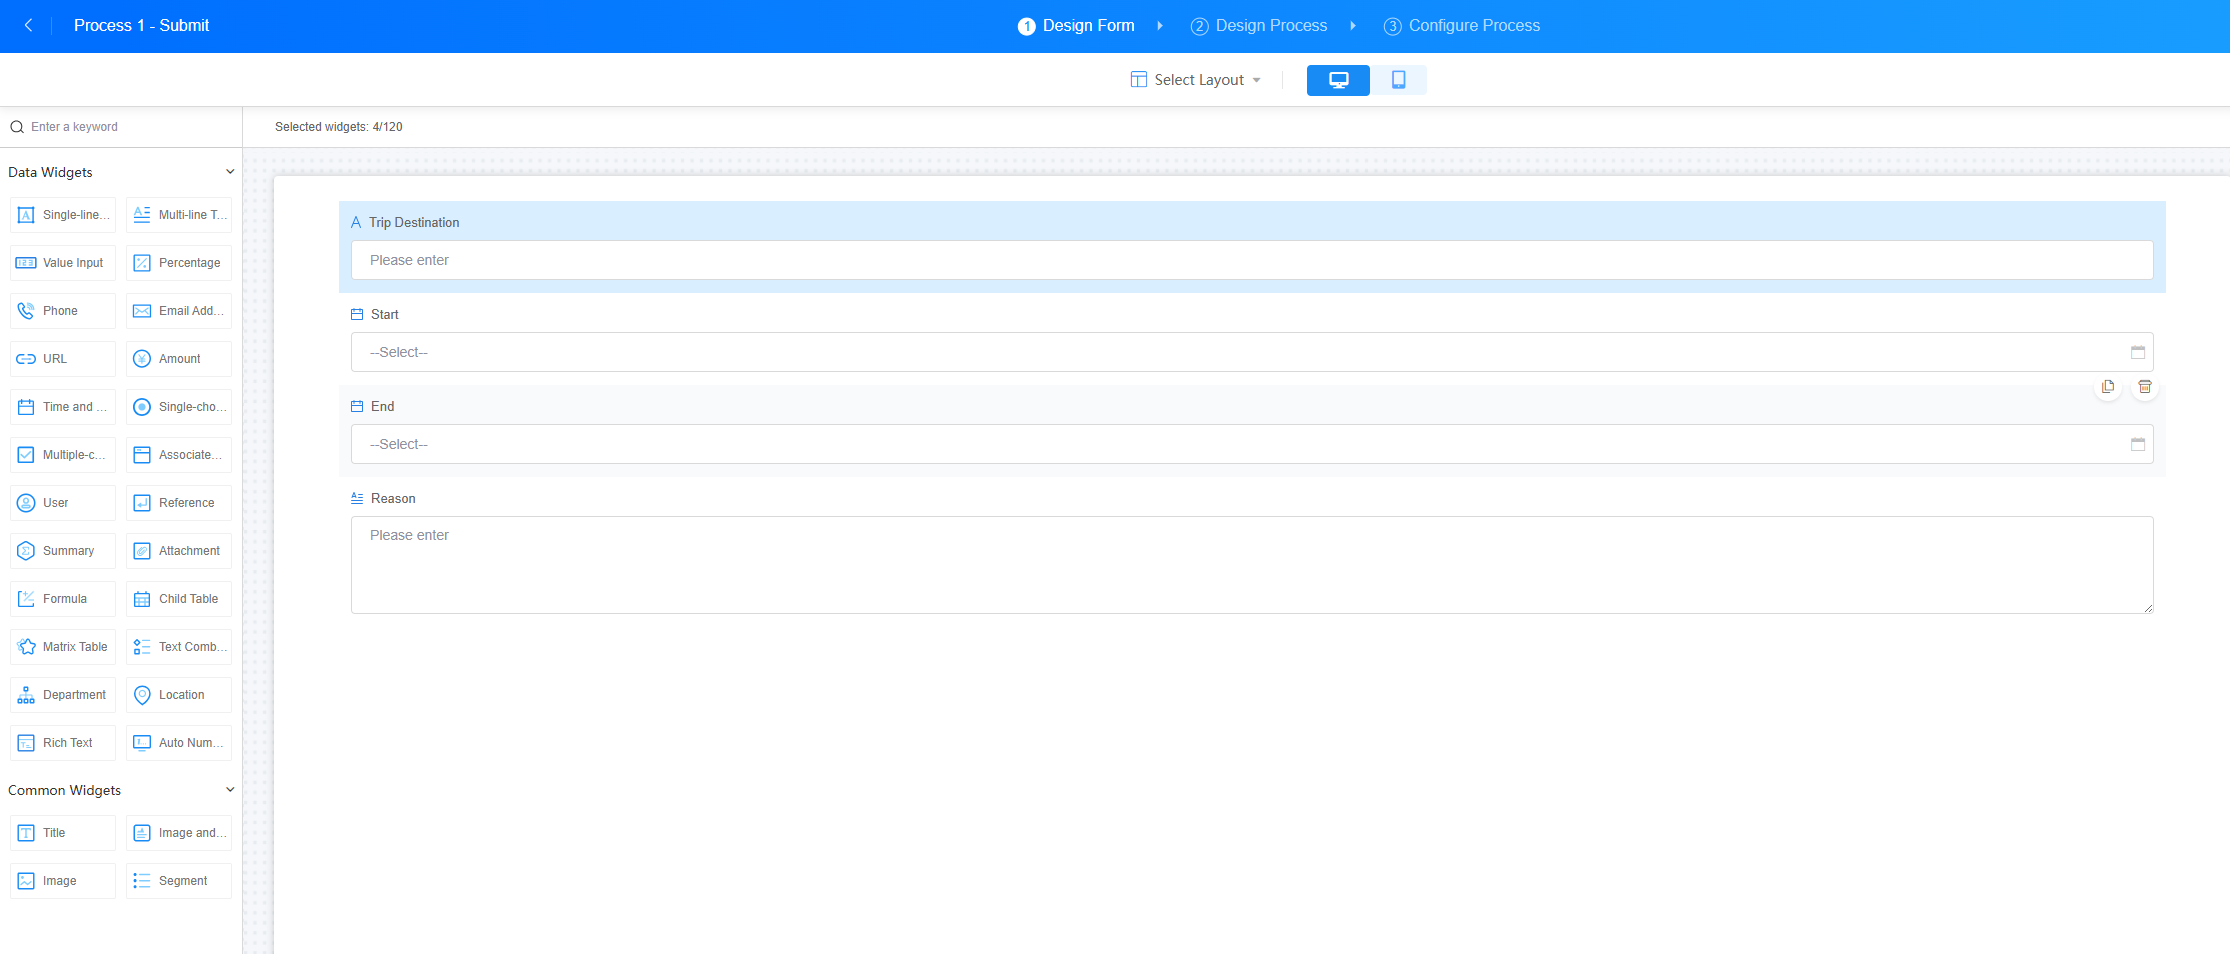
- Drag one single-line text widget, two date and time widgets, and one multi-line text widget from Data Widgets to the canvas, and set the widget properties, as shown in Figure 2.
This example uses single-line text, date and time, and multi-line text widgets. For details about other widgets, see Setting Form Widget Properties.
Table 1 Widgets in a form Widget
Description
Example
Single-line text
A widget for short text or numbers like names, license plate numbers, postal code, addresses, or ID numbers.
Trip location
Time and date
A widget for time or date like trip dates, current or custom.
Start time
End time
Multi-line text
A widget for long text like descriptions, notes, or feedback.
Trip description
- In the upper middle of the page, click Select Layout to select the desired form layout.
- Design a process.
The following shows how to design a trip request process. For more designs, see Setting Process Widget Properties.
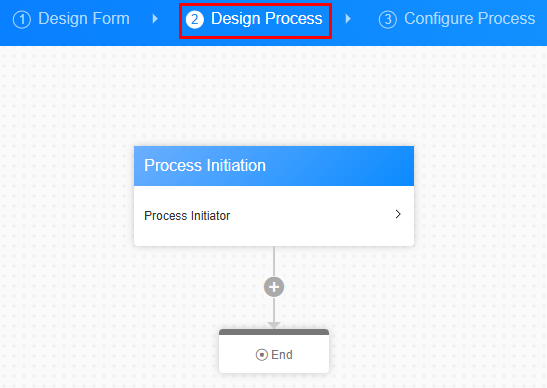
- At the top of the page, click Design Process.
Figure 3 Selecting Design Process
- Click
 , select the Approval node, set its parameters by referring to Table 2, and leave the rest as default.
Figure 4 Setting the Approval node
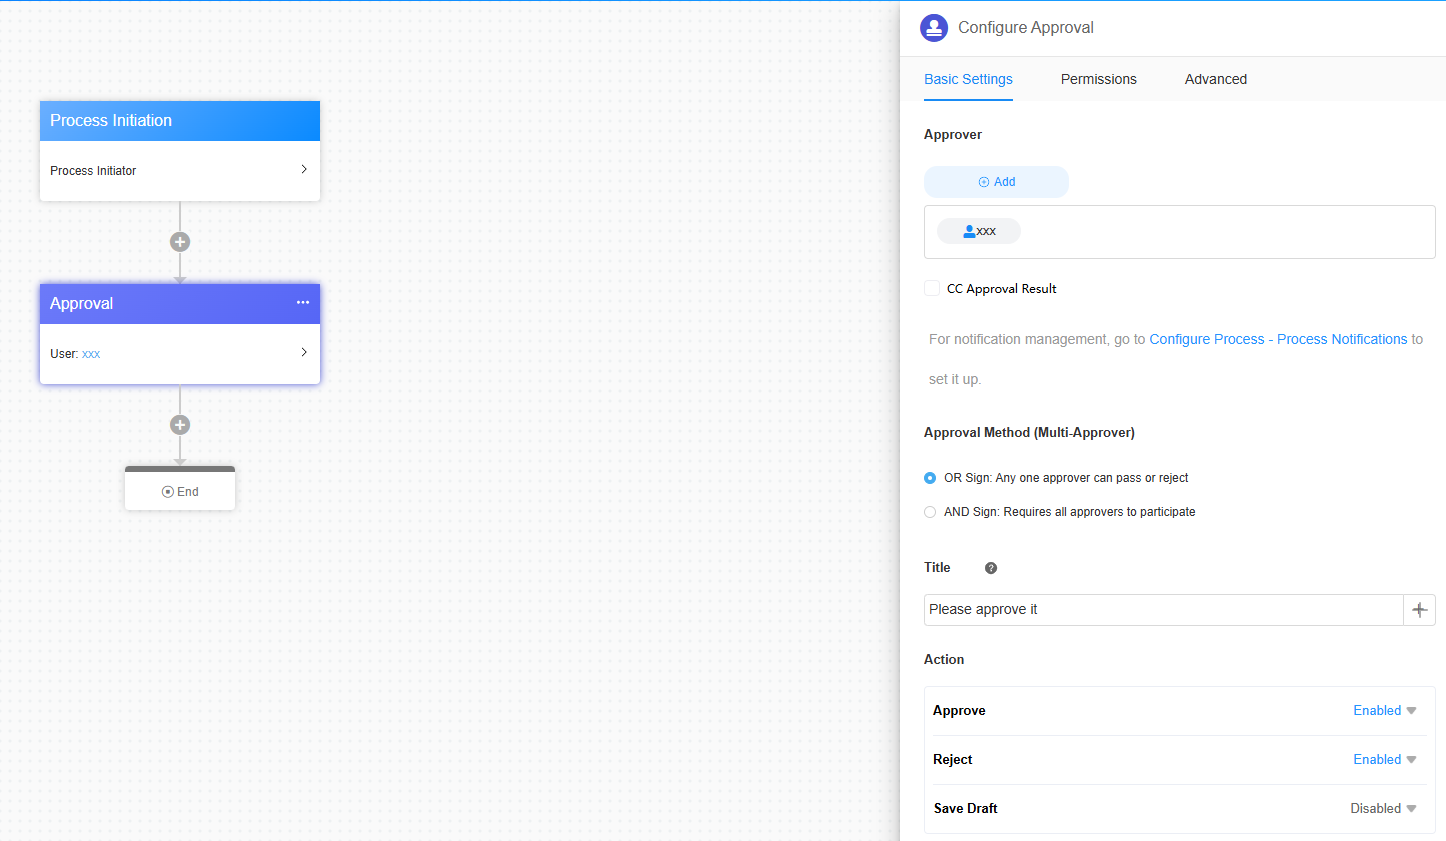 Figure 5 Setting node buttons
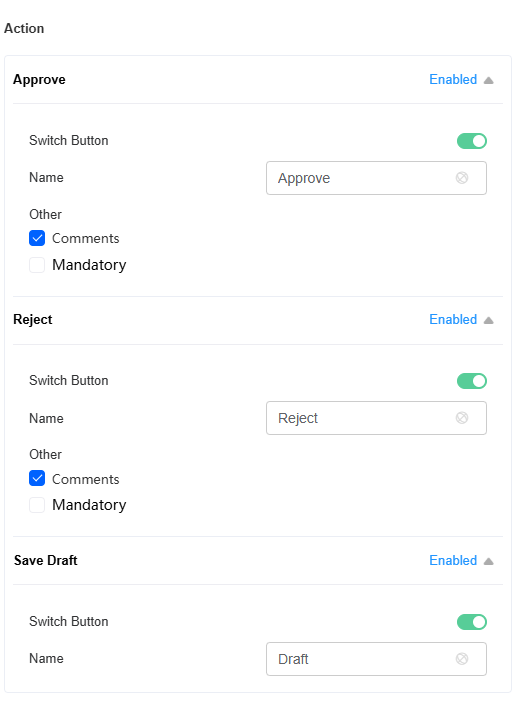
Table 2 Approval node parameters Parameter
Description
Approver
Set the approver of the process. By default, the process initiator is the approver. You can add approvers as follows:
- By member: Choose one or more members as approvers. The approver added must be created in the configuration center first. For details, see Adding Users to a System-Level Role.
- By role: Choose approvers by role, including preset and custom roles. See Customizing a System-Level Role to customize a role.
- Dynamic approver: Select the process initiator or form field as the approver. The form must contain one or more user widgets.
If you select CC Approval Result, the outcome (approved or rejected) will be sent to CC recipients.
Approval Method (Multi-Approver)
If multiple approvers are selected, set the approval method.- Any assignees: The process will go to next task if any approver finishes the approval.
- All assignees: The process will go to next task only when all approvers finish the approval.
Title
Title of the approval page (up to 255 characters).
Buttons
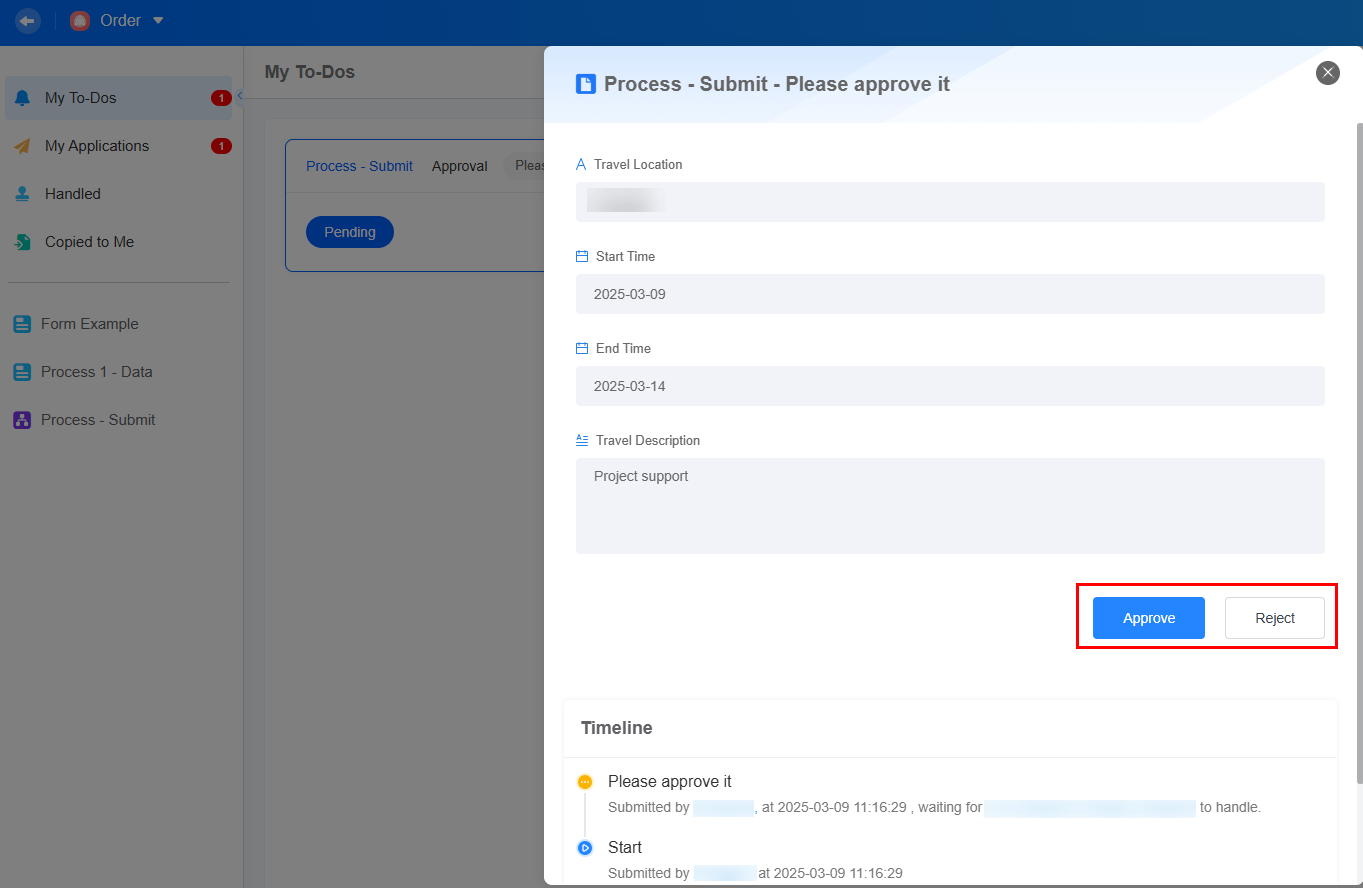
Set the button name on the approval page. Figure 6 shows the effect.
- Approve: A button for approving an application.
- Switch button: Enable or disable the button (enabled by default).
- Name: Set the button text for approval (default is Approve).
- Other > Comments: If checked, you need to enter comments when you approve.
- Other > Mandatory: Make comments required (unchecked by default).
- Reject: A button for rejecting an application.
- Switch button: Enable or disable the button (enabled by default).
- Name: Set the button text for rejection (default is Reject).
- Other > Comments: If checked, you need to enter the rejection reasons.
- Other > Mandatory: Make the rejection reasons required (unchecked by default).
- Save Draft: A button for saving form data temporarily.
- Switch button: Enable or disable the button (disabled by default). After the temporary storage function is enabled, you can click Save Draft to store your form data temporarily.
- Name: Set the button text for temporarily saving data in a form (default is "Save Draft").
- Click
 , select the CC node, set the CC recipient, and click the save button.
In this example, the process goes to the CC recipient only if the approver approves. If the approver rejects, the process ends.Figure 7 Configuring the CC node
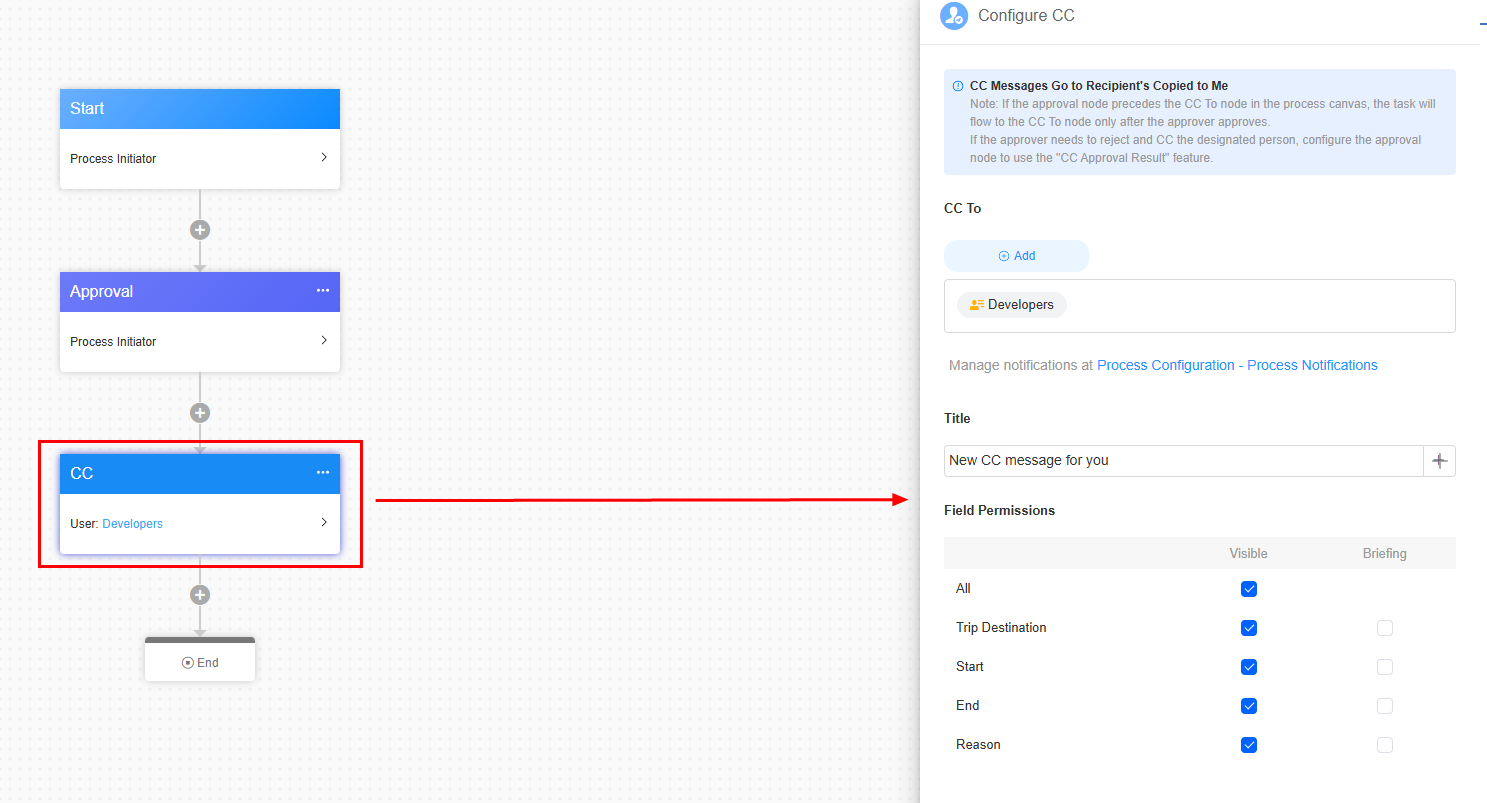
Table 3 Parameters of the CC node Parameter
Description
CC To
CC recipient. The default value is the process initiator. You can add a user or dynamic approver (process initiator or a reference field in the form) as the CC recipient.
Title
The title can contain a maximum of 85 characters. Click + to add variables to the title.
Field Permissions
Set which fields the CC recipient can see. By default, all fields are visible.
- At the top of the page, click Design Process.
- In the upper part of the page, click Configure Process and set Process Notifications and Process Cancellation.
Figure 8 Process notification and cancellation
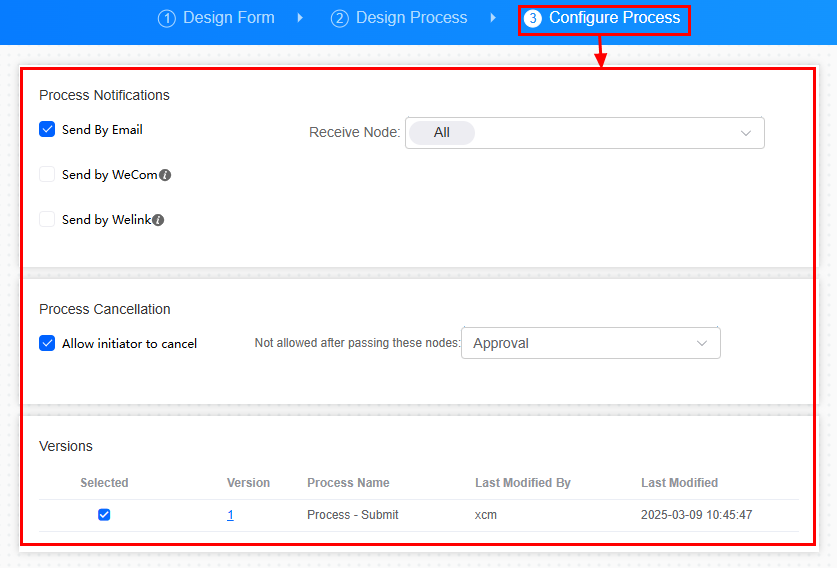
Table 4 Process configuration parameters Parameter
Description
Send by Email
Send key information of each node to its owner via email.
Send by WeCom
Send key information of each node to its owner via WeCom.
Before using this method, ensure that WeCom has been bound by choosing Environment Configuration > Configuration > Integrated Connection > Identity Authentication.
Send by WeLink
Send key information of each node to its owner via WeLink.
Before using this method, ensure that WeLink has been bound by choosing Environment Configuration > Configuration > Integrated Connection > Identity Authentication. Ensure that the sender and recipient are WeLink users.
Recipients
Specify the node that receives notifications.
- All
- Approval
- CC To
- Fill-In
Allow initiator to cancel
Whether the process initiator can cancel the process after it starts.
Not allowed after passing these nodes
Once the process reaches a certain node, the process initiator cannot cancel the process.
For example, in a trip request, the request cannot be canceled after it is approved on the Approval node.
- Click Save in the upper right corner of the page.
- Click Closed in the upper right corner to publish the process.
After publishing, the system shows a success message. If not, when you start the process, a message will appear saying that the process is disabled. Contact the administrator to enable it.
- Verify the trip request process.
- Click
 in the upper left corner to return to the development page of the trip request.
In an application, four processes are displayed: My To-Dos, My Applications, Handled, and Copied to Me.
- In the new "Process 1 - Initiate Process", fill in the trip request and submit it.
- Log in as an approver, go to Task Center > My To-Dos, and click the target request to approve it.
Figure 10 Viewing the request on the workbench
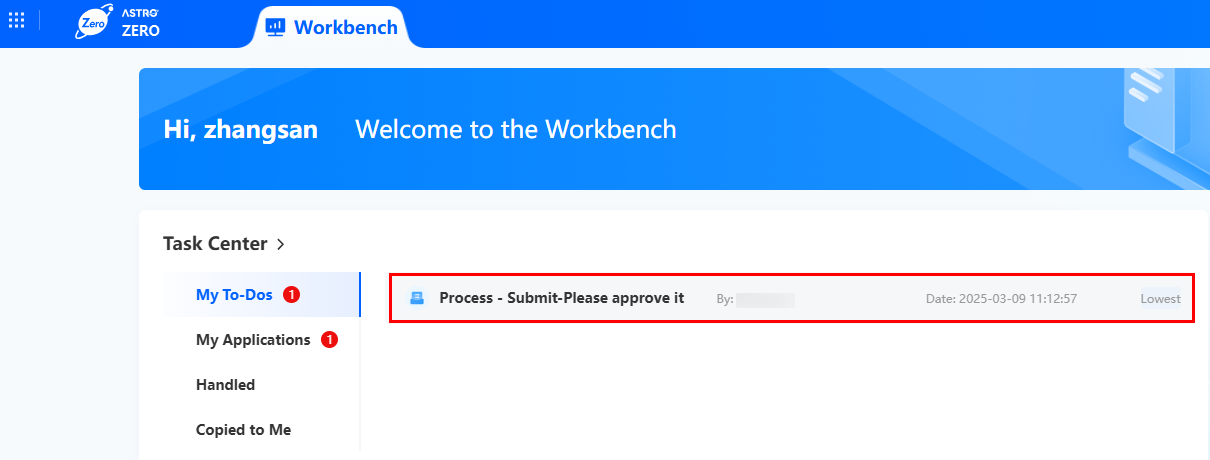 Figure 11 Approving the request
- Switch to the applicant account and check the request status again. The request is approved.
Figure 12 Viewing the approval result

- Click
Feedback
Was this page helpful?
Provide feedbackThank you very much for your feedback. We will continue working to improve the documentation.See the reply and handling status in My Cloud VOC.
For any further questions, feel free to contact us through the chatbot.
Chatbot

