Updating the Secure Boot Certificate of a Desktop
Scenarios
The private image created in Creating a User Desktop Image has the driver, software, and system environment configured and secure boot enabled using an API. However, the digital certificate of the image is still of version 2011. If the certificate is revoked or invalid, the provisioned desktop may malfunction. You need to upgrade the certificate to version 2023. A certificate of version 2023 cannot be directly imported to the initially created image. To update the certificate, you must incrementally update the original image that has enabled secure boot and contains the certificate of version 2011. Perform the following operations:
- Use the image created in Creating a User Desktop Image to provision an ECS.
- Update the certificate to version 2023 on the ECS.
- Revoke the certificate of version 2011 on the ECS.
- Create an image using the ECS.
- Call the API to enable secure boot.
Prerequisites
You have obtained the certificate of version 2023:
- Obtain the platform key: On the page for obtaining the certificate, click the windows oem devices pk.cer key next to PKpub to download the key.
- Obtain the key exchange key: On the page for obtaining the certificate, click the microsoft corporation kek 2k ca 2023.crt key next to Microsoft Corporation KEK 2K CA 2023 to download the key.
- Obtain the signature database key: On the page for obtaining the certificate, click the windows uefi ca 2023.crt key next to Windows UEFI CA 2023 to download the key.
Constraints
Only the following OS versions are supported:
- Windows 11 Enterprise 23H2
- Windows 11 Pro 24H2
- Windows 11 Enterprise 24H2
- Windows 11 Enterprise LTSC 2024
Provisioning an ECS
- Log in to the console.
- Click
 in the upper left corner of the console and choose Compute > Image Management Service.
The IMS console is displayed.
- Click the Private Images tab to show the image list.
- In the Operation column of the image created in Creating a User Desktop Image, click Apply for Server.
- For details about how to create an ECS, see Purchasing an ECS in Custom Config Mode.

- When provisioning an ECS, select Ac8.
- When provisioning an ECS, select Trusted Boot and TPM under Trusted Settings.

Updating the Certificate to Version 2023 on the ECS
Updating the DB certificate
Add the Windows UEFI CA 2023 certificate to the UEFI Secure Boot Signature Database (DB). In doing so, the device firmware will trust the startup applications signed by this certificate.
- Log in to the ECS using the account and password.
- Run the following commands to update the DB certificate:
- Click
 on the ECS, search for Command Prompt, and right-click Run as administrator to open the CLI window.
Run reg add HKEY_LOCAL_MACHINE\SYSTEM\CurrentControlSet\Control\Secureboot /v AvailableUpdates /t REG_DWORD /d 0x40 /f.
- Click
 on the ECS, search for Windows PowerShell, and right-click Run as administrator to open the Windows PowerShell window.
Run Start-ScheduledTask -TaskName "\Microsoft\Windows\PI\Secure-Boot-Update".
- In the Windows PowerShell window, run the following command to check whether the DB certificate has been updated:
[System.Text.Encoding]::ASCII.GetString((Get-SecureBootUEFI db).bytes) -match 'Windows UEFI CA 2023'
If True is returned, the database has been updated.
- Restart the ECS.
- Click
Updating the boot manager on the device
Install the boot manager signed by the Windows UEFI CA 2023 certificate on the device.
- Click
 on the ECS, search for Command Prompt, and right-click Run as administrator to open the CLI window.
Run reg add HKEY_LOCAL_MACHINE\SYSTEM\CurrentControlSet\Control\Secureboot /v AvailableUpdates /t REG_DWORD /d 0x100 /f.
- Click
 on the ECS, search for Windows PowerShell, and right-click Run as administrator to open the Windows PowerShell window.
Run Start-ScheduledTask -TaskName "\Microsoft\Windows\PI\Secure-Boot-Update".
- Restart the ECS.
Checking whether the certificate of version 2023 has been updated
Check whether the bootmgfw.efi file is signed by the Windows UEFI CA 2023 certificate.
- Click
 on the ECS, search for Command Prompt, and click Run as administrator to open the CLI window.
 - Mount the EFI partition as an administrator.
Run mountvol s: /s.
- Copy the bootmgfw.efi configuration file to drive C.
Run copy S:\EFI\Microsoft\Boot\bootmgfw.efi c:\bootmgfw_2023.efi.
- Go to drive C of the ECS, right-click the bootmgfw_2023.efi file, choose Properties, and select the Digital Signatures tab.
- Select the existing signature under Embedded Signatures. Click Details and then click View Certificate.
- On the certificate details page displayed, select the Certification Path tab as follows.
Revoking the Certificate of Version 2011

After the certificate of version 2011 is revoked, the ECS cannot be started after the restart because the certificate configured for image verification is of version 2011.
- Add the Windows Production PCA 2011 certificate to the Secure Boot UEFI Forbidden List (DBX).
Run the following commands:
- Click
 on the ECS, search for Command Prompt, and right-click Run as administrator to open the CLI window.
Run reg add HKEY_LOCAL_MACHINE\SYSTEM\CurrentControlSet\Control\Secureboot /v AvailableUpdates /t REG_DWORD /d 0x80 /f.
- Click
 on the ECS, search for Windows PowerShell, and right-click Run as administrator to open the Windows PowerShell window.
Run Start-ScheduledTask -TaskName "\Microsoft\Windows\PI\Secure-Boot-Update".
- Click
- On the menu bar of the ECS, right-click
 and choose Run from the shortcut menu. Enter eventvwr.msc and press Enter.
 - On the Event Viewer page, click Windows Logs > System.
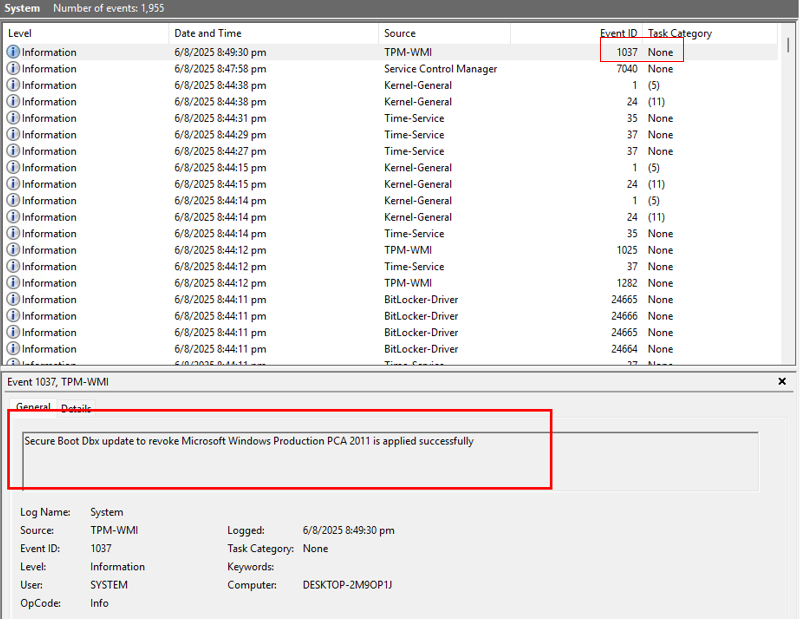
- Check the event whose ID is 1037 to verify whether the installation list and revocation list have been applied.

Deleting the temporary admin user

- The temporary user is the user created in 16.
- A local user of Windows can log in to each Windows VM created using the image. For security purposes, you are advised to delete unnecessary local users of Windows.
- On the menu bar of the ECS, right-click
 and choose Run from the shortcut menu. Enter sysdm.cpl and press Enter.
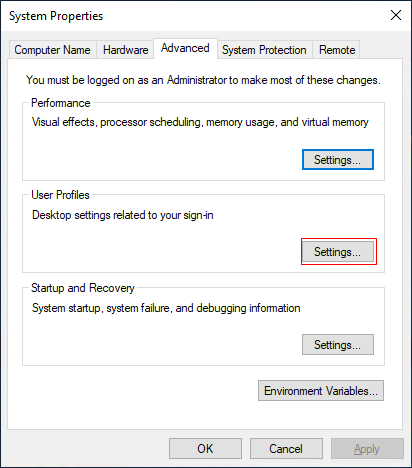
The System Properties window is displayed.
- On the Advanced tab, click Settings under User Profiles.

- On the User Profiles page, select the profiles of the user to be deleted and click Delete.
- Click Yes.
- On the menu bar of the ECS, right-click
 and choose Run from the shortcut menu. Enter compmgmt.msc and press Enter.
The Computer Management window is displayed.
- In the navigation pane, choose Local Users and Groups > Users.
- In the right pane, right-click the admin temporary user created in 16 and choose Delete from the shortcut menu. Then click Yes.
- Close the Computer Management window.
Creating an Image
- In the ECS list, locate the ECS for which you want to create an image, click More in the Operation column, and choose Manage Image/Backup > Create Image.
- After the image is created, choose Image Management Service in the navigation pane on the left to view the image.
Configuring a Certificate of Version 2023 and Secure Boot for the Image
- Obtain the certificate of version 2023 by referring to Prerequisites.
- Log in to the ECS using the account and password.
- Search for Windows PowerShell in the Start menu of the local Windows PC, and click Run as administrator to open the Windows PowerShell window.
- Run the following commands to convert the certificate obtained in 1 to the Base64 format.
- Convert the windows oem devices pk.cer certificate to the Base64 format:
[System.Convert]::ToBase64String([System.IO.File]::ReadAllBytes("windows oem devices pk.cer certificate storage path")) | Out-File -FilePath "windows oem devices pk.base64 certificate generation path" -NoNewline
- Convert the microsoft corporation kek 2k ca 2023.crt certificate to the Base64 format:
[System.Convert]::ToBase64String([System.IO.File]::ReadAllBytes("microsoft corporation kek 2k ca 2023.crtcertificate storage path")) | Out-File -FilePath "microsoft corporation kek 2k ca 2023.base64certificate generation path" -NoNewline
- Convert the windows uefi ca 2023.crt certificate to the Base64 format:
[System.Convert]::ToBase64String([System.IO.File]::ReadAllBytes("windows uefi ca 2023.crt certificate storage path")) | Out-File -FilePath "windows uefi ca 2023.base64 certificate generation path" -NoNewline

Replace the three certificate storage paths and three certificate generation paths in the preceding commands with the actual ones.
Example of the windows oem devices pk.cer certificate:
- Example of the certificate storage path: C:\windows oem devices pk.cer
- Example of the certificate generation path: C:\windows oem devices pk.base64
- Convert the windows oem devices pk.cer certificate to the Base64 format:
- Call the APIs to enable secure boot and VTPM.
- Obtain the image_id in Creating an Image. In the navigation pane of the ECS console, choose Image Management Service.
- On the Image Management Service page, obtain the image ID, as shown in Figure 1.
- Edit the following content:
Replace the values of the following parameters:
- Replace $__platform_key with the content of the windows oem devices pk.base64 certificate generated in 4.
- Replace $__key_exchange_key with the content of the microsoft corporation kek 2k ca 2023.base64 certificate generated in 4.
- Replace $__signature_database with the content of the windows uefi ca 2023.base64 certificate generated in 4.
Do not copy -----BEGIN CERTIFICATE----- in the first line and -----END CERTIFICATE----- at the end when copying the key content in 4.
[
    {
    "op": "add",
    "path": "/__support_tpm",
    "value": "true"
},{
    "op": "add",
    "path": "/__support_secure_boot",
    "value": "true"
  },
  {
    "op": "add",
    "path": "/__platform_key",
    "value": "$__platform_key"
  },
  {
    "op": "add",
    "path": "/__key_exchange_key",
    "value": "$__key_exchange_key"
  },
  {
    "op": "add",
    "path": "/__signature_database",
    "value": "$__signature_database"
  }
]
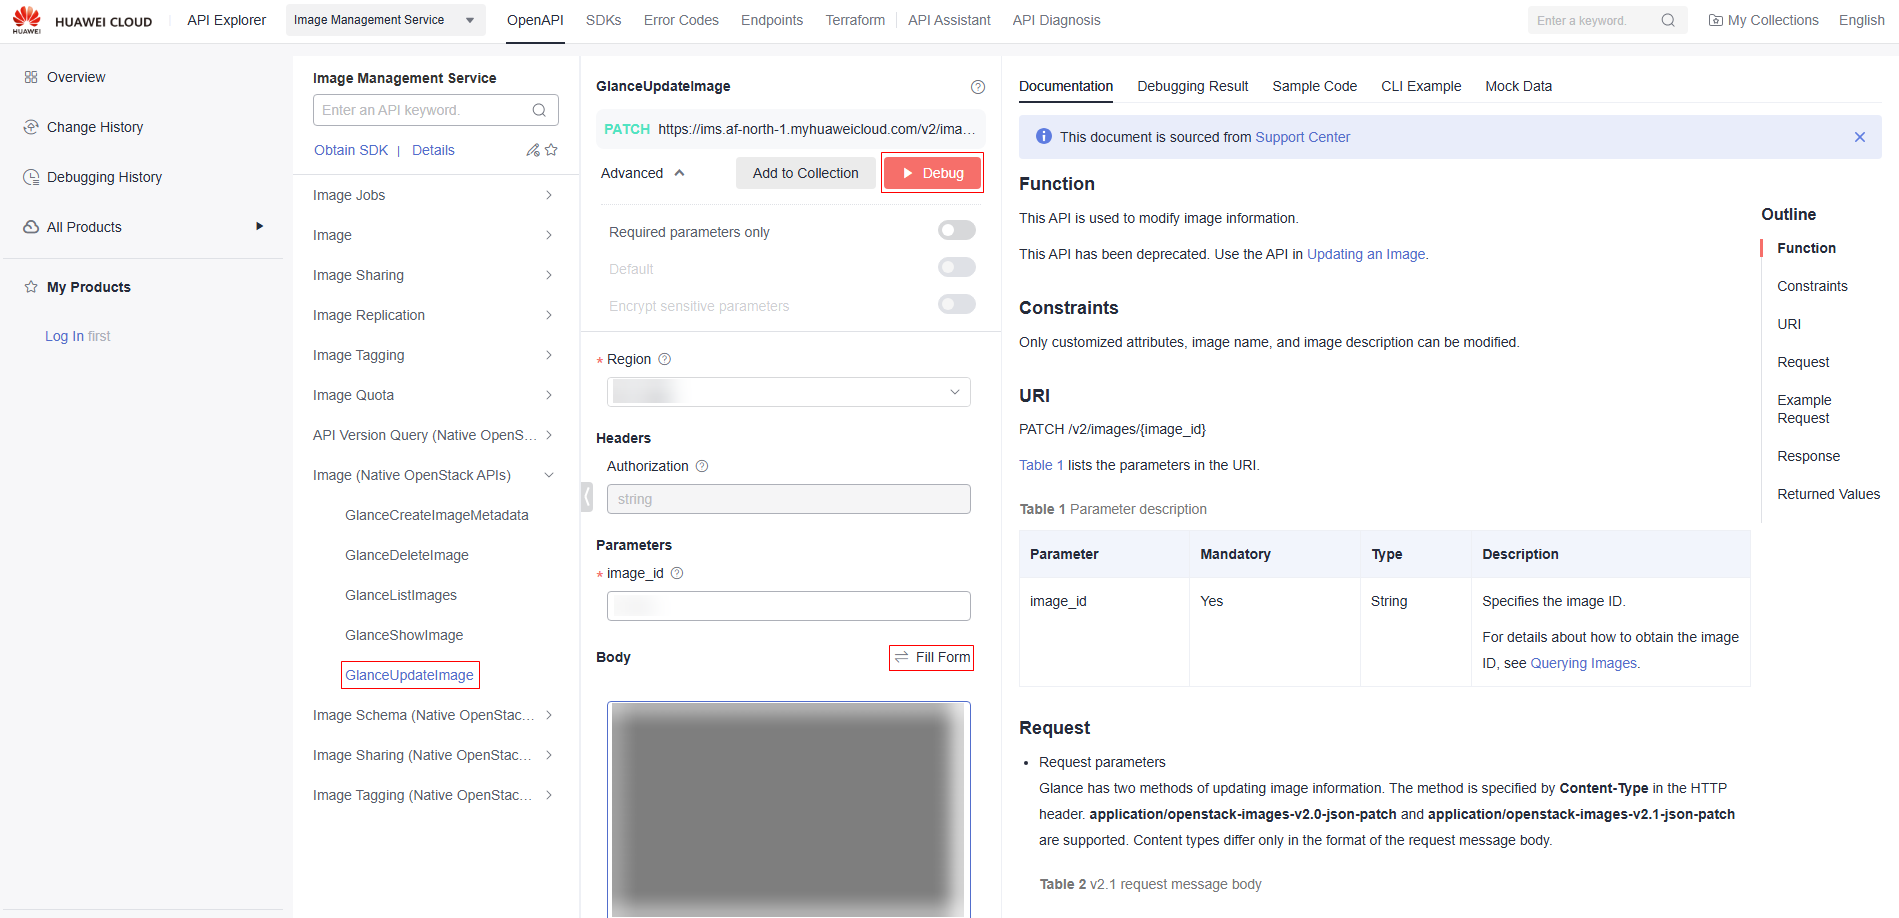
- Call the API through API Explorer.
Follow-up Operations

Workspace supports scheduled desktop snapshot creation. The purpose of desktop snapshot creation is to quickly back up and restore data. If a personal misoperation, software incompatibility, system breakdown or fault, or software conflict occurs, snapshot restoration can help quickly restore your desktop to the previous state, preventing data loss and work interruption.
- For details about how to create a desktop snapshot, see Scheduled Snapshot Creation.
- For details about how to restore a snapshot, see "Restoring a snapshot" in Snapshots.
Feedback
Was this page helpful?
Provide feedbackThank you very much for your feedback. We will continue working to improve the documentation.See the reply and handling status in My Cloud VOC.
For any further questions, feel free to contact us through the chatbot.
Chatbot


