Editing a Policy
Scenarios
This section describes how to edit an existing policy.
Procedure
- Log in to the console.
- Choose Policies > Protocol Policies.
The Protocol Policies page is displayed.
- Perform operations as required.

- The default policy is a preset general policy and its priority cannot be changed.
- When you create multiple policies, the default policy has the lowest priority.
- Adjust the policy priority. Click
 in the Priority column, adjust the priority to a proper level, and click OK.
 - Click
 in the Policy Name column to change the policy name.
 - Click View Object in the Policy Target Object column to view a policy's target objects. On the page displayed, you can click Edit to modify the target objects.
- To modify a policy's target objects, choose More > Modify Object in the Operation column.
- To modify the description, choose More > Change Description in the Operation column.
- To delete a policy, choose More > Delete in the Operation column.
- To modify a policy, perform 4 to 7.
- In the Operation column of the desired policy, click Modify Policy Item.
The General Policy Configuration page is displayed.
- On the page displayed, enable or disable the corresponding policy, as shown in Table 1.
 indicates that the policy is enabled.
 indicates that the policy is disabled.
Table 1 Policy management Type
Parameter
Description
USB Port Redirection
Graphics devices (such as scanners)
Supports USB peripherals on Workspace. Users can use devices in VMs through USB port redirection.
Video devices (such as cameras)
Printers
Storage devices (such as USB flash drives)
Smart card devices (such as Ukeys)
File Redirection
Fixed driver
- Read-only: Files in drivers and storage devices can only be pre-viewed.
- Read/Write: Files in drivers and storage devices can be modified.
Supports drivers on Workspace. Users can use drivers in VMs through file redirection.
Removable driver
CD/DVD-ROM driver
Network driver
Clipboard Redirection
Bidirectional
After this function is enabled, end users can copy data on cloud desktops and paste the data on local desktops, or copy data on local desktops and paste the data on cloud desktops.
Server to client
After this function is enabled, end users can only copy data on cloud desktops and paste the data on local desktops.
Client to server
After this function is enabled, end users can only copy data on local desktops and paste the data on cloud desktops.
NOTE:Files can be copied only from a Windows client to a server, and file redirection and the corresponding driver must be enabled.
Printer Redirection
-
VM end users can use printers connected to devices through printer redirection (a policy of device redirection).
Rendering Acceleration
NOTE:This option only applies to video editing.
Visual quality first
The visual quality is excellent and the bandwidth usage is high (25 Mbit/s).
The parameter details cannot be edited by default.
Smoothness first
The visual quality and bandwidth usage are balanced (20 Mbit/s).
The parameter details cannot be edited by default.
Level 1
NOTE:The HDP Plus parameter can be customized for adaptation.
The bandwidth (kbit/s) ranges from 256 to 25,000.
NOTE:This parameter specifies the limit of the display stream data. Increasing the value of this parameter improves user experience but consumes more network bandwidth. If the network bandwidth is insufficient, increasing the value of this parameter will compromise smoothness. In this case, you are advised to use the default value.
Display Frame Rate (FPS): 1–60
NOTE:This parameter specifies the display frame rate when no video is played. Increasing the value improves display smoothness but consumes more bandwidth resources. If the network bandwidth is insufficient, increasing the value of this parameter will compromise smoothness. In this case, you are advised to use the default value.
Video Frame Rate (FPS): 1–60
NOTE:This parameter specifies the frame rate of video display. Increasing the value improves display smoothness but consumes more bandwidth resources. If the network bandwidth is insufficient, increasing the value of this parameter will compromise smoothness. In this case, you are advised to use the default value.
Lossy Compression Recognition Threshold: 0–255
NOTE:This parameter is used to adjust static image quality. A smaller value indicates higher quality but higher bandwidth usage and lower smoothness.
Lossy Compression Quality: 20–100
NOTE:This parameter is used to adjust static natural image quality. A larger value indicates higher quality but higher bandwidth usage and lower smoothness.
- Edit an advanced policy.
- On the General Policy Configuration page, click Advanced Policy.
The Advanced Policy page is displayed.
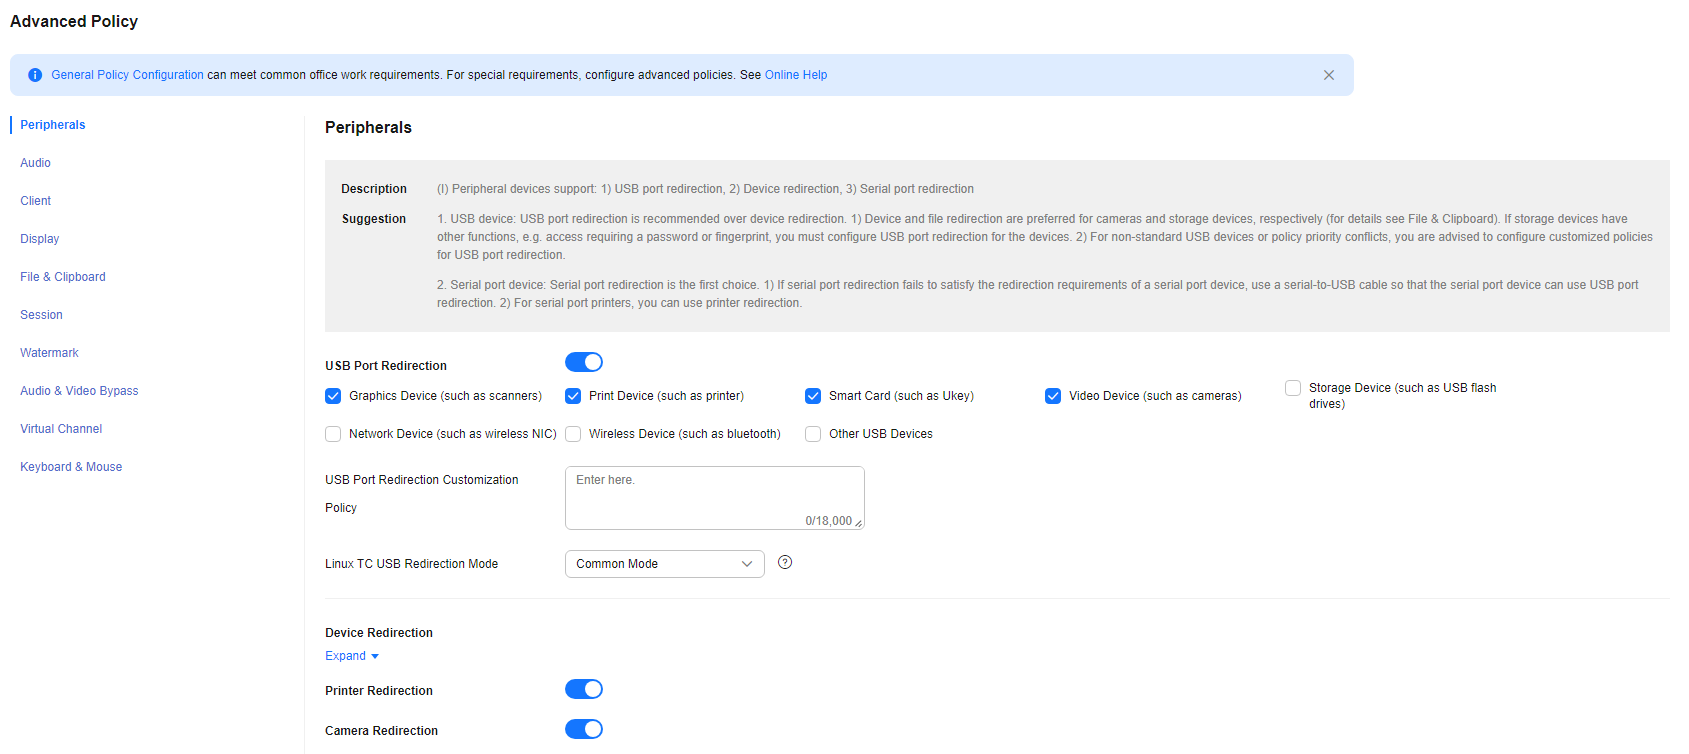
- Configure an advanced policy, as shown in Figure 1. For details about the advanced policy parameters, see Creating an Advanced Policy.
- On the General Policy Configuration page, click Advanced Policy.
- Click OK to save the configured policy information.
An end user must log in to the desktop again for the new policy to take effect.
Feedback
Was this page helpful?
Provide feedbackThank you very much for your feedback. We will continue working to improve the documentation.See the reply and handling status in My Cloud VOC.
For any further questions, feel free to contact us through the chatbot.
Chatbot


