
Step 2: Configure a Load Balancer for WAF
To ensure your dedicated WAF instance reliability, after you add a website to it, use Huawei Cloud Elastic Load Balance (ELB) to configure a load balancer and a health check for the dedicated WAF instance.

Huawei Cloud ELB is billed by traffic. For details, see ELB Pricing Details.
Prerequisites
- You have added a website to a dedicated WAF instance.
- You have purchased a dedicated load balancer. For details about load balancer types, see Differences Between Dedicated and Shared Load Balancers.

Dedicated WAF instances issued before April 2023 cannot be used with dedicated network load balancers. If you use a dedicated network load balancer (TCP/UDP), ensure that your dedicated WAF instance has been upgraded to the latest version (issued after April 2023). For details, see Dedicated Engine Version Iteration.
- Related ports have been enabled in the security group to which the dedicated WAF instance belongs.
You can configure your security group as follows:
- Inbound rules
Add an inbound rule to allow incoming network traffic to pass through over a specified port based on your service requirements. For example, if you want to allow access from port 80, add a rule that allows TCP and port 80.
- Outbound rules
Retain the default settings. All outgoing network traffic is allowed by default.
For more details, see Adding a Security Group Rule.
- Inbound rules
Constraints
- If Health Check is configured, the health check result of the dedicated instance must be Normal, or the website requests cannot be pointed to WAF. For details about health check, see How Do I Troubleshoot an Unhealthy Backend Server?
- The Backend Port for the backend server must be the same as the service port protected by the dedicated WAF instance. The service port is the protected port set in Step 1: Add a Website to WAF (Dedicated Mode).
- WAF works as a layer-7 proxy. When configuring a listener, you can only select HTTP or HTTPS as the frontend protocol.
Impact on the System
If you select Weighted round robin for Load Balancing Algorithm, disable Sticky Session. If you enable Sticky Session, the same requests will be forwarded to the same dedicated WAF instance. If this instance becomes faulty, an error will occur when the requests come to it next time.
Adding a Listener
If Health Check is configured, the health check result of the dedicated instance must be Healthy, or the website requests cannot be pointed to WAF.
- Log in to the management console.
- Click
 in the upper left corner of the management console and select a region or project.
 - Click
 in the upper left corner of the page and choose Elastic Load Balance under Network to go to the Load Balancers page.
 - Click the name of the load balancer you want in the Name column to go to the Listeners page.
- Then, click Add Listener and configure the listener information.
- Frontend Port: the port that will be used by the load balancer to receive requests from clients. You can set this parameter to any port. The origin server port configured in WAF is recommended.
- Frontend Protocol: Select HTTP or HTTPS.
Figure 1 Configuring a listener
- Click Next: Configure Request Routing Policy.
Figure 2 Configuring a backend server group
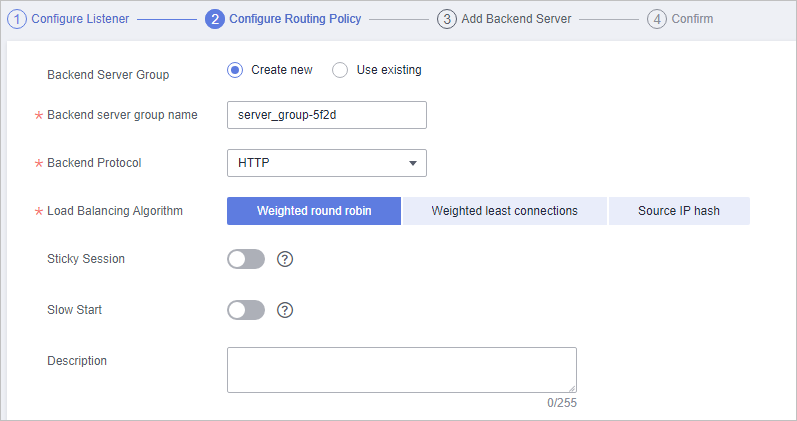
- If you select Weighted round robin for Load Balancing Algorithm, disable Sticky Session. If you enable Sticky Session, the same requests will be forwarded to the same dedicated WAF instance. If this instance becomes faulty, an error will occur when the requests come to it next time.
- For details about ELB traffic distribution policies, see Load Balancing Algorithms.
- Click Next: Add Backend Server and configure a health check.
- If Health Check is configured, the health check result must be Healthy, or the website requests cannot be pointed to WAF. For details about how to configure health check, see Configuring a Health Check.
- Click Next: Confirm.
- Click Submit.
Adding WAF Instances to an ELB Load Balancer
- Log in to the management console.
- Click
 in the upper left corner of the management console and select a region or project.
 - Click
 in the left upper corner and choose to go to the Dashboard page.
 - In the navigation pane on the left, choose Instance Management > Dedicated Engine to go to the dedicated WAF instance page.
Figure 3 Dedicated engine list

- In the row containing the instance you want to upgrade, click More > Add to ELB in the Operation column.
- In the Add to ELB dialog box, specify ELB (Load Balancer), ELB Listener, and Backend Server Group based on Adding a Listener.
Figure 4 Add to ELB
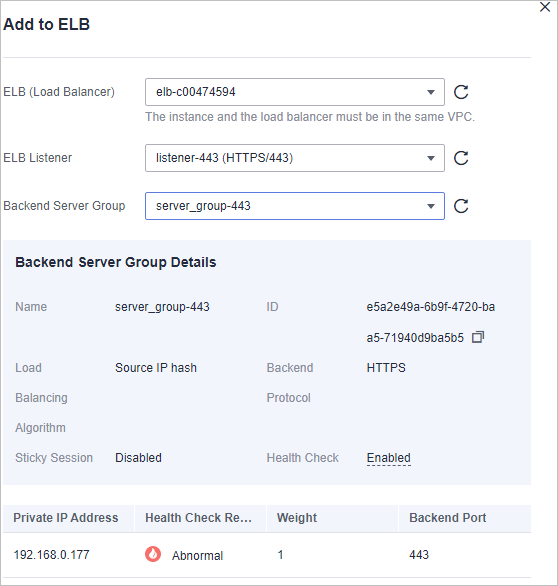
The Health Check result must be Healthy, or the website requests cannot be pointed to WAF. For details about troubleshooting, see How Do I Troubleshoot an Unhealthy Backend Server?
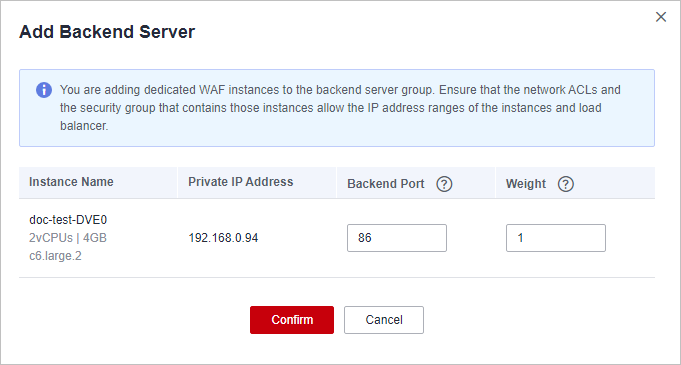
- Click Confirm. Then, configure service port for the WAF instance, and Backend Port must be set to the port configured in Step 1: Add a Website to WAF (Dedicated Mode).
Figure 5 Configuring Backend Port
Verification
If the Health Check Result is Healthy, the load balancer is configured.
Feedback
Was this page helpful?
Provide feedbackThank you very much for your feedback. We will continue working to improve the documentation.See the reply and handling status in My Cloud VOC.
For any further questions, feel free to contact us through the chatbot.
Chatbot


