Configuring a Flow Task Process
Overview
Flow tasks can be created on the console with ease, with the following functions provided:
- A processor node can collect data from one data source to multiple destinations.
- Tasks can be configured simply by dragging and dropping nodes.
- Data conversion modes include the mapping mode and script mode. With JavaScript scripts, you can read data from the source, process the data, and then write the data to the destination.
Prerequisites
- The source and destination data sources have been connected to ROMA Connect. For details, see Connecting to Data Sources.
- ROMA Connect has the permission to write data to the destination.
- If you need to configure data storage with abnormal synchronization, ensure that the OBS data source has been connected. For details, see Connecting to an OBS Data Source.
Procedure
- Log in to the ROMA Connect console. On the Instances page, click View Console next to a specific instance.
- In the navigation pane on the left, choose Fast Data Integration > Task Management. On the displayed page, click Create Flow Task.
- Add source nodes.
- Drag Integration Application under Basic Components on the left to the orchestration area.
- Click the Integration Application node for configuration. For details, see Table 1. After the configuration is complete, click OK.
Table 1 Integration application parameters Parameter
Description
Instance
Select the instance of the project.
Application
Select the application to which the instance belongs. If no application is available, click
 to create an integration application. For details, see Creating an Integration Application.
Click
 in the upper left corner of the dialog box to change the name of the integration application.
 - In the Data Source area on the left, select a data source type, click
 , and drag a data source component to the integration application as a source node.
 - Click the data source node and select the corresponding data source.
If no data source is available, click Add to add one. For details, see Data Source Management.
- Add a destination node.
- Drag Integration Application under Basic Components on the left to the orchestration area.
- Add an integration application for the data source. For details, see 3.
- Add a processor node.
- Drag Task Scheduler under Processor on the left to the orchestration area. Task schedulers schedule data between data sources and set the task integration mode and execution period. The following table describes the parameters.
Table 2 Task scheduler parameters Parameter
Description
Integration Mode
Select Scheduled as the mode used for data integration.
- Scheduled: A data integration task is executed according to the schedule to integrate data from the source to the destination.
- Real-Time: The data integration task continuously detects updates to the data at the source and integrates updates to the destination in real time.
The data integration mode varies depending on the data source. For details, see Table 1.
Parse
Specify whether to transparently transmit data, that is, pass data from the source to the destination without altering the data.
- Yes
- No
QuartZ Cron Expression
Specify whether to adopt Quartz cron expressions.
- See Using Quartz cron expressions if you use Quartz cron expressions.
- See Not using Quartz cron expressions if you do not use Quartz cron expressions.
Execution Time
Start time of a task.
Description
Enter the description of the task scheduler.
- Configure the task scheduler. Choose whether to use Quartz cron expressions for configuration.
- Using Quartz cron expressions
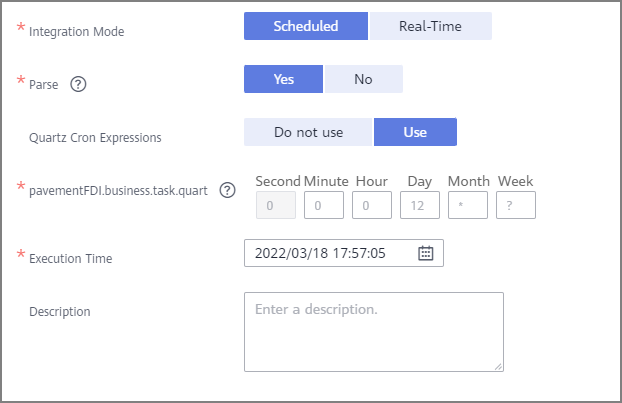
The QuartZ Cron expression supports flexible schedules. For example, a task can be executed every 15 minutes from 01:00 a.m. to 04:00 a.m. every day based on the settings of the QuartZ Cron expression. Such a schedule cannot be implemented through simple GUI configuration, but using the QuartZ Cron expression.
0 0/15 1-4 * * ?
Figure 1 Quartz cron expression parameters
Table 3 Quartz cron expression parameters Parameter
Description
QuartZ Cron Expression
Select Yes.
QuartZ Cron Expression
Specify the QuartZ Cron expression for the schedule. Currently, ROMA Connect supports only minute-level schedules. The second in the expression is fixed to 0. For details, see Appendix: Quartz Cron Expression Configuration.
For example, if a task needs to be executed every 15 minutes from 01:00 a.m. to 04:00 a.m. every day, the QuartZ Cron expression corresponding to the schedule is as follows:
0 0/15 1-4 * * ?
- Not using Quartz cron expressions
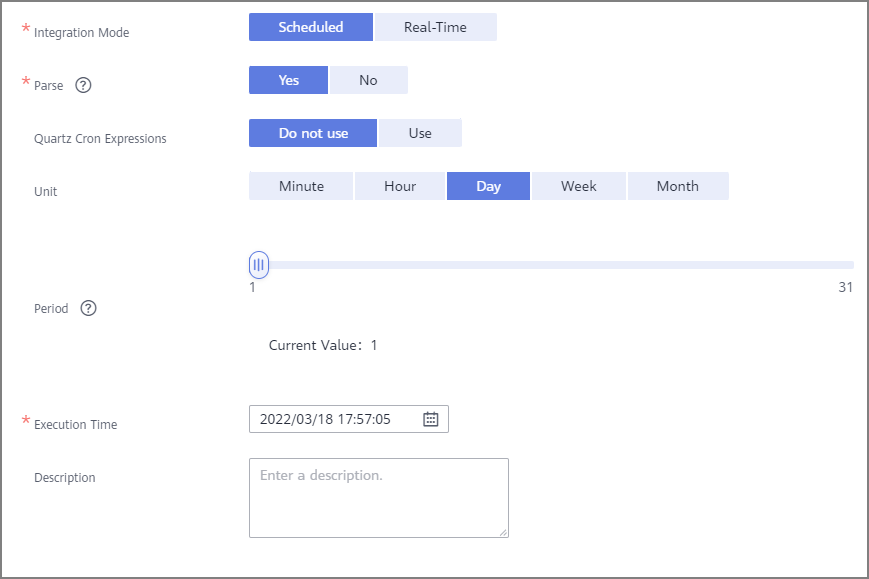
Figure 2 GUI configuration

Table 4 Simple GUI configuration Parameter
Description
QuartZ Cron Expression
Select Do not use.
Unit
Set the unit of the task execution period. The value can be Minute, Hour, Day, Week, or Month.
Period
Set the task execution cycle. The value range varies depending on the value of Unit.
For example, if Unit is set to Day and Period is set to 1, the data integration task is executed once a day. Ensure that the scheduling period is longer than the task execution period to prevent task failures.
- Using Quartz cron expressions
- After the configuration is complete, click OK.
- Drag Task Scheduler under Processor on the left to the orchestration area. Task schedulers schedule data between data sources and set the task integration mode and execution period. The following table describes the parameters.
- Configure orchestration task connections.
- Connect the data source node at the source, task scheduler, and data source node at the destination in sequence.
Figure 3 Connecting components

- Click the line between the source data node and task scheduler for configuration. For details, see Configuring Source Information. After the configuration is complete, click OK.
- Click the line between the task scheduler and destination node and configure line parameters. For details, see Configuring Destination Information. After the configuration is complete, click OK.
- Click
 in the upper right corner of the page and check whether there are incorrect configurations.
- If yes, reconfigure the nodes.
- If no, go to the next step.
- Connect the data source node at the source, task scheduler, and data source node at the destination in sequence.
- Click Save in the upper right corner of the page to save the orchestration task.
Feedback
Was this page helpful?
Provide feedbackThank you very much for your feedback. We will continue working to improve the documentation.See the reply and handling status in My Cloud VOC.
For any further questions, feel free to contact us through the chatbot.
Chatbot


