
Managing Organizations
Organizations facilitate user management and authorization. You can create, modify, move, and delete organizations, and add users to organizations. For details about organization-based authorization, see Configuring Authorization Policies for Application Organizations.
To add a large number of organizations, synchronize organization data from your identity sources or import organization data with a template.
- Import from identity sources: Configure data import logic to synchronize organization data from upstream identity sources to OneAccess. For details, see Managing Identity Source.
- Import with a template: Add organization data to the template and then import the organization data to OneAccess. For details, see Organizations.
Adding an Organization
In an organization tree, you can add top-level organizations and sub-organizations.
- Log in to the administrator portal.
- On the top navigation bar, choose Users > Organizations and Users.
- On the Organizations and Users page, switch to the Organizations tab.
- On the organization list page, click Create Organization.
- On the Create Organization page, specify organization parameters.
Table 1 Organization information Parameter
Description
* Organization Type
You can select an organization type from the drop-down list box. The options are Department, Unit, Company, and Group.
* Organization Code
Unique identifier of the organization.
*Organization Name
Organization name. Organizations at the same level must have different names.
Sequence
Position of the organization in the organization tree. By default, new organizations are displayed at the end.
Parent Organization
- Leave this parameter empty when adding a top organization.
- Displayed as the organization you selected when you create a sub-organization
- Click OK.
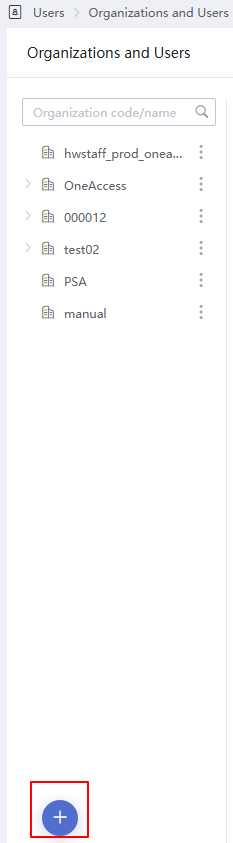
- To create a top-level organization, click the plus sign (+) in the lower left (see the following figure).
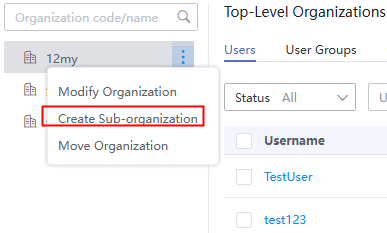
- In the organization tree on the left, click
 on the right of the organization and select Create Sub-organization by referring to Figure 1, to quickly add a sub-organization. Alternatively, select the added top organization in the organization navigation tree on the left and click Create Organization to add a sub-organization.
Viewing Organization Details
In the organization list, click the target organization and view administrators' operations on it, such as creation and modification. Set filter conditions to view desired logs.
Modifying an Organization
In the organization list, click Modify in the row that contains the target organization, and modify the ID, name, and position. You can move an organization to another parent organization. For details, see Moving an Organization.
To modify an organization, select it in the left pane, choose  > Modify Organization (see Figure 2).

Moving an Organization
Move an organization to another parent organization. If you have enabled automatic user authorization for an application, moving the organization of a user will change the user's access to the application. For details, see Configuring Authorization Policies for Application Accounts.
- In the organization list, locate the target organization and click Move in the Operation column. The Select Organization dialog box is displayed. Alternatively, in the organization tree on the left, click
 on the right of the organization and click Move Organization to quickly move the organization.
 - In the Select Organization dialog box, select an upper-level parent organization.

- If the organization to be moved is a sub-organization and you want to set it as the top organization, click Set as Top-level organizations.
- If the organization to be moved is not a sub-organization, you only need to select the top-level organization in the Select Organization dialog box.
- Click OK. In the displayed dialog box, click OK.
Deleting an Organization
- The organization cannot be recovered once deleted. Exercise caution when performing this operation.
- If an organization contains users, user groups, or sub-organizations, the organization cannot be deleted. You need to delete the users, user groups, or sub-organizations before deleting the organization.
- In the organization list, click Delete on the right of the target organization.

- In the displayed dialog box, click OK to delete the organization.
Feedback
Was this page helpful?
Provide feedbackThank you very much for your feedback. We will continue working to improve the documentation.See the reply and handling status in My Cloud VOC.
For any further questions, feel free to contact us through the chatbot.
Chatbot


