

Multipart Upload
Scenarios
In a multipart upload, an object is split into multiple parts and these parts are uploaded independently. After all parts are uploaded, OBS assembles them into a single object. Generally, if the size of an object reaches 100 MB, you should use multipart upload instead of simple upload. Multipart upload has the following advantages:
- Improved throughput: Uploading parts in parallel speeds up the upload and maximizes bandwidth utilization.
- Enhanced robustness against network instability: If a part fails to upload due to network issues, you only need to re-upload that specific part. There is no need to upload the entire object again, which saves both time and traffic.
- Uploading objects with unknown sizes: You can use multipart upload to upload an object with an unknown size. For example, in video surveillance scenarios, video files are created and uploaded in real time, so multipart upload is a good choice for uploading these files.
Constraints
- Folders do not support multipart upload.
- Each request can upload only one part, but multiple requests can be initiated at the same time.
- Constraints on parts:
Table 1 Constraints on parts Item
Constraints
Maximum object size
48.8 TB
Maximum number of parts for each upload task
10,000
Part number
1 to 10,000 (inclusive)
Part size
5 MB to 5 GB. The size of the last part is between 0 bytes and 5 GB.
Maximum number of parts returned in response to the request for listing uploaded parts
1,000
Maximum number of multipart uploads returned in response to the request for listing initiated multipart uploads
1,000
- If you use SSE-C in a multipart upload, you must include the key in the requests for initiating the multipart upload, uploading parts, and copying parts. All requests in this multipart upload must use the same key. The key is not required for completing the multipart upload. The complete object is encrypted using SSE-C.
- If you use SSE-KMS or SSE-OBS in a multipart upload, you only need to configure the encryption method, algorithm, and key in initiating the multipart upload.
Billing
- If you want to upload a large number of Deep Archive objects, you can upload them in the Standard storage class and then transition them to the Deep Archive storage class through lifecycle rules to lower the costs on PUT requests.
- After initiating a multipart upload and uploading one or more parts, you must complete or abort the multipart upload. This ensures that OBS frees up the space for storing the uploaded parts and stops billing you for the uploaded parts.
Permissions
Before performing a multipart upload, you must obtain the permissions listed in the following table.
| Operation | Required Permission |
|---|---|
| Initiate a multipart upload. | You must be the bucket owner or have the PutObject permission. |
| Upload parts. | You must be the bucket owner or have the PutObject permission. |
| Complete the multipart upload. | You must be the bucket owner or have the PutObject permission. |
| Copy parts. | You must be the bucket owner or have the PutObject and GetObject permissions. |
| List uploaded parts. | You must be the bucket owner or have the ListMultipartUploadParts permission. |
| List multipart uploads. | You must be the bucket owner or have the ListBucketMultipartUploads permission. |
| Abort the multipart upload. | You must be the bucket owner or have the AbortMultipartUpload permission. |
Important Notes
- If the local file changes during the upload, all parts need to be uploaded again.
- When concurrent upload operations are performed for the same part of an object, the server follows the Last Write Wins policy, where the Last Write is determined by the time the part's metadata was created. To ensure data accuracy, the client must use a locking mechanism to prevent concurrent uploads of the same part of an object. Locking is not required for concurrent uploads of different parts of an object.
- When uploading a large number of objects, do not name objects with sequential prefixes, such as timestamps or alphabetical order. Objects with sequential prefixes may cause a large number of object indexes to be stored in a specific storage partition. In such cases, if there are too many requests for the objects, the requests cannot be handled efficiently.
- It is advised to enable versioning to prevent objects with the same name from being overwritten. Versioning keeps multiple versions of an object in the same bucket. You can restore any historical version at any time.
Multipart Upload Process

| No. | Operation | Description |
|---|---|---|
| 1 | Split a file into parts. | On your local client, split a large file into multiple parts. Each part must be between 5 MB and 5 GB in size, except for the last part, which can be 0 bytes to 5 GB. |
| 2 | Initiate a multipart upload. | Initiate a multipart upload and obtain the upload ID. The ID is required for all subsequent operations in this multipart upload, such as uploading, assembling, and listing parts. When initiating a multipart upload, you need to specify the storage class, object ACL, and other object properties. Once specified, you do not need to specify them again when uploading or assembling parts later. |
| 3 | Upload parts. | Upload parts. You can upload parts independently and in any order. If your network is in good condition, you can upload parts concurrently to improve the upload speed and make full use of bandwidth. If a part fails to upload, you only need to upload that part again. The upload of other parts remains unaffected. To abort the upload, make an API call to abort the multipart upload and delete the uploaded parts. |
| 4 | Complete the multipart upload. | After all parts are uploaded, assemble the parts into a single, complete object. |
Ways to Use Multipart Upload
OBS Console, OBS Browser+, and obsutil encapsulate the detailed steps of multipart upload, so you can simply upload a file in multiple parts directly through the GUI or CLI. For details, see Using OBS Console to Perform Multipart Upload, Using OBS Browser+ to Perform Multipart Upload, and Using obsutil to Perform Multipart Upload. To perform multipart uploads using SDKs, refer to Using SDKs to Perform Multipart Upload. To help you better understand how multipart upload works, we will use API Explorer to call OBS APIs to demonstrate the complete process of performing a multipart upload through APIs.
Using APIs to Perform Multipart Upload
Step 1: Split a File into Parts
Split a file into parts on your local client.
- (Optional) Create a file of a specific size. Here, we create a 20 MB file named test.file. If you have prepared a file, skip this step.
Linux or macOS:
dd if=/dev/urandom of=test.file bs=1M count=20
On Windows, open CMD and run the following command:
fsutil file createnew test.file 20971520
- Split the file into parts. In this example, split the 20 MB test.file into five 4 MB parts. Each part is named test-part**, where ** is a number suffix from 00 to 04.
Linux or macOS:
split -b 4M -d test.file test-part
In the command, -b specifies the maximum size of each part, and -d indicates that the part name uses a numeric suffix, for example, test-part00.
On Windows, run the following commands in PowerShell:
$inputFile = "test.file" $outputFilePrefix = "test-part" $chunkSize = 4MB $fs = [System.IO.File]::OpenRead($inputFile) $buffer = New-Object byte[] $chunkSize $fileNumber = 0 while ($fs.Position -lt $fs.Length) { $bytesRead = $fs.Read($buffer, 0, $chunkSize) $outputFile = "{0}{1:D2}" -f $outputFilePrefix, $fileNumber $fileStream = [System.IO.File]::Create($outputFile) $fileStream.Write($buffer, 0, $bytesRead) $fileStream.Close() $fileNumber++ } $fs.Close() - After the split is complete, verify that all parts are present in the directory where the commands were executed. Parts created in this example are as follows.

Step 2: Initiate a Multipart Upload
Make an API call to initiate a multipart upload and obtain the multipart upload ID.
- Go to the InitiateMultipartUpload page of API Explorer.
- Set the API call parameters.
Parameter
Example Value
Description
object_key
test.file
The name of the object uploaded to the bucket. It refers to the entire object, not to any individual part.
bucket_name
example-bucket-a-intl
The bucket name. Click
 to choose a bucket that stores your object.
uploads
Leave it blank.
This parameter indicates that the API call initiates a multipart upload, rather than a standard POST upload. Click Leave Blank to leave the parameter blank.
- Click Debug.
- After the API call succeeds, obtain the upload ID from the response in the lower right corner of the page.
As shown in the following figure, the upload ID is 000001987D77252A002424CADFB90B1C.

Step 3: Upload Parts
Upload the parts obtained in 1 to the bucket.
- Go to the UploadPart page of API Explorer.
- Set the API call parameters.

Parameter
Example Value
Description
object_key
test.file
The name of the object uploaded to the bucket. It refers to the entire object, not to any individual part. Keep this name the same as the one set in 2.
bucket_name
example-bucket-a-intl
The bucket name. Click
 to choose a bucket that stores your object. Keep this name the same as the one set in 2.
partNumber
1
The part number. It must be an integer from 1 to 10000. A part number uniquely identifies a part and its position. Parts must be numbered in ascending order according to their position in the object. For example, if a 20 MB object is split into five parts, the first part is numbered 1, the second part 2, and so on.
If you upload a new part using the same part number as a previously uploaded part, the previously uploaded part will be overwritten.
uploadId
000001987D77252A002424CADFB90B1C
The upload ID, which must be the one obtained in 4.
Body
test-part00
The part to upload. Click
 to select the part to upload.
- Click Debug.
- After the API call succeeds, verify that a success message appears on the Debugging Result tab. The response shown in the lower right corner of the page includes the ETag value of the part.
- Repeat 2 to 3 to upload all parts.
- After the upload is complete, go to the ListParts page, set parameters, and click Debug to list all uploaded parts.

Parameter
Example Value
Description
object_key
test.file
The name of the object uploaded to the bucket. It refers to the entire object, not to any individual part. Keep this name the same as the one set in 2.
bucket_name
example-bucket-a-intl
The bucket name. Click
 to choose a bucket that stores your object. Keep this name the same as the one set in 2.
uploadId
000001987D77252A002424CADFB90B1C
The upload ID, which must be the one obtained in 4.
- Verify that all parts have been uploaded successfully and obtain the part numbers and ETag values of all parts.
If the response result in 6 contains all parts, the parts have been uploaded successfully. In this case, record the part numbers and ETag values of all parts. The recorded data will be used as the request parameters for completing the multipart upload in the next step.
Step 4: Complete the Multipart Upload
This step assembles the uploaded parts into an object.
- Go to the CompleteMultipartUpload page of API Explorer.
- Set the API call parameters.

Parameter
Example Value
Description
object_key
test.file
The name of the object uploaded to the bucket. It refers to the entire object, not to any individual part. Keep this name the same as the one set in 2.
bucket_name
example-bucket-a-intl
The bucket name. Click
 to choose a bucket that stores your object. Keep this name the same as the one set in 2.
uploadId
000001987D77252A002424CADFB90B1C
The upload ID, which must be the one obtained in 4.
Body
<CompleteMultipartUpload>
    <Part>
        <PartNumber>1</PartNumber>
        <ETag>"ef0bff811bdb99fb44804719bd0f6877"</ETag>
    </Part>
    <Part>
        <PartNumber>2</PartNumber>
        <ETag>"ef0bff811bdb99fb44804719bd0f8678"</ETag>
    </Part>
    <Part>
        <PartNumber>3</PartNumber>
        <ETag>"ef0bff811bdb99fb44804719bd0f7687"</ETag>
    </Part>
    <Part>
        <PartNumber>4</PartNumber>
        <ETag>"ef0bff811bdb99fb44804719bd0f7876"</ETag>
    </Part>
    <Part>
        <PartNumber>5</PartNumber>
        <ETag>"ef0bff811bdb99fb44804719bd0f7786"</ETag>
    </Part>
</CompleteMultipartUpload>
The body must include the part numbers and ETag values of all parts. You can obtain the data by making a ListParts API call after all parts have been uploaded. For details, see 7. Alternatively, you can obtain the ETag value of each part from its upload response. For details, see 4.
CAUTION:If a part is omitted when a multipart upload is completed, the part will be deleted and cannot be recovered. For example, if 10 parts are uploaded but only nine are assembled, the omitted part will be deleted and cannot be recovered.
Therefore, before completing a multipart upload, list all uploaded parts and make sure that no part is omitted.
- Click Debug.
- After the API call succeeds, verify that a success message appears on the Debugging Result tab. The response includes the object name, bucket name, and ETag value of the complete object.

Using OBS Console to Perform Multipart Upload
When you upload an object larger than 8 MB using OBS Console, the console automatically switches to multipart upload.
- In the navigation pane of OBS Console, choose Buckets.
- In the bucket list of OBS Console, click the desired bucket to go to the Objects page.
- On the object list page, click Upload Object.
You can also go to the folder where you want to upload the file and click Upload Object.
Batch upload is used as an example here. For regions that support only single upload, perform operations as prompted.

If the files that you want to upload to OBS are stored in Microsoft OneDrive, it is recommended that the names of these files contain a maximum of 32 characters to ensure compatibility.
Figure 2 Uploading objects

- Select a storage class. If you do not specify a storage class, the objects you upload inherit the default storage class of the bucket.
An object can have a different storage class from its bucket. By default, an object inherits the storage class of the bucket where it is uploaded. You can specify a storage class for an object when uploading it, or you can change the object storage class after the object is uploaded.
- In the Upload Object area, drag and drop the files or folders you want to upload.
You can also click add files in the Upload Object area to select files.
- Server-Side Encryption: Disable it or choose SSE-KMS or SSE-OBS. For details, see Server-Side Encryption Overview.
If your bucket has server-side encryption enabled, you can select Inherit from bucket when uploading an object.
- (Optional) To configure metadata, or retention, or object tags, click (Optional) Configure Advanced Settings.
WORM retention policies can be configured in the advanced settings only when WORM is enabled for the bucket.
Configuring metadata: Add metadata ContentDisposition, ContentLanguage, WebsiteRedirectLocation, ContentEncoding, or ContentType as needed. For more information, see OBS Metadata. Metadata is a set of name-value pairs. The metadata value cannot be left blank. You can add multiple metadata entries by clicking Add.
Configuring retention: Choose Inherit from bucket, or choose Configure and then specify a retention period, to automatically protect new objects uploaded to the bucket from being deleted before the specified date.
Configuring tags: Tags are used to identify objects with tag keys and values. For details, see Adding Tags to an Object.
Figure 3 Configuring metadata or WORM retention

- If needed, click (Optional) Configure Advanced Settings to add metadata.
- Click OK.
Using OBS Browser+ to Perform Multipart Upload
For objects larger than 50 MB, OBS Browser+ automatically uses resumable upload (essentially multipart upload) in the background. This process is transparent to you, and you can continue uploading objects as usual.
- Log in to OBS Browser+.
- Click the bucket where you want to upload files or folders.
- Click Upload and then Add File or Folder, as shown in Figure 4.
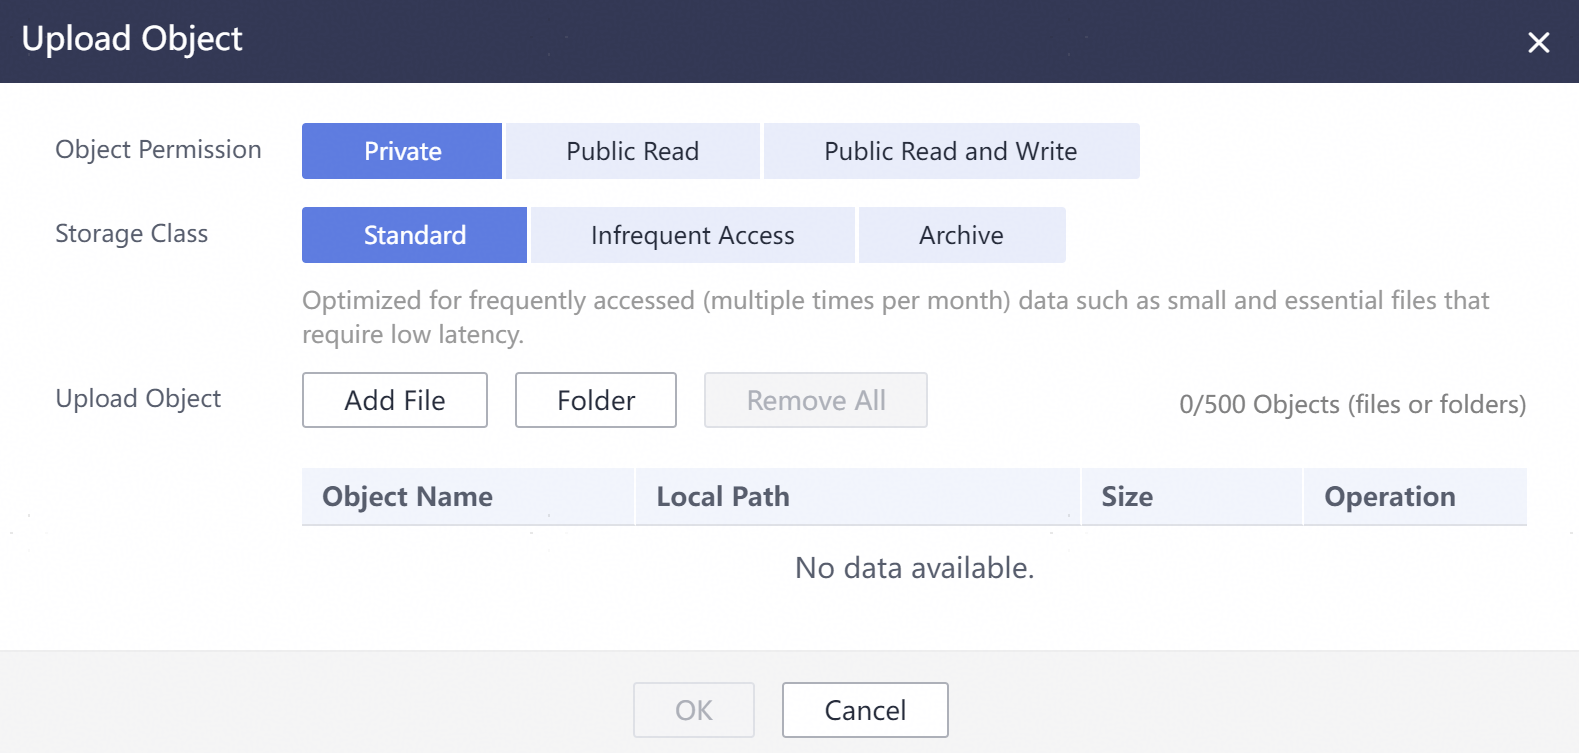
For better experience when using the Add File function, you are advised to upload a maximum of 100 files at a time. If you need to upload more, place all the files in a folder and upload them by adding a folder.
- If message "Service Unavailable" is displayed when files are being uploaded, try again later.
- If an access deny message is displayed when you are uploading a file or folder, possible causes are as follows:
- Access to the bucket is restricted by an ACL. For example, you do not have the write permission for the bucket.
- Access to the bucket is restricted by a bucket policy. For example, you do not have the write permission for the bucket, or write operations cannot be performed on the bucket during the current period.
If such a message is displayed, check the bucket's ACL and policy settings and resolve the problem accordingly.

You must have access to the file you want to upload, or the file upload will fail.
- In the displayed dialog box, select the file or folder you want to upload and click Open.
You can upload one folder or multiple files at a time. To upload multiple files, hold down Ctrl or Shift to select multiple files and batch upload them. You can also press Ctrl+A to select all files. The operations are consistent with those in Windows operating systems.
- Click OK.
Using obsutil to Perform Multipart Upload
For objects larger than 50 MB, obsutil automatically uses resumable upload (essentially multipart upload) in the background. This process is transparent to you, and you can continue uploading objects as usual.
Command Line Structure
- Windows
- Uploading a file
obsutil cp file_url obs://bucket[/key] [-arcDir=xxx] [-dryRun] [-link] [-u] [-vlength] [-vmd5] [-p=1] [-threshold=52428800] [-acl=xxx] [-sc=xxx] [-meta=aaa:bbb#ccc:ddd] [-ps=auto] [-cpd=xxx] [-fr] [-o=xxx] [-config=xxx] [-e=xxx] [-i=xxx] [-k=xxx] [-t=xxx]
- Uploading a folder
obsutil cp folder_url obs://bucket[/key] -r [-arcDir=xxx] [-dryRun] [-link] [-f] [-flat] [-u] [-vlength] [-vmd5] [-j=1] [-p=1] [-threshold=52428800] [-acl=xxx] [-sc=xxx] [-meta=aaa:bbb#ccc:ddd] [-ps=auto] [-include=*.xxx] [-exclude=*.xxx] [-timeRange=time1-time2] [-mf] [-o=xxx] [-cpd=xxx] [-config=xxx] [-e=xxx] [-i=xxx] [-k=xxx] [-t=xxx]
- Uploading multiple files/folders
obsutil cp file1_url,folder1_url|filelist_url obs://bucket[/prefix] -msm=1 [-r] [-arcDir=xxx] [-dryRun] [-link] [-f] [-u] [-vlength] [-vmd5] [-flat] [-j=1] [-p=1] [-threshold=52428800] [-acl=xxx] [-sc=xxx] [-meta=aaa:bbb#ccc:ddd] [-ps=auto] [-include=*.xxx] [-exclude=*.xxx][-timeRange=time1-time2] [-at] [-mf] [-o=xxx] [-cpd=xxx] [-config=xxx] [-e=xxx] [-i=xxx] [-k=xxx] [-t=xxx]
- Uploading a file
- macOS or Linux
- Uploading a file
./obsutil cp file_url obs://bucket[/key] [-arcDir=xxx] [-dryRun] [-link] [-u] [-vlength] [-vmd5] [-p=1] [-threshold=52428800] [-acl=xxx] [-sc=xxx] [-meta=aaa:bbb#ccc:ddd] [-ps=auto] [-cpd=xxx] [-fr] [-o=xxx] [-config=xxx] [-e=xxx] [-i=xxx] [-k=xxx] [-t=xxx]
- Uploading a folder
./obsutil cp folder_url obs://bucket[/key] -r [-arcDir=xxx] [-dryRun] [-link] [-f] [-flat] [-u] [-vlength] [-vmd5] [-j=1] [-p=1] [-threshold=52428800] [-acl=xxx] [-sc=xxx] [-meta=aaa:bbb#ccc:ddd] [-ps=auto] [-include=*.xxx] [-exclude=*.xxx] [-timeRange=time1-time2] [-at] [-mf] [-o=xxx] [-cpd=xxx] [-config=xxx] [-e=xxx] [-i=xxx] [-k=xxx] [-t=xxx]
- Uploading multiple files/folders
./obsutil cp file1_url,folder1_url|filelist_url obs://bucket[/prefix] -msm=1 [-r] [-arcDir=xxx] [-dryRun] [-link] [-f] [-u] [-vlength] [-vmd5] [-flat] [-j=1] [-p=1] [-threshold=52428800] [-acl=xxx] [-sc=xxx] [-meta=aaa:bbb#ccc:ddd] [-ps=auto] [-include=*.xxx] [-exclude=*.xxx][-timeRange=time1-time2] [-mf] [-o=xxx] [-cpd=xxx] [-config=xxx] [-e=xxx] [-i=xxx] [-k=xxx] [-t=xxx]
- Uploading a file
Examples
- In Windows, run obsutil cp d:\temp\test.txt obs://bucket-test/key to upload the test.txt file from the temp directory on the D: drive to bucket bucket-test and rename the file to key.
obsutil cp d:\temp\test.txt obs://bucket-test/key
Start at 2024-09-30 08:11:41.6724827 +0000 UTC

Parallel:      5                   Jobs:          5
Threshold:     50.00MB             PartSize:      auto
VerifyLength:  false               VerifyMd5:     false
CheckpointDir: C:\Users\Administrator\.obsutil_checkpoint

[====================================================] 100.00% 1.68 MB/s 8.46MB/8.46MB 5s
Upload successfully, 8.46MB, n/a, d:\temp\test.txt --> obs://bucket-test/key, cost [5], status [200], request id [0000016979E1D2B2860BB5181229C72C]
- In Windows, run obsutil cp d:\temp obs://bucket-test -f -r to recursively upload all files and subfolders in the temp directory on the D: drive to the temp folder in bucket bucket-test.
obsutil cp d:\temp obs://bucket-test -f -r
Start at 2024-09-30 08:14:12.1406275 +0000 UTC

Parallel:      5                   Jobs:          5
Threshold:     50.00MB             PartSize:      auto
VerifyLength:  false               VerifyMd5:     false
CheckpointDir: C:\Users\Administrator\.obsutil_checkpoint

Task id: 104786c8-27c2-48fc-bc6a-5886596fb0ed
OutputDir: C:\Users\Administrator\.obsutil_output

[========================================================] 100.00% tps:35.71 2.02 KB/s 7.20MB/7.20MB 0s
Succeed count:   5         Failed count:    0
Succeed bytes:      xxx
Metrics [max cost:90 ms, min cost:45 ms, average cost:63.80 ms, average tps:35.71, transferred size: 7.20MB]

Task id: 104786c8-27c2-48fc-bc6a-5886596fb0ed
- For more examples, see Common Examples.
Parameter Description
| Parameter | Optional or Mandatory | Description |
|---|---|---|
| file_url | Optional for uploading multiple files/folders Mandatory for uploading a file | The local file path
|
| folder_url | Optional for uploading multiple files/folders Mandatory for uploading a folder | The local folder path
|
| filelist_url | Optional for uploading multiple files/folders | The path of the file that contains the list of files/folders to be uploaded. If this parameter is configured, msm must be set to 2. |
| bucket | Mandatory | The name of the bucket where you will upload the file or folder |
| key | Optional | The object name or object name prefix specified when uploading a file, or the object name prefix specified when uploading a folder When uploading a file or folder, the upload path and name change depending on the value of this parameter. The specific rules are as follows:
NOTE: For details about how to use this parameter, see Upload. |
| fr | Optional for uploading a file (additional parameter) | Generates an operation result file when uploading a file. |
| flat | Optional for uploading a folder or multiple files/folders (additional parameter) | Uploads all files in a folder but not the folder itself. |
| arcDir | Optional (additional parameter) | The path to which the uploaded files are archived |
| dryRun | Optional (additional parameter) | Conducts a dry run. |
| u | Optional (additional parameter) | Indicates incremental upload. When this parameter is set, each file is compared with the object at the corresponding path in the bucket. A file is uploaded only when the object does not exist, the object size differs from the file size, or the object was last modified earlier than the file. When you compare each local file with data in the bucket, a billable HEAD request is generated. For details, see Requests. NOTE: This parameter can be used together with -last-modify-only. For details, see the description of -last-modify-only. |
| -last-modify-only | Optional (additional parameter) | Only checks whether the target object exists and the object modification time, and performs the incremental operation on the last modified object. NOTE: This parameter is used together with -u and will not take effect if used independently. |
| vlength | Optional (additional parameter) | After the upload completes, checks whether the sizes of the objects in the bucket are the same as those of the local files. |
| vmd5 | Optional (additional parameter) | After the upload completes, checks whether the MD5 values of the objects in the bucket are the same as those of the local files.
|
| p | Optional (additional parameter) | The maximum number of concurrent uploads for a multipart upload The default value is the value of defaultParallels in the configuration file. |
| threshold | Optional (additional parameter) | The threshold for enabling multipart upload. If the size of the file or folder to be uploaded is smaller than the threshold, upload it directly. Otherwise, a multipart upload is required. The default value is the value of defaultBigfileThreshold in the configuration file. Unit: byte This parameter value can contain a unit, for example, 1MB (indicating 1,048,576 bytes). NOTE: If you upload a file or folder directly, no part record is generated, and resumable transmission is not supported. |
| acl | Optional (additional parameter) | The access control policies that can be specified for objects when uploading files. The value can be:
|
| sc | Optional (additional parameter) | The storage classes of objects that can be specified when uploading files The value can be:
|
| meta | Optional (additional parameter) | The standard or custom metadata that can be specified during file upload
|
| ps | Optional (additional parameter) | The size of each part in a multipart upload task
|
| cpd | Optional (additional parameter) | The folder where the part records reside. The default value is .obsutil_checkpoint, the subfolder in the home directory of the user who executes obsutil commands. A part record is generated during a multipart upload and saved to the upload subfolder. After the upload succeeds, its part record is deleted automatically. If the upload fails or is suspended, the system attempts to resume the task according to its part record when you perform the upload the next time. |
| r | Mandatory for uploading a folder (additional parameter) Optional for uploading multiple files/folders | Recursively uploads all files and subfolders within a folder. |
| f | Optional for uploading a folder or multiple files/folders (additional parameter) | Performs operations without asking for confirmation. |
| j | Optional for uploading a folder or multiple files/folders (additional parameter) | The maximum number of concurrent tasks for uploading a folder. The default value is the value of defaultJobs in the configuration file. NOTE: The tool ensures that this value is at least 1. |
| msm | Mandatory for uploading multiple files/folders (additional parameter) | Enables the mode for uploading multiple files/folders. Possible values are 1 and 2.
|
| exclude | Optional for uploading a folder or multiple files/folders (additional parameter) | The file matching patterns that are excluded. After this parameter is specified, if the name of the file to be uploaded matches the value of this parameter, the file is skipped. For example, if this parameter is set to *.txt, all files whose names end with .txt are skipped and not uploaded.
Restrictions: The matching pattern takes effect only for files in the folder. NOTE:
|
| include | Optional for uploading a folder or multiple files/folders (additional parameter) | The file matching patterns that are included. After this parameter is specified, if the name of the file to be uploaded matches the value of this parameter, the file is uploaded. For example, if this parameter is set to *.txt, all files whose names end with .txt are uploaded.
Restrictions:
Example: ./obsutil cp /localpath/ obs://test/ -include=/localpath/2022-12-09/* -f -r This command uploads files that are under localpath and start with /localpath/2022-12-09/ to bucket test. NOTE:
|
| at | Optional for uploading a folder or multiple files/folders (additional parameter) | Indicates that only the files whose latest access time is within the value of timeRange are uploaded. This parameter must be used together with timeRange. |
| disableDirObject | Optional for uploading multiple folders (additional parameter) | Indicates the folders themselves are not uploaded as an object. Configuring this parameter can avoid uploading empty folders to a bucket. If a folder contains files, the files will be uploaded and the original path format is retained. |
| timeRange | Optional for uploading a folder or multiple files/folders (additional parameter) | The time range matching pattern when uploading files. Only files whose latest modification time is within the configured time range are uploaded. This pattern has a lower priority than the file matching patterns (exclude/include). That is, the time range matching pattern is executed after the configured file matching patterns.
|
| mf | Optional (additional parameter) | Indicates that the name matching pattern (include or exclude) and the time matching pattern (timeRange) also take effect on folders. |
| o | Optional (additional parameter) | The folder that stores the result files. After the command is executed, result files (possibly success, failure, and warning files) will be created in the specified folder. The default value is .obsutil_output, a subfolder in the user's home directory where obsutil commands are executed.
|
| bucket-cname | Optional (additional parameter) | The user-defined domain name bound to the bucket NOTE: This parameter is only supported by obsutil 5.7.9 and later. |
| config | Optional (additional parameter) | The user-defined configuration file for executing the current command. For details about parameters that can be configured, see Configuration Parameters. |
| e | Optional (additional parameter) | The endpoint |
| i | Optional (additional parameter) | The user's AK |
| k | Optional (additional parameter) | The user's SK |
| t | Optional (additional parameter) | The user's security token |
Response
| Field | Description |
|---|---|
| Parallel | The parameter -p in the request |
| Jobs | The parameter -j in the request |
| Threshold | The parameter -threshold in the request |
| PartSize | The parameter -ps in the request |
| Exclude | The parameter -exclude in the request |
| Include | The parameter -include in the request |
| TimeRange | The parameter -timeRange in the request |
| VerifyLength | The parameter -vlength in the request |
| VerifyMd5 | The parameter -vmd5 in the request |
| CheckpointDir | The parameter -cpd in the request |
| OutputDir | The parameter -o in the request |
| ArcDir | The parameter -arcDir in the request |
| Succeed count | The number of successful tasks |
| Failed count | The number of failed tasks |
| Skip count | The number of tasks that are skipped during incremental upload, download, or copy, and synchronous upload, download, or copy. NOTE: Skipped tasks are recorded into successful tasks. |
| Warning count | The number of tasks that are executed successfully but contain warnings. NOTE:
|
| Succeed bytes | The number of bytes that are successfully uploaded |
| max cost | The maximum duration of all tasks, in ms |
| min cost | The minimum duration of all tasks, in ms |
| average cost | The average duration of all tasks, in ms |
| average tps | The average number of tasks completed per second |
| Task id | The unique ID of an operation, which is used to search for the result file generated for a batch task |
Related Operations
The following are operations related to multipart upload:
Best Practices
- Control concurrent uploads to balance speed and stability.
Multipart upload improves transfer speeds by uploading parts concurrently. However, higher concurrency does not always mean higher performance. Too many concurrent requests increase system load and cause network congestion, which slows uploads. Too few requests underuse available bandwidth. Determine the number of concurrent parts dynamically based on network bandwidth and device performance.
- Avoid sequential prefixes when naming objects.
OBS partitions objects based on the UTF-8 encoding range of their names. Object names with sequential prefixes (sorted by timestamp or in alphabetical order) can concentrate access on a single partition, creating hotspots. Hot partitions limit request rates and increase latency. Use object names with random prefixes to distribute requests evenly across partitions and achieve horizontal scaling. For details, see Suggestions on OBS Performance Optimization.
- Use resumable transfer for higher reliability.
Multipart uploads do not expire and can be paused and resumed. Each multipart upload is uniquely identified by an upload ID. If a part fails to be uploaded due to network jitter or device issues, you only need to reupload that part instead of the entire file, improving transfer efficiency.
Helpful Links
If you have over 48.8 TB of data to upload, refer to Migrating Local Data to OBS.
What is your overall rating for this page?
Thank you very much for your feedback. We will continue working to improve the documentation.See the reply and handling status in My Cloud VOC.
For any further questions, feel free to contact us through the chatbot.
Chatbot


