Command Delivery Example
Platform Delivering a Command
- Access the IoTDA service page and click Access Console.
- In the navigation pane, choose Devices > All Devices. In the device list, click View in the row of a device to access its details page.
- The Cloud Delivery tab page varies according to the device protocol.
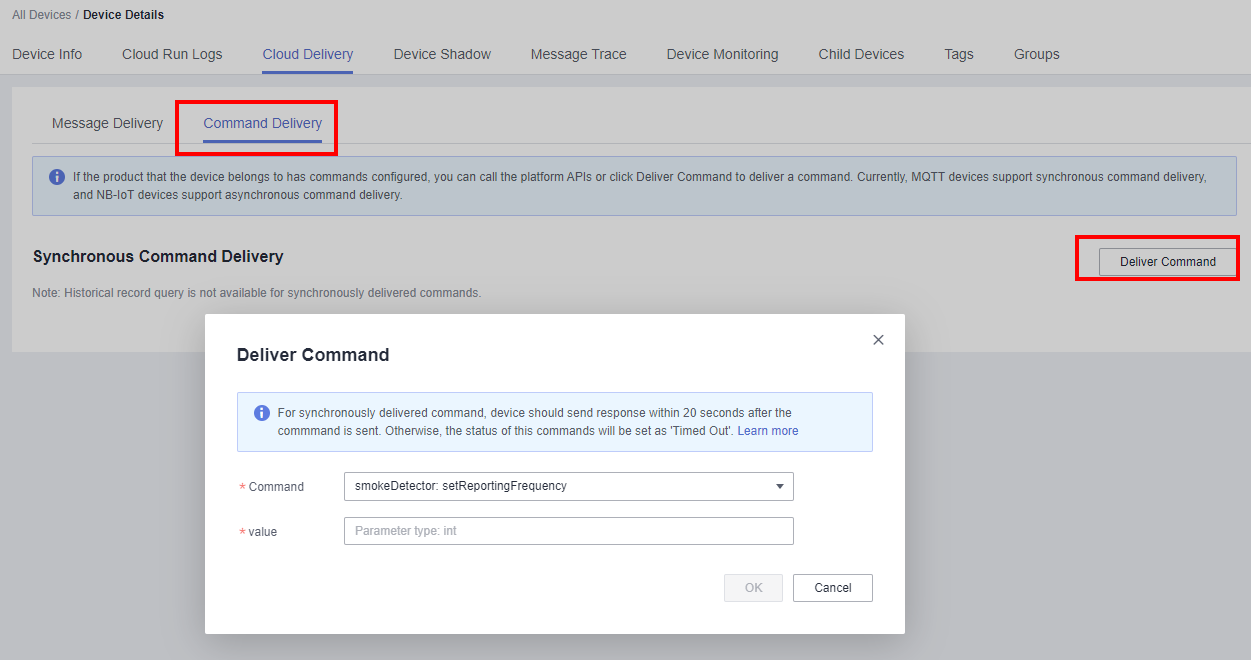
- Devices using MQTT support only synchronous command delivery. Click Command Delivery on the right. In the displayed dialog box, select the command to be delivered and set command parameters.
Figure 1 Synchronous command delivery

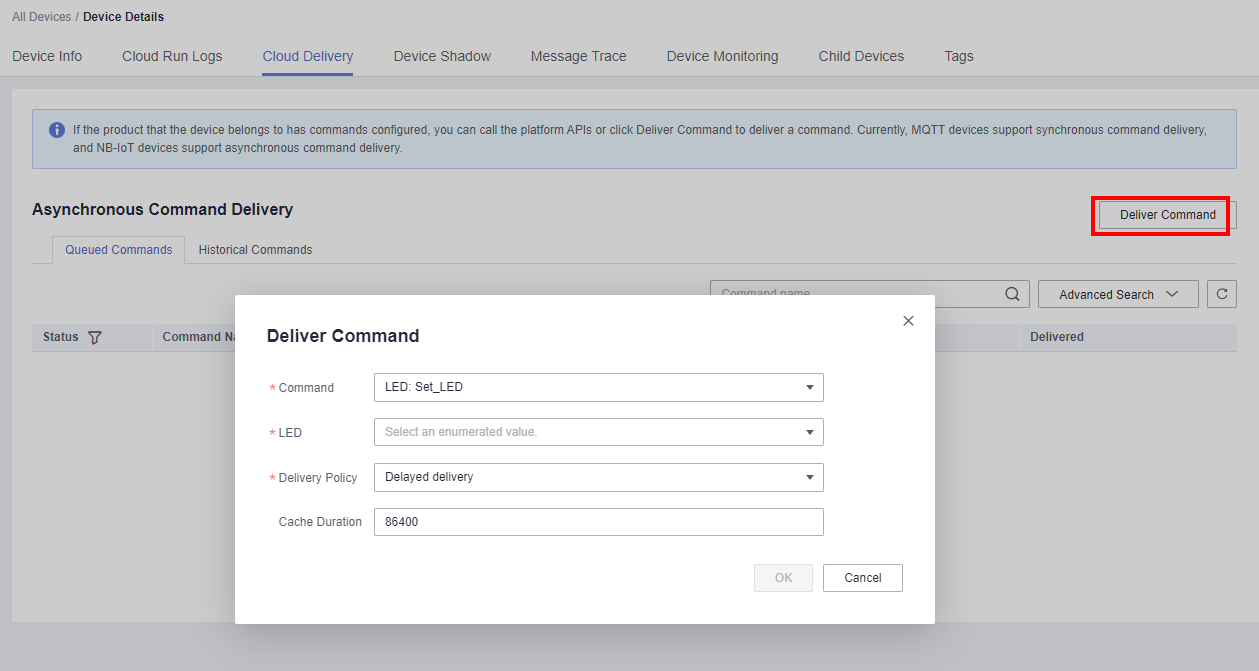
- Devices using LwM2M over CoAP support only asynchronous command delivery. Click Deliver Command on the right. In the displayed dialog box, select the command to be delivered and set command parameters. You can choose to send the command immediately or after a delay.
Figure 2 Asynchronous command delivery

- Devices using MQTT support only synchronous command delivery. Click Command Delivery on the right. In the displayed dialog box, select the command to be delivered and set command parameters.

- On the Message Trace tab page, you can view the creation time, sending time, delivered time, and the delivery status of a command delivery task. This information helps you learn the command execution status.
- In addition, you can call the API for querying a command with a specific ID to query the status and content of delivered commands on the platform.
Configuring the Java SDK for the Application
The application uses the Java SDK for the development of synchronous command delivery. The development environment used in the example is JDK 1.8 or later. Download an SDK.
- Configure the Maven dependency.
<dependency> <groupId>com.huaweicloud.sdk</groupId> <artifactId>huaweicloud-sdk-core</artifactId> <version>[3.0.40-rc, 3.2.0)</version> </dependency> <dependency> <groupId>com.huaweicloud.sdk</groupId> <artifactId>huaweicloud-sdk-iotda</artifactId> <version>[3.0.40-rc, 3.2.0)</version> </dependency> - The following is an example of delivering a synchronous command:
public class CommandSolution {
    // REGION_ID: If CN East-Shanghai1 is used, enter cn-east-3. If CN North-Beijing4 is used, enter cn-north-4. If CN South-Guangzhou is used, enter cn-south-4.
    private static final String REGION_ID = "<YOUR REGION ID>";
    // ENDPOINT: On the console, choose Overview and click Access Addresses to view the HTTPS application access address.
    private static final String ENDPOINT = "<YOUR ENDPOINT>";
    // For the standard or enterprise edition, create a region object.
    public static final Region REGION_CN_NORTH_4 = new Region(REGION_ID, ENDPOINT);
    public static void main(String[] args) {
        String ak = "<YOUR AK>";
        String sk = "<YOUR SK>";
        String projectId = "<YOUR PROJECTID>";
        // Create a credential.
        ICredential auth = new BasicCredentials().withDerivedPredicate(AbstractCredentials.DEFAULT_DERIVED_PREDICATE)
            .withAk(ak)
            .withSk(sk)
            .withProjectId(projectId);
        // Create and initialize an IoTDAClient instance.
        IoTDAClient client = IoTDAClient.newBuilder().withCredential(auth)
            // For the basic edition, select the region object in IoTDARegion.
            //.withRegion(IoTDARegion.CN_NORTH_4)
            // For the standard or enterprise edition, create a region object.
            .withRegion(REGION_CN_NORTH_4).build();
        // Instantiate a request object.
        CreateCommandRequest request = new CreateCommandRequest();
        request.withDeviceId("<YOUR DEVICE_ID>");
        DeviceCommandRequest body = new DeviceCommandRequest();
        body.withParas("{\"value\":\"1\"}");
        request.withBody(body);
        try {
            CreateCommandResponse response = client.createCommand(request);
            System.out.println(response.toString());
        } catch (ConnectionException e) {
            e.printStackTrace();
        } catch (RequestTimeoutException e) {
            e.printStackTrace();
        } catch (ServiceResponseException e) {
            e.printStackTrace();
            System.out.println(e.getHttpStatusCode());
            System.out.println(e.getRequestId());
            System.out.println(e.getErrorCode());
            System.out.println(e.getErrorMsg());
        }
    }
}
Table 1 Parameters Parameter
Description
ak
Access key ID (AK) of your Huawei Cloud account. You can create and view your AK/SK on the My Credentials > Access Keys page of the Huawei Cloud console. For details, see Access Keys.
sk
Secret access key (SK) of your Huawei Cloud account.
projectId
Project ID. For details on how to obtain a project ID, see Obtaining a Project ID.
IoTDARegion.CN_NORTH_4
Region where the IoT platform to be accessed is located. The available regions of the IoT platform have been defined in the SDK code IoTDARegion.java.
On the console, you can view the region name of the current service and the mapping between regions and endpoints. For details, see Platform Connection Information.
REGION_ID
If CN East-Shanghai1 is used, enter cn-east-3. If CN North-Beijing4 is used, enter cn-north-4. If CN South-Guangzhou is used, enter cn-south-4.
ENDPOINT
On the console, choose Overview and click Access Addresses to view the HTTPS application access address.
DEVICE_ID
Unique ID of the device that a message is delivered to. The value of this parameter is allocated by the platform during device registration. The value is a string of no more than 128 characters. Only letters, digits, underscores (_), and hyphens (-) are allowed.
Configuring the Java SDK for the Device
The device uses the Java SDK for the development of synchronous command delivery. The development environment used in the example is JDK 1.8 or later.
- Configure the Maven dependency of the SDK on devices.
<dependency>
	<groupId>com.huaweicloud</groupId>
	<artifactId>iot-device-sdk-java</artifactId>
	<version>1.1.4</version>
</dependency>
- Configure the SDK and device connection parameters on devices.
// Load the CA certificate of the IoT platform. For details about how to obtain the certificate, visit https://support.huaweicloud.com/intl/en-us/devg-iothub/iot_02_1004.html#section3. URL resource = BroadcastMessageSample.class.getClassLoader().getResource("ca.jks"); File file = new File(resource.getPath()); // The format is ssl://Domain name:Port number. // To obtain the domain name, log in to the Huawei Cloud IoTDA console. In the navigation pane, choose Overview and click Access Details in the Instance Information area. Select the access domain name corresponding to port 8883. String serverUrl = "ssl://localhost:8883"; // Device ID created on the IoT platform String deviceId = "deviceId"; // Secret corresponding to the device ID String deviceSecret = "secret"; // Create a device. IoTDevice device = new IoTDevice(serverUrl, deviceId, deviceSecret, file); if (device.init() != 0) { return; } - Set the command delivery callback function and send a response.
 client.setCommandListener(new CommandListener() {
    @Override
    public void onCommand(String requestId, String serviceId, String commandName, Map<String, Object> paras) {
        log.info("onCommand, serviceId = " +serviceId);
        log.info("onCommand , name = " + commandName);
        log.info("onCommand, paras =  " + paras.toString());

        // Define the processing command.

        // Send a command response.
        device.getClient().respondCommand(requestId, new CommandRsp(0));
    }
});
Testing and Verification
- On the IoTDA console, choose Devices > All Devices, select a device to access its details page, and click Start Trace on the Message Trace tab page.
- Run the SDK code on the device to bring the device online.
- Run the application code. After receiving a command, the device processes and responds to the command. The following is an example of a command received by the device.
Figure 3 Successful command delivery result on the device

- Check the result on the Message Trace tab page.
Figure 4 Tracing the command delivery result with messages on the platform

Feedback
Was this page helpful?
Provide feedbackThank you very much for your feedback. We will continue working to improve the documentation.See the reply and handling status in My Cloud VOC.
For any further questions, feel free to contact us through the chatbot.
Chatbot


