
Viewing the Data Security Situation on the Asset Map
The data asset map allows you to view the security status of your assets from multiple dimensions, such as asset overview, categories and risk levels, permissions, storage, sensitivity, and data egress analysis. This helps you quickly detect risky assets and handle them.
Constraints
- A maximum of 1,000 assets can be displayed.
- Table 1 lists the data sources supported by DSC.
Table 1 Supported datasource versions Data Type
Data Source Type
Version
Databases
MySQL
5.6, 5.7, 5.8, and 8.0
SQL Server
2017_SE, 2017_EE, and 2017_WEB
2016_SE, 2016_EE, and 2016_WEB
2014_SE and 2014_EE
2012_SE, 2012_EE, and 2012_WEB
2008_R2_EE and 2008_R2_WEB
PostgreSQL
15, 14, 13, 12, 11, 10, 9.6, 9.5, 9.4, 9.1, and 1.0
TDSQL
10.3.X
Oracle
11 and 12
KingBase
V8
GaussDB
1.3, 1.4, and 2.7
DMDBMS
7 and 8
DWS
8.1.X
Big Data
ElasticSearch
5.x, 6.x, and 7.x
DLI
1.0
Hive
1.0
MRS-Hive
3.x
Hbase
1.0
OBS
OBS
V3
Prerequisites
- Cloud asset access permissions are granted. For details, see Allowing or Disallowing Access to Cloud Assets.
- There are added OBS assets or authorized big data or database assets. For details, see Adding and Authorizing Data Assets in DSC.
Asset Map Functions
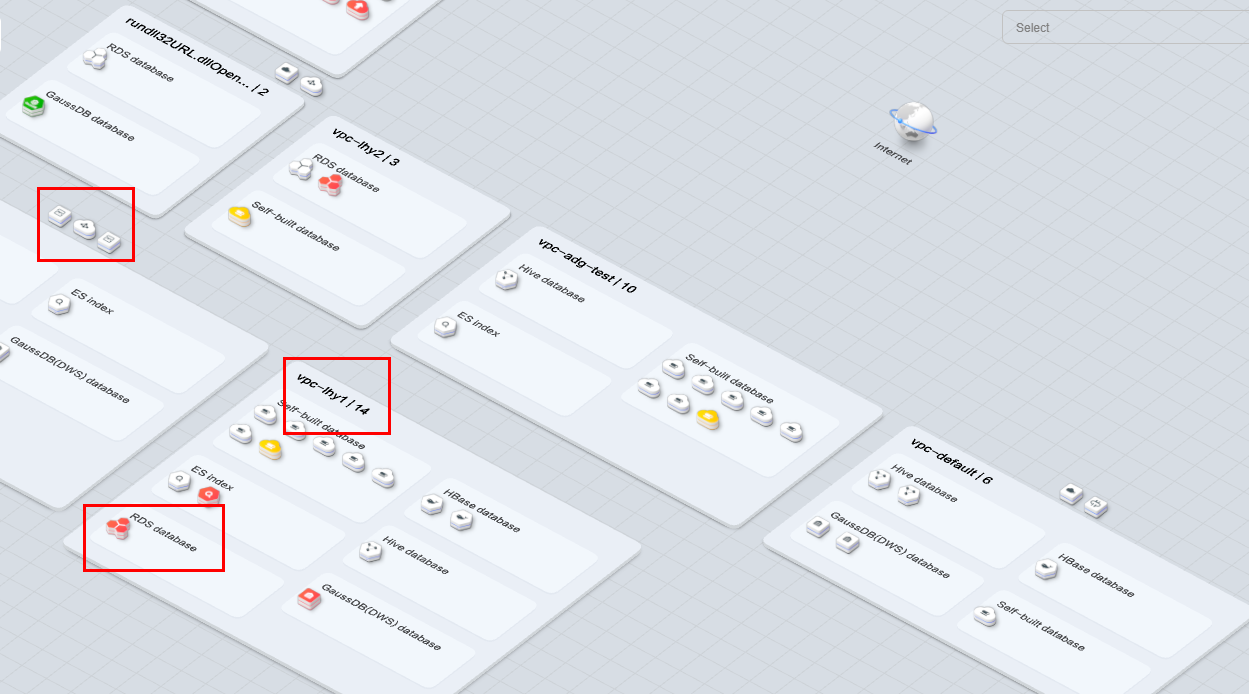
- Sorts out data assets on the cloud and displays them by region: DSC automatically scans and sorts out data assets on the cloud and on-premises and displays asset distribution on a map. The asset map displays regions of assets based on VPCs and associates asset regions with service regions.
Figure 1 Asset Map
- Sensitive data display: DSC displays sensitive data by categories. It identifies and classifies sensitive data using a three-layer identification engine, including default compliance rules, natural language semantic identification, and advanced file similarity detection.
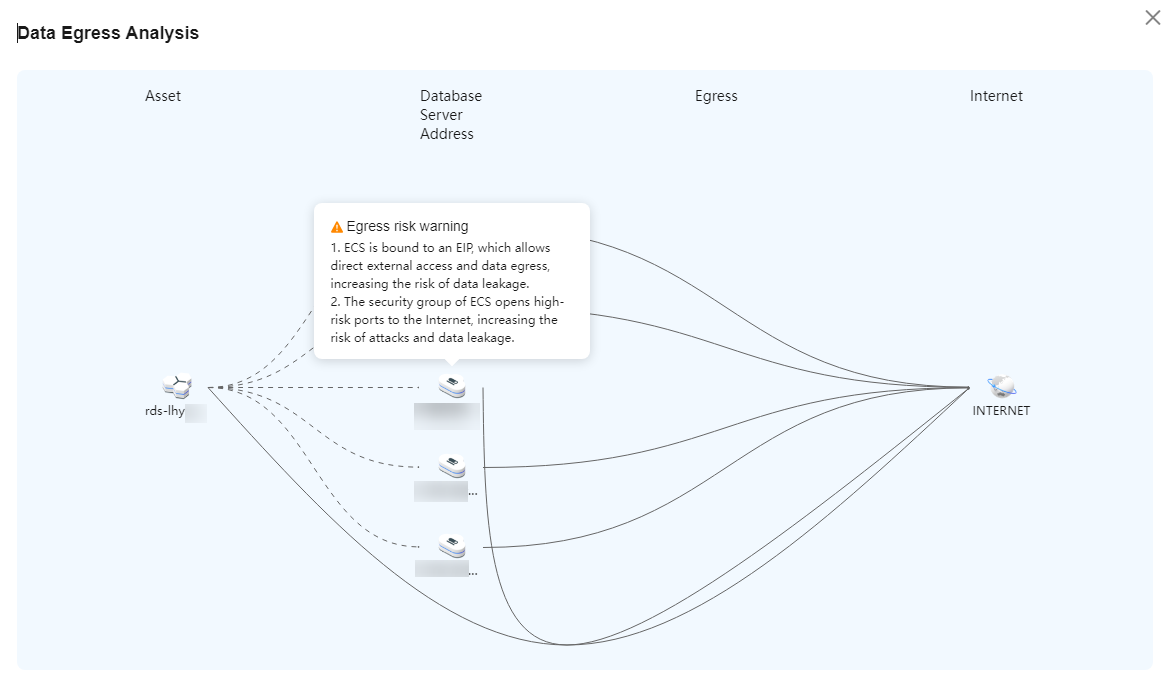
- Data egress analysis: DSC provides a unified data egress view based on the asset map to help you identify all data egresses of on the cloud and on-premises and potential security risks of these egresses, so you can take corresponding data security protection measures.
Figure 2 Data egress analysis
- Risk monitoring and alarming: DSC monitors data asset risks using the risk identification engine, displays the risk distribution for each asset type, and reports alarms for you to take quick response.
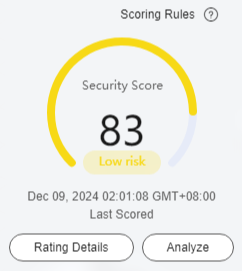
- Security Score: The asset map displays the overall security score of all your assets. You can click
 next to Scoring Rules to view the asset security score calculation rule, as shown in Figure 3.
- Sensitivity Level: Assets are classified into different sensitivity levels to facilitate viewing and management. You can click an asset with risks to view the risk details.
Figure 4 Sensitivity levels
- Security Score: The asset map displays the overall security score of all your assets. You can click
Procedure
- Log in to the DSC console.
- Click
 in the upper left corner and select a region or project.
 - In the navigation pane, choose Asset Map.
- After assets are added or authorized, you can view asset information on the Asset Map page. The following describes the functions and usage of each module on the page.
Risk Statistics
- The security score, last scored time, and rating details of the asset are displayed, as shown in Figure 5. You can manually re-analyze the score. The details are as follows:
- The security score of the asset is displayed. Click
 next to the Scoring Rules to view the asset security score calculation rule.
 - Click Analyze to perform security analysis and scanning cloud and on-premises data again.
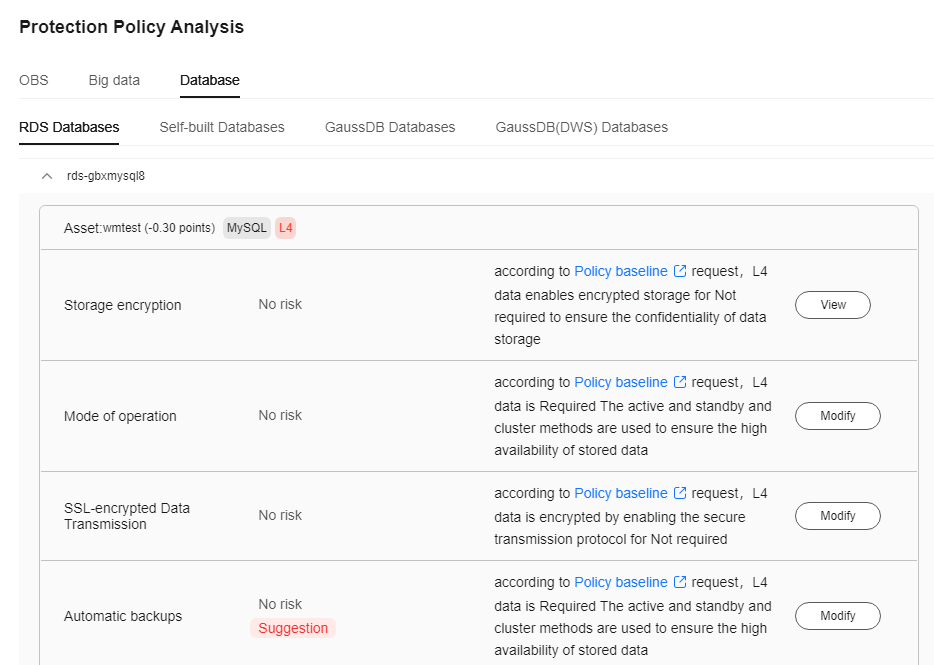
- Click Rating Details to view the Protection Policy Analysis and Common Read/Write tabs. Click Modify or Details in the Operation column to configure policies based on the Configuration Policy Recommendation.
Figure 6 Security policy analysis
- The security score of the asset is displayed. Click
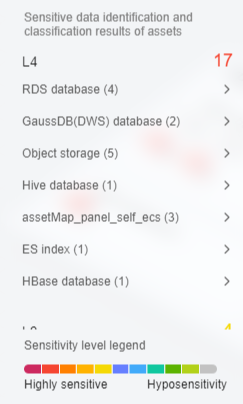
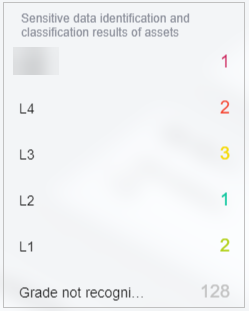
- The sensitive data identification and leveling results of assets are displayed. Assets are displayed by category based on the grading results, as shown in Figure 7. The details are as follows:
- You can hover the cursor over a sensitivity level to show information about all assets at the sensitivity level.
- You can hover the cursor over an asset category to display the names and scan times of all its scanned assets in the adjacent dialog box.
- You can select an asset to view its details in the right-hand dialog box, which includes basic asset information, sensitive data detection, protection policy analysis, bucket protection policy analysis, and data egress analysis. For details, see Viewing Database Instance Details.

Viewing Database Instance Details
- Basic Info: displays the type, port number, version, private IP address, and engine type of the instance.
- Sensitive data identification: displays authorized and unauthorized databases in the instance.
- For an authorized database that has not been scanned. Click Create identification task to go to the sensitive data identification page and create an identification task to identify sensitive information in the database. For details, see Creating an Identification Task.
- For an authorized database that has been scanned. Click Expand to view database scan details.
- For an unauthorized database, click Go to Authorize to obtain the access permission to the database. For details, see Adding and Authorizing Data Assets in DSC.
Figure 8 Sensitive data identification

For OBS data, click View Details to view the Result Details of the sensitive data identification task. If there is no identification result, create an identification task by referring to section Creating an Identification Task and view the identification result again.
- Bucket security protection policy analysis:
- Checks whether high-risk permissions, such as server-side encryption, database encryption, transmission encryption, security group, and public network access, are enabled and displays handling notifications. You can click View or Modify to handle the permissions.
- Allows you to view the current status of security configurations, including encryption, backup, and audit, for all assets, along with the specific requirements of the policy baseline. Additionally, you can switch to the policy/task configuration page to configure policies and tasks.
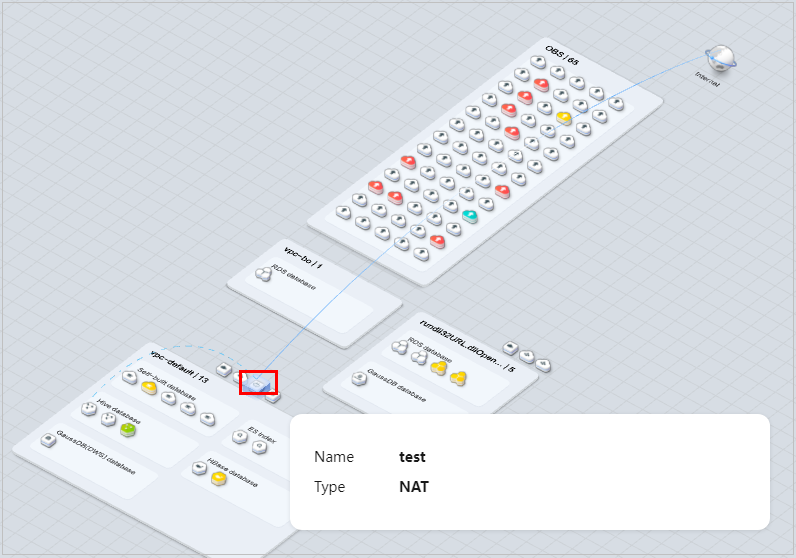
- Data Egress Analysis: identifies all data egresses on the cloud and on-premises, including EIP, NAT, API Gateway, and ROMA. You can also move the cursor to the data type icon or VPC icon on the asset map to view the data egress gateway lines.
Figure 9 Data exit analysis
Related Operations
- If you want to change authorization status of your assets, click Modify in the upper right corner. If you want to stop authorization of your assets, ensure that the assets have no ongoing tasks. DSC will delete your agencies and assets and all related data. Exercise caution when performing this operation. For details, see Allowing or Disallowing Access to Cloud Assets.
- Asset sensitivity level legend: Each color represents an asset sensitivity level from L0 to L10.
- You can drag the slider on the progress bar to adjust the scale of the asset map.
- Click
 in the lower right corner.
 - Click
 in the lower right corner to display the asset map operation guide.
 - Click
 in the lower right corner to display the data exception events, so that you can handle the exceptions in time.
 - Click
 in the lower right corner to display the asset legend.
Feedback
Was this page helpful?
Provide feedbackThank you very much for your feedback. We will continue working to improve the documentation.See the reply and handling status in My Cloud VOC.
For any further questions, feel free to contact us through the chatbot.
Chatbot


