Creating a Masking Rule in the Result
You can create a masking rule based on the sensitive data discovery result. This section describes how to create a masking rule in the result.
You can also create masking rules in the dynamic masking module. For details, see Creating a Masking Rule.
The data table information is plaintext information (data is not encrypted or user authorization is performed after encryption) before masking, as shown in Figure 1.
Creating a Data Masking Rule
- Log in to a database encryption and access control instance as the sysadmin user.
- In the navigation tree on the left, choose Sensitive Data Discovery > Sensitive Data Scan.
- On the scan task list page, locate the target data asset and click View.
- On the scan result page, locate the target database table and click Add Masking Rule.
You can also click Add Desensitization Rules in Batch on the scan result list page to generate masking rules in batches based on the industry template used for scanning sensitive data. For details about how to configure an industry template, see Adding an Industry Template.
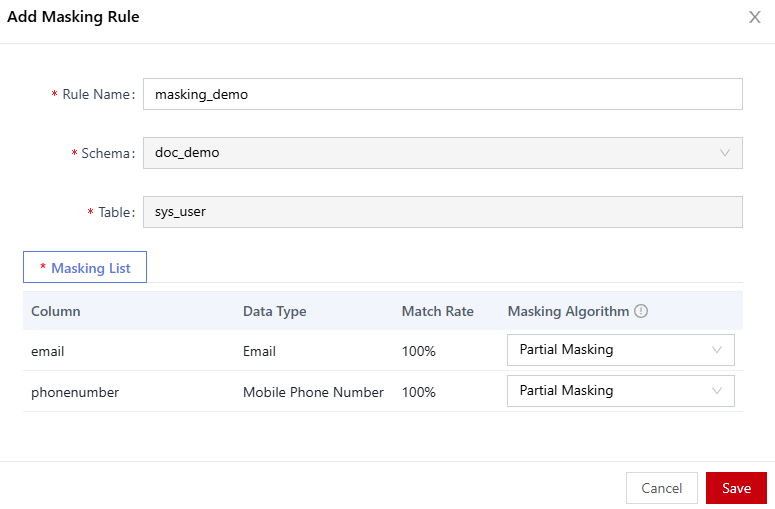
- In the Add Masking Rule dialog box, set masking information, as shown in Table 1.
Table 1 Adding a masking rule Parameter
Description
Rule Name
Enter a masking rule name.
Schema
Name of the schema of the asset.
Table Name
Table name of an asset.
Masking List
Configure the masking algorithm in the masking list.
Figure 2 Adding a masking rule
- Click Save.
Upgrade Verification
- After the masking rule is created, choose Dynamic Data Mask > Data Masking Policy to view and manage the new masking rule.
- Use the proxy to query the database table again. The query result is the masked data, as shown in Figure 3.
Feedback
Was this page helpful?
Provide feedbackThank you very much for your feedback. We will continue working to improve the documentation.See the reply and handling status in My Cloud VOC.
For any further questions, feel free to contact us through the chatbot.
Chatbot


