Creating an Intelligent Analysis Assistant
The intelligent analysis assistant simplifies the entire process from data acquisition to decision support, helping you easily access and analyze data while effectively reducing your workload. Creating an intelligent analysis assistant involves four steps: creating an assistant, configuring the assistant (optional), synchronizing table structure semantic configuration, and gaining data insights.
Prerequisites
- A project has been created by referring to Creating a Project.
- A data source has been connected by referring to Connecting to a Data Source.
- A dataset has been created by referring to Creating a Dataset.
Process

|
Step |
Description |
|---|---|
|
To simplify processes such as data acquisition and chart creation, you can create an intelligent analysis assistant. |
|
|
(Optional) Step 2: Configure the Intelligent Analysis Assistant |
If the initial response from the intelligent analysis assistant does not fully meet your expectations, you can configure it. Configuring an intelligent analysis assistant includes assistant configuration, knowledge base configuration, and Q&A configuration. |
|
Synchronize table structure semantic configuration so that the intelligent analysis assistant can gain a deeper understanding of the associated datasets. After editing the semantic information of the dataset associated with the intelligent analysis assistant, such as field names, field descriptions, and synonyms, you need to resynchronize the information. Otherwise, gaining intelligent data insights will be impacted. |
|
|
When asking questions in the intelligent analysis assistant's Q&A interface, it will automatically return results. |
Step 1: Create an Intelligent Analysis Assistant
- Log in to the DataArts Insight console.
- Click
 in the upper left corner of the management console to select a region. Then, select an enterprise project in the upper right corner.
 - On the top menu of the console, click Project. On the displayed My Projects page, click the name of the desired project.
- In the navigation pane on the left, choose Q&A Management > Intelligent Analysis Assistants.
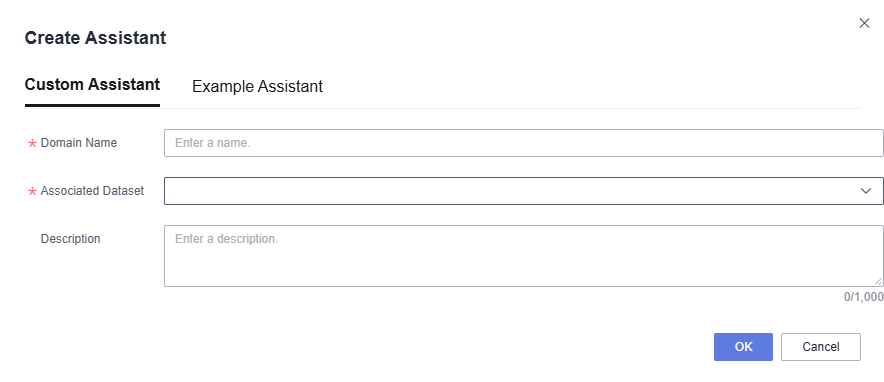
- On the displayed page, click Create Intelligent Analysis Assistant in the upper right corner. See Figure 2. In the dialog box that appears, enter the name and select the associated dataset. Set the parameters based on Table 2.
Table 2 Parameters for creating an intelligent analysis assistant Parameter
Description
Custom Assistant
You can create a custom assistant as needed to analyze specific datasets.
- Domain Name: Name the intelligent analysis assistant. The name can contain up to 32 characters. Only letters, numbers, hyphens (-), and underscores (_) are allowed.
- Associated Dataset: Select one or multiple datasets you want to analyze with the assistant, which serves as the foundation for data analysis.
- Description: Enter a description for the intelligent analysis assistant. You can enter information like the purpose and use case to facilitate subsequent management. The description can contain up to 1,000 characters.
Example Assistant
The example assistant lets you effortlessly experience the Q&A service of the intelligent analysis assistant, requiring no configuration of data sources, datasets, or assistants. The procedure is as follows:
- In the Create Assistant dialog box, click the Example Assistant tab, select an example assistant, and click OK. The example assistant is successfully created.
- On the Intelligent Analysis Assistants page, locate the created example assistant, wait until its Synchronization Status changes to Successful, and click Q&A in the Operation column. You can then use the assistant to gain data insights.
- Click OK.
(Optional) Step 2: Configure the Intelligent Analysis Assistant
If the initial response from the intelligent analysis assistant does not fully meet your expectations, you can configure it. Configuring an intelligent analysis assistant includes assistant configuration, knowledge base configuration, and Q&A configuration. For details, see Configuring an Intelligent Analysis Assistant.
Step 3: Synchronize Table Structure Semantic Configuration
- In the navigation pane on the left, choose Q&A Management > Intelligent Analysis Assistants. See Figure 3.
- On the displayed page, locate the intelligent analysis assistant you created and click its name. On the Assistant Settings page, click Synchronization in the upper right corner to synchronize the table structure semantic configuration.
As shown in Figure 3, if Synchronization Status is Successful, the table structure semantic configuration has been successfully synchronized.


After editing the semantic information of the dataset associated with the intelligent analysis assistant, such as field names, field descriptions, and synonyms, you need to resynchronize the information. Otherwise, gaining intelligent data insights will be impacted.
Step 4: Perform Intelligent Q&A
- In the navigation pane on the left, choose Q&A Management > Intelligent Analysis Assistants.
- Locate the intelligent analysis assistant you trained and click Q&A in the Operation column.
- Ask questions on the displayed Q&A page.
- If the initial response does not meet your expectations, you can configure the intelligent analysis assistant to improve its accuracy.
- If you need to experience the advanced Q&A features of the intelligent analysis assistant (such as anomaly detection, intelligent insight generation, automatic insights), refer to Intelligent Insights for details.

If there is ambiguity in the input question, use the question clarification function. Simply click Clarify Question to bring up the clarification page, which displays optional results. Select the most appropriate result based on the actual situation.
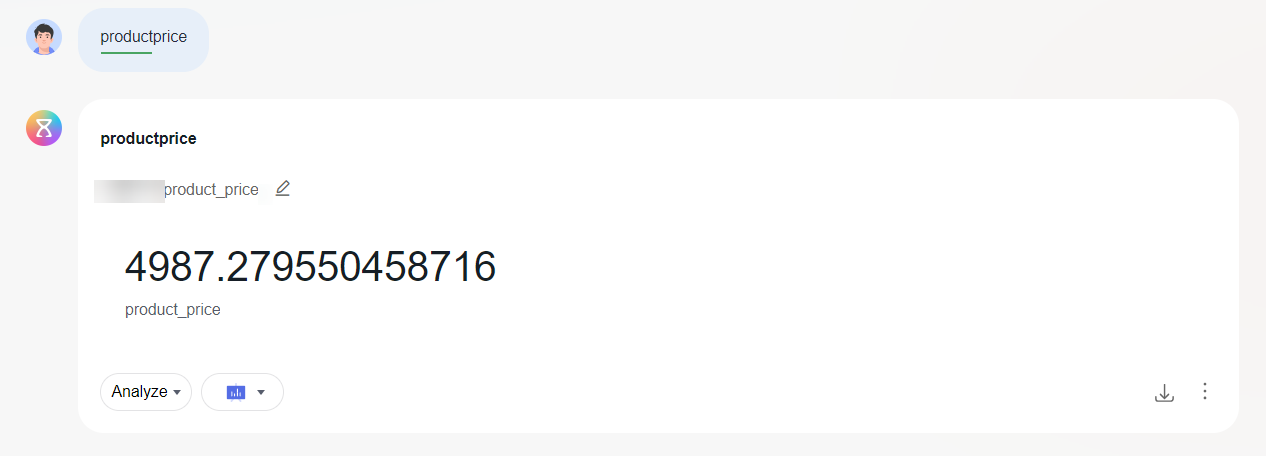
- Example intelligent data insight: Ask productprice on the Q&A page, and the intelligent analysis assistant will return data query results.
Figure 4 Example intelligent data insight

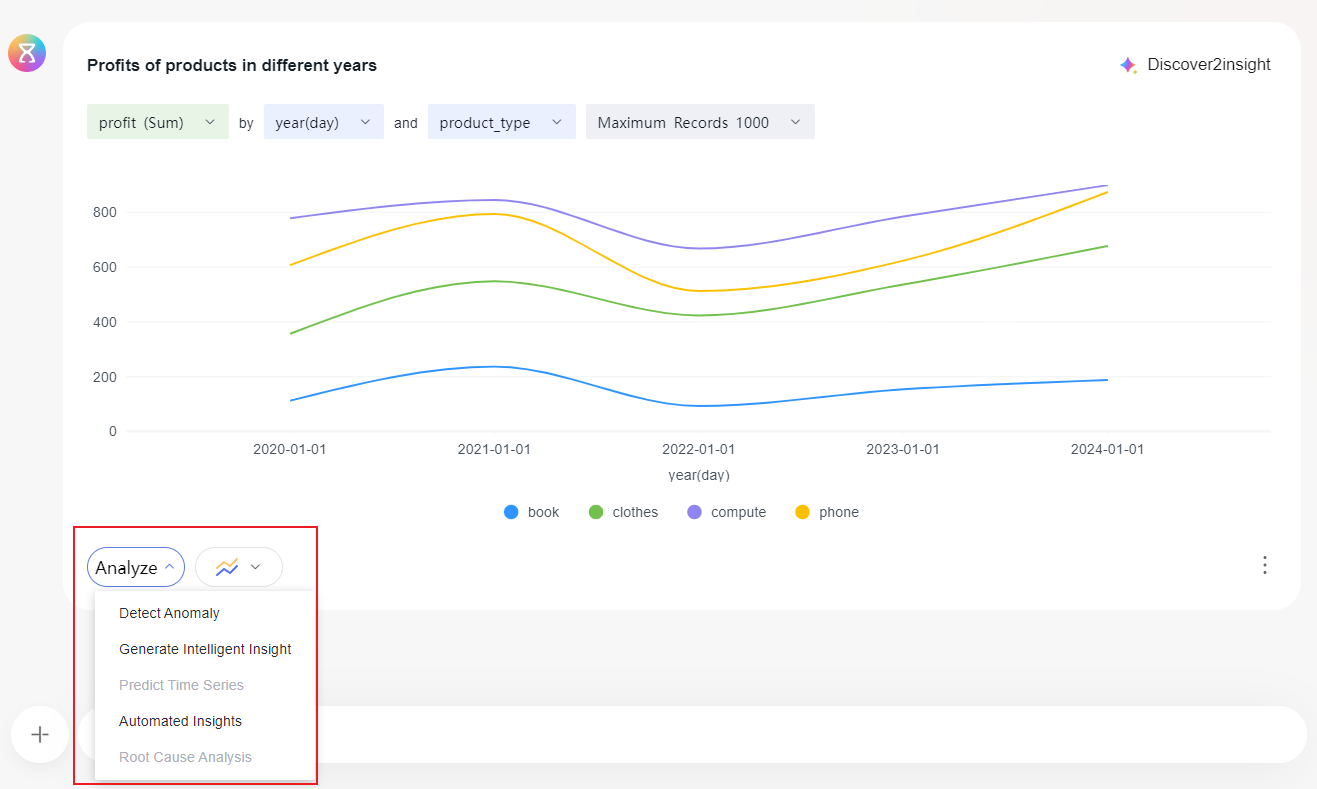
- Example intelligent insights: Click Analyze in the lower left corner of the chart, and then click Generate Intelligent Insight, Automated Insights, Root Cause Analysis and other functions. The intelligent analysis assistant will automatically generate insights.
Figure 5 Example intelligent insights

- Example intelligent building: Click
 in the lower right corner of the chart, and then click Add to Dashboard to quickly add the chart generated by the intelligent analysis assistant to the dashboard.
Figure 6 Example intelligent building
- Example intelligent data insight: Ask productprice on the Q&A page, and the intelligent analysis assistant will return data query results.
Feedback
Was this page helpful?
Provide feedbackThank you very much for your feedback. We will continue working to improve the documentation.See the reply and handling status in My Cloud VOC.
For any further questions, feel free to contact us through the chatbot.
Chatbot


