Executing a Custom Script
Scenarios
To execute a custom script, perform the operations in this section.
Precautions
Ensure that you have the resource permissions of the component to which the target VM belongs when executing a script.
Notes and Constraints
A maximum of 999 instances can be selected for a task.
Executing a Custom Script
- Log in to COC.
- In the navigation pane on the left, choose Resource O&M > Automated O&M.
- In the Routine O&M area, click Script Management.
- On the Custom Scripts tab page, locate the script to be executed and click Execute in the Operation column.
- Set Script Input Parameters.
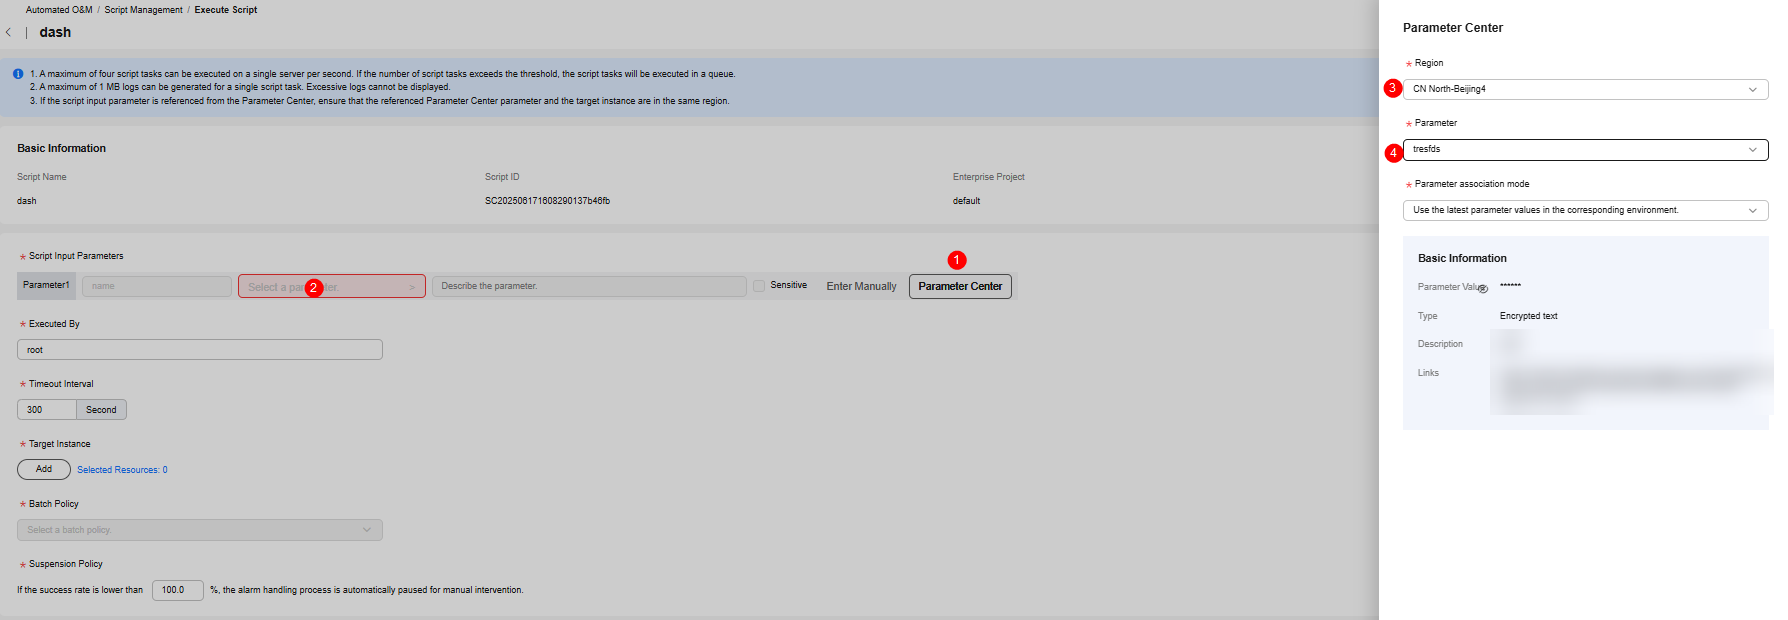
- The parameter names and default values have been preset when the custom script is created. When the script is executed, you can manually set the input parameter values or select the input parameter values from the parameter center. You can manually specify parameter values or select a preset parameter value from the parameter center. Select the region where the parameter is located, parameter name, and parameter association mode.
Figure 1 Manually specifying script parameters
 Figure 2 Selecting script parameters from the parameter center
- The parameter names and default values have been preset when the custom script is created. When the script is executed, you can manually set the input parameter values or select the input parameter values from the parameter center. You can manually specify parameter values or select a preset parameter value from the parameter center. Select the region where the parameter is located, parameter name, and parameter association mode.
- Set Executed By and Timeout Interval.
- Executed By: root is set by default. It is the user who executes the script on a target instance node.
- Timeout Interval: 300 is set by default. It indicates the timeout interval for executing the script on a single target instance.
- Click Add and configure the parameters on the Select Instance dialog box.
Table 1 Instance parameters Parameter
Description
Example Value
Selection Method
Select an instance selection method.
- Manual Selection: Manually select an instance based on Enterprise Project, View Type, Resource Type, Region, and Target Instance.
Manual Selection
Enterprise Project
Select an enterprise project from the drop-down list. You can choose All.
All
View Type
Select a view type.
- CloudCMDB resources: Select an instance from the resource list.
- CloudCMDB application groups: Select an instance from the application group list.
CloudCMDB resources
Resource Type
The value can be ECS or BMS.
ECS
Region
Select a region from the drop-down list.
CN-Hong Kong
Target Instance
Set filter criteria in the filter box and select the filtered instances.
-
- Configure Batch Policy and Suspension Policy.
- Batch Policy: Select Automatic, Manual, or No Batch.
- Automatic: The selected instances to be executed are automatically divided into multiple batches based on the preset rule.
- Manual: You can manually create multiple batches and add instances to each batch as required.
- No Batch: All instances will be executed in the same batch.
- Suspension Policy:
- You can set the execution success rate. When the number of failed hosts reaches the number failed ones that are calculated based on the execution success rate, the service ticket status becomes abnormal and the service ticket stops being executed.
- The success rate ranges from 0 to 100 and supports accuracy up to one decimal place.
- Batch Policy: Select Automatic, Manual, or No Batch.
- Click OK to go to the Confirm Execution page. Click OK to start the execution.
- Perform the following operations to check whether a service ticket execution is complete.
- For the service tickets that are being executed:
- If you want to pause the next batch when the current batch is executed, click Pause in the upper right corner.
- If you want to continue the paused batch, click Continue in the upper right corner.
- If you want to stop the service ticket that is about to be executed or is abnormal, click Forcibly End.
- For the service tickets that are executed:
- If some or all instance tasks in the service tickets are executed abnormally:
Click the Abnormal tab in the Execution Information area. Locate an abnormal batch and click Cancel in the Operation column.
- If all instance tasks in the service tickets are executed successfully, no more operation is needed.
- If some or all instance tasks in the service tickets are executed abnormally:
- For the service tickets that are being executed:
Feedback
Was this page helpful?
Provide feedbackThank you very much for your feedback. We will continue working to improve the documentation.See the reply and handling status in My Cloud VOC.
For any further questions, feel free to contact us through the chatbot.
Chatbot


