
Configuring the LINE Channel
A tenant administrator can configure the LINE channel for customers to access.
Prerequisites

This feature applies only to regions outside the Chinese mainland.
- The system administrator has uploaded the LINE authentication certificate on the page.
- You have applied for a LINE account (used to bind a payment method for package purchase).
- Access the LINE Official Account Manager (https://manager.line.biz/) and register a LINE business account.

- Create an official account in the LINE Official Account Manager (https://manager.line.biz/).


- Use the LINE business account to log in to the LINE Developers console (https://developers.line.biz/console/) to create a provider.

- Click Create a new provider to create a provider.

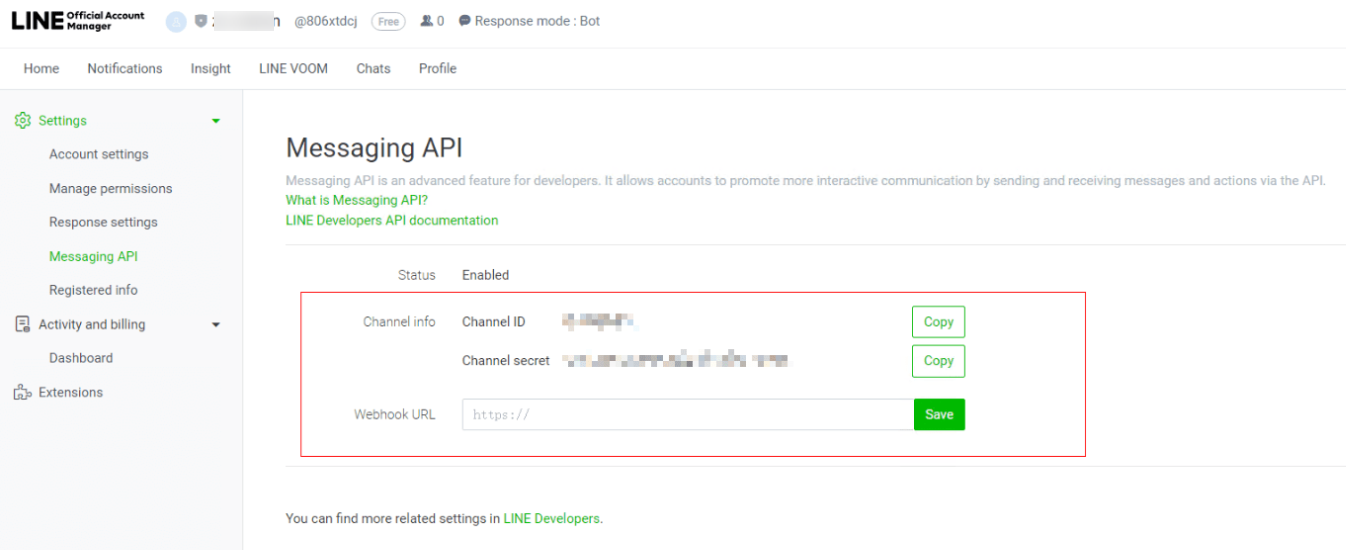
- In the LINE Official Account Manager (https://manager.line.biz/), click Settings in the upper right corner, choose Messaging API from the navigation pane, and select the provider created in the previous step when enabling the messaging API.
Record the values of Channel ID and Channel Secret, which will be used for configuring the LINE channel in the AICC.
- In the LINE Official Account Manager (https://manager.line.biz/), bind a payment method and purchase a package.

- On the LINE Developers console (https://developers.line.biz/en/docs/messaging-api/generate-json-web-token/#create-an-assertion-signing-key), generate private.key and public.key by referring to "Generate using browser" and save them to the local PC.
- On the LINE Developers console (https://developers.line.biz/console/), click Register a public key and enter the public.key value generated in the previous step to generate a key ID.

Save the generated kid value to the JSON structure of private.key. The following is an example of the JSON content. Record the JSON structure content, which will be used for configuring the LINE channel in the AICC.
{ "alg": "RS256", "d": "FeBYAkika**********************************************gF_oQ", "dp": "Xx3YZ********************************************bRo03E", "dq": "f8hijP***************************************SOBWmqE", "e": "AQAB", "ext": true, "key_ops": [ "sign" ], "kty": "RSA", "n": "wOaQQ5n***********************************wLTkY6oWQ", "p": "-_yu-Tea***********************************NdFo--2Dk", "q": "w_j-Lkd**************************************BhESE", "qi": "ppVDVR**************************************IR9EoxbI", "kid": "2b3599*************4aed014" } - In the LINE Official Account Manager, disable Auto-response and enable Webhooks.

- In the LINE Official Account Manager, disable Group and multi-person chats.


- Unauthenticated official accounts cannot be found. You can download the QR code from the LINE Official Account Manager and scan the QR code on a mobile phone to add an official account.
You can also view Bot basic ID of the official account by referring to the following figure. The LINE user can search for the value of Bot basic ID in Search to initiate a chat to the official account.

- Access the LINE Official Account Manager (https://manager.line.biz/) and register a LINE business account.

Context
If the channel ID, channel secret, and assertion signing key provided by LINE are changed, you need to modify the involved LINE channel as follows: Sign in as a tenant administrator, choose , click Edit in the Operation column corresponding to the involved channel, and update the values of Channel ID, Channel secret, and Assertion Signing Key
Procedure
- Sign in to the AICC as a tenant administrator and choose .
- Click New. The Create Channel page is displayed.
- Set channel information parameters.
Table 1 Channel information parameters Parameter
Description
Channel Selection
Select LINE.
Channel ID
Enter the value of Channel ID obtained from the LINE.
Channel secret
Enter the value of Channel Secret obtained from the LINE.
Assertion Signing Key
Enter the JSON structure of private.key obtained from LINE after the kid value is added.
Interconnection Encryption Algorithm
Encryption algorithm used for LINE interconnection. The options are as follows:
- SHA256WithRSA
- SHA256WithPSS
NOTE:SHA-256 with RSA is not strong enough, which poses security risks. If the platform supports SHA-256 with PSS, you are advised to use this algorithm, which is stronger.
- Set basic configuration parameters.
Table 2 Basic configuration parameters Parameter
Description
Channel Name
The channel name must be unique. The code can contain a maximum of 64 characters, including only letters, digits, and underscores (_), and can start only with a letter or an underscore (_).
OU Configuration
Select an OU created in Configuring OUs to assign it to channel resources.
Skill Queue
The options are all multimedia called routes of the current tenant space. For details about how to configure a called route, see Configuring Called Routes.
The search criterion All accessible organizations is controlled by the tenant parameter Has the tenant enabled inter-organization data isolation enforcement. When the tenant parameter is set to Yes, the called route can be searched by OU. In addition, a non-administrator account that is not configured with the OU permission can search for only the called routes under the current OU.
Keyword for Transfer to Agent
Keywords for switching from robot service to manual service. After a customer enters any of the keywords on the client, robot service is switched to manual service.NOTE:If the intelligent robot is enabled, this parameter must be set.
Agent Work Time
- Workday: A maximum of four working time segments (from 00:00 to 24:00) can be configured. By default, a time segment is displayed. You can click New to add a time segment.
- Non-workday: A maximum of four working time segments (from 00:00 to 24:00) can be configured. By default, a time segment is displayed. You can click New to add a time segment.
Non-working days are set on the page.
Non-Working Time Notification
When a customer call is connected to an agent in non-working time, this message is displayed to notify the customer that the agent is in rest state.
Queue Reminder
Queue reminder mode.
- All Reminders
- Queue Reminder
- Queue Progress Reminder
- Close Reminder
Queue Reminder Content
Queue reminder content.
The value can contain a maximum of 256 characters and cannot contain the following special characters: <>'"/\
This parameter is mandatory when Queue Reminder is set to All Reminders or Queue Reminder.
Queue Progress Reminder Content
Queue progress reminder content.
- The value can contain a maximum of 256 characters and cannot contain the following special characters: <>'"/\
- Variables can be set. The bound variables can only be user ID (${userId}), username (${nickName}), queue position (${position}), and estimated waiting time (${waitTime}, in seconds).
- Default value: You are currently in the queue, in position ${position}, and are expected to wait for ${waitTime} seconds
This parameter is mandatory when Queue Reminder is set to All Reminders or Queue Progress Reminder.
Call Transfer Interaction Times
The call transfer function can be used only when the number of messages sent by an agent to a customer reaches the set value.
When the value is 0 or empty, the agent can use the call transfer function at any time.
More
Last Agent Mode
For details, see How Do I Enable the Last Agent Mode?
Session End Due to No Customer Reply
For details, see How Do I Set Session End Due to No Customer Reply?
Session Transfer Due to No Agent Reply
For details, see How Do I Set Session Transfer Due to No Agent Reply?
Session Transfer
For details, see How Do I Set Session Transfer?
- Set robot configuration parameters.
Table 3 Robot configuration parameters Parameter
Description
Connecting to the Intelligent Robot
For details, see How Do I Enable Connection to the Intelligent Robot?
Access Robot Assistant
For details, see How Do I Enable Connection to the Robot Assistant?
- Click The next step. The Channel Integration page is displayed.
- Configure the Webhook URL in LINE.
After the LINE channel is created on the channel configuration page in the AICC, the Webhook URL can be obtained. In the LINE Official Account Manager (https://manager.line.biz/), select the official account to be configured, click Settings in the upper right corner, choose Messaging API from the navigation pane, and set Webhook URL.

Follow-up Procedure
Export channel information.
- All information under Basic Configuration and Robot Configuration can be exported. Passwords and keys cannot be exported.
- A maximum of 100,000 channel records can be exported at a time, and a maximum of 2000 records are allowed in an exported file.
- If no channel is selected, all channel information is exported by default.
- Enter a compression password and click
 to view the plaintext password.
- Return to the channel list.
- Select the new channel and click
 to export the channel information.
 - Click
 and confirm that Status of the export task is Success.
 - Click Download to obtain the exported channel information.
Feedback
Was this page helpful?
Provide feedbackThank you very much for your feedback. We will continue working to improve the documentation.See the reply and handling status in My Cloud VOC.
For any further questions, feel free to contact us through the chatbot.
Chatbot


