Using Built-in Actions to Implement Widget Interactions
You can use the preset common event interaction actions to implement interaction between pages or widgets. The following describes how to orchestrate an event using a built-in action by orchestrating a reset button. In this example, the built-in action Form Reset is used to implement this function, that is, reset form data. Form Submit is to submit page data to a form. This action is similar to Form Reset and is not described.
Orchestrating Events Using Built-in Actions
- Log in to the application designer by referring to Logging In to the Application Designer.
- In the navigation pane, choose Page.
- Move the cursor to
 of the corresponding standard page and choose Edit.
 - On the standard page development page, select the button widget.
- On the Event tab page in the right pane, click + next to on-click. The page for adding an action is displayed.
- In BuiltIn Action, click Form Reset, select the form to be reset, and click Create.
Figure 1 Adding an action
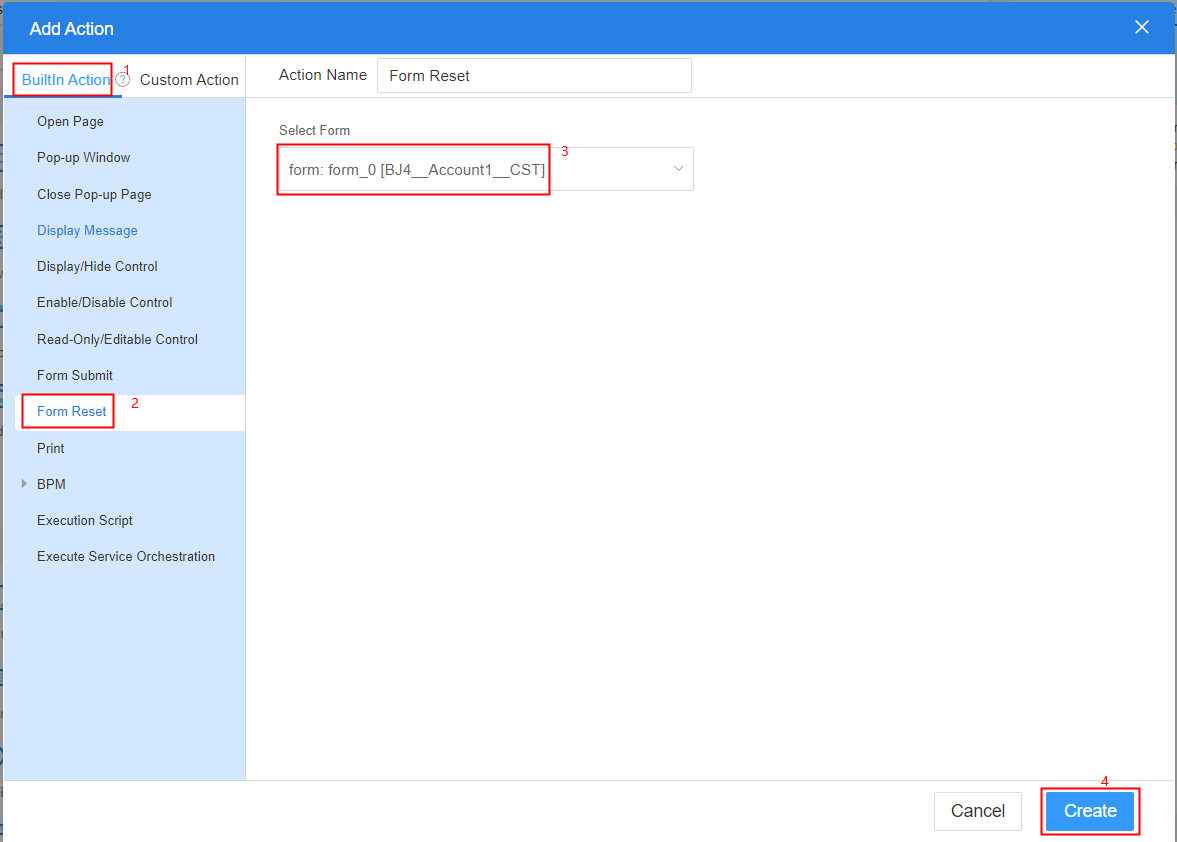
In this example, the built-in action Form Reset is selected. For details about other built-in actions, see Table 1.
Table 1 Built-in action functions Action
Description
Open a page that has been created in the current application on the current page.
Pop up a page that has been created in the current application on the current page.
Close a pop-up page.
Display a message dialog box, such as success, error, warning, and prompt.
Control whether all or some widgets on the page are visible.
Control whether all or some widgets on the page are available.
Control whether all or some widgets on the page are editable.
Submit page data to a form, which is similar to resetting the form configuration.
Print fields in a form.
User Activity diagram elements in BPMs represent tasks where users are involved, like form filling, data submission, and approvals. These activities link to specific pages for user interaction, and standard pages come with preset BPM-related events for easy association.
- BPM-Submit Instance
Submit data to BPMs. The effect is the same as that of the preset API context.$BPM.submitInstance (variables:object).
- BPM-Submit Task
Submit data to BPMs. The effect is the same as that of the preset API context.$BPM.submitTask (variables:object).
- BPM-Transfer Task
Transfer user activities in BPMs.
- BPM-Change Variables
Set variable values in BPMs. The effect is the same as that of the preset API context.$BPM.putVariables (variables:object, instId: string).
- BPM-Load Variables
Obtain parameter variables in BPMs. The effect is the same as that of the preset API context.$BPM.loadVariables().
This preset action is used to execute a script.
This action is used to execute a flow.
This action is used to download files on standard pages.
- BPM-Submit Instance
- Return to the standard page development page, click
 in the upper part of the page, save the page, and click
  to preview the page.
 - Enter data in the form and click the reset button to preview the event effect of the button.
Open Page
On a standard page, the built-in action Open Page is usually used to implement the page redirection function. This section uses the try now button as an example.
- On the standard page design page, select the button widget.
- On the Event tab page on the right, click
 . The page for adding an action is displayed.
 - In BuiltIn Action, click Open Page, set parameters such as the target page and open mode, and click Create.
Figure 2 Open Page

- Target Page: Page to be opened.
- Current application page: Pages that have been created in the current application.
- URL: URL of a page.
- Reload current page: Load and refresh the current page.
- Open Type: Set the mode of opening the target page, for example, opening the target page in a new tab page or in the current window.
- Bind Parameter: If the URL of the page to be opened contains parameters, you can click Add to set the parameters in the URL.
- Target Page: Page to be opened.
- Return to the standard page development page and click
 in the upper part of the page to save the page.
 - Click
 to preview the page. Click the try now button to preview the event effect of the button.
Pop-up Window
On a standard page, the built-in action Pop-up Window is usually used to implement the function of displaying a window or dialog box. For example, after you click the submit button, a message is displayed, indicating that the submission is successful.
- On the standard page design page, select the button widget.
- On the Event tab page on the right, click
 . The page for adding an action is displayed.
 - In BuiltIn Action, click Pop-up Window, configure the target page and window options, and click Create.
Figure 3 Pop-up Window
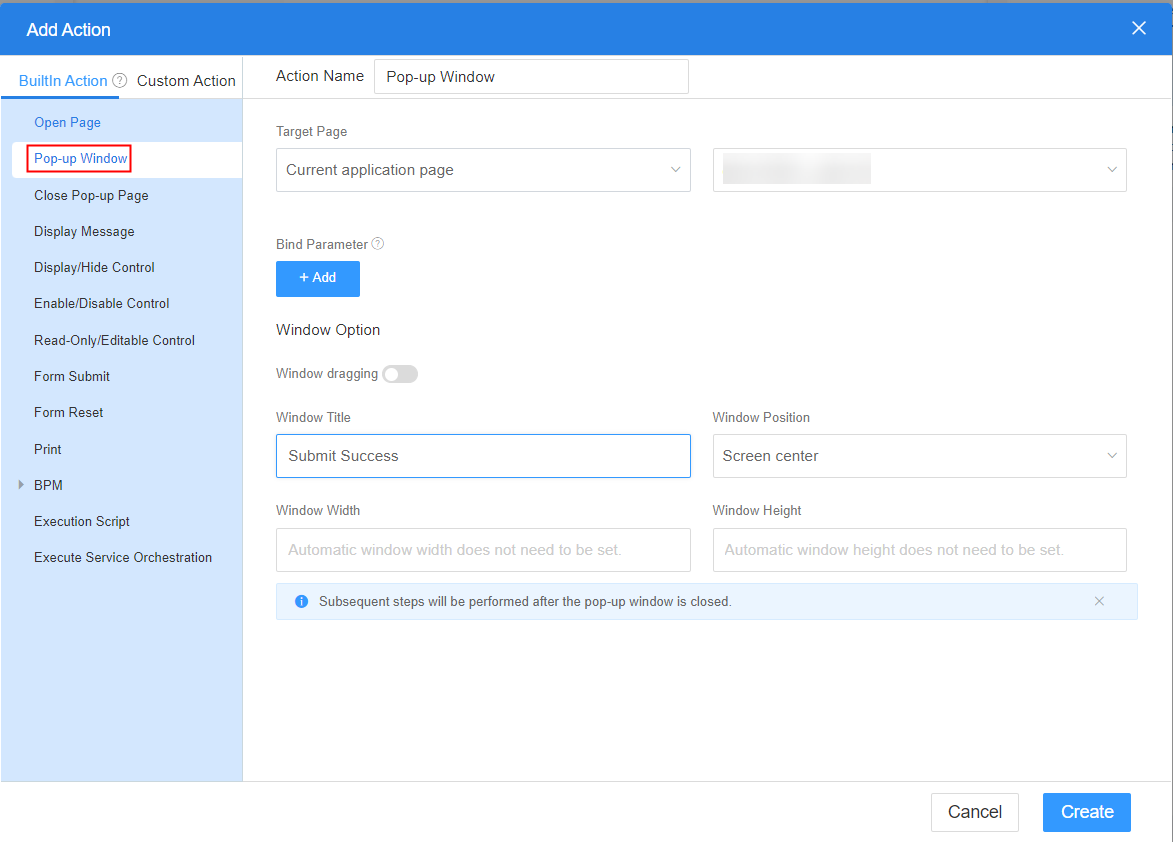
- Target Page: Type of the page to be displayed.
- Current application page: Pages that have been created in the current application.
- URL: URL of a page.
- Window dragging: Whether a window can be dragged back and forth.
- Window Title: Title of the pop-up window.
- Window Position: Position of the pop-up window on the screen, for example, center of the screen or center of the top of the screen.
- Window Width: Width of the window, in pixels.
- Window Height: Height of the window, in pixels.
- Target Page: Type of the page to be displayed.
- Return to the standard page development page and click
 in the upper part of the page to save the page.
 - Click
 to preview the page. Click the submit button to preview the event effect of the button.
Close Pop-up Page
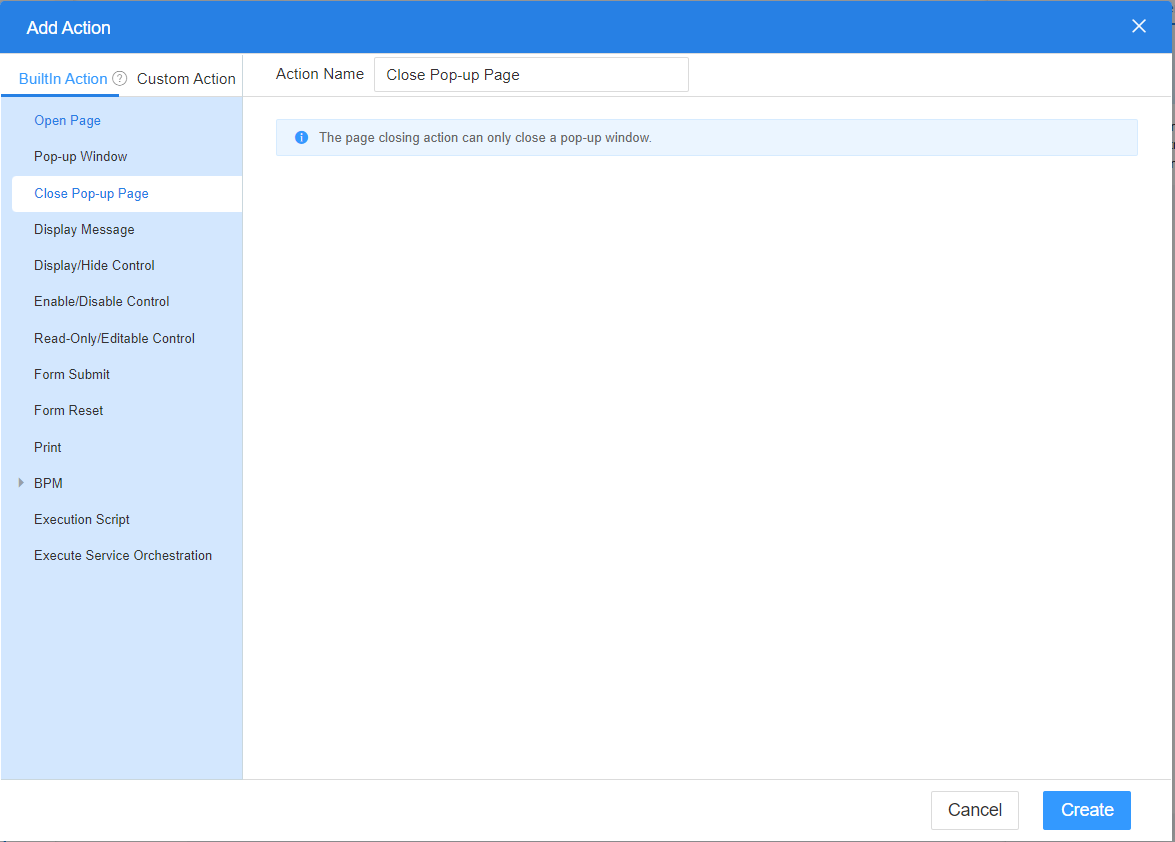
On a standard page, the built-in action Close Pop-up Page is usually used to close a pop-up page. The following describes how to click the confirm button to close the pop-up page.
- On the standard page design page, select the button widget.
- On the Event tab page on the right, click
 . The page for adding an action is displayed.
 - In BuiltIn Action, click Close Pop-up Page and click Create.
Figure 4 Close Pop-up Page
- Return to the standard page development page and click
 in the upper part of the page to save the page.
 - Click
 to preview the page. Click the confirm button to preview the event effect of the button.
Display Message
On a standard page, the built-in action Display Message is usually used to display a message dialog box. For example, after you click the confirm button, the system displays a message indicating that the instance is created successfully.
- On the standard page design page, select the button widget.
- On the Event tab page on the right, click
 . The page for adding an action is displayed.
 - In BuiltIn Action, click Display Message, set related parameters, and click Create.
Figure 5 Display Message
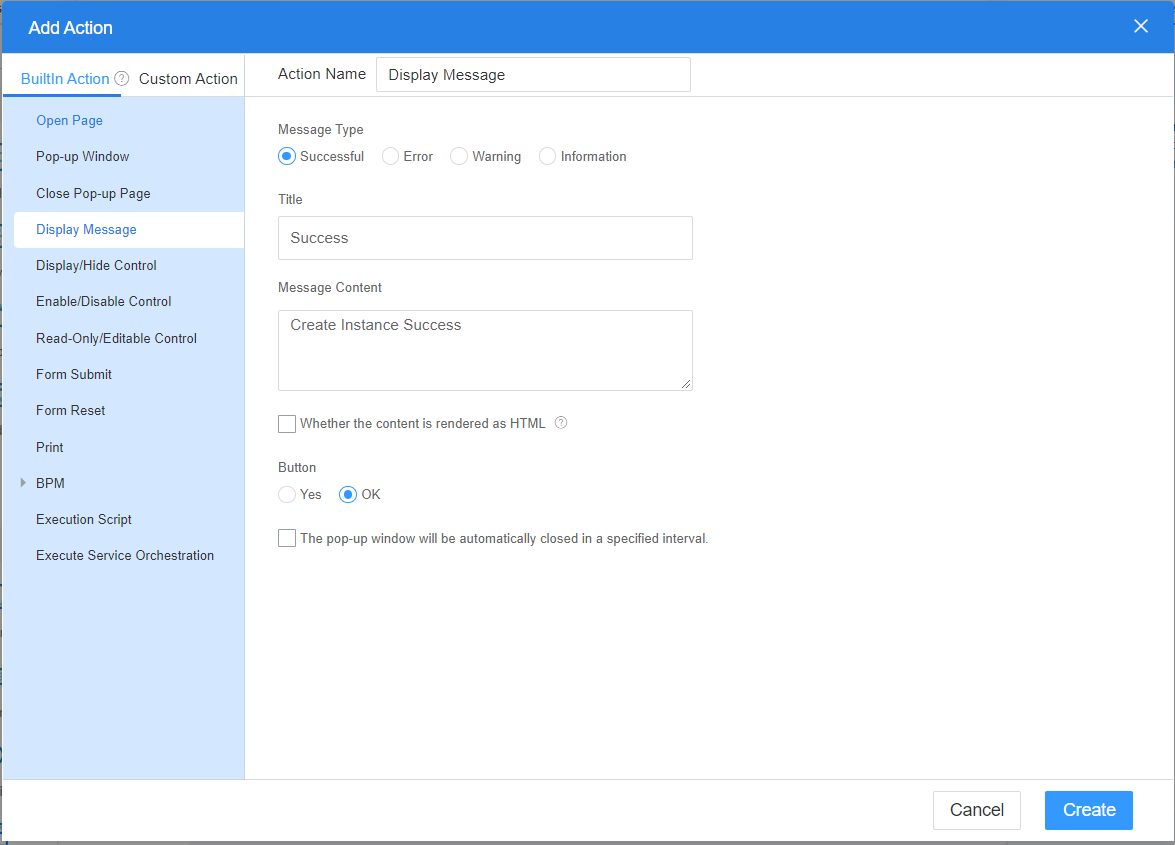
- Message Type: Type of the displayed message, such as Successful, Error, Warning, and Information.
- Title: Title displayed in the upper left corner of the message dialog box.
- Message Content: Message content displayed in the message dialog box.
- Whether the content is rendered as HTML: Whether to render content as HTML. Dynamic HTML rendering may cause XSS attacks. When this property is enabled, ensure that the input content is trusted.
- Button: Yes or OK.
- The pop-up window will be automatically closed in a specified interval: Whether to support delayed auto-close after pop-up. If this property is selected, you need to set the delay in seconds.
For example, select this property and set the delay to 3 seconds. After a dialog box is displayed, the dialog box is automatically closed 3 seconds later.
- Return to the standard page development page and click
 in the upper part of the page to save the page.
 - Click
 to preview the page. Click the confirm button to preview the event effect of the button.
Display/Hide Control
Display/Hide Control is used to control whether all or some widgets on a standard page are visible.
- On the standard page design page, select the button widget.
- On the Event tab page on the right, click
 . The page for adding an action is displayed.
 - In BuiltIn Action, click Display/Hide Control.
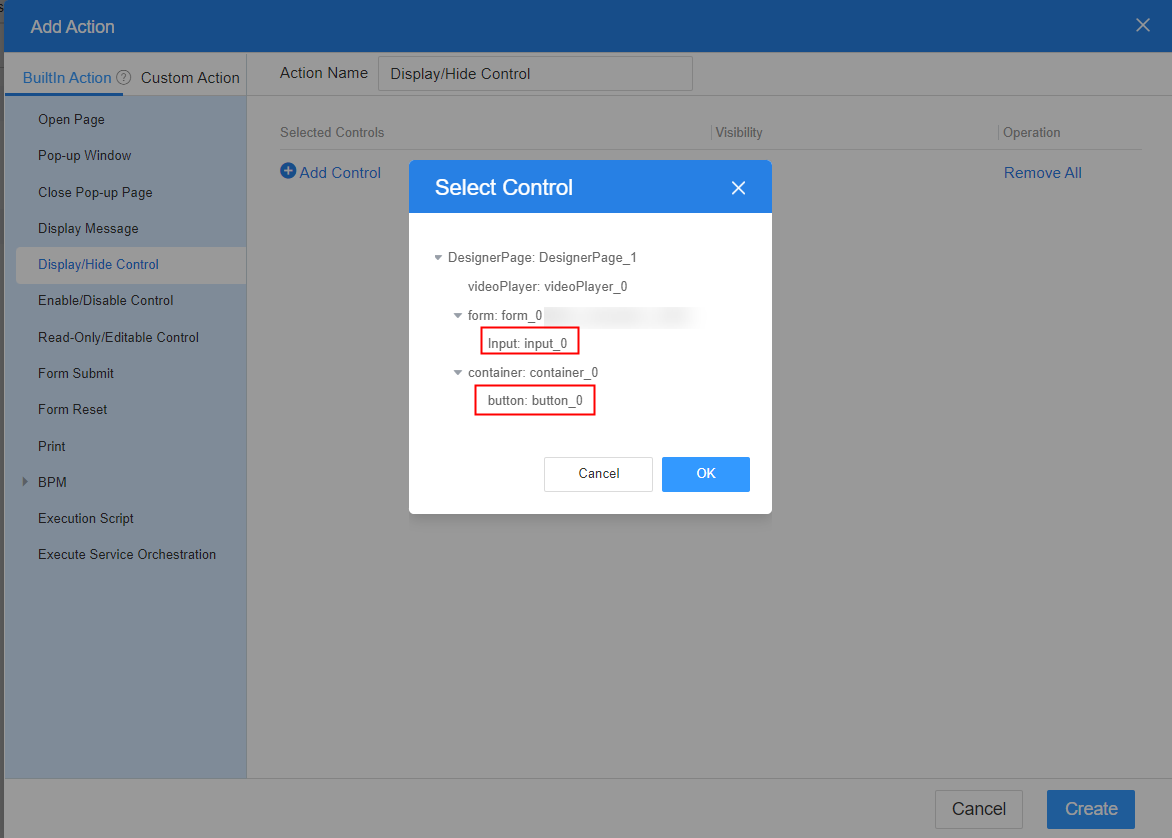
- On the right of the page, click Add Control, select the widget to be set, and click OK.
Figure 6 Select Control
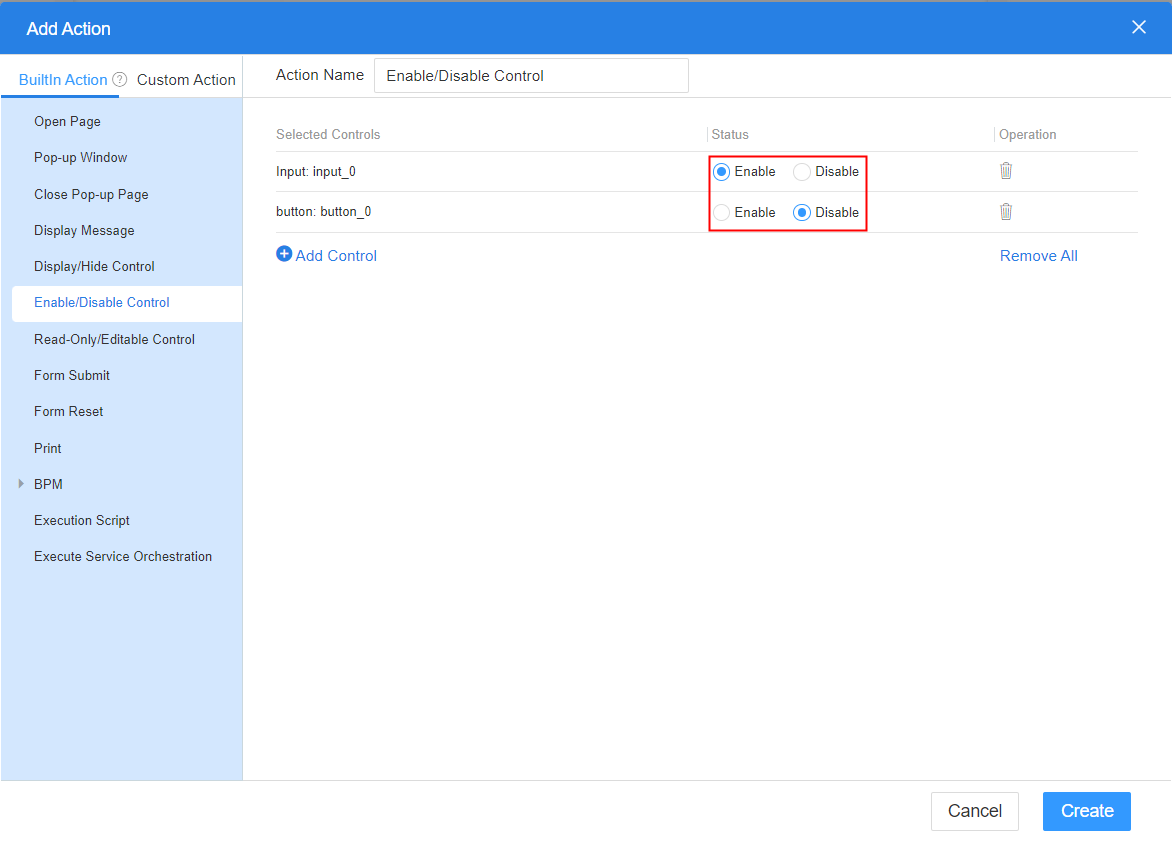
- Set whether to display the widget and click Create.
Figure 7 Configuring whether to display the widget
- Return to the standard page development page and click
 in the upper part of the page to save the page.
 - Click
 to preview the effect.
Enable/Disable Control
Enable/Disable Control is used to control whether all or some widgets on a standard page are available.
- On the standard page design page, select the button widget.
- On the Event tab page on the right, click
 . The page for adding an action is displayed.
 - In BuiltIn Action, click Enable/Disable Control.
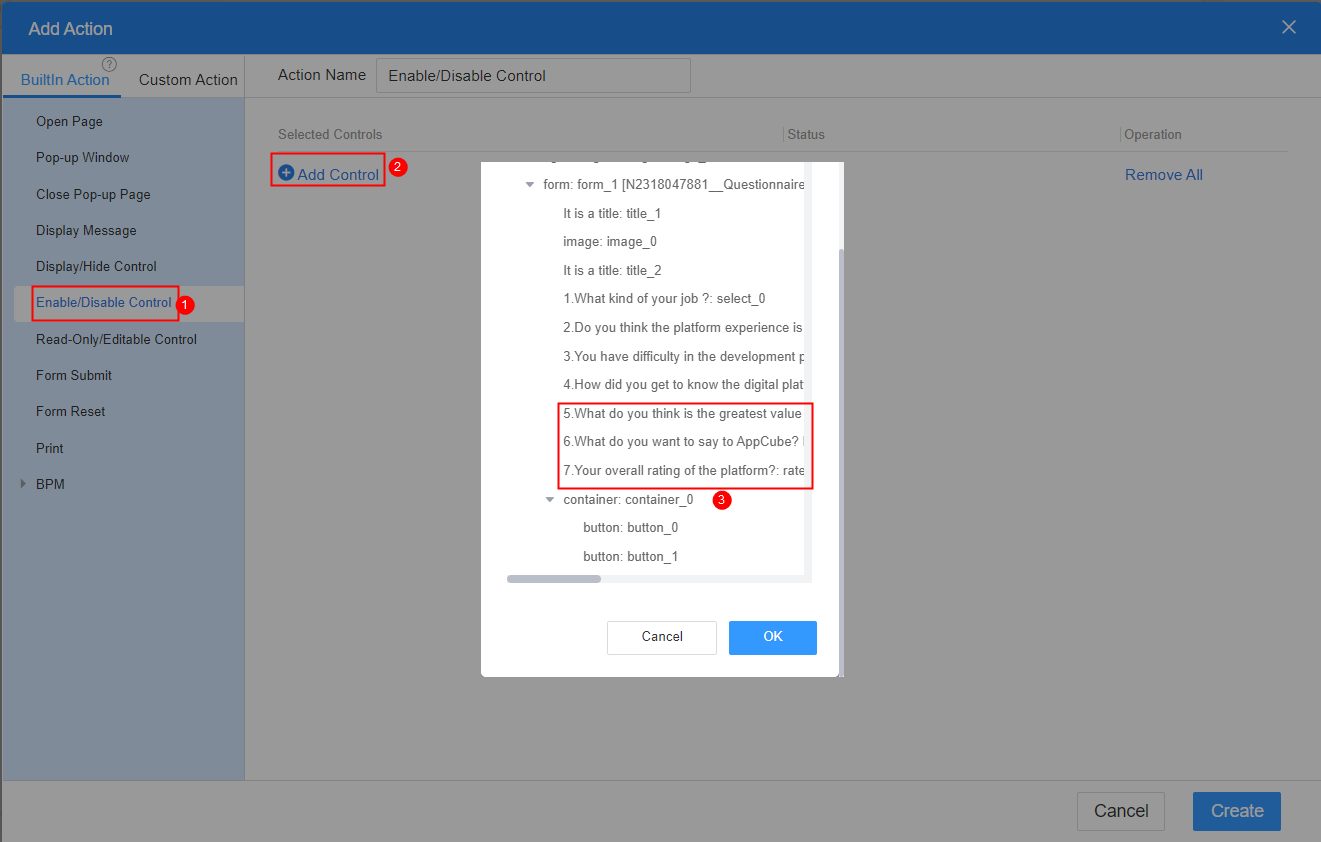
- On the right of the page, click Add Control, select the widget to be set, and click OK.
Figure 8 Select Control
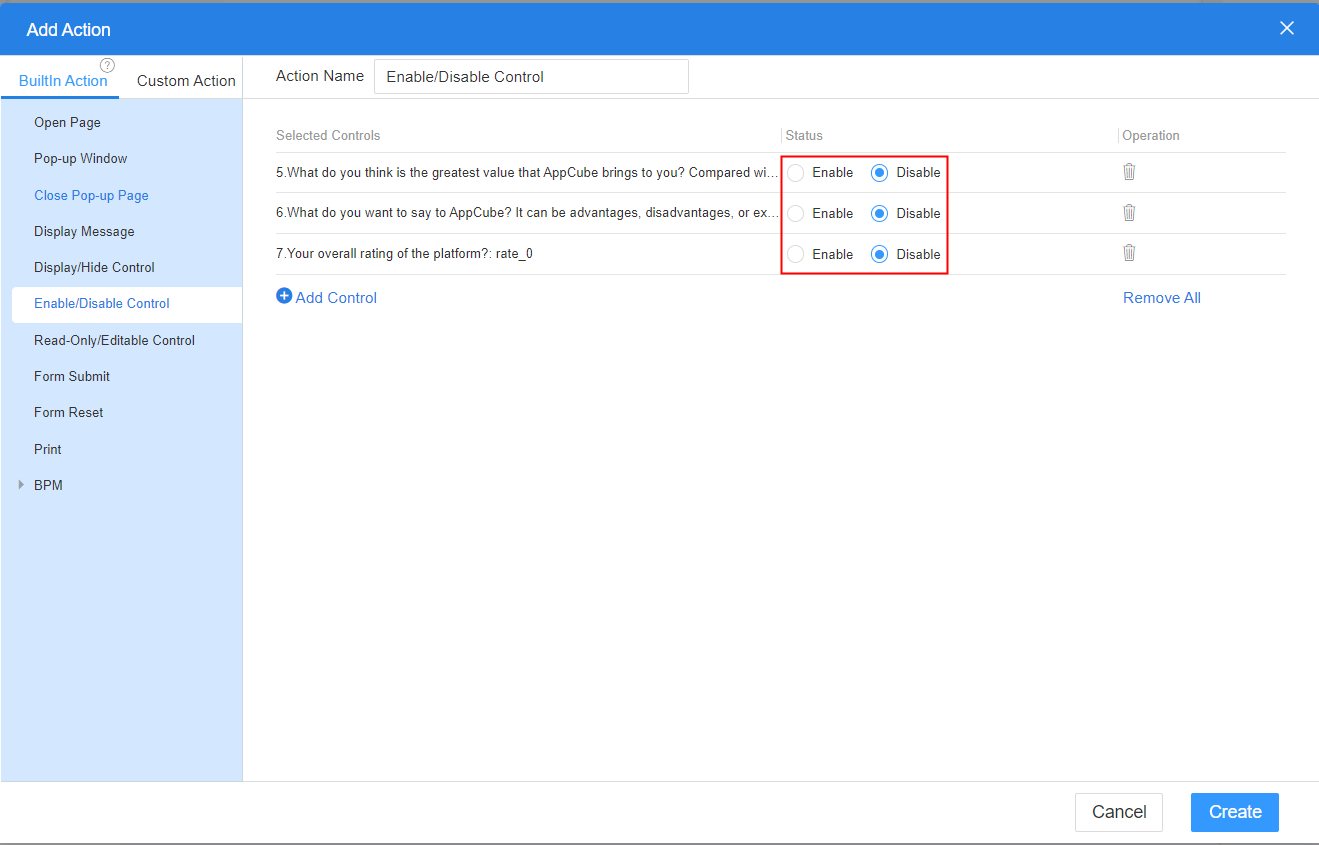
- Set whether to enable the widget and click Create.
Figure 9 Configuring whether to enable the widget
- Return to the standard page development page and click
 in the upper part of the page to save the page.
 - Click
 to preview the effect.
Read-Only/Editable Control
Read-Only/Editable Control is used to control whether all or some widgets on a standard page are editable.
- On the standard page design page, select the button widget.
- On the Event tab page on the right, click
 . The page for adding an action is displayed.
 - In BuiltIn Action, click Read-Only/Editable Control.
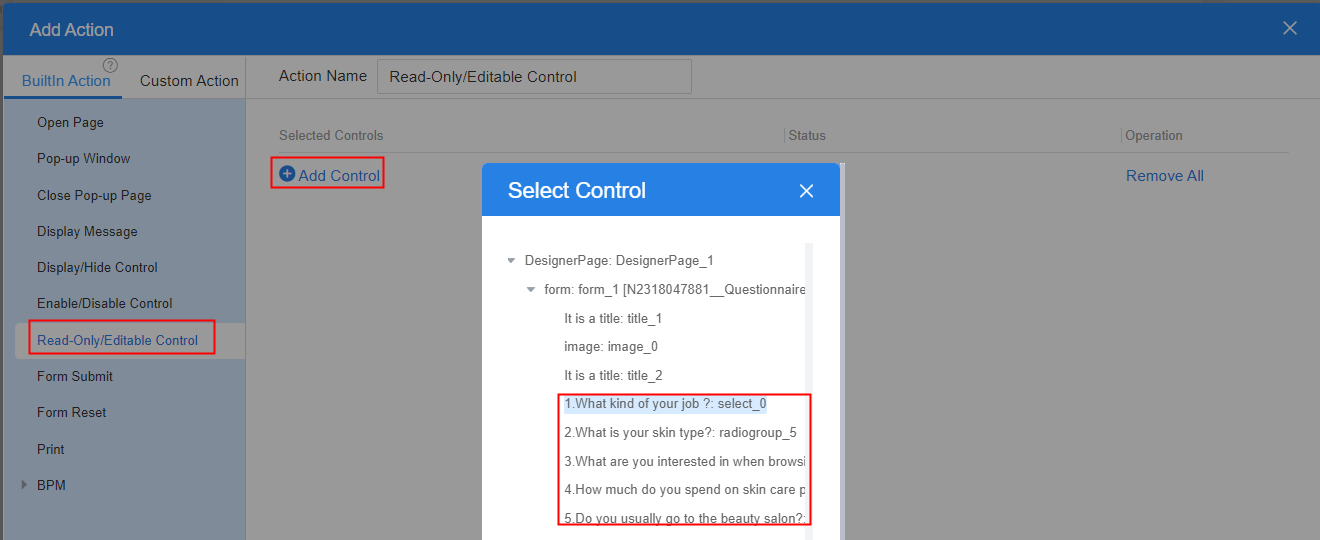
- On the right of the page, click Add Control, select the widget to be set, and click OK.
Figure 10 Select Control
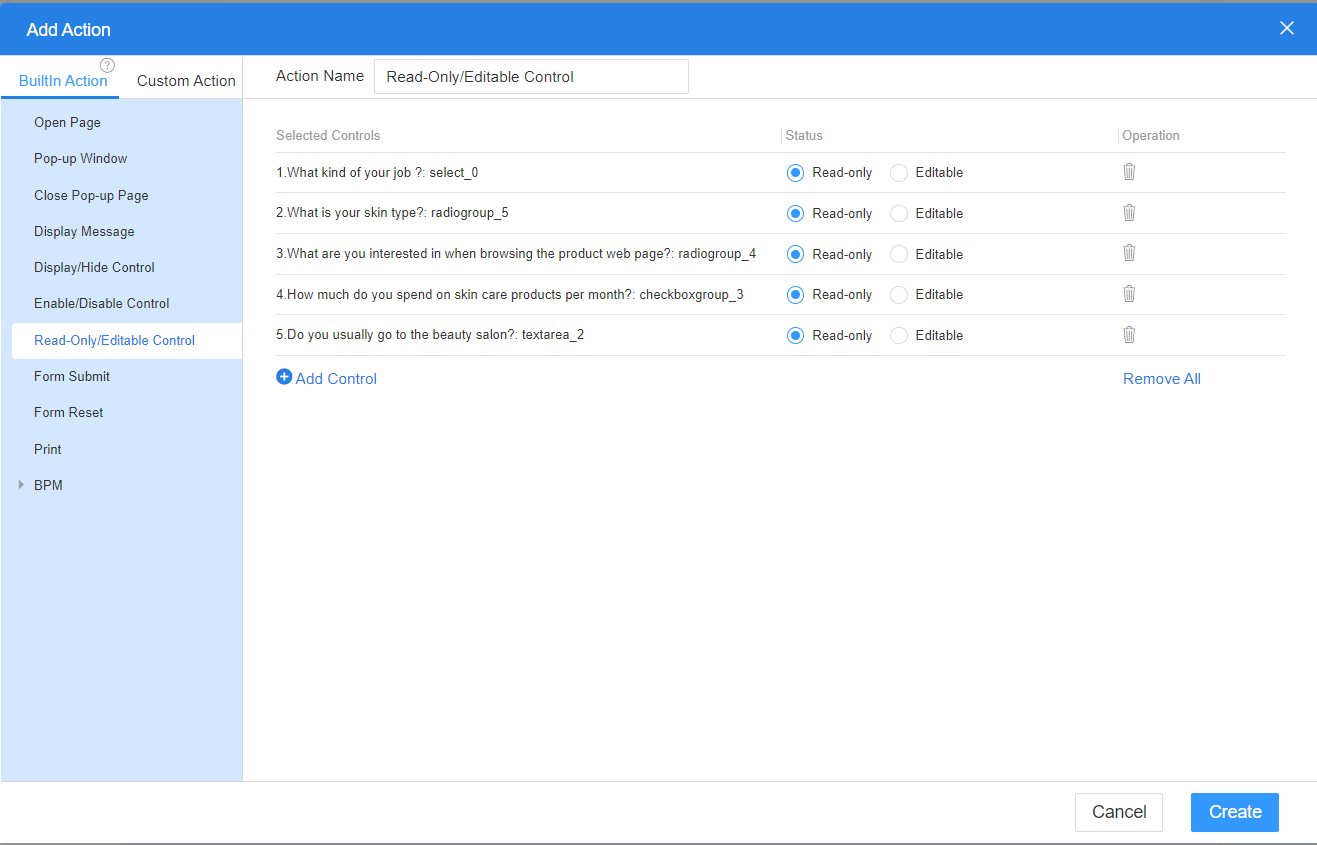
- Set whether the widget is editable and click Create.
Figure 11 Configuring whether the widget is editable
- Return to the standard page development page and click
 in the upper part of the page to save the page.
 - Click
 to preview the effect.
Form Submit
On a standard page, Form Submit is usually used to implement the form submission function.
- On the standard page design page, select the button widget.
- On the Event tab page on the right, click
 . The page for adding an action is displayed.
 - In BuiltIn Action, click Form Submit.
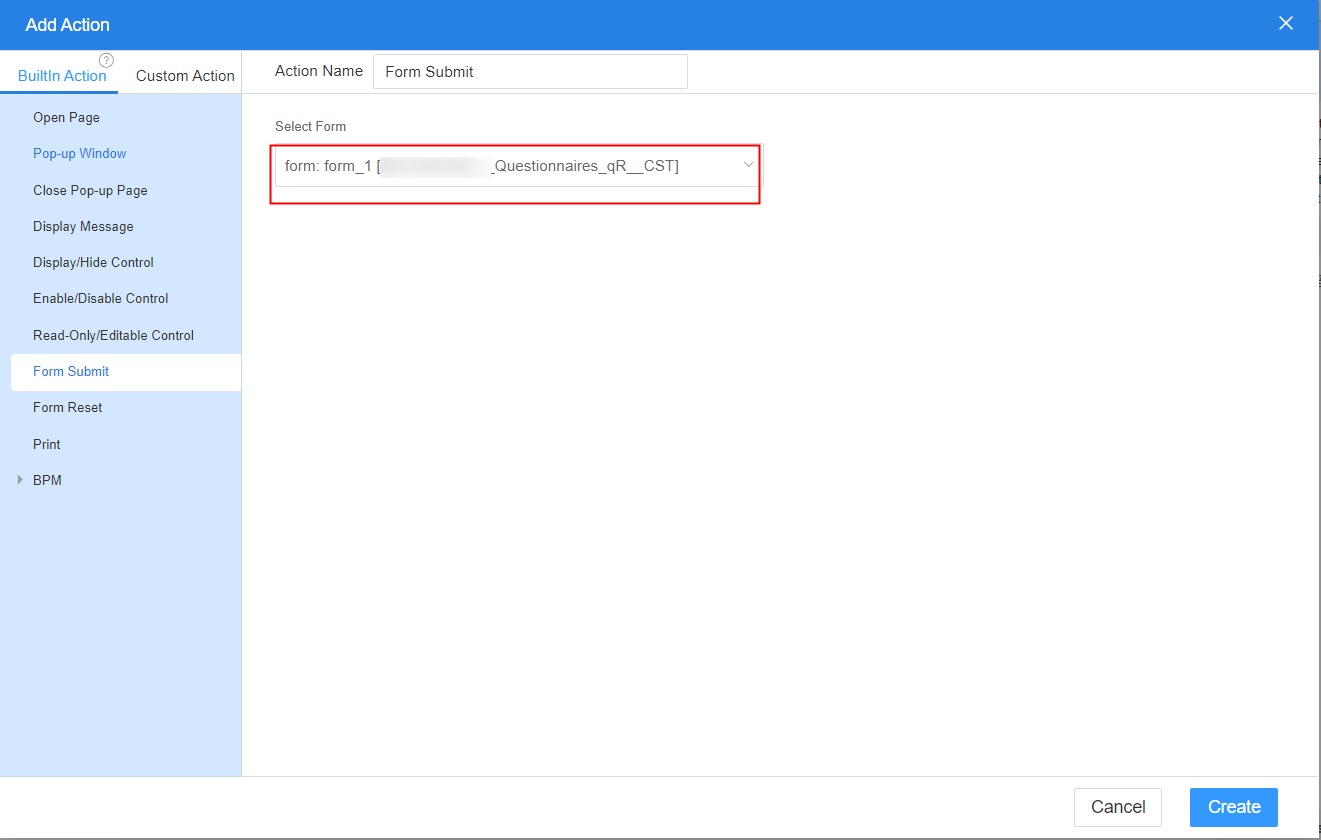
- On the right of the page, select the form to be submitted and click Create.
Figure 12 Selecting the form to be submitted
- Return to the standard page development page and click
 in the upper part of the page to save the page.
 - Click
 to preview the effect.
On a standard page, Print is usually used to print fields in a form.
- On the standard page design page, select the button widget.
- On the Event tab page on the right, click
 . The page for adding an action is displayed.
 - In the BuiltIn Action tab page, click Print.
- In the right pane, click Settings.
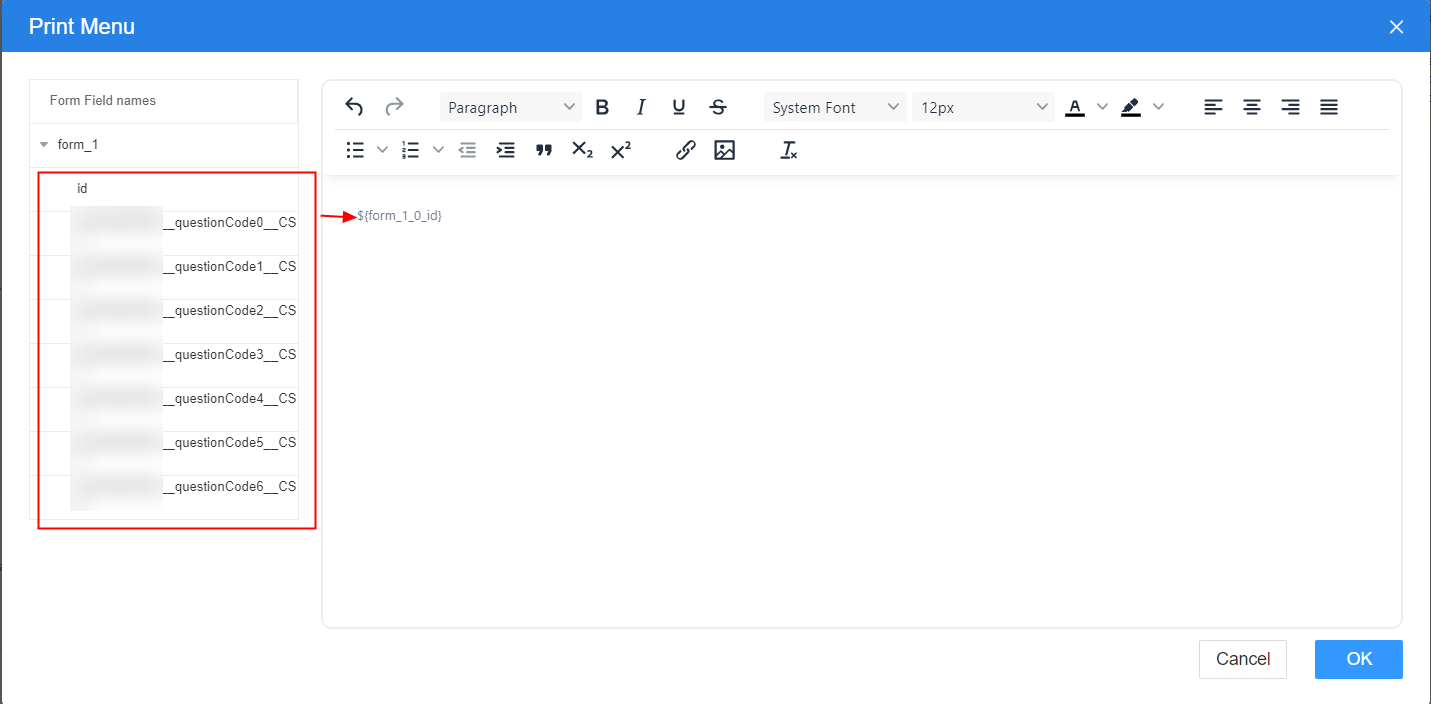
- In the print settings, select the fields to be printed in the form and click OK.
Figure 13 Print settings
- Click the save button. Return to the standard page development page and click
 in the upper part of the page to save the page.
 - Click
 to preview the effect.
BPM
User Activity diagram elements in BPMs represent tasks where users are involved, like form filling, data submission, and approvals. These activities link to specific pages for user interaction, and standard pages come with preset BPM-related events for easy association.
- BPM-Submit Instance
Submit data to BPMs. The effect is the same as that of the preset API context.$BPM.submitInstance (variables:object).
- Select a widget (for example, button). On the Event tab page on the right, click
 next to on-click. The page for adding an action is displayed.
 - In BuiltIn Action > BPM, click BPM-Submit Instance.
- In the right pane, set related parameters and click Create.
Figure 14 Selecting an action
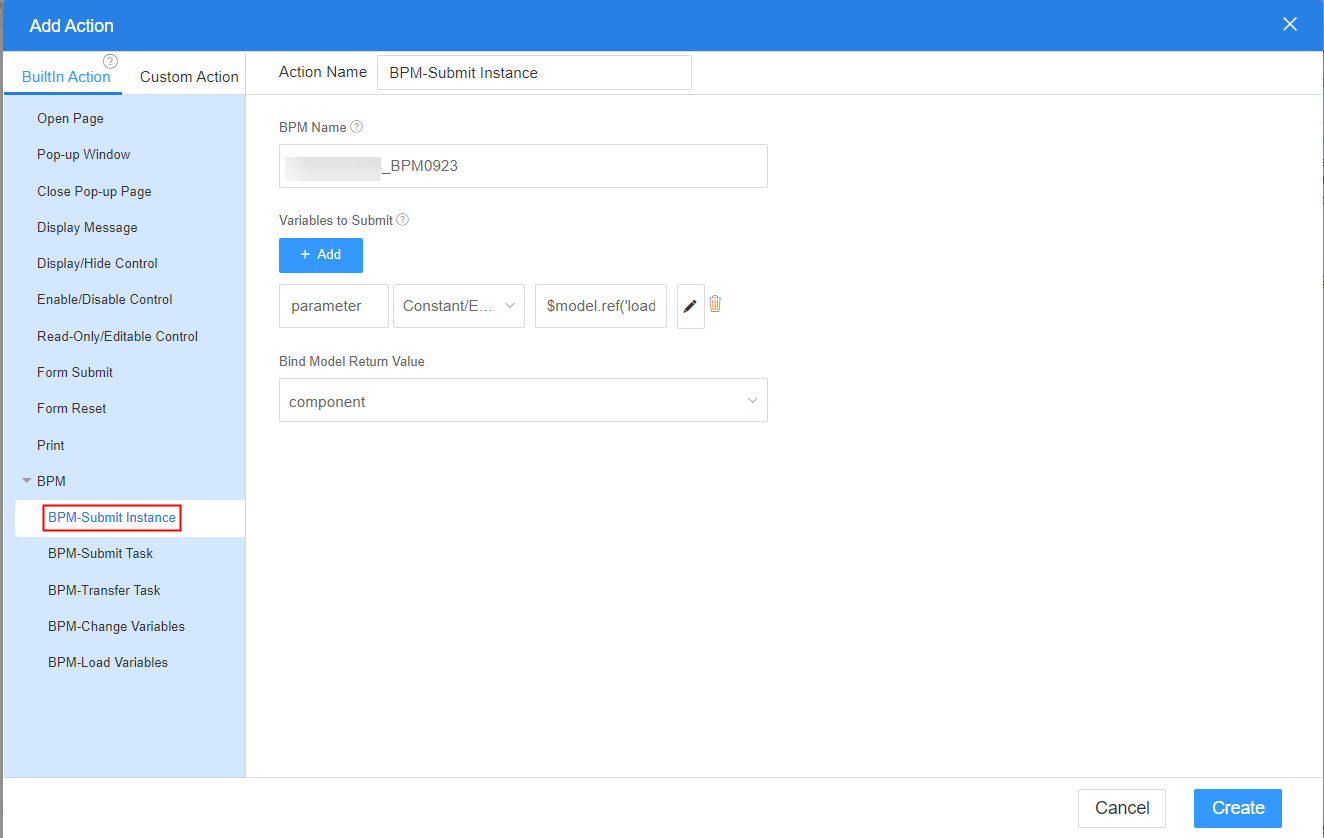
- BPM Name: BPM name. If this parameter is not set, the query parameter bp.name on the page is used by default.
- Variables to Submit: Assign values to the variables to be submitted.
- Bind Model Return Value: The return value is bound to the page model.
- Return to the standard page development page and click
 in the upper part of the page to save the page.
 - Click
 to preview the page, and click to preview the event effect.
- Select a widget (for example, button). On the Event tab page on the right, click
- BPM-Submit Task
Submit data to BPMs. The effect is the same as that of the preset API context.$BPM.submitTask (variables:object).
- Select a widget (for example, button). On the Event tab page on the right, click
 next to on-click. The page for adding an action is displayed.
 - In BuiltIn Action > BPM, click BPM-Submit Task.
- In the right pane, set related parameters and click Create.
Figure 15 Selecting an action
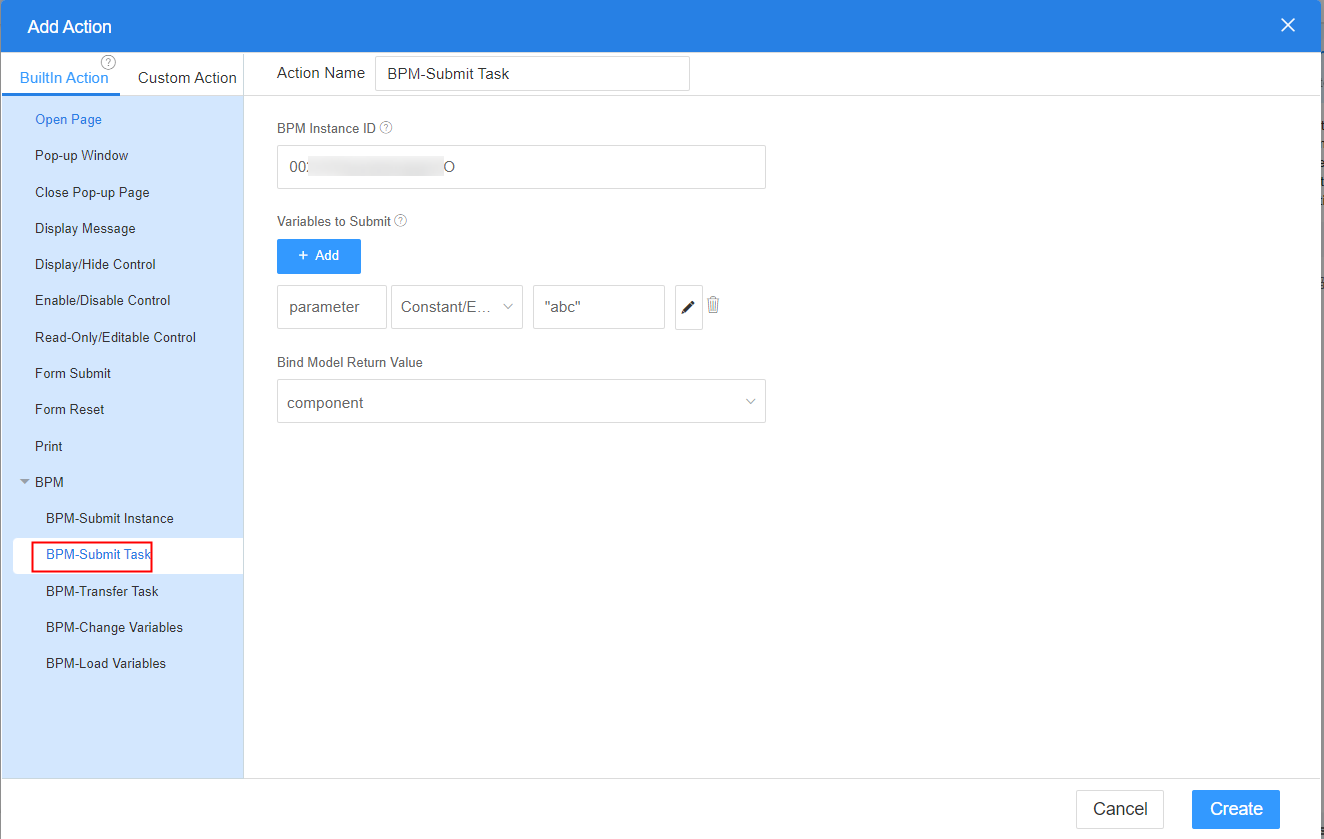
- BPM Instance ID: BPM instance ID. If this parameter is not set, the query parameter interviewID on the page is used by default.
- Variables to Submit: Assign values to the variables to be submitted.
- Bind Model Return Value: The return value is bound to the page model.
- Return to the standard page development page and click
 in the upper part of the page to save the page.
 - Click
 to preview the page. After filling in the questionnaire items, click the submit button to preview the event effect of the button.
- Select a widget (for example, button). On the Event tab page on the right, click
- BPM-Transfer Task
Transfer user activities in BPMs.
- Select a widget (for example, button). On the Event tab page on the right, click
 next to on-click. The page for adding an action is displayed.
 - In BuiltIn Action > BPM, select BPM-Transfer Task.
- In the right pane, set related parameters and click Create.
Figure 16 Selecting an action
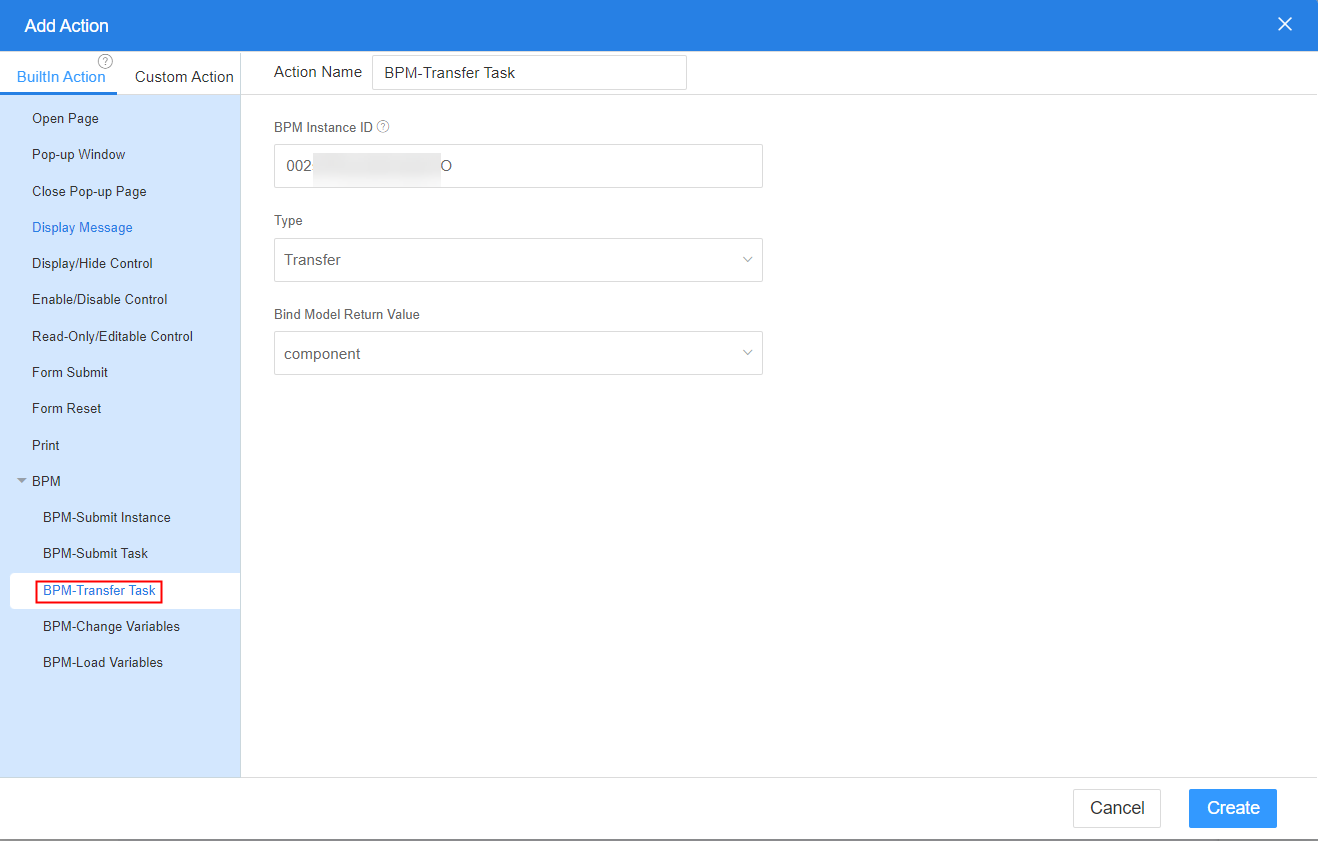
- BPM Instance ID: BPM instance ID. If this parameter is not set, the query parameter interviewID on the page is used by default.
- Type: Select Transfer or Delegate as required.
- Bind Model Return Value: The return value is bound to the page model.
- Return to the standard page development page and click
 in the upper part of the page to save the page.
 - Click
 to preview the page, and click to preview the event effect.
- Select a widget (for example, button). On the Event tab page on the right, click
- BPM-Change Variables
Set variable values in BPMs. The effect is the same as that of the preset API context.$BPM.putVariables (variables:object, instId: string).
- Select a widget (for example, button). On the Event tab page on the right, click
 next to on-click. The page for adding an action is displayed.
 - In BuiltIn Action > BPM, select BPM-Change Variables.
- In the right pane, set related parameters and click Create.
Figure 17 Selecting an action
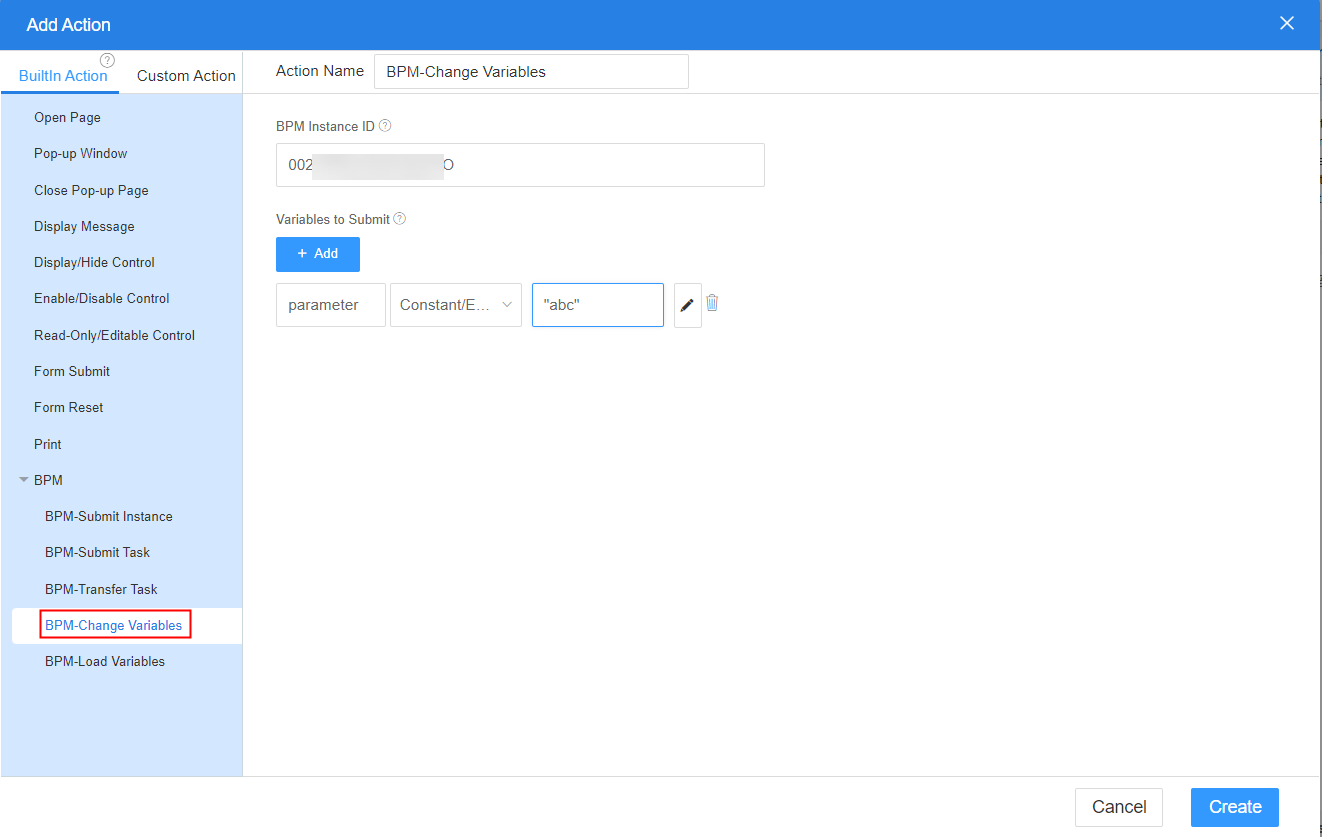
- BPM Instance ID: BPM instance ID. If this parameter is not set, the query parameter interviewID on the page is used by default.
- Variables to Submit: Assign values to the variables to be submitted.
- Return to the standard page development page and click
 in the upper part of the page to save the page.
 - Click
 to preview the page, and click to preview the event effect.
- Select a widget (for example, button). On the Event tab page on the right, click
- BPM-Load Variables
Obtain parameter variables in BPMs. The effect is the same as that of the preset API context.$BPM.loadVariables().
- Select a widget (for example, button). On the Event tab page on the right, click
 next to on-click. The page for adding an action is displayed.
 - In BuiltIn Action > BPM, select BPM-Load Variables.
- In the right pane, set related parameters and click Create.
Figure 18 Selecting an action
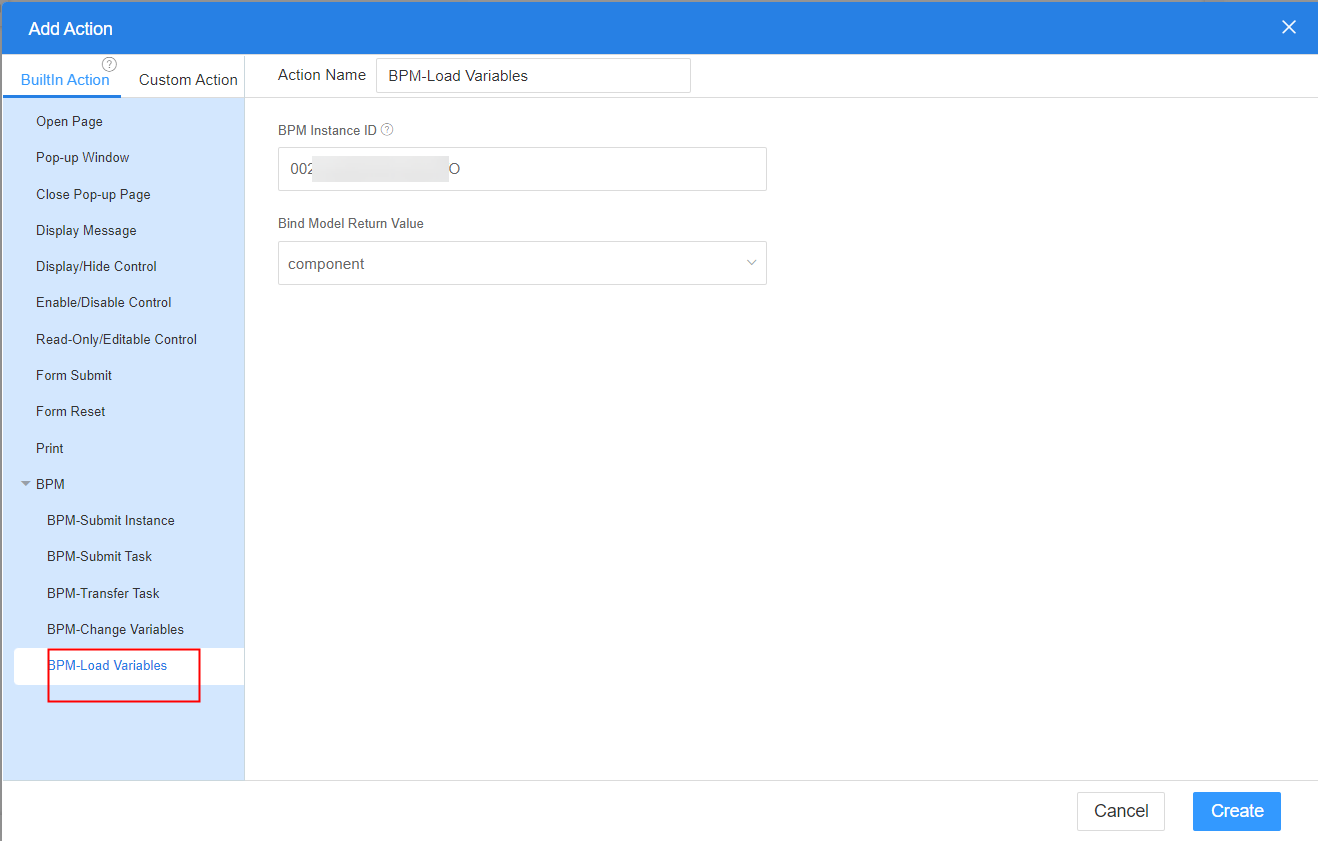
- BPM Instance ID: BPM instance ID. If this parameter is not set, the query parameter interviewID on the page is used by default.
- Bind Model Return Value: The return value is bound to the page model.
- Return to the standard page development page and click
 in the upper part of the page to save the page.
 - Click
 to preview the page, and click to preview the event effect.
- Select a widget (for example, button). On the Event tab page on the right, click
Calling a Script or Flow
Built-in actions are used to call scripts and flows on standard pages.
- On the standard page design page, select the button widget.
- On the Events tab page on the right, click
 . The page for adding an action is displayed.
 - In the built-in actions area, click the button to call a service or flow.
- On the right of the page, select the script or flow to be executed and click the create button.
- Return to the standard page development page and click
 in the upper part of the page to save the page.
 - Click
 to preview the effect.
Downloading Files
This action can be used to download files from a standard page to a specified bucket. You can also download files by customizing actions on the Custom Action tab page.
- On the standard page design page, select related widgets.
- On the Events tab page on the right, click
 . The page for adding an action is displayed.
 - In the built-in action area, click File Download.
- On the right side of the page, set the connector information and click the create button.
Table 2 Parameter description Parameter
Description
Connector Type
Storage type of the downloaded file. OBS and MinIO are supported.
- OBS: stores data to OBS through an OBS connector.
- MINIO: stores data to MINIO through a MINIO connector.
Connector Name
Select the name configured when the connector is created in Interconnecting with OBS Instances or Connecting MinIO for Object and Asset Storage.
Bucket Name
Select a bucket name, that is, the bucket to which the downloaded file is stored.
File Path
Select the file storage location. The options are as follows:
- Constant/Expression: Set this parameter to a fixed value or the calculation result of a built-in expression.
- Control Attribute: Use the attribute of the current page widget as the value of this item, for example, the control name and label.
- Control Value: Use the value obtained by the current page widget as the value of this item, for example, the value entered in the text box widget and the value selected in the drop-down list box widget.
- URL Parameter: Use the value of the URL query parameter in the link of the page where the widget is located. Set this parameter to the key of the query parameter. The page must have the corresponding query parameter.
- Return to the standard page development page and click
 in the upper part of the page to save the page.
 - Click
 to preview the effect.
Feedback
Was this page helpful?
Provide feedbackThank you very much for your feedback. We will continue working to improve the documentation.See the reply and handling status in My Cloud VOC.
For any further questions, feel free to contact us through the chatbot.
Chatbot


