
How Do I Deploy an RD Licensing Server?
Scenarios
Workspace Application Streaming must obtain remote desktop authorization. This section describes how to deploy an RD Licensing server. If an RD Licensing server is available, skip this section.

- Huawei does not provide RD Licensing servers. Users need to purchase and configure RD Licensing servers.
- RDS CAL type must be set to Per User CALs.
- For details about the RDS CAL version compatibility, visit RDS CAL version compatibility.
Prerequisites
- You have purchased an ECS.
- You have obtained the serial number (SN) of the Windows OS from Microsoft or other official channels.
- You have obtained licenses for remote applications from Microsoft.
- You have created a domain account of the RD Licensing server on Windows AD, for example, vdesktop\vdsuser. For details, see How Do I Create a User on the AD Server?.
Procedure
Logging in to a server
- In the ECS list, locate the created ECS and click Remote Login in the Operation column.
- Click Send CtrlAltDel in the upper right corner of the remote login screen.
- Enter the password of the ECS to log in.
Disabling the firewall
- Right-click
 in the lower left corner, enter gpedit.msc in the Run text box, and press Enter.
 The Local Group Policy Editor window is displayed.
- In the navigation pane on the left, choose Computer Configuration > Administrative Templates > Network > Network Connections > Windows Firewall. Click Domain Profile and disable Windows Firewall: Protect all network connections. Click Standard Profile and disable Windows Firewall: Protect all network connections, as shown in Figure 1.
- Close the Local Group Policy Editor window.

Configuring the AD domain address to the DNS server of the RD Licensing server
- Log in to the RD Licensing server.
- Right-click the NIC connection status icon in the lower right corner and choose Open Network and Sharing Center from the shortcut menu. The network configuration page is displayed.
- Click Change adapter settings. The network connection page is displayed.
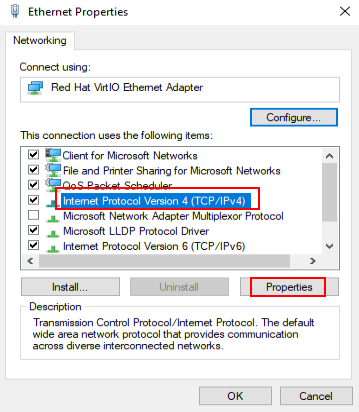
- Right-click the NIC and choose Properties from the shortcut menu. The NIC's properties page is displayed.
- In the connection item list on the Networking tab page, click the Internet protocol version with the IPv4 suffix, and click Properties. The IPv4 Internet protocol properties page is displayed, as shown in Figure 2.
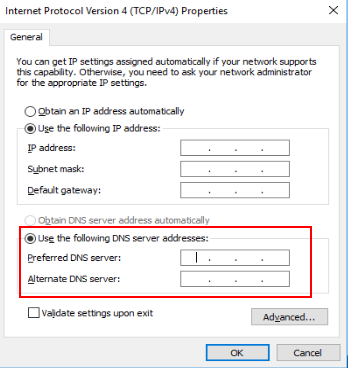
- On the General tab page, choose Use the following DNS server address:, and set Preferred DNS server: to the AD domain address, as shown in Figure 3.
- Click OK.
Adding the server to the domain
- On the server, right-click
 in the lower left corner, enter sysdm.cpl in the Run text box, and press Enter.
 The System Properties window is displayed.
- Click Change.
The Computer Name/Domain Changes dialog box is displayed.
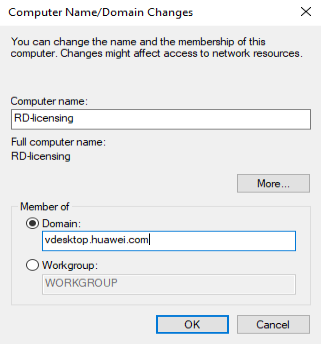
- Set the following parameters and click OK, as shown in Figure 4.
- Computer name: Enter the planned computer name, for example, RD-licensing.
- Domain: Enter the fully qualified domain name (FQDN) of the domain, for example, vdesktop.huawei.com.
- Enter the username and password of the domain administrator to be added to the domain and click OK.
- Complete the configuration as prompted, restart the VM, and log in to the VM using the administrator account.
Adding the domain account to the administrator group
- Domain administrator account (for example, vdesktop\vdsadmin)
- Domain account for logging in to a server (for example, vdesktop\vdsuser)
- In the server, right-click
 in the lower left corner, enter compmgmt.msc, and press Enter.
 The Computer Management window is displayed.
- Choose System Tools > Local Users and Groups > Groups.
The group list is displayed in the right pane.
- Right-click Administrators and choose Add to Group from the shortcut menu.
- Click Add. In the Enter the object names to select area, enter Domain account for logging in to a server, for example, vdesktop\vdsuser, and click OK.
The Enter Network Credentials dialog box is displayed.
- Enter the username and password of the domain administrator and click OK twice.
- Repeat 19 to 23 to add other domain accounts to the administrator group.
Installing the remote desktop licensing service
- Log out of the RD Licensing server, and log in to the RD Licensing server again using a domain account, for example, vdesktop\vdsuser.
- On the taskbar in the lower left corner, click
 .
. - On the taskbar, click
 .
. The Server Manager window is displayed.
If the system displays the Server Manager window after the VM is logged in to, you do not need to perform this operation. Refer to this note if similar cases occur.
- In the Server Manager window, click Add roles and features in the right pane.
The Add Roles and Features Wizard window is displayed.
- Retain the default settings and repeatedly click Next.
The Select server roles window is displayed.
- Select Remote Desktop Services and repeatedly click Next.
The Select role services window is displayed.
- Select Remote Desktop Licensing.
The Add Roles and Features Wizard window is displayed.
- Click Add Features.
- Click Next.
- Click Install.
- Close the installation page when the remote desktop licensing function is installed.
Activating the RD Licensing server
- Log in to the RD Licensing server using a domain account, for example, vdesktop\vdsuser.
- Activate the server by referring to Activate the Remote Desktop Services license server.
Configuring RDS CALs
- Configure RDS client access licenses by referring to Install RDS client access licenses on the Remote Desktop license server.
Feedback
Was this page helpful?
Provide feedbackThank you very much for your feedback. We will continue working to improve the documentation.See the reply and handling status in My Cloud VOC.
For any further questions, feel free to contact us through the chatbot.
Chatbot


