
How Do I Configure RDS Licensing and Security Policies?
Scenarios
This section describes how to configure RDS licensing and security policies on the AD domain server by setting group policies.
After VMs are added to an application group, you need to configure the RDS service authorization function of the APS on the AD domain server to ensure that users obtain RDS service authorization of the RD Licensing server when accessing applications published by the APS. Otherwise, users cannot use remote applications after a trial period of 120 days.
Before publishing applications on the APS, harden the security by configuring security policies of the APS to ensure secure access of authorized users.
Prerequisites
- You have logged in to the AD domain server as an administrator.
- You have obtained RDS service licensing options and security policies.
Data
Table 1 lists the data to be obtained.
| Parameter | Description | Example Value |
|---|---|---|
| Name | Identifies an APS organization unit (OU) in the cloud application scenario. | SBCOU |
| Name of the group policy | Identifies a group policy of the APS. The name consists of digits, letters, and underscores (_), and cannot exceed 30 characters. | SBCGRP |
| IP address of the license server to use | Specifies the server that provides the RDS service licensing function to the APS, that is, the RD Licensing server. | 192.168.1.60 |
Procedure
Creating an APS OU
In the cloud application scenario, control authorization and configure security policies for the APS by configuring group policies. In this case, an independent OU must be created for the APS.
- On the active AD domain server, choose
 > Administrative Tools > Active Directory Users and Computers.
This section uses a Windows AD domain server running Windows Server 2016 as an example to describe the configuration procedure.
The Active Directory Users and Computers window is displayed.
- In the navigation pane, right-click a domain name and choose New > Organizational Unit.
The New Object-Organizational Unit dialog box is displayed.
- Enter the name of the application virtualization OU to be created, for example, SBCOU, and click OK.
- Add the APS to the new OU.
Creating an APS group policy
- On the active AD domain server, click
 .
. The Windows PowerShell dialog box is displayed.
- Enter gpmc.msc to open the Group Policy Management window.
- Right-click the selected OU and choose Create a GPO in this domain, and Link it here.
- In the displayed dialog box, enter the group policy name, for example, SBCGRP.
- Click OK.
Configuring the RDS service licensing function of the APS
- Right-click the new group policy and choose Edit from the shortcut menu.
The Group Policy Management Editor window is displayed.
- In the navigation pane, choose Computer Configuration > Policy > Administrative Templates > Windows Components > Remote Desktop Services > Remote Desktop Session Host > Licensing.
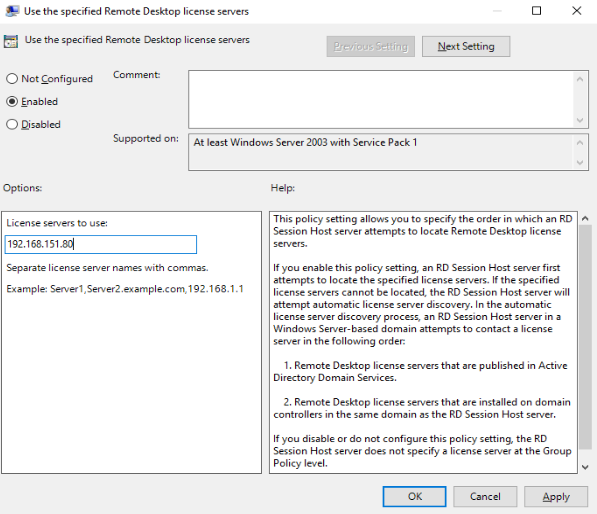
- In the Licensing area, right-click Use the specified Remote Desktop license servers and choose Edit.
The Use the specified Remote Desktop license servers dialog box is displayed.
- Set parameters as shown in Figure 1, and click OK.
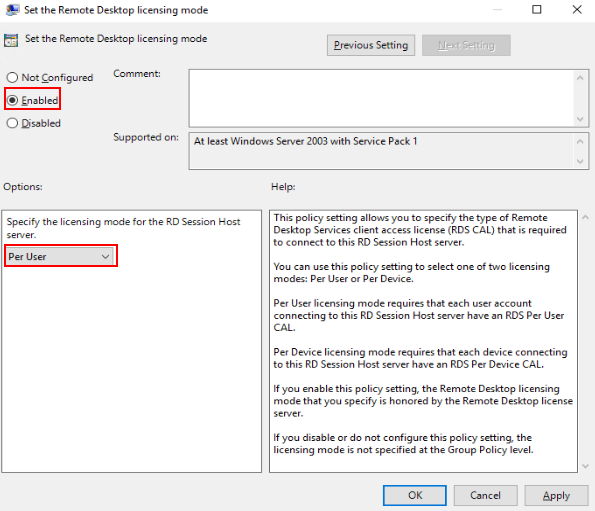
- In the Licensing area, right-click Set the Remote Desktop licensing mode and choose Edit.
The Set the Remote Desktop licensing mode dialog box is displayed.
- Set parameters as shown in Figure 2, and click OK.

Security policies are mandatory if users have specific security requirements.
For the APS, two security policies are available. Table 2 provides the specific operations and application scenarios of the two security policies.
| Security Policy | Operation | Scenario |
|---|---|---|
| Common office mode |
| Scenarios that require the advantages of cloud applications for efficient office and that do not require high security. |
| Security isolation mode |
| Scenarios that have high security requirements and must strictly control application and session rights |
- Right-click the new group policy and choose Edit from the shortcut menu.
The Group Policy Management Editor window is displayed.
- Set an APS security policy for common office or security isolation mode. For details about how to configure security policies of the APS, see the following file.
Submit a service ticket for technical support of security policies.
- The following uses the Prohibit access to the Control Panel policy as an example to describe how to configure security policies.
- In the navigation pane of the Local Group Policy Management Editor window, choose User Configuration > Policies > Administrative Templates > Control Panel.
- In the right pane, right-click Prohibit access to the Control Panel and choose Edit.
- Select Enabled and click OK.
Denying Apply group policy to the APS domain account
- In the navigation pane of the Group Policy Management window, choose Forest:Domain name > Domains > Domain name > APS OU > Group policy name.
The Group Policy Management Console dialog box is displayed.
- Click OK.
The APS group policy is displayed in the right pane.
- Click the Delegation tab and then click Add.
The Select User, Computer, or Group dialog box is displayed.
This policy applies to all users by default. You need to deny this policy to the APS domain account to facilitate the APS maintenance.
- Enter the APS domain account and click Check Names.
The queried domain account is displayed.
- Click OK.
The Add Group or User dialog box is displayed.
- Grant the Read permission for a group or user, and click OK.
The APS group policy window is displayed.
- Click Advanced.
The Group policy name Security Settings dialog box is displayed.
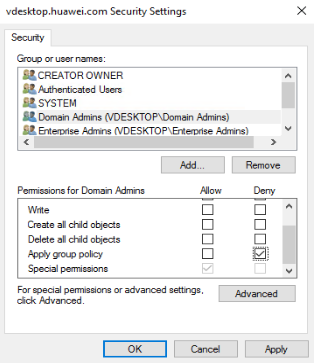
- Select the APS domain account, and select Deny in Apply group policy, as shown in Figure 3.
- Click Apply.
The Windows Security window is displayed.
- In the displayed dialog box, click Yes.
- Click OK.
Refreshing the policy
- Click
 .
. The Windows PowerShell dialog box is displayed.
- Run the following command to refresh the policy:
gpupdate /force
- Press Enter. The task is complete.
If the following information is displayed, the policy is successfully refreshed:
Updating Policy...
User Policy update has completed successfully.
Computer Policy update has completed successfully.
- Other component servers will synchronize the new policy. The synchronization mechanism determines the specific synchronization time.
- The new policy is synchronized after component servers are restarted.
Feedback
Was this page helpful?
Provide feedbackThank you very much for your feedback. We will continue working to improve the documentation.See the reply and handling status in My Cloud VOC.
For any further questions, feel free to contact us through the chatbot.
Chatbot


