

Buying a GeminiDB HBase Instance
This section describes how to buy a GeminiDB HBase instance.
GeminiDB Cassandra, DynamoDB-Compatible, and HBase instances of each tenant share a quota. Each tenant can create a maximum of 50 instances by default. To request a higher quota, choose Service Tickets > Create Service Ticket in the upper right corner of the console and contact the customer service.
Prerequisites
- You have created a Huawei Cloud account.
Procedure
- Log in to the GeminiDB console.
- On the Instances page, click .
- On the displayed page, select a billing mode, set Compatible API to HBase, set other parameters, and click Next. If HBase is unavailable, contact the customer service.
Figure 1 Billing mode and basic information (classic storage)
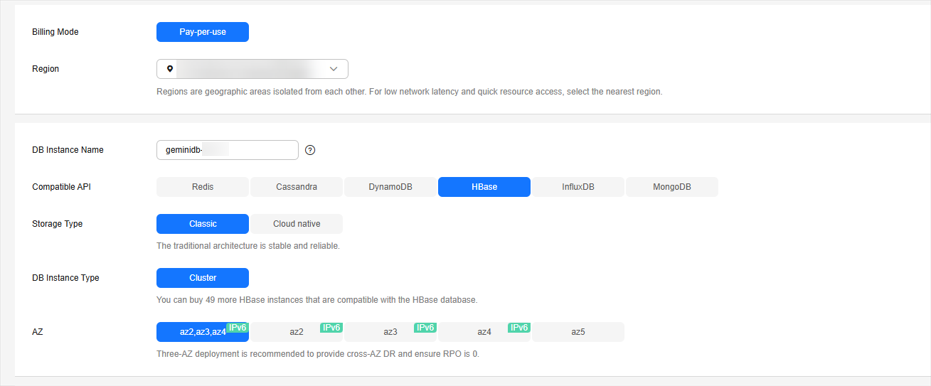 Figure 2 Billing mode and basic information (cloud native storage)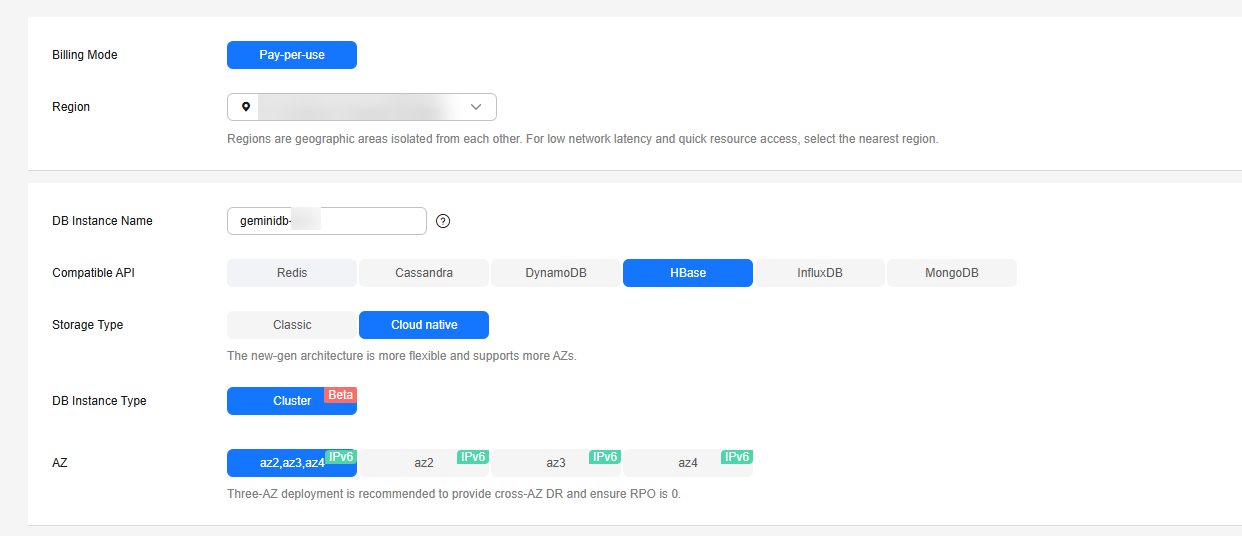
Table 1 Billing parameters Parameter
Description
Billing Mode
Select Yearly/Monthly or Pay-per-use.
- Yearly/Monthly
- Specify Required Duration. The system deducts fees from your account based on the service price.
- If you do not need such an instance any longer after it expires, change the billing mode to pay-per-use. For details, see Changing a Yearly/Monthly Instance to Pay-per-Use.
NOTE:
- Yearly/Monthly instances cannot be deleted directly. If such an instance is no longer required, unsubscribe from it. For details, see How Do I Unsubscribe from a Yearly/Monthly Instance?.
- Pay-per-use
- You do not need to set Validity Period because you are billed based on how long you have actually used your instance.
- To use an instance for a long time, change its billing mode to yearly/monthly to reduce costs. For details, see Changing a Pay-per-Use Instance to Yearly/Monthly.
Table 2 Basic information Parameter
Description
Region
Region where a tenant is located
NOTE:To reduce network latency, select a region nearest from which you will access the instance. Instances deployed in different regions cannot communicate with each other over a private network. After you buy an instance, you cannot change its region.
DB Instance Name
The instance name:
- Can be the same as an existing instance name.
- Can include 4 to 64 bytes and must start with a letter. It is case-sensitive and allows only letters, digits, hyphens (-), and underscores (_).
Compatible API
HBase
GeminiDB is compatible with mainstream NoSQL databases, including Redis, DynamoDB, Cassandra, HBase, MongoDB, and InfluxDB. You can select GeminiDB APIs by following How Do I Select an API?
Storage Type
- Classic: classic architecture with decoupled storage and compute
- Cloud native: more flexible, new-gen version with support for more AZs
NOTE:- The way you use instances with classic or cloud native storage is similar. Cloud native storage supports more AZs. If both classic and cloud native are supported, you can select any of them.
DB Instance Type
Cluster
One cluster consists of at least three nodes. A cluster is easy to scale out to meet increasing data growth needs. A cluster is recommended when dealing with stringent availability demands, substantial data volumes, and the need for seamless scalability.
AZ
Availability zone where the instance is created. An AZ is a part of a region with its own independent power supplies and networks. AZs are physically isolated but can communicate with each other over a private network.
Figure 3 Specifications and storage
Table 3 Specifications and storage Parameter
Description
Instance Specifications
Higher CPU specifications provide better performance. Select specifications as needed.
Nodes
Number of nodes that the instance is deployed on.
If the number of nodes exceeds the upper limit, you can choose Service Tickets > Create Service Ticket in the upper right corner of the console and contact the customer service.
After an instance is created, you can add nodes. For details, see Manually Adding Instance Nodes.
Storage Space
Instance storage space. The range depends on the instance specifications.
To scale up storage, you need to add at least 1 GB each time. The value must be an integer.
Auto Scale
Whether autoscaling is enabled.
You can enable Auto Scale after an instance is created. For details, see Automatically Scaling Up Storage Space.
Disk Encryption
You can select to enable disk encryption based on service requirements.
- Disable: Data is not encrypted.
- Enable: If you select this option, your data will be encrypted on disks and stored in ciphertext after you create an instance. When you download encrypted objects, the ciphertext will be decrypted into plain text and then sent to you. Disk encryption can improve data security and may have slight impacts on database writes and reads.
- Key Name: Select an existing key or create one.
- To use a shared key, ensure that you have created an agency. For details, see Creating an Agency (by a Delegating Party). Select another account from the drop-down list to share the key of the current account.
VPC owners can share the keys with one or multiple accounts through Resource Access Manager (RAM). For details, see Creating a Resource Share.
- Enter a key ID. The key must be in the current region.
NOTE:- This function is now in CBT. To use it, choose Service Tickets > Create Service Ticket in the upper right corner of the console and contact the customer service.
- After an instance is created, the disk encryption status and the key cannot be changed.
- The key cannot be disabled, deleted, or frozen when being used. Otherwise, the database becomes unavailable.
- For details about how to create a key, see "Creating a Key" in Data Encryption Workshop User Guide.
Figure 4 Network configuration
Table 4 Network configuration Parameter
Description
VPC
Virtual private network where your instances are located. A VPC isolates networks for different services. You can select an existing VPC or create a VPC.
If there are no VPCs available, the system automatically allocates a VPC to you.
For details, see "Creating a VPC" in the Virtual Private Cloud User Guide.
You can also use VPCs and subnets shared by other accounts.
VPC owners can share the subnets in a VPC with one or multiple accounts through Resource Access Manager (RAM). This allows for more efficient use of network resources and reduces O&M costs.
For more information about VPC subnet sharing, see VPC Sharing in Virtual Private Cloud User Guide.
NOTE:- After the instance is created, its VPC cannot be changed.
- To connect an instance to an ECS over a private network, ensure they are in the same VPC. If they are not, create a VPC peering connection between them.
Subnet
A subnet where your instance is created. The subnet provides dedicated and isolated networks, improving network security.
NOTE:An IPv6 subnet cannot be associated with your instance. Select an IPv4 subnet.
Security Group
A security group controls access between instances and other services. Ensure that the security group you selected allows your client to access the instance.
If no security group is available, the system creates one for you.
Figure 5 Database configuration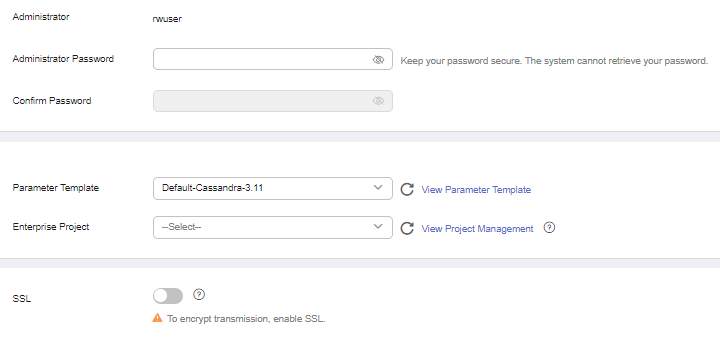
Table 5 Database configuration Parameter
Description
Administrator
Username of the administrator account. The default value is rwuser.
Administrator Password
Password of the administrator account. The password:
- Can include 8 to 32 characters.
- Must contain uppercase letters, lowercase letters, digits, and any of the following special characters: ~!#%^*-_=+?
- Cannot contain @ or /
- For security reasons, set a strong password. The system will verify the password strength.
Keep your password secure. The system cannot retrieve it if it is lost.
Confirm Password
This password must be consistent with administrator password.
Enterprise Project
This parameter is provided for enterprise users.
An enterprise project groups cloud resources, so you can manage resources and members by project. The default project is default.
Select an enterprise project from the drop-down list. For more information about enterprise projects, see Enterprise Management User Guide.
Parameter Template
A parameter template contains the configuration values of a database engine. The parameters can be applied to one or more instances of the same type. After creating an instance, you can modify the parameter template.
You can modify the instance parameters as required after the instance is created.
SSL
A security protocol. Secure Sockets Layer (SSL) certificates set up encrypted connections between clients and servers, preventing data from being tampered with or stolen during transmission.
You are advised to enable SSL to improve data security.
NOTE:If SSL is not enabled when you create an instance, you can enable it after the instance is created. For details, see How Can I Connect to a GeminiDB HBase Instance over TLS (SSL)?
- Yearly/Monthly
- On the displayed page, confirm instance details.
- To modify the configurations, click Previous.
- If no modification is required, read and agree to the service agreement and click Submit.
- On the Instances page, view and manage the created instance.
- The instance status is displayed as Creating.
- After the instance is created, its status becomes Available.
You can click
 in the upper right corner to refresh the instance status.
 - An automated backup policy is enabled by default during instance creation. After the instance is created, a full backup is created.
Feedback
Was this page helpful?
Provide feedbackThank you very much for your feedback. We will continue working to improve the documentation.See the reply and handling status in My Cloud VOC.
For any further questions, feel free to contact us through the chatbot.
Chatbot


