
Deploying and Accessing a Spring Boot Application
To deploy and access a Spring Boot application, perform the following steps:
Creating and Deploying a Spring Boot Application Component
- Log in to ServiceStage.
- Choose Application Management. The application list is displayed.
- Choose More > Create Component in the Operation column of the application created in Creating an Application, for example, springGuides.
- In the Basic Information area, set the following mandatory parameters. Retain the default values for other parameters.
Parameter
Description
Component Name
Enter a component name, for example, spring-boot.
Component Version
Enter 1.0.0.
Application
Select the application created in Creating an Application, for example, springGuides.
Environment
Select the environment created in Creating an Environment, for example, env-test.
Namespace
Select default to isolate component instances.
- In the Component Package area, set the following mandatory parameters. Retain the default values for other parameters.
Parameter
Description
Stack
Select Java.
Source Code/Software Package
- Select Source code repository.
- Select GitHub.
- Authorization: Select the authorization information created when Setting GitHub Repository Authorization.
- Username/Organization: Select the GitHub account created when Registering a GitHub Account and Forking the Source Code.
- Repository: Select the Spring Boot source code repository that has been forked to your GitHub account when Registering a GitHub Account and Forking the Source Code. For example, gs-spring-boot.
- Branch: Select boot-2.7.
- In the Build Job area, set the following mandatory parameters. Retain the default values for other parameters.
Parameter
Description
Command
- Select Custom command.
- Enter the following command in the command text box:
cd ./complete/;mvn clean package
Organization
Select the organization created in Creating an Organization.
An organization is used to manage images generated during component build.
Build
Select Use current environment to use the CCE cluster in the deployment environment to which the component belongs to build an image.
In the current environment, masters and nodes in the CCE cluster must have the same CPU architecture. Otherwise, the component build fails.
Namespace
Select default to isolate build data.
Figure 1 Configuring build parameters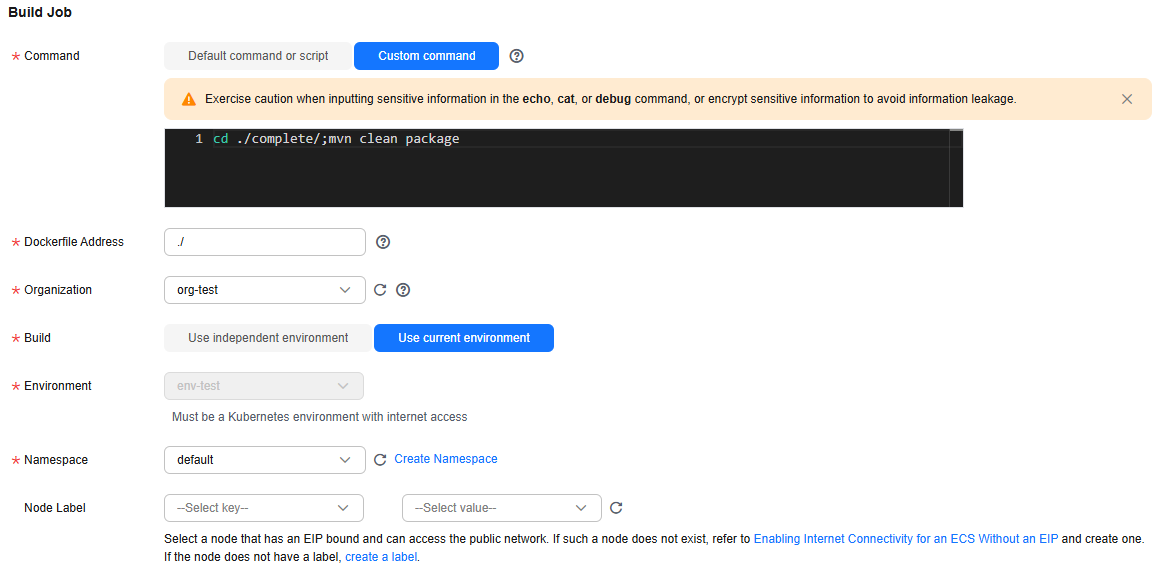
- Click Next.
- In the Access Mode area, click
 to enable Public Network Access and set public network access parameters for the component by referring to the following table.
Parameter
Description
Public Network Access
Enable this option.
Public Network Load Balancer
By default, managed ELBs in the deployment environment to which the component belongs are selected.
Client Protocol
Retain the default value.
Domain Name
Select Bind Domain Name and enter the public domain name obtained in Preparing Resources.
Listening Port
Enter 8080.
- Click Create and Deploy.
Accessing a Spring Boot Application
- Click
 in the upper left corner to return to the Application Management page.
 - Click the application created in Creating an Application (for example, springGuides). The Overview page is displayed.
- In the Component List area, locate the row that contains the component name (for example, spring-boot) configured in Creating and Deploying a Spring Boot Application Component and click the access address in the External Access Address column to access the application.
If information similar to the following is displayed, the application is successfully deployed:
Greetings from Spring Boot!
Feedback
Was this page helpful?
Provide feedbackThank you very much for your feedback. We will continue working to improve the documentation.See the reply and handling status in My Cloud VOC.
For any further questions, feel free to contact us through the chatbot.
Chatbot


