Configuring Real-Time Network Connections
Before configuring a real-time data migration task, ensure that the resource group used to execute the migration task can communicate with the source and destination databases. You can choose a proper network solution based on the network environment of the databases. This section describes the solutions for connecting databases in different environments.
Scenario
DataArts Migration jobs run on the resources provided by resource groups. Resource groups must be connected to data sources for real-time data extraction, transformation, and load.
After creating a migration job and selecting the data source, destination, and resource group, you need to check the connectivity between the resource group and two data sources (source and destination sources).
The method for enabling communication between the resource group and two data sources varies depending on the account and cloud to which they belong.
- If the data sources are located in the VPC of the current tenant, use a VPC peering connection to connect the resource group and data sources. For details, see Data Connection and Resource Group Belong to the Same Huawei Cloud Tenant.
Figure 1 Working mechanism

The resource group network segment and data source VPC are connected through a VPC peering connection.
- If the data sources are located in a local equipment room, another region, or another public cloud, or belong to another tenant, use a service VPC and a transit VPC to connect the resource group and data sources. For details, see Data Connection and Resource Group Belong to Different Tenants or Clouds.
- Recommended solution: Use a transit VPC.
Figure 2 Working mechanism

If the data source VPC is not in the same network segment as the resource group, use Direct Connect or other methods to connect Huawei Cloud private network (service VPC) and the data source VPC, and then buy a private NAT gateway and create a transit IP address to connect the transit VPC and the resource group.
Constraints:
- You have a service VPC account.
- The transit VPC and the resource group must belong to the same account.
Advantages: The resource group network segment does not need to be bypassed and no route needs to be added on the network link. Only SNAT rules need to be added for new resource groups, reducing the adaptation workload.
Disadvantages: You need to buy a private NAT gateway and create a transit VPC. The real-time synchronization speed is limited by the NAT bandwidth.
- Alternative solution: Manually add routes based on the actual networking.
Figure 3 Working mechanism

If the data source VPC is not in the same network segment as the resource group, use Direct Connect or other methods to connect Huawei Cloud private network (service VPC) and the data source VPC, and then use a VPC peering connection to connect the service VPC and the resource group.
Advantages: You do not need to buy other services.
Disadvantages: The operations are complex and limited. You need to modify route and service configurations on the network link based on the actual networking. The entire process needs to be repeated each time a resource group is added.
- Recommended solution: Use a transit VPC.
Notes and Constraints
- The resource group uses a private network segment that cannot overlap with the VPC of the current tenant. Otherwise, the network cannot be connected.
- The resource group does not have a public network segment and can only connect to the private network of the data source.
Prerequisites
You have purchased a resource group. For details, see Buying a DataArts Migration Resource Group Incremental Package.
Data Connection and Resource Group Belong to the Same Huawei Cloud Tenant

The resource group network segment and data source VPC are connected through a VPC peering connection.
- Log in to the DataArts Studio console.
- On the DataArts Studio console, click Resources.
Figure 5 Creating a network connection

- On the Real-Time Network Connections tab page, click Create. In the displayed Create Network Connection dialog box, set required parameters.
Table 1 lists the parameters.
Table 1 Parameters for creating a network connection Parameter
Description
Connection Name
Name of the network connection
Only letters, digits, and underscores (_) are allowed.
Resource Group
Resource group that can communicate with the specified VPC. This parameter is optional.
If you do not select a resource group, you can bind resource groups to the connection after the connection is created by clicking More in the Operation column and selecting Bind Resource Group.
VPC
VPC that can communicate with the resource group.
In this solution, the resource group network segment and the data source VPC are connected through a VPC peering connection. Therefore, you must select the VPC and subnet of the data source.
Subnet
Subnet of the data source cluster or instance
Routing Table
Routing table associated with the subnet. When the connection is bound to a resource group, routing information of the resource group is added to the routing table. You do not need to set this parameter.
When the connection is bound to a resource group, a route to the resource group IP address is added to the routing table. The route connects the resource group network segment to the data source VPC.
- Configure security group rules for the data source to allow access from the resource group.
To add a security group rule for a resource group, perform the following steps: Go to the data source service page, access the user cluster, locate the network information, and click the security group. On the displayed security group editing page, add an inbound rule.
The following is an example of how to allow access from the resource group.
Priority  Policy    Type         Protocol Port                    Source Address
1        Allow    IPv4       All protocols                 IP address: resource group network segment
- For MRS data sources, perform the following operations to enable network connectivity:

For RDS(MySQL), DMS Kafka, Oracle, RDS(PostgreSQL), RDS(SQL Server), MongoDB, and GaussDB(DWS), skip this step.
Table 2 Enabling network connectivity for MRS data sources Data Source Type
Procedure
MRS Hudi
After creating a network connection and binding it to a resource group, click More in the Operation column and select Modify Host Information. In the displayed dialog box, enter the IP addresses and domain names of all nodes in the MRS cluster as prompted.
Figure 6 Modifying host information
To obtain the IP addresses and domain names of the nodes in an MRS cluster, perform the following steps:
- Open the MRS page, access the MRS cluster, click the Nodes tab, and expand all node groups to view the IP address and name (domain name) of each node.
Add the IP addresses (1 in the figure) and domain names (2 in the figure) of all nodes and separate them by pressing Enter.
Figure 7 Obtaining the IP addresses and domain names of the nodes in the MRS cluster
- Log in to an MRS cluster node by referring to Logging In to an MRS Cluster Node and run the cat /etc/hosts command to list the IP addresses and domain names of all nodes.
- Open the MRS page, access the MRS cluster, click the Nodes tab, and expand all node groups to view the IP address and name (domain name) of each node.
Data Connection and Resource Group Belong to Different Tenants or Clouds
- Recommended solution: Use a transit VPC.
Figure 8 Working mechanism

If the data source VPC is not in the same network segment as the resource group, use Direct Connect or other methods to connect Huawei Cloud private network (service VPC) and the data source VPC, and then buy a private NAT gateway and create a transit IP address to connect the transit VPC and the resource group.
- Ensure that the data source has been connected to a service VPC of the tenant.
If your data source is located in an on-premises equipment room, another cloud tenant, or another public cloud, you need to use Direct Connect, VPN, VPC Peering, Enterprise Router, or Cloud Connect to connect to your VPC.
- Connect to the resource group network segment through a transit VPC.
- Select or create a VPC as the transit VPC. For details, see Creating a VPC.
The transit VPC must belong to the same account as the resource group and cannot be the service VPC created in 1. The IP address of the transit VPC cannot overlap with the network segment of the resource group.
- Create a real-time network connection in the region where the resource group is located, and create a real-time network connection in the transit VPC.
Table 3 Parameters for creating a network connection Parameter
Description
Connection Name
Name of the network connection
Only letters, digits, and underscores (_) are allowed.
Resource Group
Resource group that can communicate with the specified VPC. This parameter is optional.
If you do not select a resource group, you can bind resource groups to the connection after the connection is created by clicking More in the Operation column and selecting Bind Resource Group.
VPC
VPC that can communicate with the resource group
In this solution, the resource group network segment and the transit VPC are connected through a VPC peering connection. Therefore, you must select the VPC and subnet of the transit VPC.
Subnet
Subnet of the transit VPC
Routing Table
Routing table associated with the subnet. When the connection is bound to a resource group, routing information of the resource group is added to the routing table. You do not need to set this parameter.
When the connection is bound to a resource group, a route to the resource group IP address is added to the routing table. The route connects the resource group network segment to the transit VPC.
- Select or create a VPC as the transit VPC. For details, see Creating a VPC.
- Add a route to the data source VPC to associate the resource group with the data source.
Locate the created network connection and click View Route in the Operation column to add a route to the data source network segment.
Figure 9 Adding a route
- Buy a private NAT gateway in the region where the resource group is located to connect the transit VPC and service VPC.
- Buy a private NAT gateway by following the instructions in Buying a Private NAT Gateway.
Select the transit VPC created in 2.
- Assign a transit IP address. For details, see Assigning a Transit IP Address.
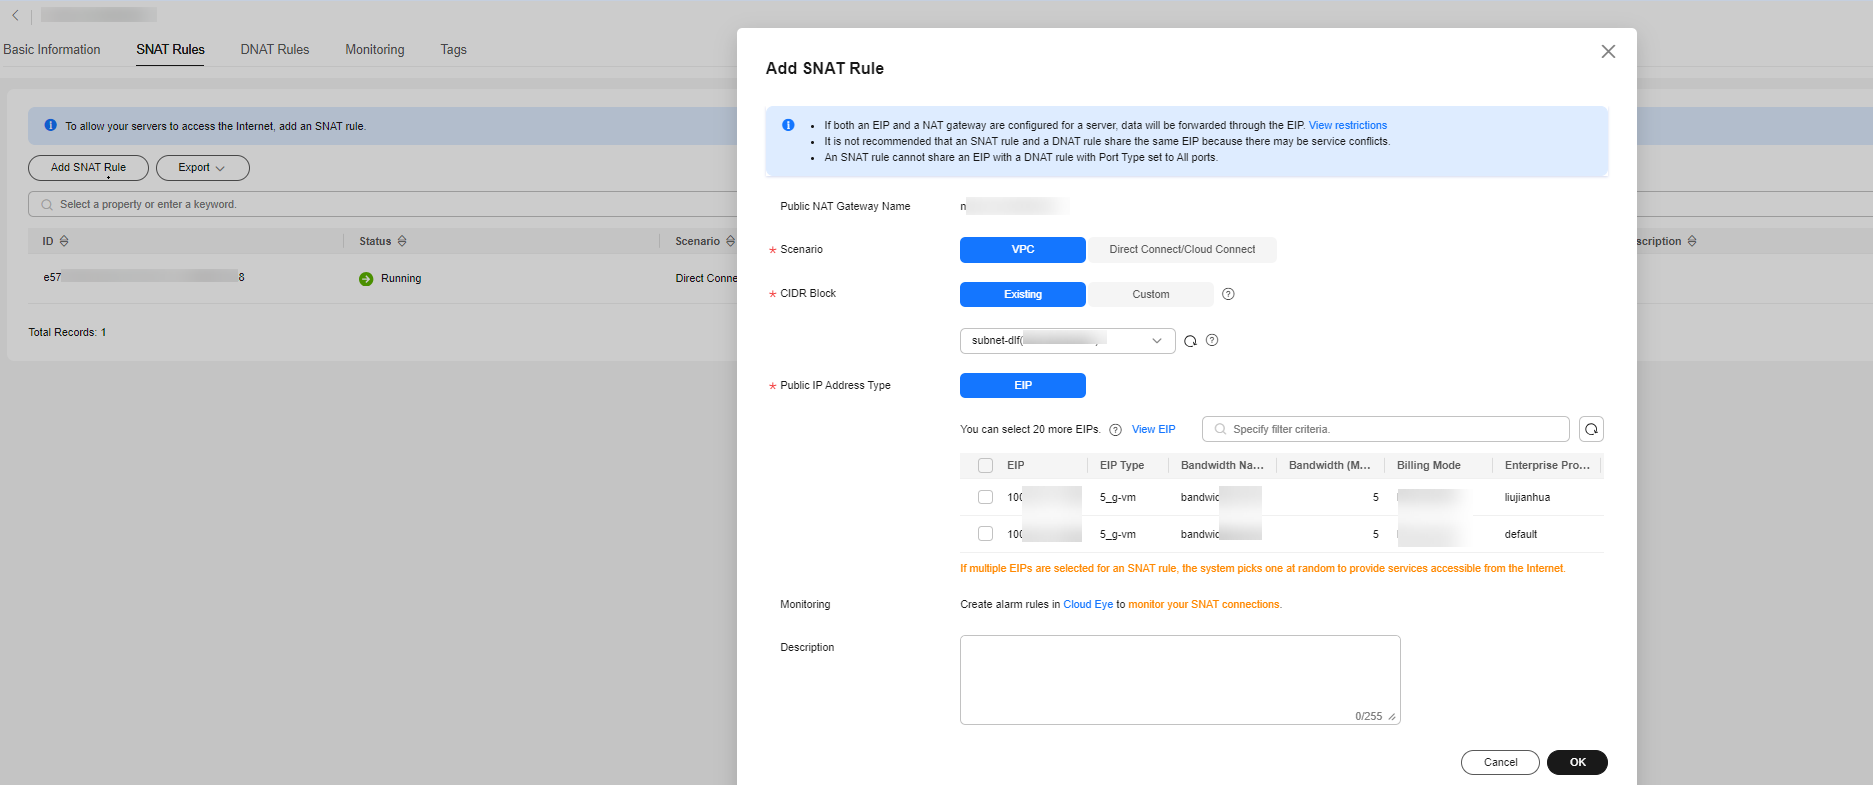
- Add an SNAT rule to the private NAT gateway. For details, see Adding an SNAT Rule.
Click the name of the private NAT gateway you purchased to access its details page. Click the SNAT Rules tab and then Add SNAT Rule.
Select Custom for CIDR Block and enter the resource group network segment. Select the transit IP address created in 2 for Transit IP Address.
Figure 10 Adding an SNAT rule
- Buy a private NAT gateway by following the instructions in Buying a Private NAT Gateway.
- Add a route to connect the transit VPC to the data source IP address. For details, see Adding a Route.
Go to the VPC console and choose Route Tables. Access the details page of the route table to which the transit VPC belongs and click Add Route.
Enter the data source IP address or network segment for Destination, select NAT gateway for Next Hop Type, and select the private NAT gateway purchased in 4.a for Next Hop.
Figure 11 Adding a route
- Ensure that the data source has been connected to a service VPC of the tenant.
- Alternative solution: Manually add routes based on the actual networking.
Figure 12 Working mechanism

If the data source VPC is not in the same network segment as the resource group, use Direct Connect or other methods to connect Huawei Cloud private network (service VPC) and the data source VPC, and then use a VPC peering connection to connect the service VPC and the resource group.
- Ensure that the data source has been connected to a service VPC of the tenant.
If your data source is located in an on-premises equipment room, another cloud tenant, or another public cloud, you need to use Direct Connect, VPN, VPC Peering, Enterprise Router, or Cloud Connect to connect to your VPC.
- Create a real-time network connection in the region where the resource group is located,
Table 4 Parameters for creating a network connection Parameter
Description
Connection Name
Name of the network connection
Only letters, digits, and underscores (_) are allowed.
Resource Group
Resource group that can communicate with the specified VPC. This parameter is optional.
If you do not select a resource group, you can bind resource groups to the connection after the connection is created by clicking More in the Operation column and selecting Bind Resource Group.
VPC
VPC that can communicate with the resource group
In this solution, the resource group network segment and the service VPC are connected through a VPC peering connection. Therefore, you must select the VPC and subnet of the service VPC.
Subnet
Subnet of the service VPC
Routing Table
Routing table associated with the subnet. When the connection is bound to a resource group, routing information of the resource group is added to the routing table. You do not need to set this parameter.
When the connection is bound to a resource group, a route to the resource group IP address is added to the routing table. The route connects the resource group network segment to the service VPC.
- Add a route network segment and add the data source VPC to the route table of the resource group.
Locate the created network connection and click View Route in the Operation column to add a route to the data source VPC.
Figure 13 Adding route 1 Figure 14 Adding route 2
- Enable the network segment of the resource group for the data source. For details, see Adding a Security Group Rule.
Enable the network segment of the resource group for the user data source security group and firewall.
- Add a route to connect the data source VPC to the resource group network segment.
Add a route to the network to which the data source belongs. Set the destination address to the resource group network segment. Set the next hop based on the actual networking to ensure that network requests sent to the resource group can be correctly routed to the service VPC of the tenant on the cloud.
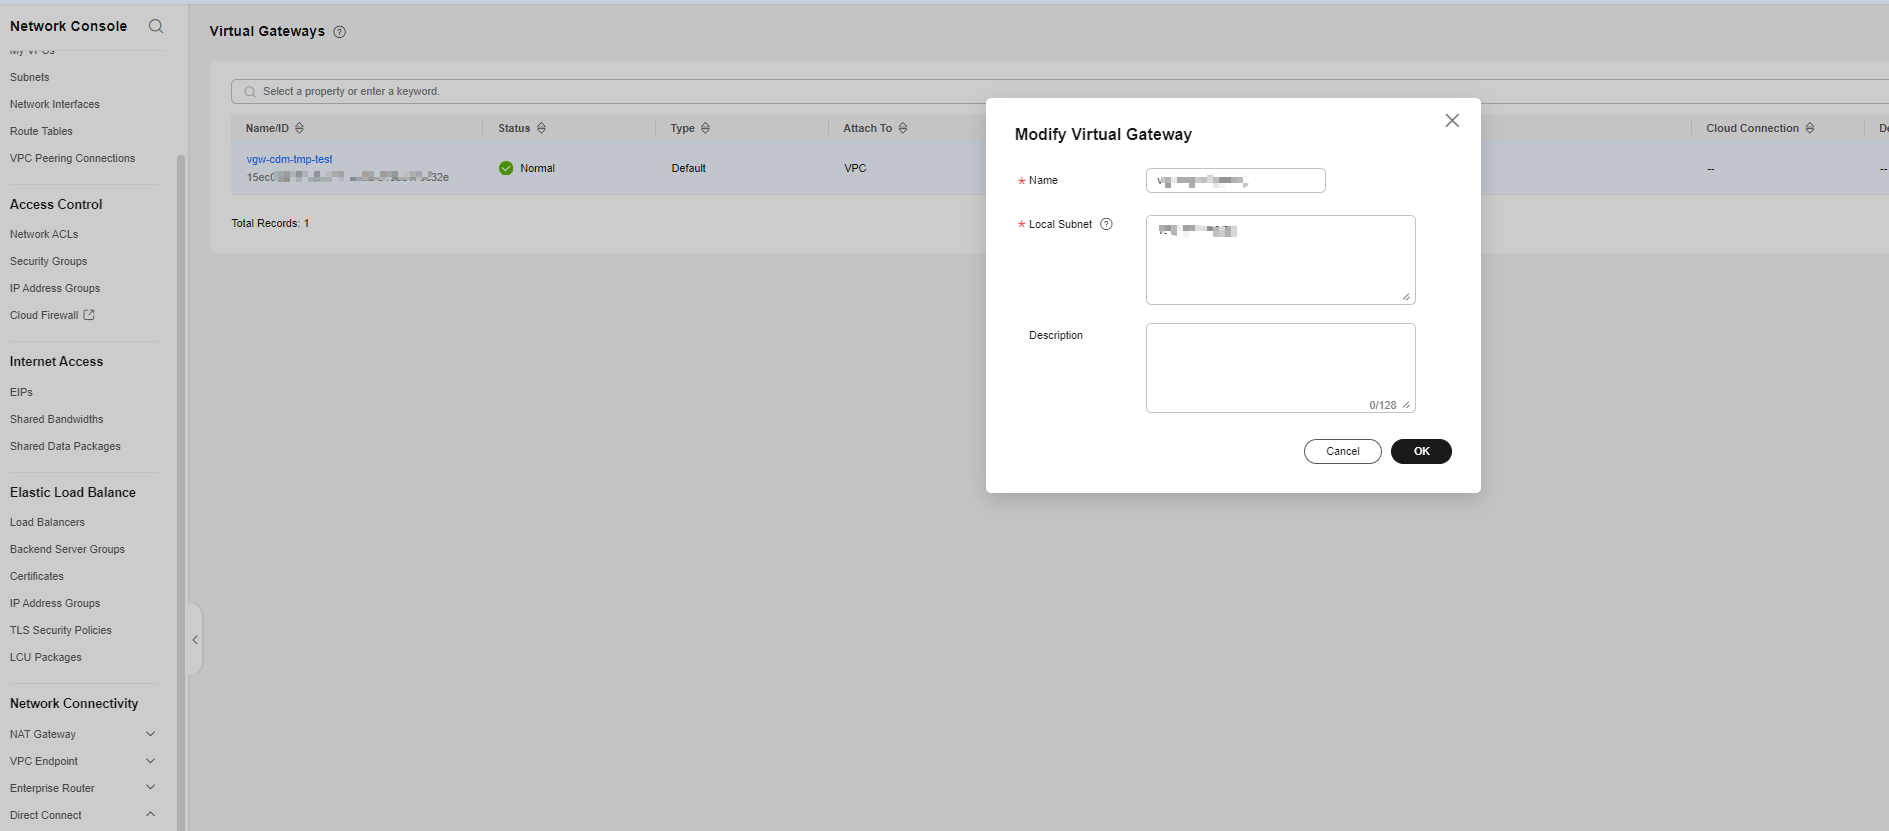
- Direct Connect: Add the resource group network segment to the data source network route, set the next hop to the Direct Connect connection, and add the resource group network segment to the local subnet of the Direct Connect virtual gateway. Enter the resource group network segment for the local subnet.
Figure 15 Modifying the virtual gateway

- Enterprise router: Add the resource group network segment to the data source network route and set the next hop to the enterprise router. In addition, add a route to the enterprise route table, set the destination to the resource group network segment, and set the next hop to the service VPC in step 1.
- Cloud Connect: Access the details page of a cloud connection and click the Network Instances tab. Locate a network instance (corresponding to the service VPC in 1) and click Modify VPC CIDR Block. On the displayed tab page, click Advanced Settings, enter the network segment for Other CIDR Block, and click Add.
Figure 16 Creating a cloud connection

Modify the VPC as prompted.
- VPN: Add a VPN gateway and VPN connection to the VPN.
Figure 17 VPN

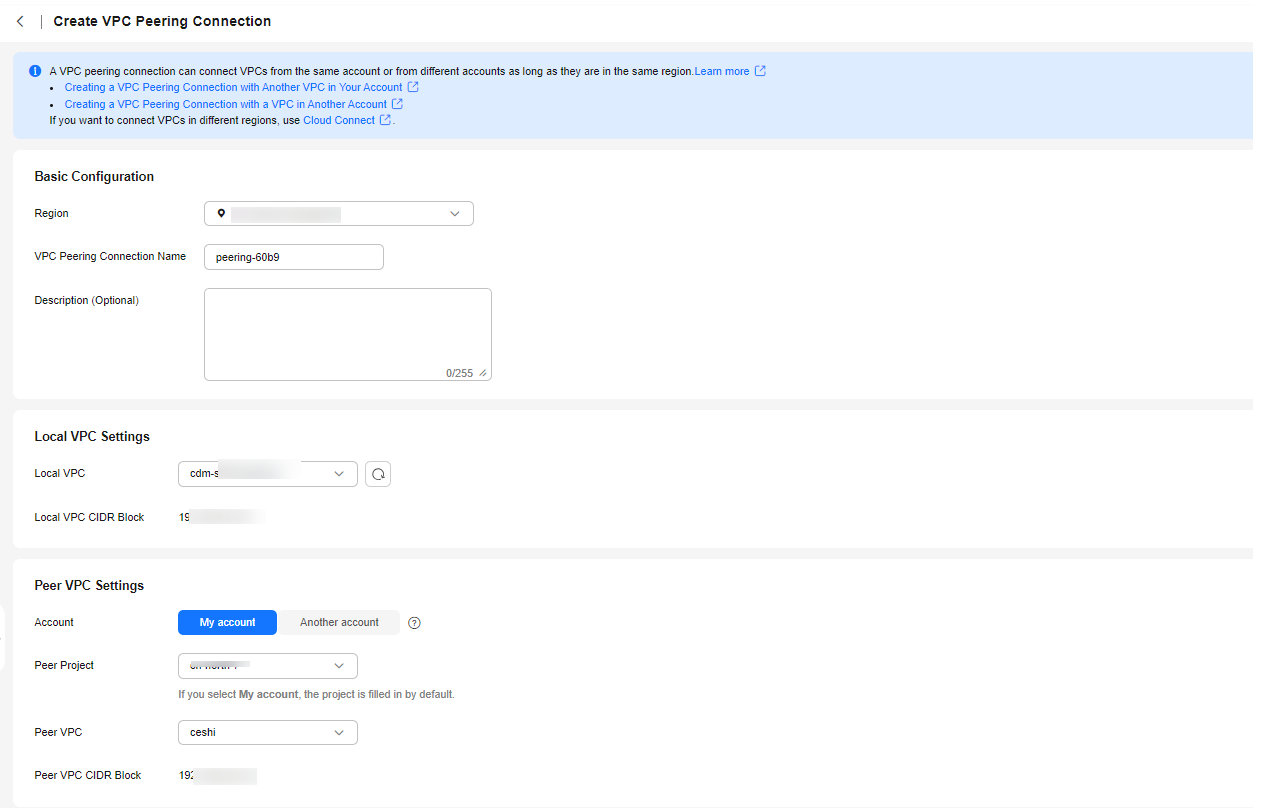
- VPC peering connection: Add the resource group network segment to the data source network route, and set the next hop to the VPC peering connection created between the data source and service VPC. The peering connection connects data sources and resource groups of different accounts on the cloud. Create a VPC peering connection using the data source account, set the local VPC to the VPC where the RDS data source is located, and set the peer VPC to the VPC where the resource group is located.
Figure 18 Configuration parameters
 Figure 19 Obtaining the peer project ID
 Figure 20 Obtaining the peer VPC ID
 Figure 21 Adding a route
1: Enter the resource group network segment. 2: Select the created VPC peering connection as the next hop.
- Direct Connect: Add the resource group network segment to the data source network route, set the next hop to the Direct Connect connection, and add the resource group network segment to the local subnet of the Direct Connect virtual gateway. Enter the resource group network segment for the local subnet.
- Ensure that the data source has been connected to a service VPC of the tenant.
Feedback
Was this page helpful?
Provide feedbackThank you very much for your feedback. We will continue working to improve the documentation.See the reply and handling status in My Cloud VOC.
For any further questions, feel free to contact us through the chatbot.
Chatbot


