
Submitting a DLI Job Using a Notebook Instance
Notebook is an interactive data analysis and mining module that has been deeply optimized based on the open-source JupyterLab. It provides online development and debugging capabilities for writing and debugging model training code. After connecting DLI to a notebook instance, you can write code and develop jobs using Notebook's web-based interactive development environment, as well as flexibly perform data analysis and exploration. This section describes how to submit a DLI job using a notebook instance.
For how to perform operations on Jupyter Notebook, see Jupyter Notebook Documentation.
Use notebook instances to submit DLI jobs in scenarios involving online development and debugging. You can perform data analysis and exploration seamlessly, without the need to set up a development environment.
Notes
- To use this function, which is currently in the whitelist, submit a request by choosing Service Tickets > Create Service Ticket in the upper right corner of the management console.
- Deleting an elastic resource pool on the DLI management console will not delete the associated notebook instances. If you no longer need the notebook instances, log in to the ModelArts management console to delete them.
Procedure
- Create an elastic resource pool and create general-purpose queues within it.
To create a notebook instance on DLI, first create an elastic resource pool and create a general-purpose queue within the pool. So the queue can offer compute resources required to run DLI jobs. See Step 1: Create an Elastic Resource Pool and Create General-Purpose Queues Within It.
- Create a VPC and security group.
After configuring the elastic resource pool, the pool will prepare the components required for the notebook instance. See Step 2: Create a VPC and Security Group.
- Create an enhanced datasource connection, which will be used to connect the DLI elastic resource pool to a notebook instance.
- Prepare a custom image.
- Create a custom agency, which will be used to access a notebook instance.
- Create a notebook instance in the DLI elastic resource pool.
See Step 6: Create a Notebook Instance in the DLI Elastic Resource Pool.
- Configure the notebook instance to access DLI or LakeFormation metadata.
- Write and debug code in JupyterLab.
On the JupyterLab home page, you can edit and debug code in the Notebook area. See Step 8: Use the Notebook Instance to Write and Debug Code.
Notes and Constraints
- To submit a DLI job using a notebook instance, you must have a general-purpose queue within an elastic resource pool.
- Each elastic resource pool is associated with a unique notebook instance.
- Temporary data generated during the running of notebook jobs is stored in DLI job buckets in a parallel file system.
- Manage notebook instances on the ModelArts management console.
- Notebook instances are used for code editing and development, and associated queues are used for job execution.
To change the queue associated with a notebook instance, perform related operations on the ModelArts management console.
Step 1: Create an Elastic Resource Pool and Create General-Purpose Queues Within It
- Create an elastic resource pool.
- Log in to the DLI management console. In the navigation pane on the left, choose Resources > Resource Pool.
- On the displayed page, click Buy Resource Pool in the upper right corner.
- On the displayed page, set the parameters based on Creating an Elastic Resource Pool and Creating Queues Within It.
- CU range: Reserve over 16 CUs.
- CIDR Block: Make sure the CIDR block differs from the following ones:
172.18.0.0/16, 172.16.0.0/16, 10.247.0.0/16
- Click Buy.
- Click Submit. Wait until the elastic resource pool changes to the Available state.
- Create a general-purpose queue within the elastic resource pool.
- Locate the elastic resource pool in which you want to create queues and click Add Queue in the Operation column.
- On the Add Queue page, configure basic information about the queue. For details about the parameters, see Creating an Elastic Resource Pool and Creating Queues Within It.
Set Type to For general purpose.
- Click Next. On the displayed page, configure a scaling policy for the queue.
- Click OK.
Step 2: Create a VPC and Security Group
- Create a VPC.
- Log in to the VPC management console and click Create VPC in the upper right corner of the page.
- On the Create VPC page, set the parameters as prompted.
Make sure not to set IPv4 CIDR Block to any of the following ones:
172.18.0.0/16, 172.16.0.0/16, 10.247.0.0/16
- Create a security group.
- On the network console, access the Security Groups page.
- Click Create Security Group in the upper right corner.
On the displayed page, set security group parameters as prompted.
Ensure that the security group allows TCP ports 8998 and 30000–32767 to pass through the CIDR block of the DLI elastic resource pool.
Step 3: Create an Enhanced Datasource Connection
- Log in to the DLI management console.
- In the navigation pane on the left, choose Datasource Connections.
- On the displayed Enhanced tab, click Create.
Set parameters based on Table 2.
When creating an enhanced datasource connection:
- Resource Pool: Select the elastic resource pool created in Step 1: Create an Elastic Resource Pool and Create General-Purpose Queues Within It.
- VPC: Select the VPC created in Step 2: Create a VPC and Security Group.
Step 4: Register a ModelArts Custom Image
Based on the preset MindSpore image provided by ModelArts and the ModelArts CLI, you can load the image creation template and modify a Dockerfile to create an image. Then, register the image.
- Base image address: swr.{endpoint}/atelier/pyspark_3_1_1:develop-remote-pyspark_3.1.1-py_3.7-cpu-ubuntu_18.04-x86_64-uid1000-20230308194728-68791b4
Replace endpoint (region name) with the actual one.
For example, the endpoint of AP-Singapore is ap-southeast-3.myhuaweicloud.com.
The combined base image address is swr.ap-southeast-3.myhuaweicloud.com/atelier/pyspark_3_1_1:develop-remote-pyspark_3.1.1-py_3.7-cpu-ubuntu_18.04-x86_64-uid1000-20230308194728-68791b4.
Step 5: Create a DLI Custom Agency
Create a DLI custom agency, which will be used to access a notebook instance. For details, see Creating a Custom DLI Agency.
Make sure the agency includes the following permissions: ModelArts FullAccess, DLI FullAccess, OBS Administrator, and IAM permission to pass agencies to cloud services.
{
    "Version": "1.1",
    "Statement": [
        {
            "Effect": "Allow",
            "Action": [
                "iam:agencies:*"
            ]
        },
        {
            "Effect": "Deny",
            "Action": [
                "iam:agencies:update*",
                "iam:agencies:delete*",
                "iam:agencies:create*"
            ]
        }
    ]
}
Step 6: Create a Notebook Instance in the DLI Elastic Resource Pool

Log in to the ModelArts management console. In the navigation pane on the left, choose System Management > Permission Management. On the displayed page, check if the access authorization for ModelArts is configured. The new agency must include the IAM permission to pass agencies to cloud services. For details about permission policies, see Step 5: Create a DLI Custom Agency.
- On the DLI elastic resource pool page, preset DLI resource information required for creating a notebook instance.
- Log in to the DLI management console. In the navigation pane on the left, choose Resources > Resource Pool.
- On the displayed page, locate the elastic resource pool created in Step 1: Create an Elastic Resource Pool and Create General-Purpose Queues Within It.
- Click More in the Operation column and select Notebook (New).
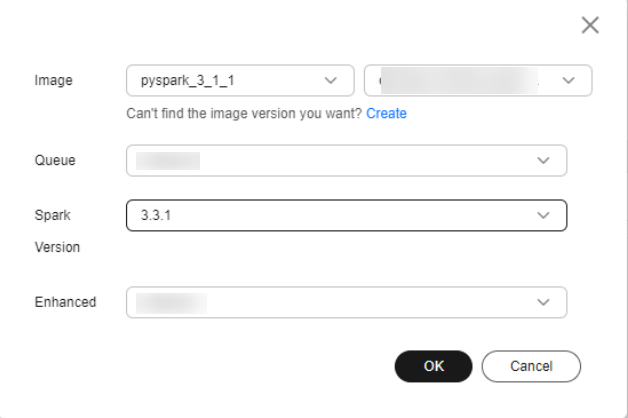
- In the slide-out panel, click Create Notebook. In the dialog box that appears, set the following parameters:
- Image: Select the image registered in Step 4: Register a ModelArts Custom Image.
- Queue: Select the queue created in Step 1: Create an Elastic Resource Pool and Create General-Purpose Queues Within It.
- Spark Version: 3.3.1 is recommended.
- Enhanced: Select the enhanced datasource connection created in Step 3: Create an Enhanced Datasource Connection.
Figure 1 Presetting DLI resource information required for creating a notebook instance
- Click OK. The instance creation page is displayed.
- On the displayed page, set notebook instance parameters.
- Create a notebook instance.
Set the parameters as follows:
- Image: Select the image registered in Step 4: Register a ModelArts Custom Image.
- VPC Access: Enable VPC access.
Contact customer support to enable the VPC access function for the notebook instance.
Select the security group created in Step 2: Create a VPC and Security Group. The security group must allow TCP ports 8998 and 30000–32767 to pass through the CIDR block of the DLI elastic resource pool.
Click Create.
- Create a notebook instance.
- Connect the notebook instance to DLI.
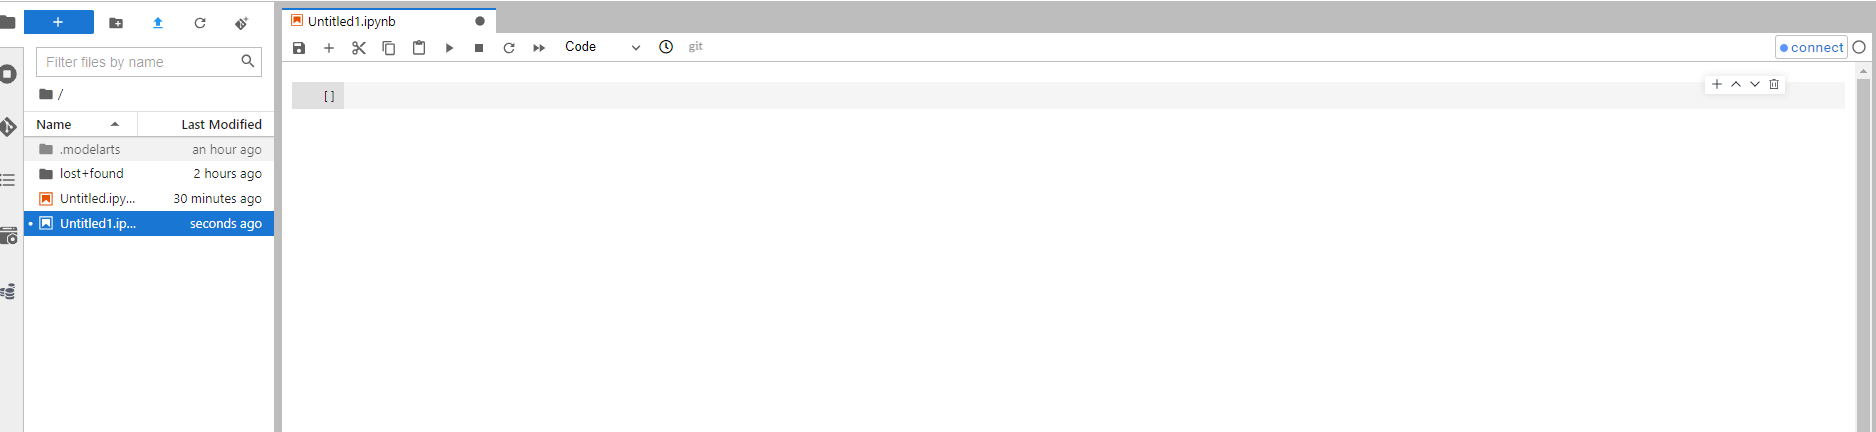
- In the notebook instance list, locate the notebook instance and click Open in the Operation column to access the notebook instance page.
- On the notebook instance page, click connect in the upper right corner to connect to DLI.
Figure 2 Connecting to DLI
- In the Connect Cluster dialog box, configure job running information.
Figure 3 Connect Cluster

Table 1 Connect Cluster Parameter
Description
Example Value
Service Type
Name of the service to connect
DLI
Pool Name
Elastic resource pool of the queue where the notebook job is running
In this example, set this parameter to the elastic resource pool created in Step 1: Create an Elastic Resource Pool and Create General-Purpose Queues Within It.
Queue Name
Queue where the notebook job is running
In this example, set this parameter to the queue created in Step 1: Create an Elastic Resource Pool and Create General-Purpose Queues Within It.
Spark Version
Spark version
Only Spark 3.3.1 currently supports submitting DLI jobs using notebook instances.
Spark Arguments(--conf)
Allows you to configure custom parameters for the DLI job.
See Table 2.
Table 2 Common Spark parameters Parameter
Description
spark.dli.job.agency.name
Name of the agency for the DLI job
When Flink 1.15, Spark 3.3, or a later version is used to execute jobs, you need to add information about the new agency to the job configuration.
Example configuration:
In this example, set this parameter to dli_notebook.
spark.dli.job.agency.name=dli_notebook
spark.sql.session.state.builder
Configuration item for accessing metadata
Example configuration: Set this parameter to access DLI metadata.
spark.sql.session.state.builder=org.apache.spark.sql.hive.DliLakeHouseBuilder
spark.sql.catalog.class
Different data sources and metadata management systems
Example configuration: Set this parameter to access DLI metadata.
spark.sql.catalog.class=org.apache.spark.sql.hive.DliLakeHouseCatalog
spark.dli.metaAccess.enable
Enables or disables access to DLI metadata.
spark.dli.metaAccess.enable=true
- Click connect. When the connect button in the upper right corner changes to the queue name and the dot before the name turns green, the connection is successful. Then, you can execute the notebook job.
Figure 4 Notebook instance connected
- Click connect to test the connection.
Once the notebook instance is initialized, you can perform online data analysis on it. Instance initialization typically takes about 2 minutes.
When you run SQL statements in the notebook instance, a Spark job is started in DLI, and the results are displayed in the instance.
Step 7: Configure the Notebook Instance to Access DLI Metadata
Before running a job, you need to configure the notebook instance to access DLI or LakeFormation metadata.
Step 8: Use the Notebook Instance to Write and Debug Code
After the notebook instance is connected to the DLI queue, you can edit and debug code in the Notebook area.
(Optional) Configuring the Notebook Instance to Access DLI Metadata
After connecting the notebook instance to DLI, you need to configure access to metadata if you plan to submit DLI jobs using the notebook instance. This section describes how to configure access to DLI metadata.
For how to configure the notebook instance to access LakeFormation metadata, see (Optional) Configuring the Notebook Instance to Access LakeFormation Metadata.
- Specify a notebook image.
- Create a custom agency to authorize DLI to use DLI metadata and OBS.
For how to create a custom agency, see Creating a Custom DLI Agency.
Make sure the custom agency contains the following permissions:
Table 3 DLI custom agency scenarios Scenario
Agency Name
Use Case
Permission Policy
Allowing DLI to read and write data from and to OBS to transfer logs
Custom
For DLI Flink jobs, the permissions include downloading OBS objects, obtaining OBS/GaussDB(DWS) data sources (foreign tables), transferring logs, using savepoints, and enabling checkpointing. For DLI Spark jobs, the permissions allow downloading OBS objects and reading/writing OBS foreign tables.
Allowing DLI to access DLI catalogs to retrieve metadata
Custom
DLI accesses catalogs to retrieve metadata.
- Confirm access to DLI metadata.
- Log in to the ModelArts console and choose Development Workspace > Notebook.
- Create a notebook instance. When the instance is Running, click Open in the Operation column.
- On the displayed JupyterLab page, choose File > New > Terminal. The Terminal page appears.
Figure 5 Accessing the Terminal page

- Run the following commands to go to the Livy configuration directory and view the Spark configuration file:
vi spark-defaults.conf
Ensure that the spark.dli.user.catalogName=dli configuration item exists. This item is used to access DLI metadata.
It is the default configuration item.
Figure 6 Disabling default access to DLI metadata
- Use Notebook to edit a job.
(Optional) Configuring the Notebook Instance to Access LakeFormation Metadata
After connecting the notebook instance to DLI, you need to configure access to metadata if you plan to submit DLI jobs using the notebook instance. This section describes how to configure access to LakeFormation metadata.
For how to configure the notebook instance to access DLI metadata, see (Optional) Configuring the Notebook Instance to Access DLI Metadata.
- Connect DLI to LakeFormation.
- For details, see Connecting DLI to LakeFormation.
- Specify a notebook image.
- Create a custom agency to authorize DLI to use LakeFormation metadata and OBS.
For how to create a custom agency, see Creating a Custom DLI Agency.
Make sure the custom agency contains the following permissions:
Table 4 DLI custom agency scenarios Scenario
Agency Name
Use Case
Permission Policy
Allowing DLI to read and write data from and to OBS to transfer logs
Custom
For DLI Flink jobs, the permissions include downloading OBS objects, obtaining OBS/GaussDB(DWS) data sources (foreign tables), transferring logs, using savepoints, and enabling checkpointing. For DLI Spark jobs, the permissions allow downloading OBS objects and reading/writing OBS foreign tables.
Allowing DLI to access LakeFormation catalogs to retrieve metadata
Custom
DLI accesses LakeFormation catalogs to retrieve metadata.
- On the notebook instance page, set Spark parameters.
- Select the queue of the DLI notebook image, click connect, and set Spark parameters.
spark.sql.catalogImplementation=hive
spark.hadoop.hive-ext.dlcatalog.metastore.client.enable=true
spark.hadoop.hive-ext.dlcatalog.metastore.session.client.class=com.huawei.cloud.dalf.lakecat.client.hiveclient.LakeCatMetaStoreClient
spark.hadoop.lakecat.catalogname.default=lfcatalog // Specify the catalog to access.
spark.dli.job.agency.name=agencyForLakeformation // The agency must have the necessary permissions on LakeFormation and OBS and must be delegated to DLI.
spark.driver.extraClassPath=/usr/share/extension/dli/spark-jar/lakeformation/*
spark.executor.extraClassPath=/usr/share/extension/dli/spark-jar/lakeformation/*
spark.sql.extensions=org.apache.spark.sql.hudi.HoodieSparkSessionExtension
spark.hadoop.hoodie.support.write.lock=org.apache.hudi.lakeformation.LakeCatMetastoreBasedLockProvider
Table 5 Parameter description Parameter
Mandatory
Example Value
Configuration Scenario
spark.sql.catalogImplementation
Yes
hive
Type of catalog used to store and manage metadata
spark.hadoop.hive-ext.dlcatalog.metastore.client.enable
Yes
true
Mandatory when LakeFormation metadata access is enabled
spark.hadoop.hive-ext.dlcatalog.metastore.session.client.class
Yes
com.huawei.cloud.dalf.lakecat.client.hiveclient.LakeCatMetaStoreClient
Mandatory when LakeFormation metadata access is enabled
spark.hadoop.lakecat.catalogname.default
No
lfcatalog
Name of the LakeFormation data directory to access
The default value is hive.
spark.dli.job.agency.name
Yes
User-defined agency name
User-defined agency name
- For how to create a custom agency, see Creating a Custom DLI Agency.
- For DLI metadata agency permissions, see Permission to Access LakeFormation Catalog Metadata.
spark.driver.extraClassPath
Yes
/usr/share/extension/dli/spark-jar/lakeformation/*
Loading of the LakeFormation dependency package
spark.executor.extraClassPath
Yes
/usr/share/extension/dli/spark-jar/lakeformation/*
Loading of the LakeFormation dependency package
spark.sql.extensions
No
org.apache.spark.sql.hudi.HoodieSparkSessionExtension
Mandatory in Hudi scenarios
spark.hadoop.hoodie.support.write.lock
No
org.apache.hudi.lakeformation.LakeCatMetastoreBasedLockProvider
Mandatory in Hudi scenarios
- Select the queue of the DLI notebook image, click connect, and set Spark parameters.
- Disable the default access to DLI metadata and use LakeFormation metadata.
- Log in to the ModelArts management console and choose DevEnviron > Notebook.
- Create a notebook instance. When the instance is Running, click Open in the Operation column.
- On the displayed JupyterLab page, choose File > New > Terminal. The Terminal page appears.
Figure 7 Accessing the Terminal page

- Run the following commands to go to the Livy configuration directory and modify the Spark configuration file to disable the default access to DLI metadata:
vi spark-defaults.conf
Use # to comment out spark.dli.user.catalogName=dli to disable the default access to DLI metadata.
Figure 8 Disabling default access to DLI metadata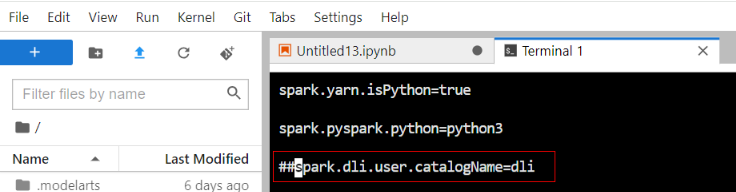
- Use Notebook to edit a job.
Run the spark.sql statement to access LakeFormation metadata and Hudi tables.
Figure 9 Accessing LakeFormation metadata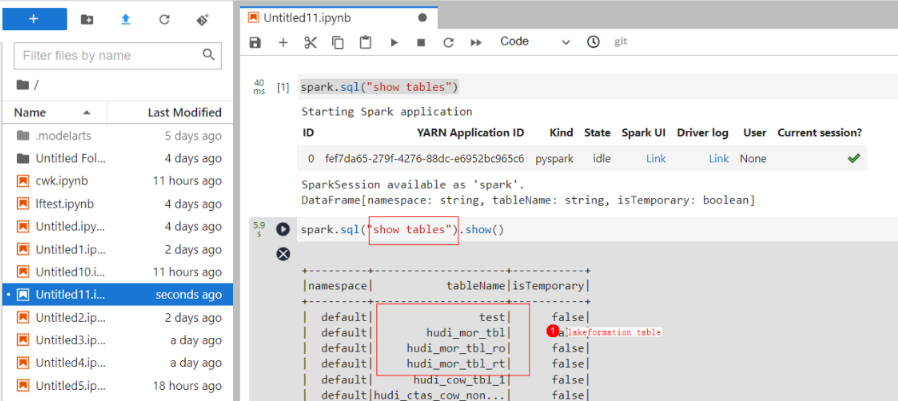
Feedback
Was this page helpful?
Provide feedbackThank you very much for your feedback. We will continue working to improve the documentation.


