Step 5: Design Data Architecture
Use DataArts Studio DataArts Architecture to create entity-relationship (ER) models and dimensional models to standardize and visualize data development and output data governance methods that can guide development personnel to work with ease.
- Source Data Integration (SDI) copies data from the source system.
- Data Warehouse Integration (DWI) integrates and cleanses data from multiple source systems, and builds ER models based on the third normal form (3NF).
- Data Warehouse Report (DWR) is based on the multi-dimensional model and its data granularity is the same as that of the DWI layer.
- Data Mart (DM) is where multiple types of data are summarized and displayed.
This topic describes how to use the DataArts Studio DataArts Architecture module to design models.
Adding Reviewers
In the DataArts Architecture module, all modeling steps must be reviewed. Therefore, you need to add a reviewer first. DAYU Administrator or the workspace administrator has the permission to add reviewers.
- On the DataArts Studio console, locate a workspace and click DataArts Architecture.
- In the navigation pane on the left, choose Configuration Center. On the displayed Reviewers page, click Add.
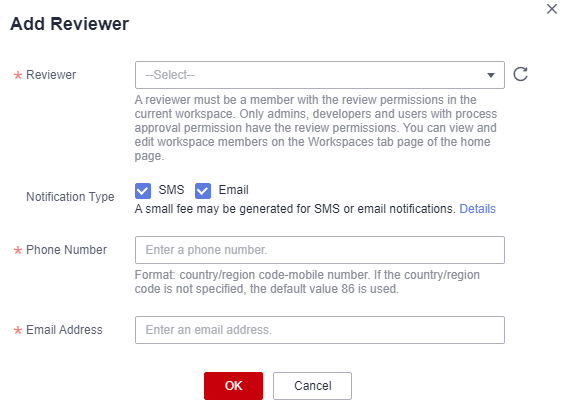
- Select a reviewer (workspace administrator, developer, or custom role with the review permission), enter the correct email address and phone number, and click OK.
You can also add your current account as a reviewer. In this way, auto review is supported in subsequent operations. Add more reviewers, if required.Figure 1 Adding a reviewer
Configuration Center Management
- On the DataArts Architecture console, choose Configuration Center in the navigation pane on the left.
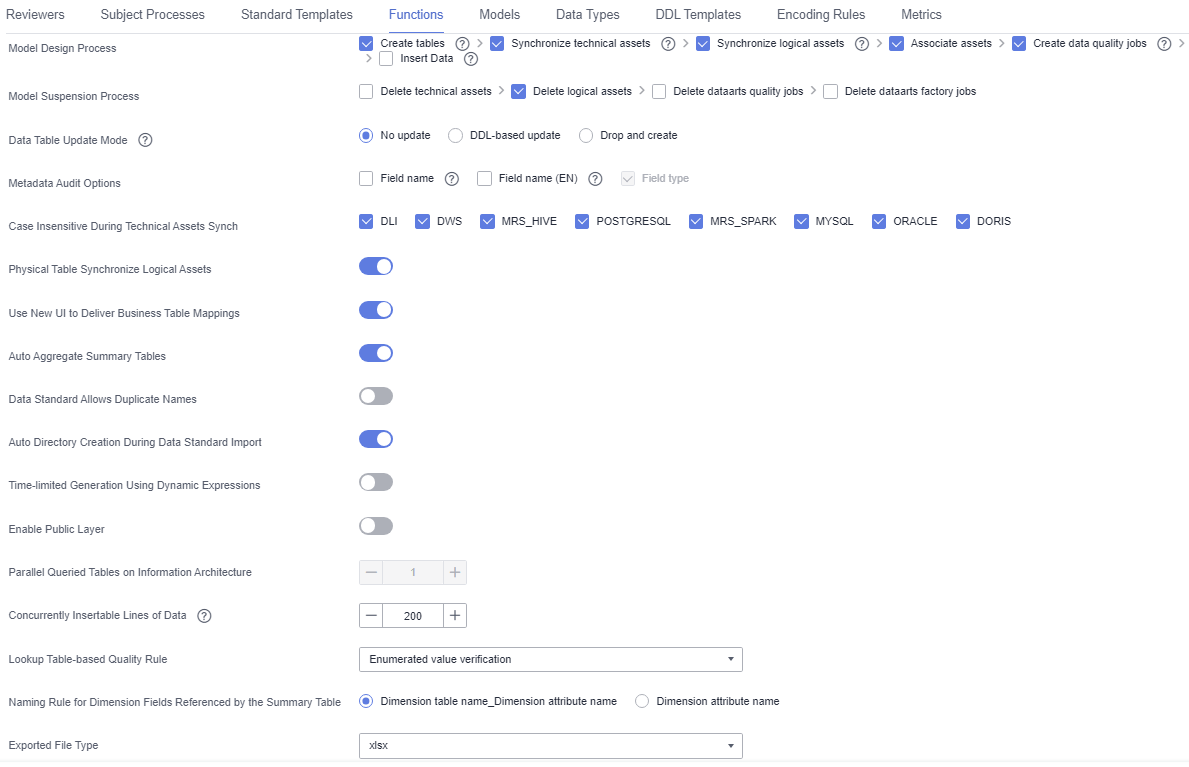
- Click the Functions tab and set Model Design Process.
Figure 2 Functions
- Click OK.
Designing a Subject
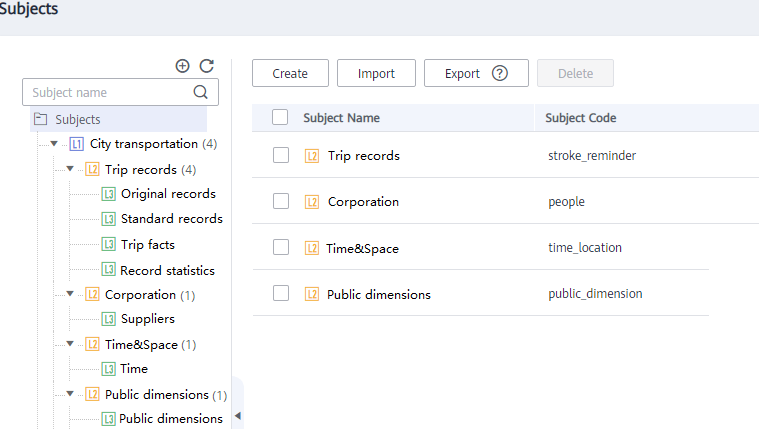
This section uses the subjects listed in Table 1 as an example.
- There is a subject area group named City transportation.
- Under City transportation, there are four subject areas: Trip records, Corporation, Time&Space, and Public dimensions.
- Under Trip records, there are four business objects: Original records, Standard records, Trip facts, and Record statistics.
- Under Corporation, there is one business object: Suppliers.
- Under Time&Space, there is one business object: Time.
- Under Public dimensions, there is one business object: Public dimensions.
|
Subject Area Group Name (L1) |
Subject Area Group Code (L1) |
Subject Area Name (L2) |
Subject Area Code (L2) |
Business Object Name (L3) |
Business Object Code (L3) |
|---|---|---|---|---|---|
|
City transportation |
city_traffic |
Trip records |
stroke_reminder |
Original records |
origin_stroke |
|
Standard records |
stand_stroke |
||||
|
Trip facts |
stroke_fact |
||||
|
Record statistics |
stroke_statistic |
||||
|
Corporation |
people |
Suppliers |
vendor |
||
|
Time&Space |
time_location |
Time |
date |
||
|
Public dimensions |
public_dimension |
Public dimensions |
public_dimension |
Procedure
- Log in to the DataArts Studio console. Locate the created DataArts Studio instance and click Access.
- In the workspace list, locate the target workspace and click DataArts Architecture.
- Choose Configuration Center in the navigation pane on the left. Click the Subject Processes tab, and use the default three levels.
There can be a maximum of seven subject levels, a minimum of two subject levels, and three subject levels by default. L1 to L7 are used to represent the layers. The last level is Business Object and cannot be customized. The names of other levels can be customized. The levels configured in Configuration Center take effect on the Subjects page.
Figure 4 Configuring the subject levels
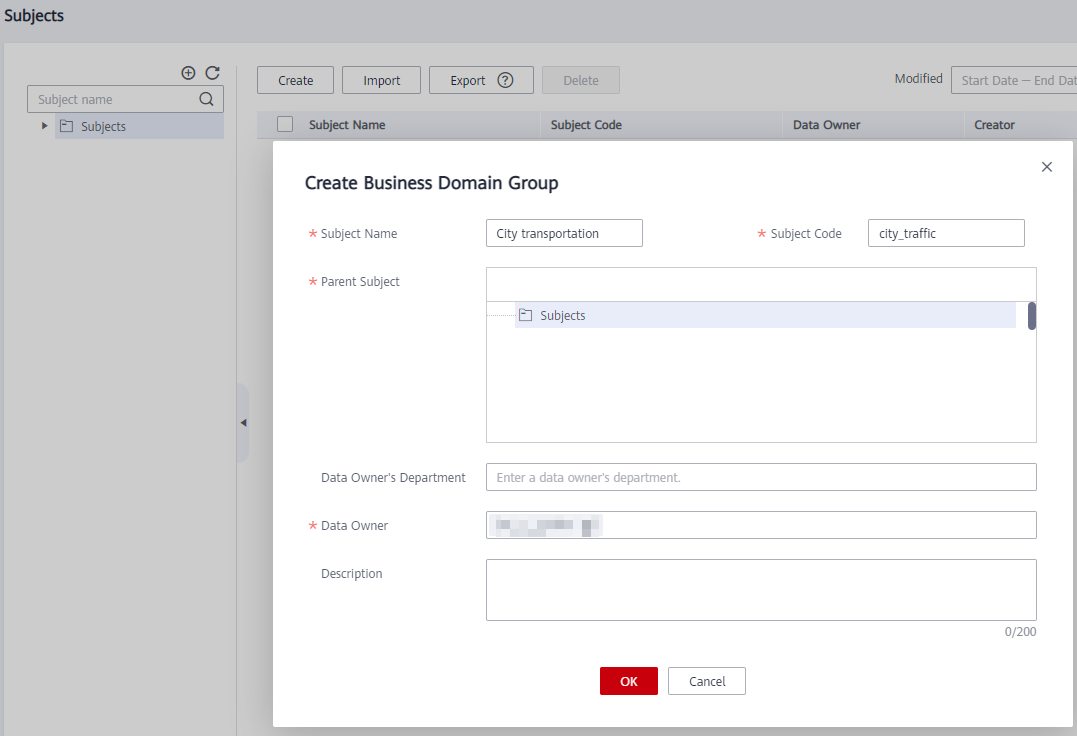
- On the DataArts Architecture console, choose in the left navigation pane. On the page displayed, click Create to create an L1 subject, which is a subject area group.
In the dialog box displayed, set the parameters as shown in Figure 5 and click OK.
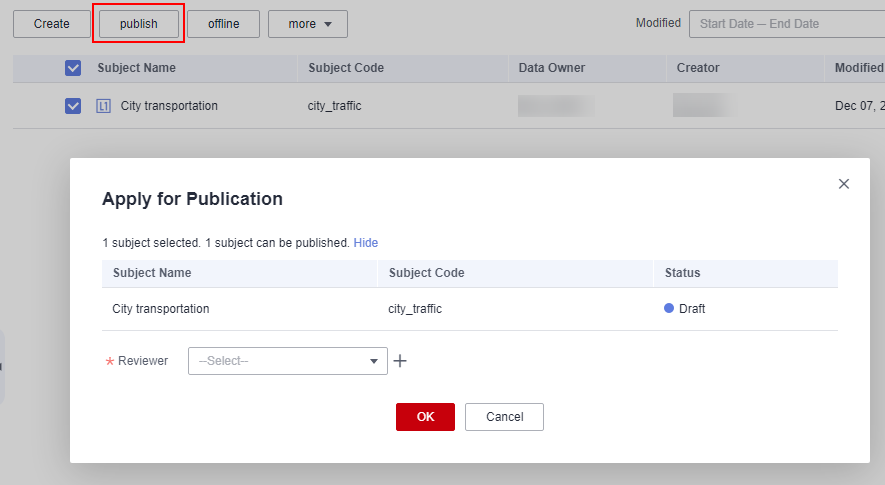
- Select the created subject area group and click publish. In the Apply for Publication dialog box, select a reviewer and click OK. Wait for the reviewer to review the application. If you have the reviewer permissions, select Auto-review and click OK.
Figure 6 Publishing a subject area group
- Create four L2 subjects under the L1 subject City transportation: Trip records, Corporation, Time&Space, and Public dimensions.
Perform the following procedure to create a subject area named Trip records. The procedure for creating other subject areas is similar.
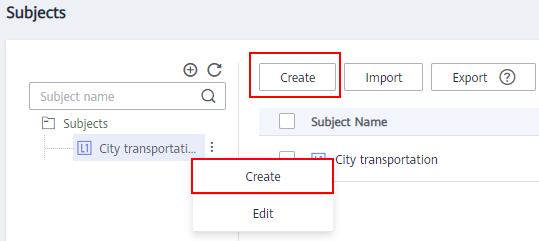
- Right-click the L1 subject City transportation in the subject tree, and select Create from the shortcut menu. Alternatively, click Create in the right pane.
Figure 7 Creating an L2 subject
- In the dialog box displayed, set Subject Name and Subject Code to the values of Subject Area Name and Subject Area Code in Table 1, set other parameters based on project requirements, and click OK.
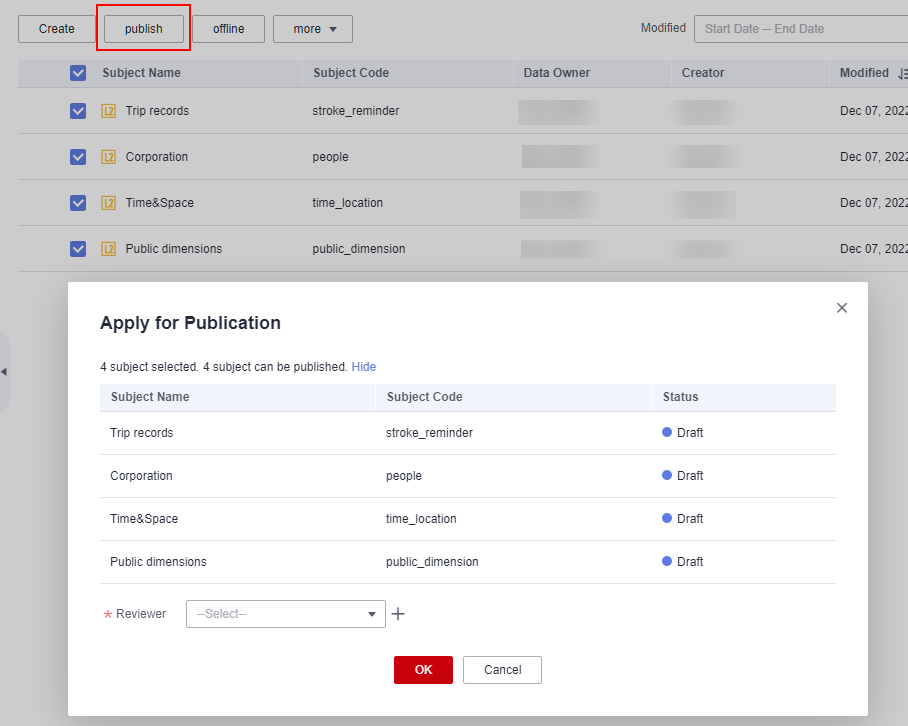
- Select the created subject area and click publish. In the Apply for Publication dialog box, select a reviewer and click OK. Wait for the reviewer to review the application. If you have the reviewer permissions, select Auto-review and click OK.
Figure 8 Publishing a subject area
- Right-click the L1 subject City transportation in the subject tree, and select Create from the shortcut menu. Alternatively, click Create in the right pane.
- Create business objects.
- Under Trip records, create four business objects: Original records, Standard records, Trip facts, and Record statistics.
- Under Corporation, create one business object: Suppliers.
- Under Time&Space, create one business object: Time.
- Under Public dimensions, create one business object: Public dimensions.
Perform the following procedure to create a business object named Original records in the subject area Trip records. The procedure for creating other business objects is similar.
- Right-click the L2 subject Trip records in the subject tree, and select Create from the shortcut menu. Alternatively, click Create in the right pane.
- In the dialog box displayed, set Subject Name and Subject Code to the values of Business Object Name and Business Object Code in Table 1, set other parameters based on project requirements, and click OK.
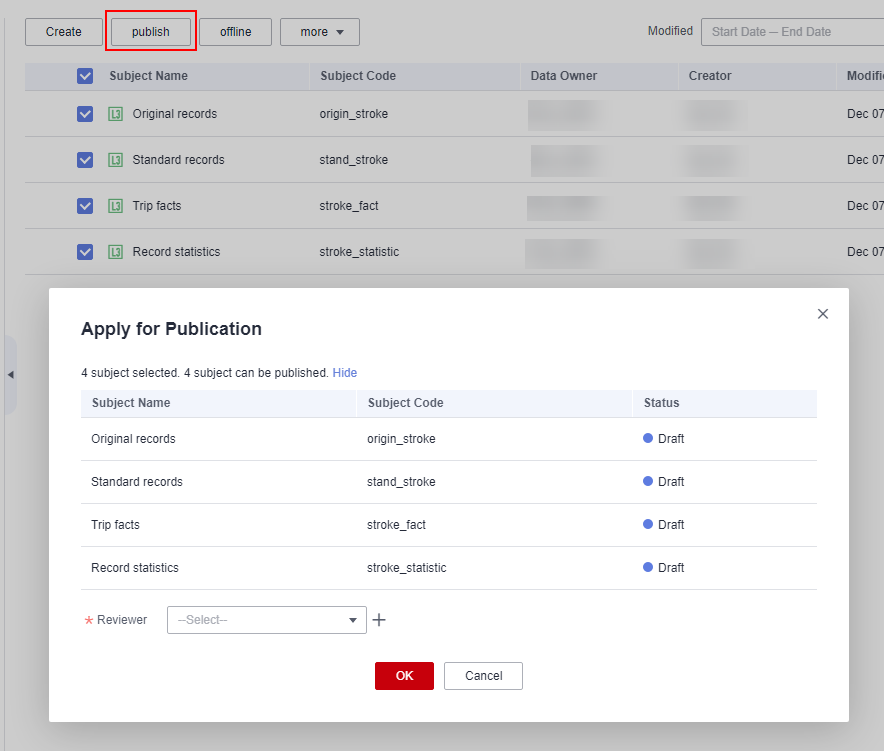
- Select the created business object and click publish. In the Apply for Publication dialog box, select a reviewer and click OK. Wait for the reviewer to review the application. If you have the reviewer permissions, select Auto-review and click OK.
Figure 9 Publishing a business object
Creating and Publishing Lookup Tables
This section uses the lookup tables listed in Table 2 as an example.
|
Directory |
*Table Name |
* Table English Name |
Table Description |
* Field Name |
* Field Code |
* Data Type |
Field Description |
|---|---|---|---|---|---|---|---|
|
payment_type |
payment_type |
payment_type |
None |
payment_type_id |
payment_type_id |
BIGINT |
None |
|
payment_type_value |
payment_type_value |
STRING |
None |
||||
|
vendor |
vendor |
vendor |
None |
vendor_id |
vendor_id |
BIGINT |
None |
|
vendor_value |
vendor_value |
STRING |
None |
||||
|
rate |
rate_code |
rate_code |
None |
rate_code_id |
rate_code_id |
BIGINT |
None |
|
rate_code_value |
rate_code_value |
STRING |
None |
Procedure
- On the DataArts Architecture console, choose in the navigation pane on the left.
- Create three lookup table directories: payment_type, vendor, and rate.
Perform the following procedure to create a directory named payment_type. The procedure for creating other directories is similar.
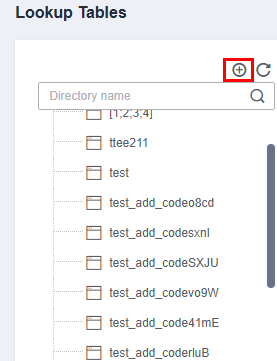
- On the Lookup Tables page, click
 above the directory tree to create a directory.
Figure 10 Lookup table directory tree
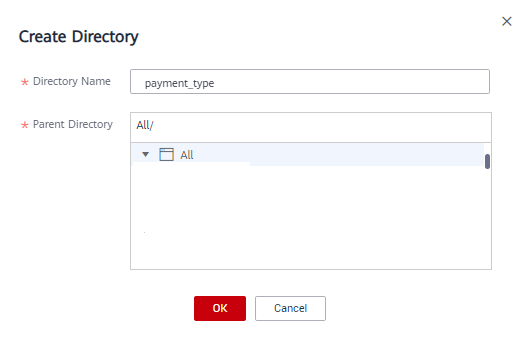
- In the dialog box displayed, enter a directory name, select a parent directory, and click OK.
Figure 11 Creating a directory for lookup tables
- On the Lookup Tables page, click
- Create three lookup tables: payment_type, vendor, and rate_code.
Perform the following procedure to create a lookup table named payment_type. The procedure for creating other lookup tables is similar.
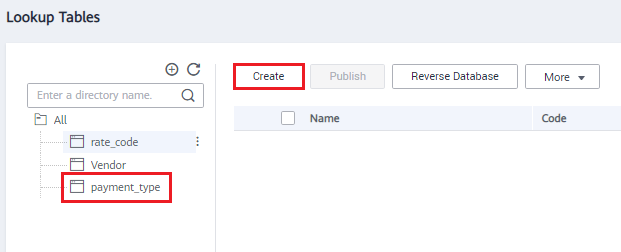
- On the Lookup Tables page, click payment_type in the directory tree, and click Create on the page displayed.
Figure 12 Lookup Tables page
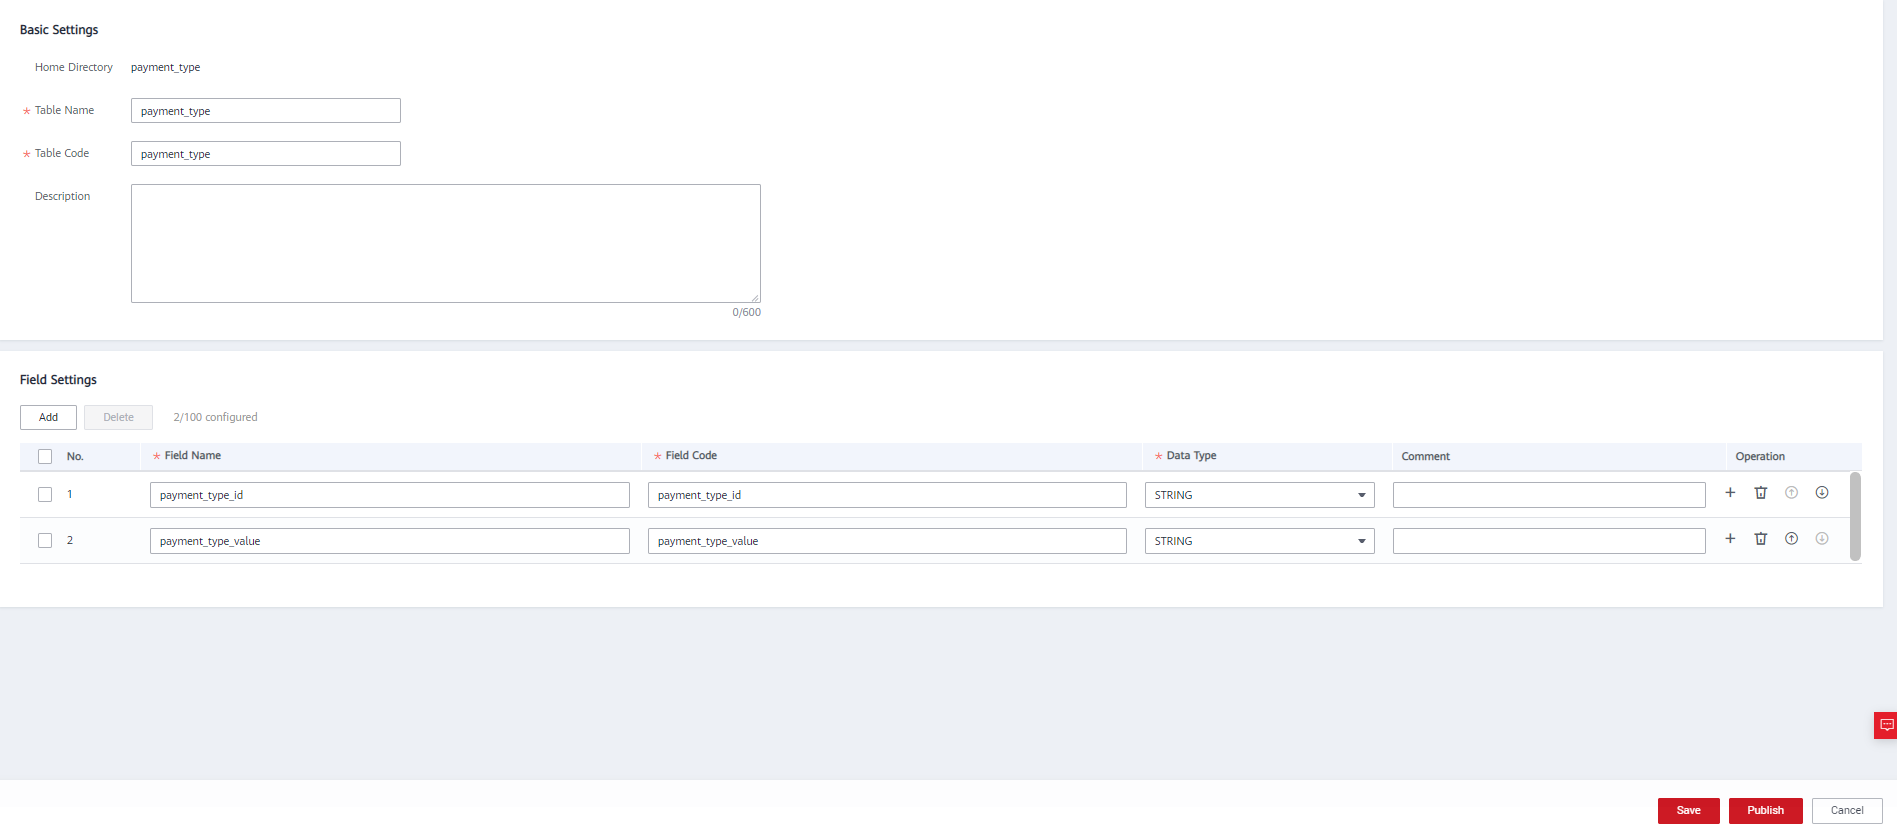
- Set the parameters based on Table 2 and click Save.
Figure 13 Creating a lookup table
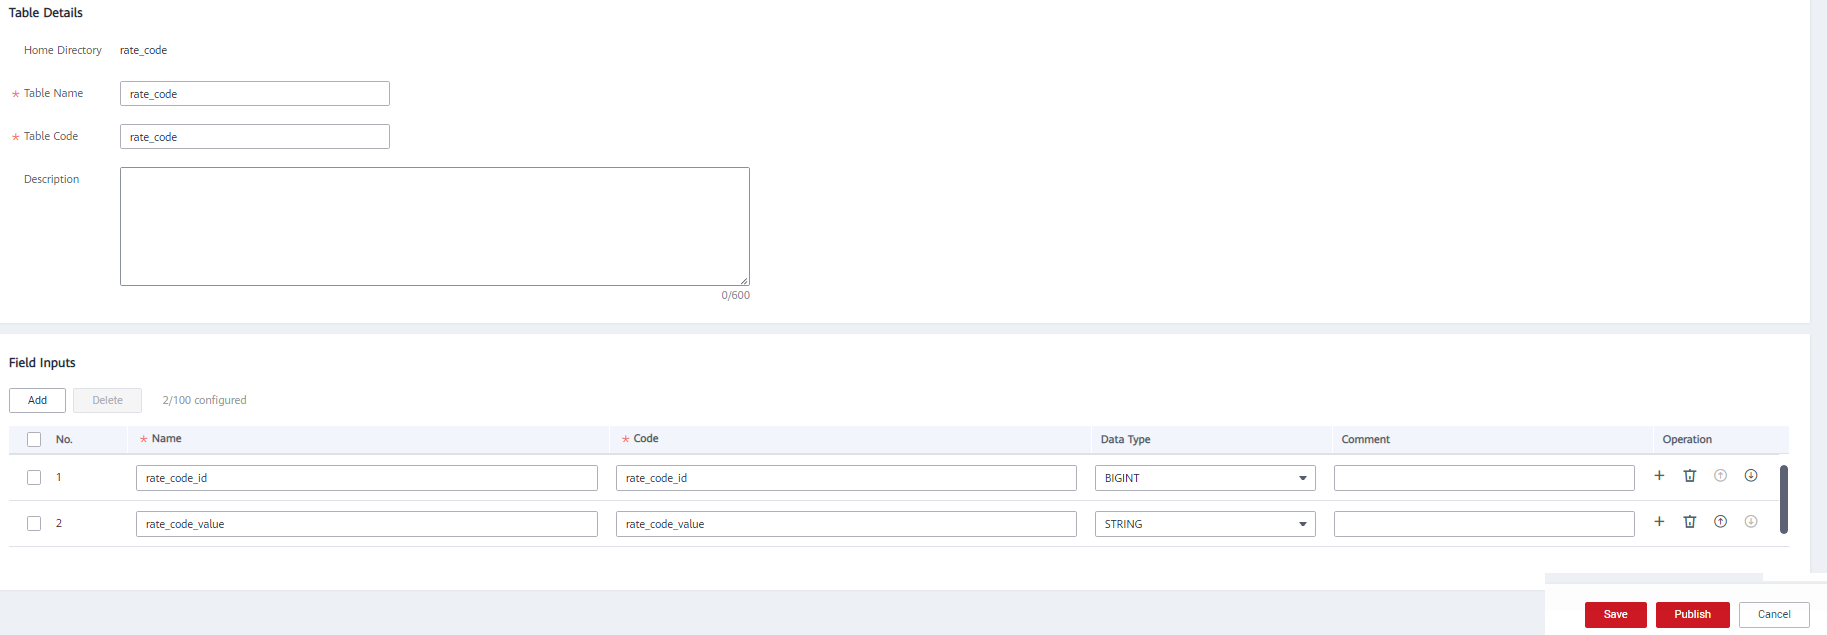
- Refer to 3.a to 3.b to create the lookup table vendor in the vendor directory and the lookup table rate_code in the rate directory.
Figure 14 Creating a lookup table named vendor
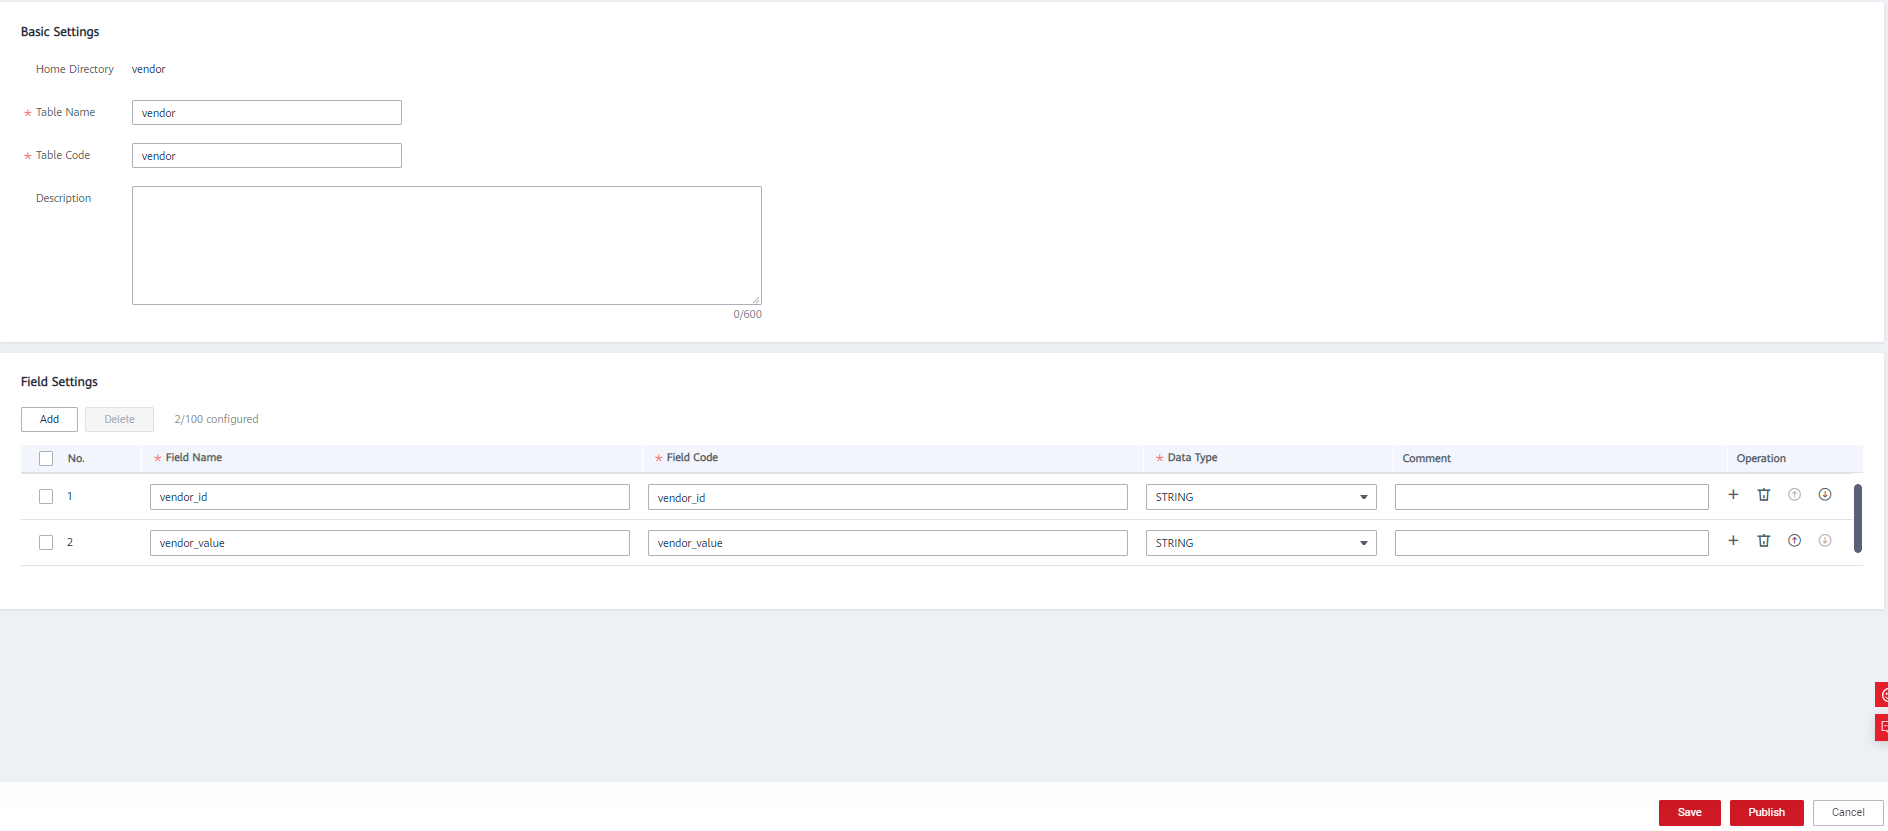 Figure 15 Creating a lookup table named rate_code
- On the Lookup Tables page, click payment_type in the directory tree, and click Create on the page displayed.
- Enter values for the three lookup tables payment_type, vendor, and rate_code.
On the Lookup Tables page, locate the row that contains the lookup table payment_type, and choose in the Operation column. On the page displayed, click Add to add the values listed in Table 3.
Table 3 Values to be added for the lookup table payment_type payment_type_id
payment_type_value
1
Credit card
2
Cash
3
No charge
4
Dispute
5
Unknown
6
Voided trip
Return to the Lookup Tables page, locate the row that contains the lookup table vendor, and choose in the Operation column. On the page displayed, click Add to add the values listed in Table 4.
Table 4 Values to be added for the lookup table vendor vendor_id
vendor_value
1
A Company
2
B Company
Return to the Lookup Tables page, locate the row that contains the lookup table rate_code, and choose in the Operation column. On the page displayed, click Add to add the values listed in Table 5.
- Return to the Lookup Tables page, select the three lookup tables, and click Publish.
- In the Apply for Publication dialog box, select a reviewer and click OK. Wait for the reviewer to review the application. If you have the reviewer permissions, select Auto-review and click OK.
Creating and Publishing Data Standards
In this example, you need to create the three data standards listed in Table 6.
|
Directory |
*Standard Name |
* Standard Code (Custom) |
*Data Type |
Data Length |
Lookup Table |
*Lookup Table Field |
Description |
|---|---|---|---|---|---|---|---|
|
payment_type |
payment_type |
payment_type |
Long integer (BIGINT) |
None |
payment_type |
payment_type_id |
None |
|
vendor |
vendor |
vendor |
Long integer (BIGINT) |
None |
vendor |
vendor_id |
None |
|
rate |
rate_code |
rate_code |
Long integer (BIGINT) |
None |
rate_code |
rate_code_id |
None |
- On the DataArts Architecture console, choose in the navigation pane on the left.
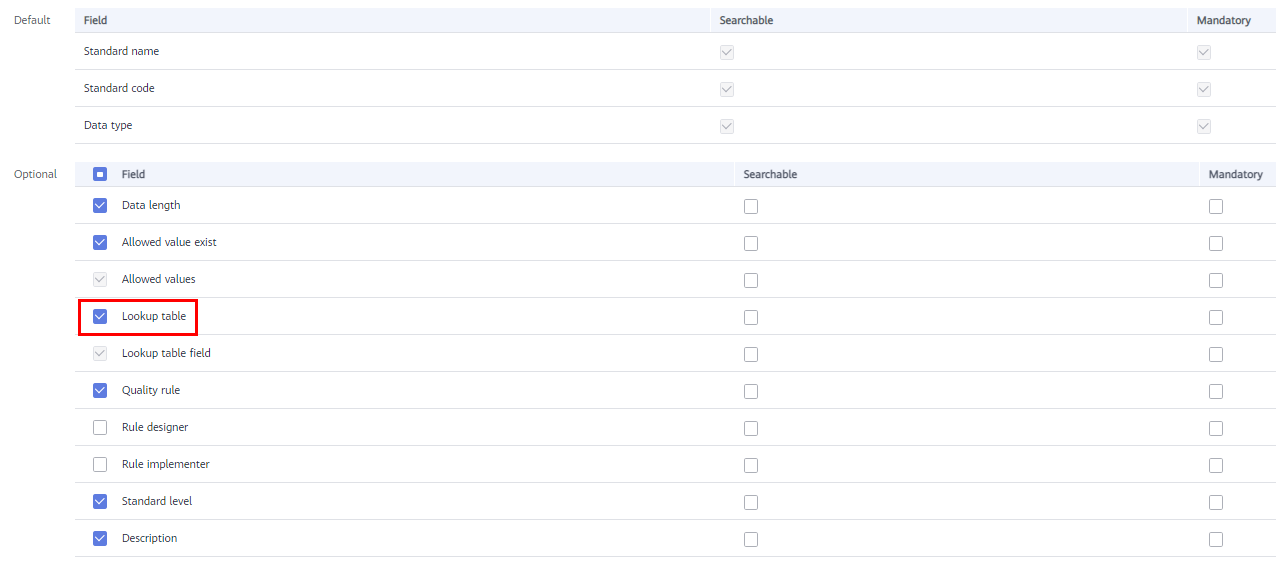
- If you access the Data Standards page for the first time, you must customize a template. The custom template can be modified in Configuration Center. Additionally, select Lookup table, as shown in the following figure.
Figure 16 Customize Template
- Create three directories for data standards: payment_type, vendor, and rate_code.
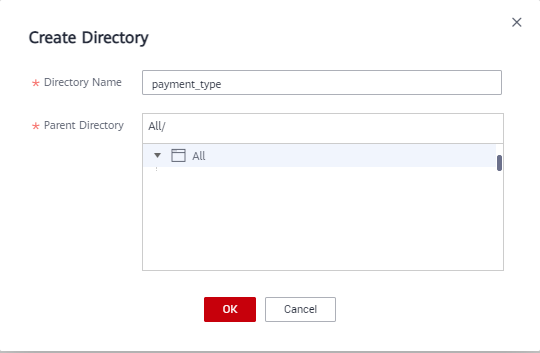
In the upper part of the directory tree on the Data Standards page, click
 . In the dialog box displayed, enter the directory name as payment_type, select a parent directory, and click OK.Figure 17 Creating a directory for data standards
- Create three data standards: payment_type, vendor, and rate_code.
- In the directory tree on the Data Standards page, select the required directory and click Create on the page displayed on the right.
- On the Create Data Standard page, configure the three data standards by referring to the following figures, and click Save. In this example, only a few parameters are selected for the data standard template. You can customize a data standard template by referring to Configuration Center.
Figure 18 Creating a data standard named payment_type Figure 19 Creating a data standard named vendor
 Figure 20 Creating a data standard named rate_code
- Return to the Data Standards page, select the three data standards in the list, and click Publish.
- In the Apply for Publication dialog box, select a reviewer and click OK. Wait for the reviewer to review the application. If you have the reviewer permissions, select Auto-review and click OK.
Data Warehouse Planning: Creating Two ER Models for the SDI and DWI Layers
During data warehouse planning, create two models for the SDI and DWI layers, import the source table to the ER model for the SDI layer by reversing the database, and create a standard business table to record trip data for the DWI layer.
- On the DataArts Architecture page, choose Data Warehouse Layer in the left navigation pane.
In the SDI area, click Create to create an SDI model named sdi. In the DWI area, click Create to create a DWI model named dwi. Click OK.
Figure 21 Creating an SDI model Figure 22 Creating a DWI model
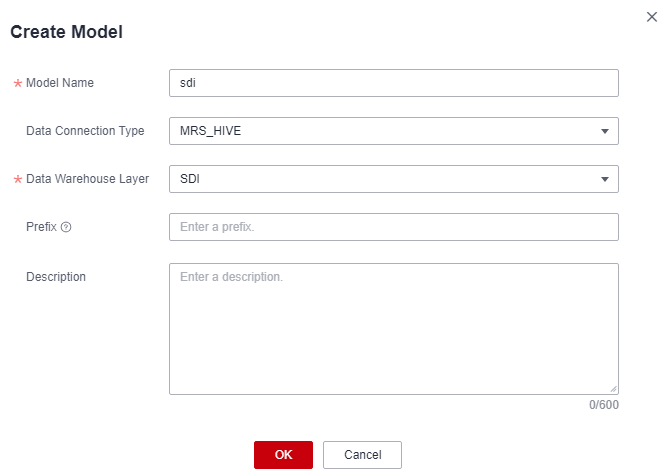
- Create an SDI ER model named sdi. In the SDI area, click Create. In the displayed Create Model dialog box, set the following parameters and click OK.
Figure 23 Creating a physical model named sdi
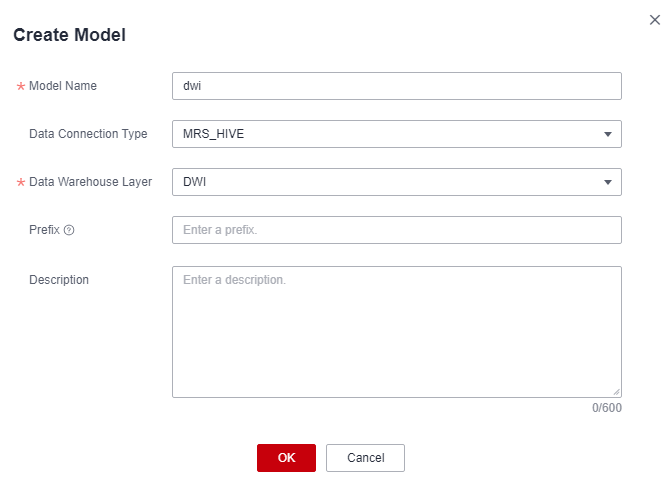
- Create a DWI ER model named dwi. In the DWI area, click Create. In the displayed Create Model dialog box, set the following parameters and click OK.
Figure 24 Creating a physical model named dwi
- Create an SDI ER model named sdi. In the SDI area, click Create. In the displayed Create Model dialog box, set the following parameters and click OK.
- On the Data Warehouse Layer page, click the newly created SDI model to go to the ER Modeling page. Choose , and click Reverse Database on the page displayed on the right to import the source table.

Before reversing a database, ensure that you have collected the data assets of the database.
Figure 25 Model directory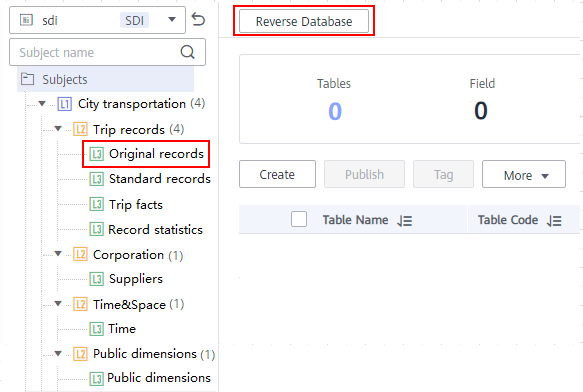
In the Reverse Database dialog box, set the parameters and click Yes. In this example, select the source table in the SDI layer database demo_sdi_db.
Figure 26 Reversing a database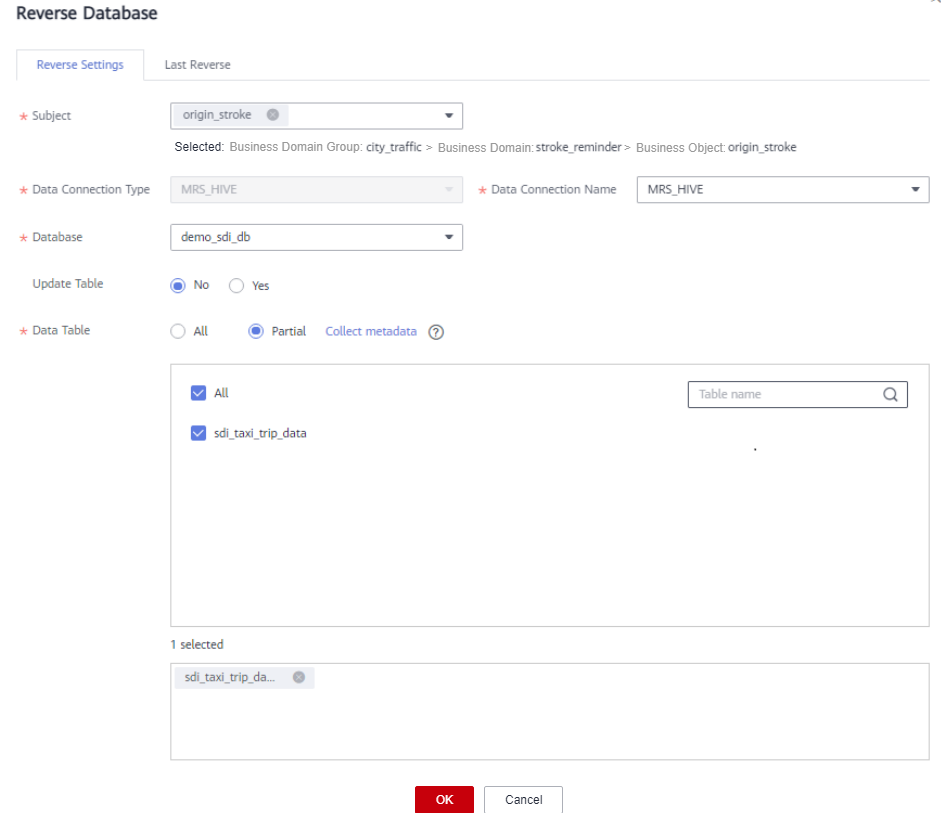
After the database is reversed, click Close. The table is in the draft state. Click Publish in the Operation column, and you can view the imported and published table.
Figure 27 Viewing a table
- Create a standard business table to record trip data.
- On the Data Warehouse Layer area, click the newly created DWI model to go to the ER Modeling page. Expand subjects, choose , and click Create on the page displayed on the right.
- On the Basic Settings tab page, set the parameters as shown in the figure below.
Table 7 Standard trip data table *Subject
*Table Name
* Table English Name
*Data Connection Name
Database
*Description
Standard records
dwi_taxi_trip_data
dwi_taxi_trip_data
mrs_hive_link
demo_dwi_db
None
Figure 28 Basic settings of the table named dwi_taxi_trip_data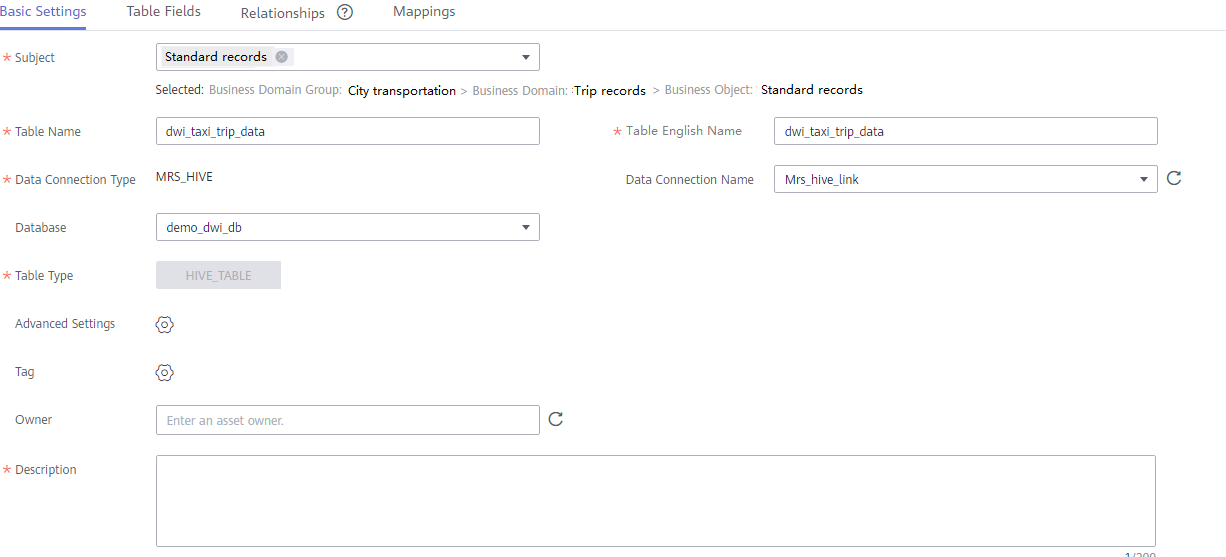
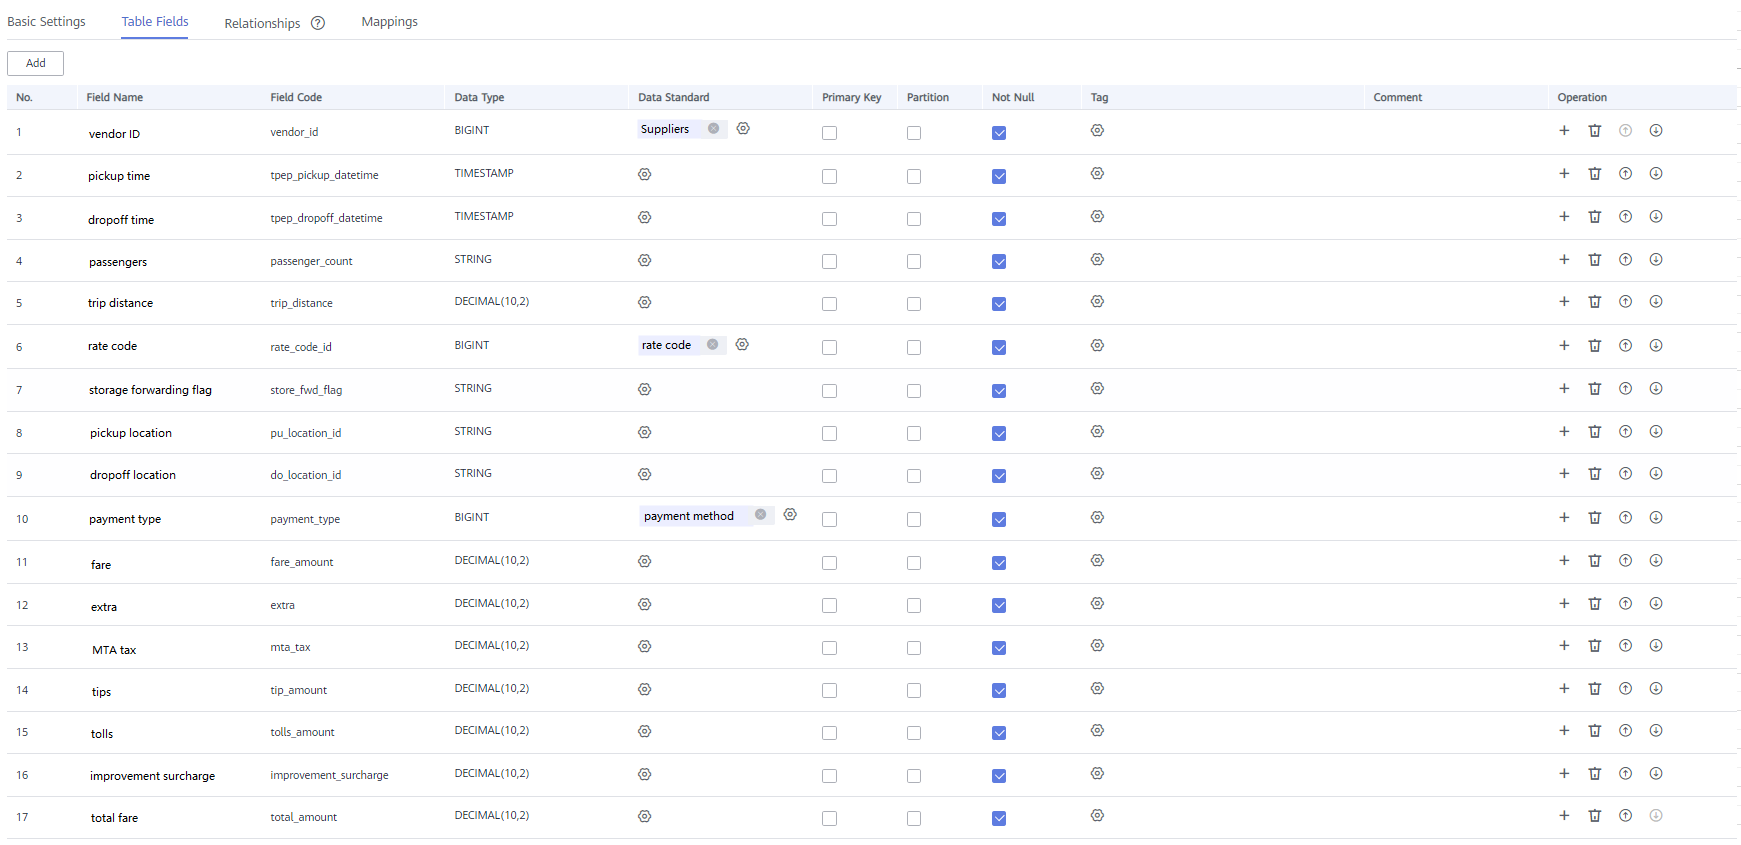
- Click Next to go to the Table Fields page. Click Add. Add the fields listed in Table 8. Then click
 in the Data Standard column of the rows where the vendor ID, rate code ID, and payment type reside to associate with the Vendor, Rate Code ID, and Payment Type standards, respectively. Figure 29 shows the configuration after the fields are added.
Table 8 Fields to be added to the table named dwi_table_trip_data No.
Field Name
Field Code
Data Type
Data Standard
Primary Key
Partition
Not Null
Tag
1
vendor_id
vendor_id
BIGINT
vendor
Not selected
Not selected
Selected
-
2
tpep_pickup_datetime
tpep_pickup_datetime
TIMESTAMP
-
Not selected
Not selected
Selected
-
3
tpep_dropoff_datetime
tpep_dropoff_datetime
TIMESTAMP
-
Not selected
Not selected
Selected
-
4
passenger_count
passenger_count
STRING
-
Not selected
Not selected
Selected
-
5
trip_distance
trip_distance
DECIMAL (10,2)
-
Not selected
Not selected
Selected
-
6
rate_code_id
rate_code_id
BIGINT
rate_code
Not selected
Not selected
Selected
-
7
store_fwd_flag
store_fwd_flag
STRING
-
Not selected
Not selected
Selected
-
8
pu_location_id
pu_location_id
STRING
-
Not selected
Not selected
Selected
-
9
do_location_id
do_location_id
STRING
-
Not selected
Not selected
Selected
-
10
payment_type
payment_type
BIGINT
payment_type
Not selected
Not selected
Selected
-
11
fare_amount
fare_amount
DECIMAL (10,2)
-
Not selected
Not selected
Selected
-
12
extra
extra
DECIMAL (10,2)
-
Not selected
Not selected
Selected
-
13
mta_tax
mta_tax
DECIMAL (10,2)
-
Not selected
Not selected
Selected
-
14
tip_amount
tip_amount
DECIMAL (10,2)
-
Not selected
Not selected
Selected
-
15
tolls_amount
tolls_amount
DECIMAL (10,2)
-
Not selected
Not selected
Selected
-
16
improvement_surcharge
improvement_surcharge
DECIMAL (10,2)
-
Not selected
Not selected
Selected
-
17
total_amount
total_amount
DECIMAL (10,2)
-
Not selected
Not selected
Selected
-
You can perform the following operations on the fields.
- Associating with data standards
When creating or editing a table, click the Table Fields tab. In the Data Standard column of the row where the field is located, click
 to select a data standard to be associated with the field. After a field is associated with a data standard, a quality job is automatically generated after the table is published. A quality rule is generated for each field associated with the data standard. You can monitor the quality of fields based on the data standard. You can view the quality job on the Quality Jobs page of DataArts Quality. For more information about associating data standards, see Designing Physical Models.
 - Adding a tag
A tag is a custom identifier. After adding a tag, you can search for data assets in the DataArts Studio DataArts Catalog module with ease.
When creating or editing a table, click the Table Fields tab. In the Tag column of the row where the field is located, click
 to select a tag. In the dialog box displayed, enter a new tag name and press Enter. Alternatively, select an existing tag from the drop-down list. Then click OK.
 - Associating with quality rules
After a table is created, you can associate fields in the table with quality rules. After the association, a quality job is automatically created in the DataArts Quality module after the table is published. If the table has been published, the system automatically updates the quality job. For more information about associating quality rules, see Associating with Quality Rules.
- Associating with data standards
- Click Next to go to the Relationships page. In this example, you do not need to perform any operation on this page.
- Click Next to go to the Mappings page and create mappings to design data sources of the table.
- If the table fields come from different ER models, you must create multiple mappings. In each mapping, you only need to set the source field for the field that comes from the current mapping.
- If the table fields come from multiple tables in the same ER model, you can create a mapping. In the Table field of the mapping, you can join multiple tables and then set source fields for the fields in the table.
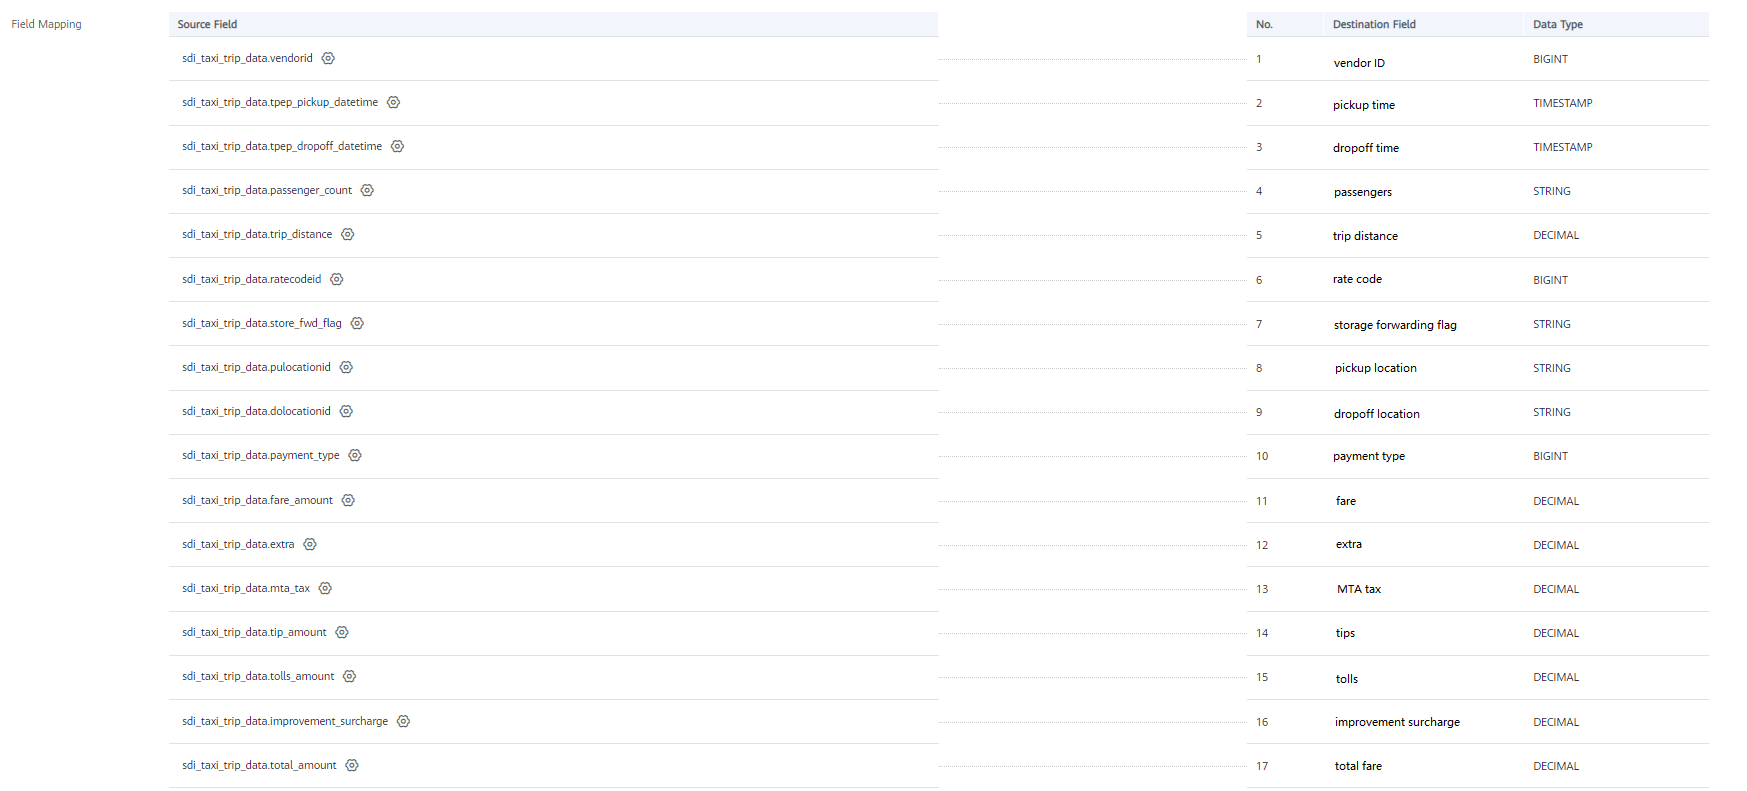
In this example, you only need to create one mapping. Click Create and set a mapping as shown in Figure 30.
- Mapping is automatically generated. You can customize the name.
- Select sdi for Model.
- Select the source table sdi_taxi_trip_data for Table. All data in the dwi_taxi_trip_data table comes from this source table.
- Field Mapping
In the Field Mapping area, set source fields for the fields in the table in sequence. The selected source fields must have the same meaning as the fields in the table. As shown in Figure 31, an SQL statement is displayed at the bottom of Field Mapping for reference.

- On the DataArts Architecture page, choose in the navigation pane on the left, and click the Functions tab. On the Functions page, if Create data development jobs is selected (unselected by default) for Model Design Process, the system can create an ETL job during data development based on the table mapping information during table release. An ETL node is generated for each mapping, and the job name starts with Database name_Table code. Currently, this function is in the internal test stage. Only DLI-to-DLI and DLI-to-DWS mapping jobs can be created.
You can choose DataArts Factory > Job Development to view the created ETL jobs. By default, ETL jobs are scheduled at 00:00 every day.
- In this example, the function of automatically creating ETL jobs is not enabled. The function provides only the data flow direction for data development. During data development, you can refer to the mapping to write SQL scripts.
- On the DataArts Architecture page, choose in the navigation pane on the left, and click the Functions tab. On the Functions page, if Create data development jobs is selected (unselected by default) for Model Design Process, the system can create an ETL job during data development based on the table mapping information during table release. An ETL node is generated for each mapping, and the job name starts with Database name_Table code. Currently, this function is in the internal test stage. Only DLI-to-DLI and DLI-to-DWS mapping jobs can be created.
- After the mappings are configured, click Save.
- Select the created model and choose . In the dialog box displayed, select Table for Export and click OK. Export the sdi model in the same way. You can use the exported model as a backup and import it.
Figure 32 Export dialog box

- Publish the table model.
- Publish the source table imported to the SDI ER model in 2. After the table is published, you can use DataArts Studio to manage and monitor the source table.
Return to the ER Modeling page, select the sdi model in the model directory. Select the sdi_taxi_trip_data table in the list on the right, and click Publish. In the dialog box displayed, select a reviewer and click OK. Wait for the reviewer to review the application. If you have the reviewer permissions, select Auto-review and click OK.
- Publish a table of the DWI ER model.
Return to the ER Modeling page, select the dwi model in the model directory. Select the dwi_table_trip_data table in the list on the right, and click Publish. In the dialog box displayed, select a reviewer and click OK. Wait for the reviewer to review the application. If you have the reviewer permissions, select Auto-review and click OK.
- Publish the source table imported to the SDI ER model in 2. After the table is published, you can use DataArts Studio to manage and monitor the source table.
- After the application is approved, you can view Status and Sync Status of the corresponding model on the ER Modeling page.
Publication is an asynchronous operation. You can click
 to refresh the status. After an application for publishing a table is approved, the system performs operations such as creating tables and synchronizing technical assets and logical assets based on the configurations of Model Design Process on the Functions tab page in Configuration Center. The synchronization status is displayed in the Sync Status column of the table.
- If all items in Sync Status are displayed as Succeeded, the table is published. Move your mouse pointer to
 in Sync Status. If Creation succeeded is displayed, the table is created in the corresponding data source.
 - If an item in Sync Status is displayed as Failed, you can refresh the status. If the fault persists, choose to view logs.
Locate the failure cause based on the logs. After the fault is rectified, return to the ER Modeling page, select the table to be synchronized in the list, choose and click OK in the dialog box displayed. If the synchronization fails again, contact technical support for assistance.
Figure 33 Checking the table status
Click a table name in the list to view the table details. Data Source shows the table location.
Figure 34 Table details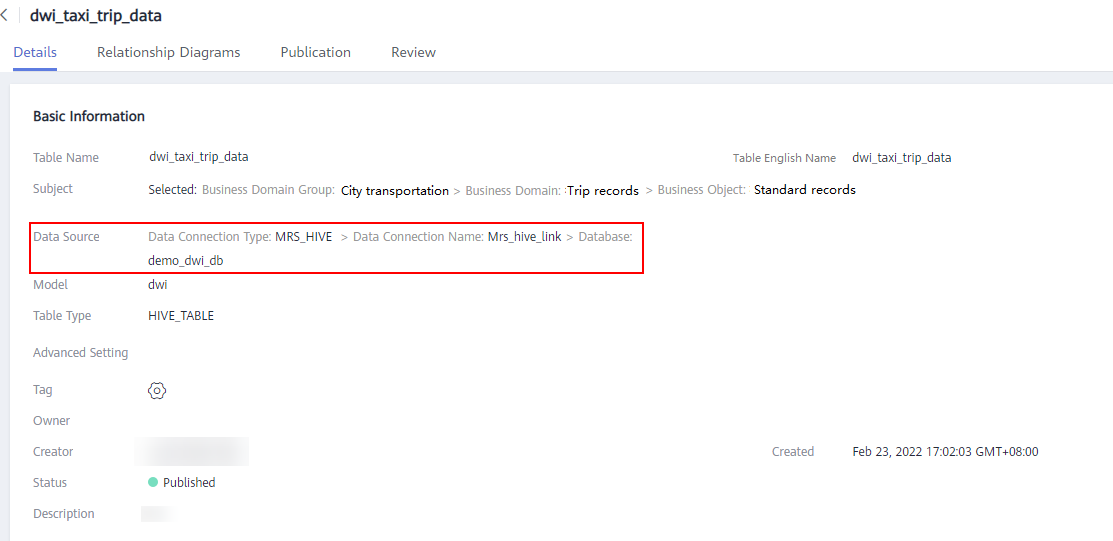
- If all items in Sync Status are displayed as Succeeded, the table is published. Move your mouse pointer to
Creating and Publishing Dimensions for the DWR Layer
During dimension modeling, create three lookup table dimensions (vendor, rate_code, and payment_type) and one hierarchy dimension (date) for the DWR layer.
- On the DataArts Architecture console, choose in the navigation pane on the left.
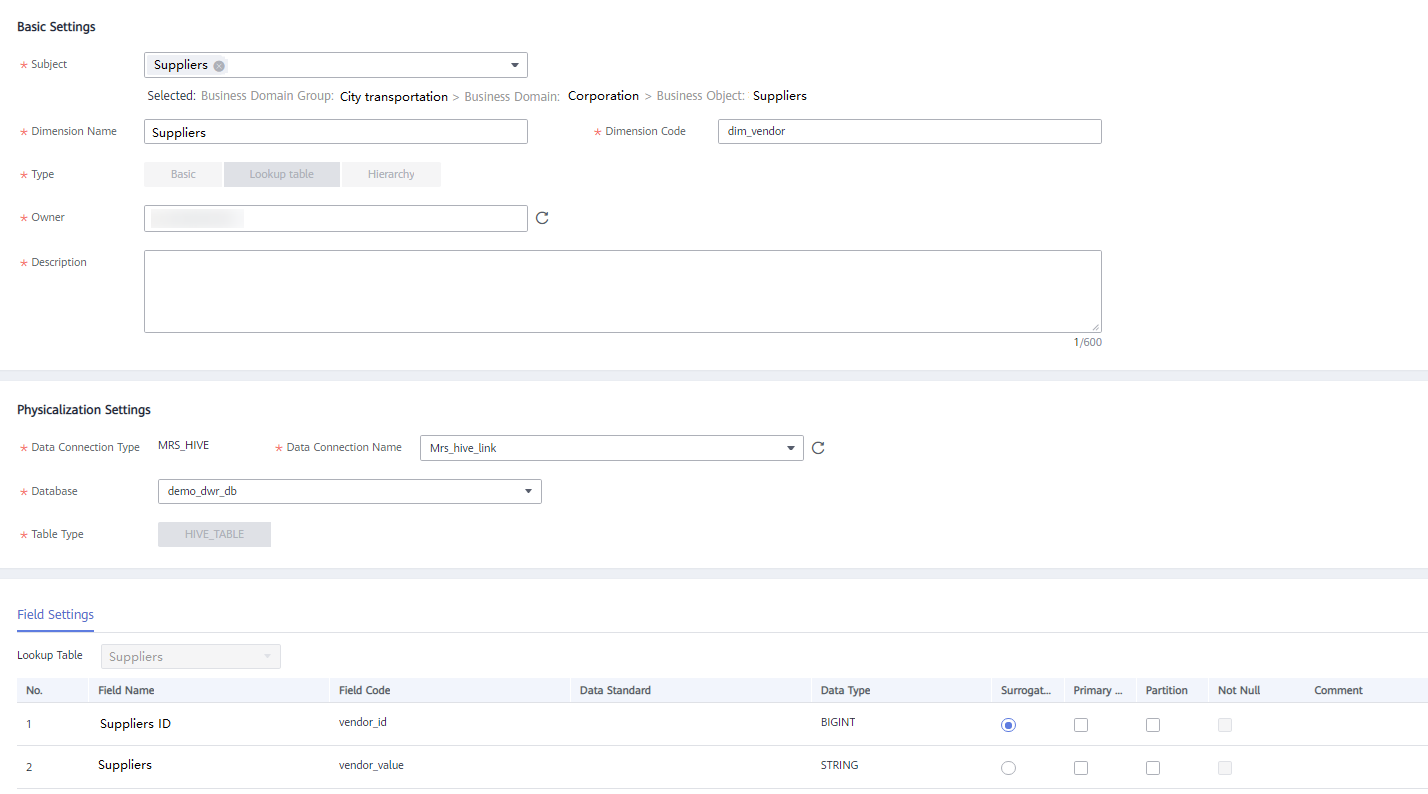
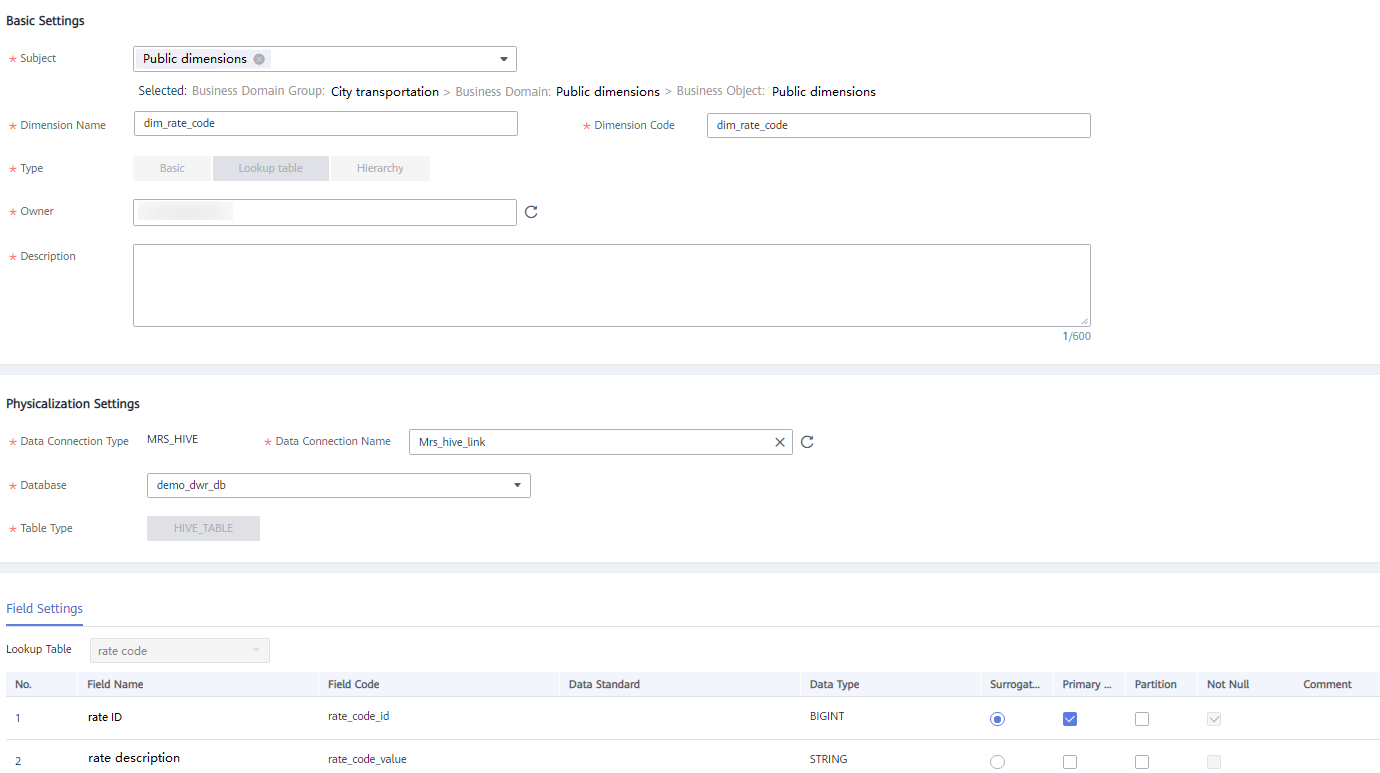
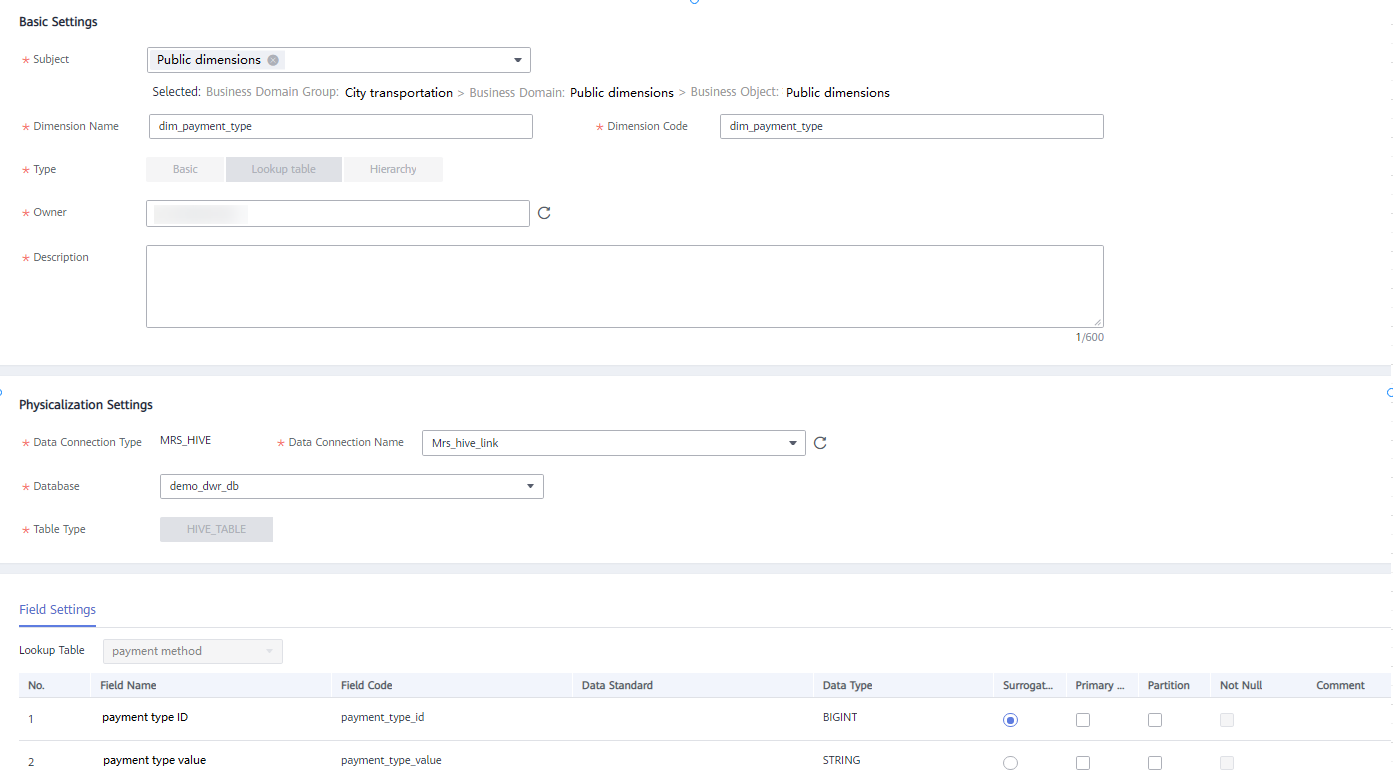
- Create the three lookup table dimensions listed in Table 9.
Table 9 Lookup table dimensions *Subject
*Dimension Name
* Dimension Code
*Type
*Owner
Description
*Data Connection Type
*Data Connection Name
*Database
Lookup Table
vendor
dim_vendor
dim_vendor
Lookup table
-
None
MRS_HIVE
mrs_hive_link
demo_dwr_db
vendor
public_dimension
dim_rate_code
dim_rate_code
Lookup table
-
None
MRS_HIVE
mrs_hive_link
demo_dwr_db
rate
public_dimension
dim_payment_type
dim_payment_type
Lookup table
-
None
MRS_HIVE
mrs_hive_link
demo_dwr_db
payment_type
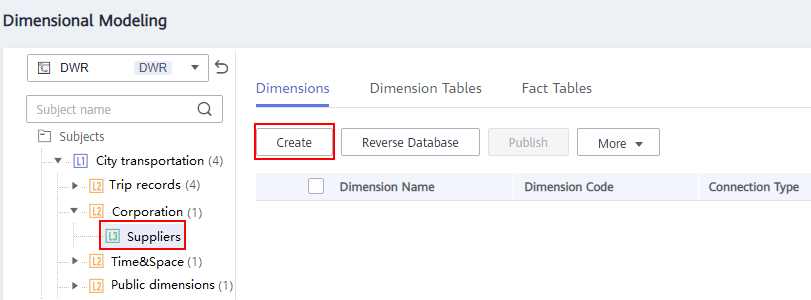
- Click the Dimensions tab, choose in the subject tree, and click Create to create a dimension named dim_vendor.
Figure 35 Dimensional modeling
- On the Create Dimension page, set the parameters as shown in the figure below and click Save.
Figure 36 Creating a dimension named dim_vendor
- Click the Dimensions tab, choose in the subject tree, and click Create to create a dimension named dim_rate_code. On the Create Dimension page, set the parameters as shown in the figure below and click Save.
Figure 37 Creating a dimension named dim_rate_code
- Click the Dimensions tab, choose in the subject tree, and click Create to create a dimension named dim_payment_type. On the Create Dimension page, set the parameters as shown in the figure below and click Save.
Figure 38 Creating a dimension named dim_payment_type
- Click the Dimensions tab, choose in the subject tree, and click Create to create a dimension named dim_vendor.
- Create a hierarchy dimension named dim_date.
- On the Dimensional Modeling tab page, choose in the subject tree. Then click Create on the Dimensions tab page to create a dimension named dim_date.
- Configure the basic settings and physicalization settings as shown in the figure below.
Table 10 Date dimension *Subject
*Dimension Name
* Dimension English Name
*Type
*Owner
Description
*Data Connection Type
*Data Connection Name
*Database
date
dim_date
dim_date
Hierarchy
-
None
MRS_HIVE
mrs_hive_link
demo_dwr_db
Figure 39 Date dimension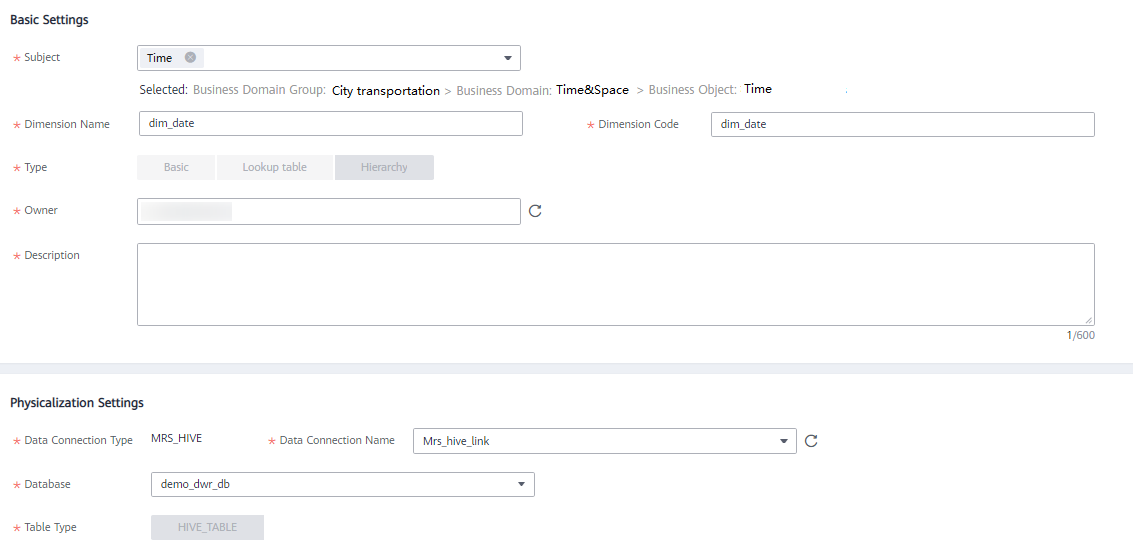
- In the Field Settings area, add fields as described in the table below.
Table 11 Field settings No.
Field Name
Field Code
Data Standard
Data Type
Surrogate Key
Primary Key
Partition
Not Null
1
dim_date_key
dim_date_key
-
TIMESTAMP
Selected
Selected
Not selected
Selected
2
real_time
real_time
-
TIMESTAMP
Not selected
Not selected
Not selected
Not selected
3
minute_id
minute_id
-
BIGINT
Not selected
Not selected
Not selected
Not selected
4
minute
minute
-
BIGINT
Not selected
Not selected
Not selected
Not selected
5
hour_id
hour_id
-
BIGINT
Not selected
Not selected
Not selected
Not selected
6
hour
hour
-
BIGINT
Not selected
Not selected
Not selected
Not selected
7
day_id
day_id
-
BIGINT
Not selected
Not selected
Not selected
Not selected
8
day
day
-
STRING
Not selected
Not selected
Not selected
Not selected
9
month_id
month_id
-
BIGINT
Not selected
Not selected
Not selected
Not selected
10
month
month
-
STRING
Not selected
Not selected
Not selected
Not selected
11
year_id
year_id
-
BIGINT
Not selected
Not selected
Not selected
Not selected
12
year
year
-
BIGINT
Not selected
Not selected
Not selected
Not selected
Figure 40 Field settings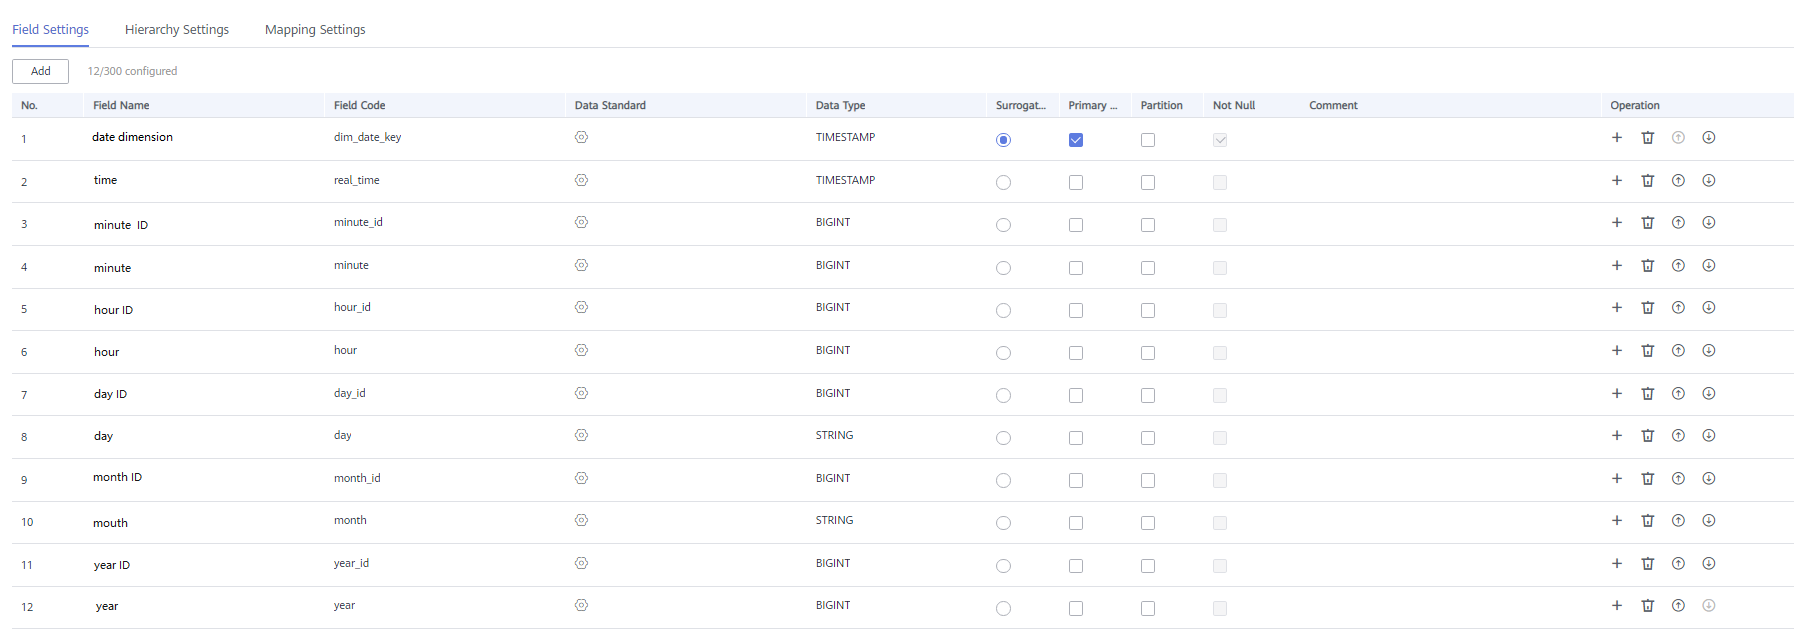
- In the Hierarchy Settings area, click Add to create two layers as shown in the figures below.
Figure 41 Layer 1
 Figure 42 Layer 2
- Click Save.
- Return to the Dimensions tab page, select the four new dimensions in the dimension list, and click Publish.
- In the Apply for Publication dialog box, select a reviewer and click OK. Wait for the reviewer to review the application. If you have the reviewer permissions, select Auto-review and click OK.
- After a dimension is published and approved, the system automatically creates a dimension table for the dimension. The name and code of the dimension table are the same as those of the dimension. On the Dimensional Modeling page, click the Dimension Tables tab to view the created dimension table.
In the dimension table list, you can view Sync Status of the dimension tables.
- If all items in Sync Status are displayed as Succeeded, the dimension is published and the dimension table is created in the database.
- If an item in Sync Status is displayed as Failed, click View History in the row. On the page displayed, click the History tab to view logs. Troubleshoot the fault based on the logs. After the fault is rectified, select the dimension table, click above the dimension table list, and click OK in the dialog box displayed. If the fault persists, contact technical support for assistance.
Figure 43 Sync Status of the dimension tables
Creating and Publishing a Fact Table for the DWR Layer
During dimensional modeling, create a fact table named stroke_order for the DWR layer.
- On the DataArts Architecture console, choose in the navigation pane on the left.
- Click the Fact Tables tab, choose in the subject tree, and click Create to create a fact table named stroke_order.
In the Basic Settings area on the Create Fact Table page, set the following parameters:
- Subject: Subject Area Group: City transportation > Subject Area: Trip records > Business Object: Trip facts
- Table Name: stroke_order
- Table English Name: fact_stroke_order
- Data Connection Type: MRS_HIVE
- Data Connection Name: mrs_hive_link
- Database: demo_dwr_db
- Table Type: HIVE_TABLE
- Owner: an owner in the drop-down list box
- Description: None
In the Field Settings area, choose . In the dialog box displayed, select the dimensions rate_code, vendor, payment_type, and date, and click OK. Choose . In the dialog box displayed, select the dimension date and click OK. In the dimension field list, adjust the sequence of the dimension fields and modify the information about the two date dimensions, as listed in Table 12.
Table 12 Dimension fields No.
Field Name
Field Code
Data Type
Primary Key
Partition
Not Null
Associated Standard
Associated Dimension
Role
Description
1
rate_code_id
rate_code_id
BIGINT
Not selected
Not selected
Not selected
-
rate_code
dim_
-
2
vendor_id
vendor_id
BIGINT
Not selected
Not selected
Not selected
-
vendor
dim_
-
3
payment_type_id
payment_type_id
BIGINT
Not selected
Not selected
Not selected
-
payment_type
dim_
-
4
pickup_date_key
dim_pickup_date_key
TIMESTAMP
Not selected
Not selected
Not selected
-
Date
dim_pickup
Date dimension table
5
tpep_dropoff_datetime
dim_dropoff_date_key
TIMESTAMP
Not selected
Not selected
Not selected
-
Date
dim_dropoff
Date dimension table
In the Field Settings area, choose and create the fields listed in Table 13 in sequence.
Table 13 Measure fields No.
Field Name
Field Code
Data Type
Primary Key
Partition
Not Null
Associated Standard
6
pu_location_id
pu_location_id
STRING
Not selected
Not selected
Not selected
-
7
do_location_id
do_location_id
STRING
Not selected
Not selected
Not selected
-
8
fare_amount
fare_amount
DECIMAL (10,2)
Not selected
Not selected
Not selected
-
9
extra
extra
DECIMAL (10,2)
Not selected
Not selected
Not selected
-
10
mta_tax
mta_tax
DECIMAL (10,2)
Not selected
Not selected
Not selected
-
11
tip_amount
tip_amount
DECIMAL (10,2)
Not selected
Not selected
Not selected
-
12
tolls_amount
tolls_amount
DECIMAL (10,2)
Not selected
Not selected
Not selected
-
13
improvement_surcharge
improvement_surcharge
DECIMAL (10,2)
Not selected
Not selected
Not selected
-
14
total_amount
total_amount
DECIMAL (10,2)
Not selected
Not selected
Not selected
-
Figure 44 Fact table fields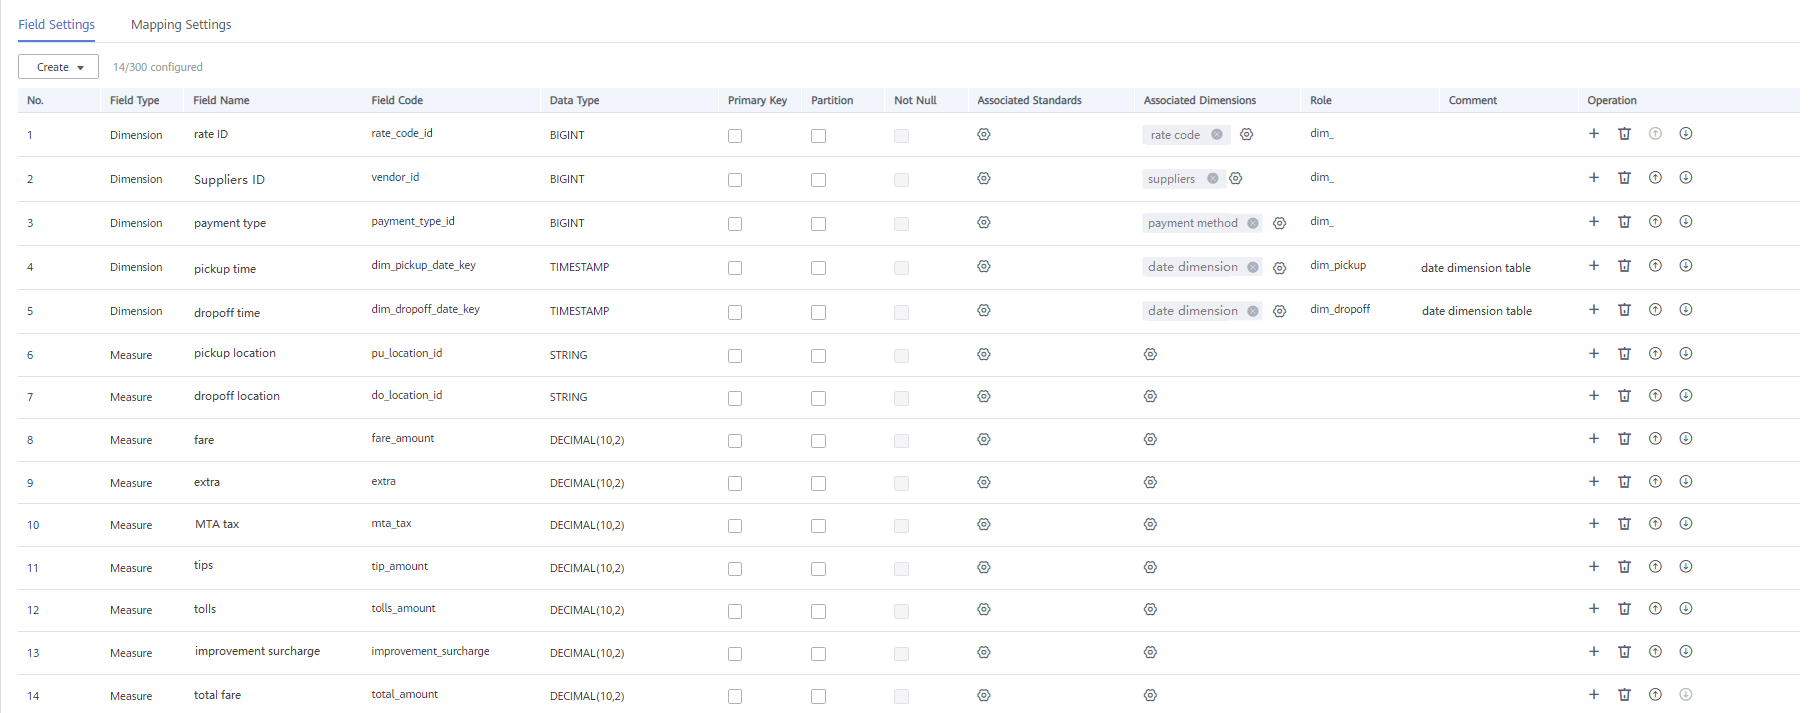
- After the configuration, click Publish.
- In the dialog box displayed, select a reviewer and click OK. Wait for the reviewer to review the application. If you have the reviewer permissions, select Auto-review and click OK.
- Return to the Fact Tables tab page, find the new fact table in the list, and view Sync Status.
- If all items in Sync Status are displayed as Succeeded, the fact table is published and created in the database.
- If an item in Sync Status is displayed as Failed, choose . On the page displayed, click the History tab to view logs. Troubleshoot the fault based on the logs. After the fault is rectified, choose above the fact table list, and click OK in the dialog box displayed. If the fault persists, contact technical support for assistance.
Creating and Publishing Technical Metrics
In this example, you need to create the technical metrics listed in Table 14 and Table 15.
|
*Metric Name |
* Metric Code |
Data Table |
*Subject |
*Expression |
Description |
|---|---|---|---|---|---|
|
sum_total_amount |
sum_total_amount |
Itinerary order |
stroke_fact |
sum (total amount) |
None |
|
Metric |
*Data Table |
*Subject |
*Atomic Metric |
Statistical Dimension |
Time Filter |
General Filter |
|---|---|---|---|---|---|---|
|
total_amount_(payment_type) |
Itinerary order |
stroke_statistic |
total_amount |
payment_type |
None |
None |
|
total_amount_(rate_code) |
Itinerary order |
stroke_statistic |
total_amount |
rate_code |
None |
None |
|
total_amount_(vendor,stroke_order.dim_dropoff_date_key) |
Itinerary order |
stroke_statistic |
total_amount |
vendor and stroke_order.dim_dropoff_date_key |
None |
None |
- On the DataArts Architecture console, choose in the navigation pane on the left.
- Create an atomic metric named total_amount to collect statistics on fares.
- Click the Atomic Metrics tab and click Create.
- On the Create Atomic Metric page, set the parameters as shown in the figure below and click Publish.
Figure 45 Creating an atomic metric
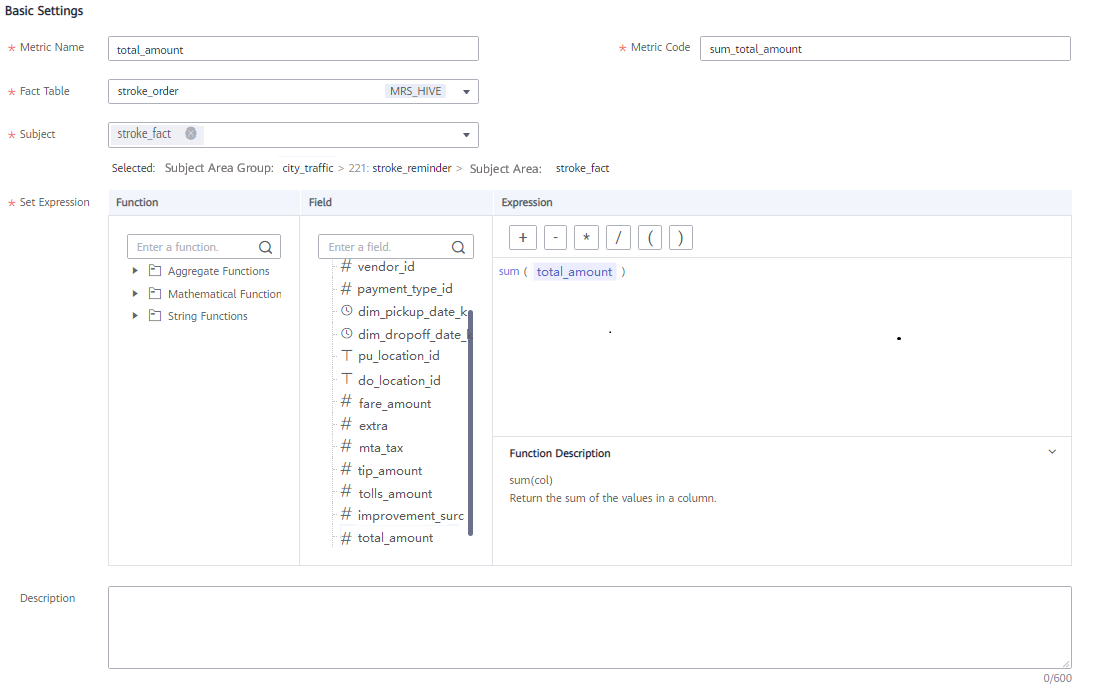
- Wait for the reviewer to review the application. After the application is approved, the atomic metric will be created.
- Create three derivative metrics.
- Create total_amount_(payment_type) to collect statistics on the total fares based on payment_type.
On the Technical Metrics page, click the Derivative Metrics tab and click Create. On the Create Derivative Metric page, set the parameters as shown in the figure below. After the configuration is complete, click Trial Run. In the dialog box displayed, click Execute. If the trial running is successful, click Save.
Figure 46 Creating a derivative metric named total_amount_(payment_type)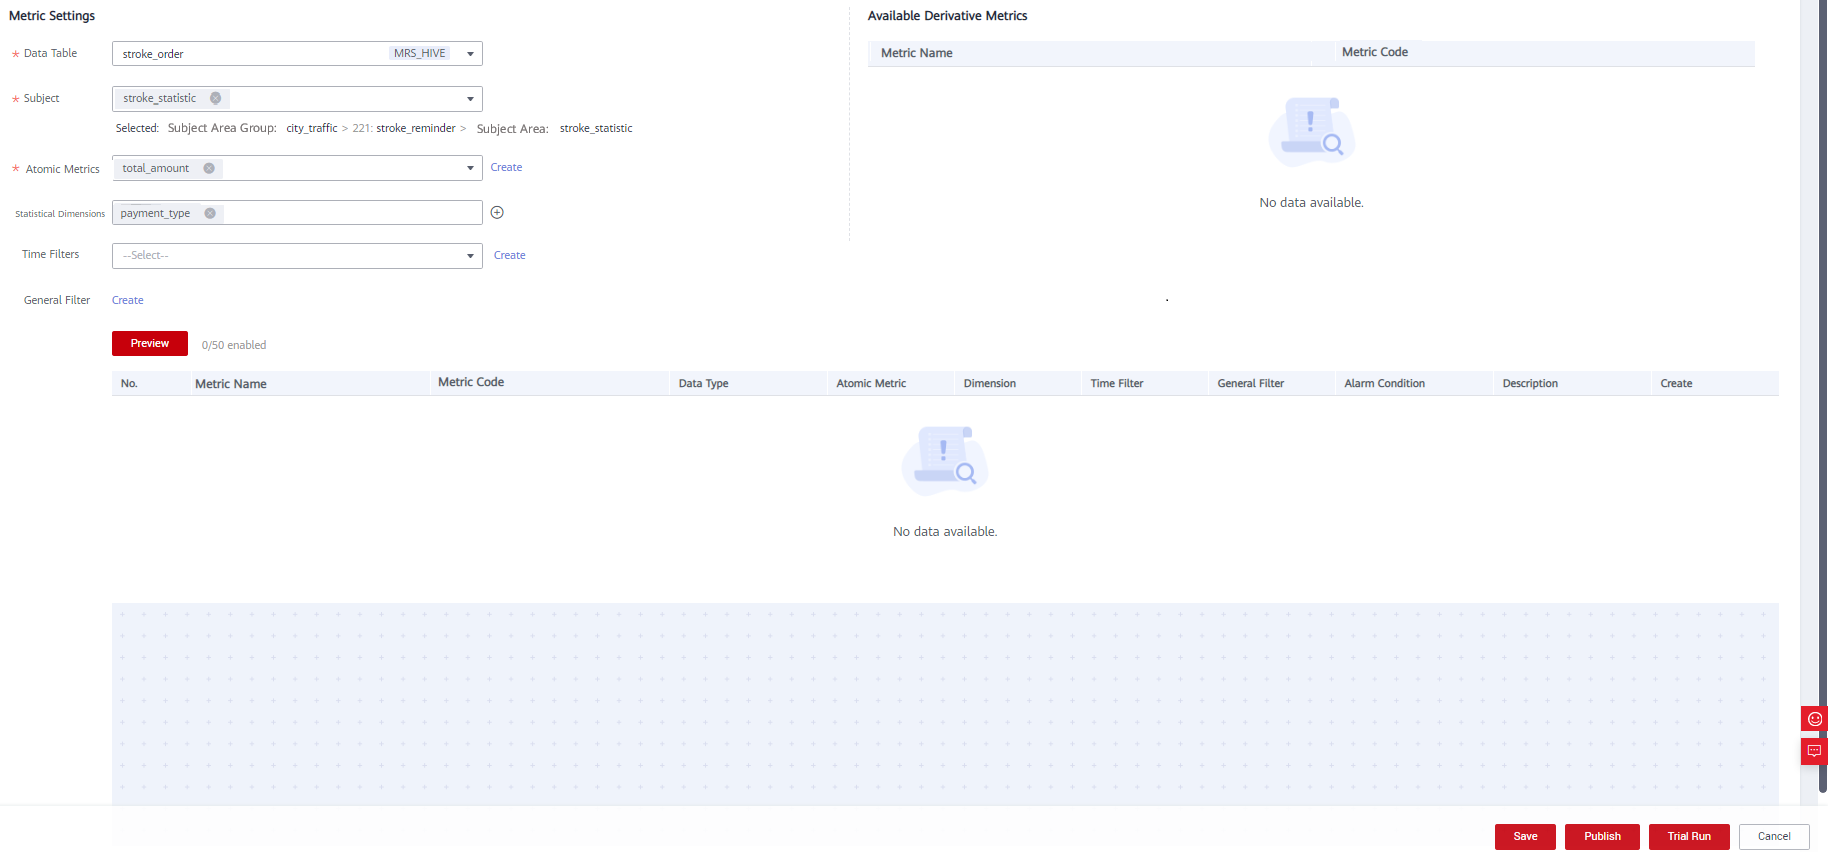
- Create total_amount_(rate_code) to collect statistics on the total fares based on rate_code.
On the Technical Metrics page, click the Derivative Metrics tab and click Create. On the Create Derivative Metric page, set the parameters as shown in the figure below. After the configuration is complete, click Trial Run. In the dialog box displayed, click Execute. If the trial running is successful, click Save.
Figure 47 Creating a derivative metric named total_amount_(rate_code)
- Create total_amount_(vendor,stroke_order.dim_dropoff_date_key) to collect statistics on the total fares based on vendor.
On the Technical Metrics page, click the Derivative Metrics tab and click Create. On the Create Derivative Metric page, set the parameters as shown in the figure below. After the configuration is complete, click Trial Run. In the dialog box displayed, click Execute. If the trial running is successful, click Save.
Figure 48 Creating a derivative metric named total_amount_(vendor,stroke_order.dim_dropoff_date_key)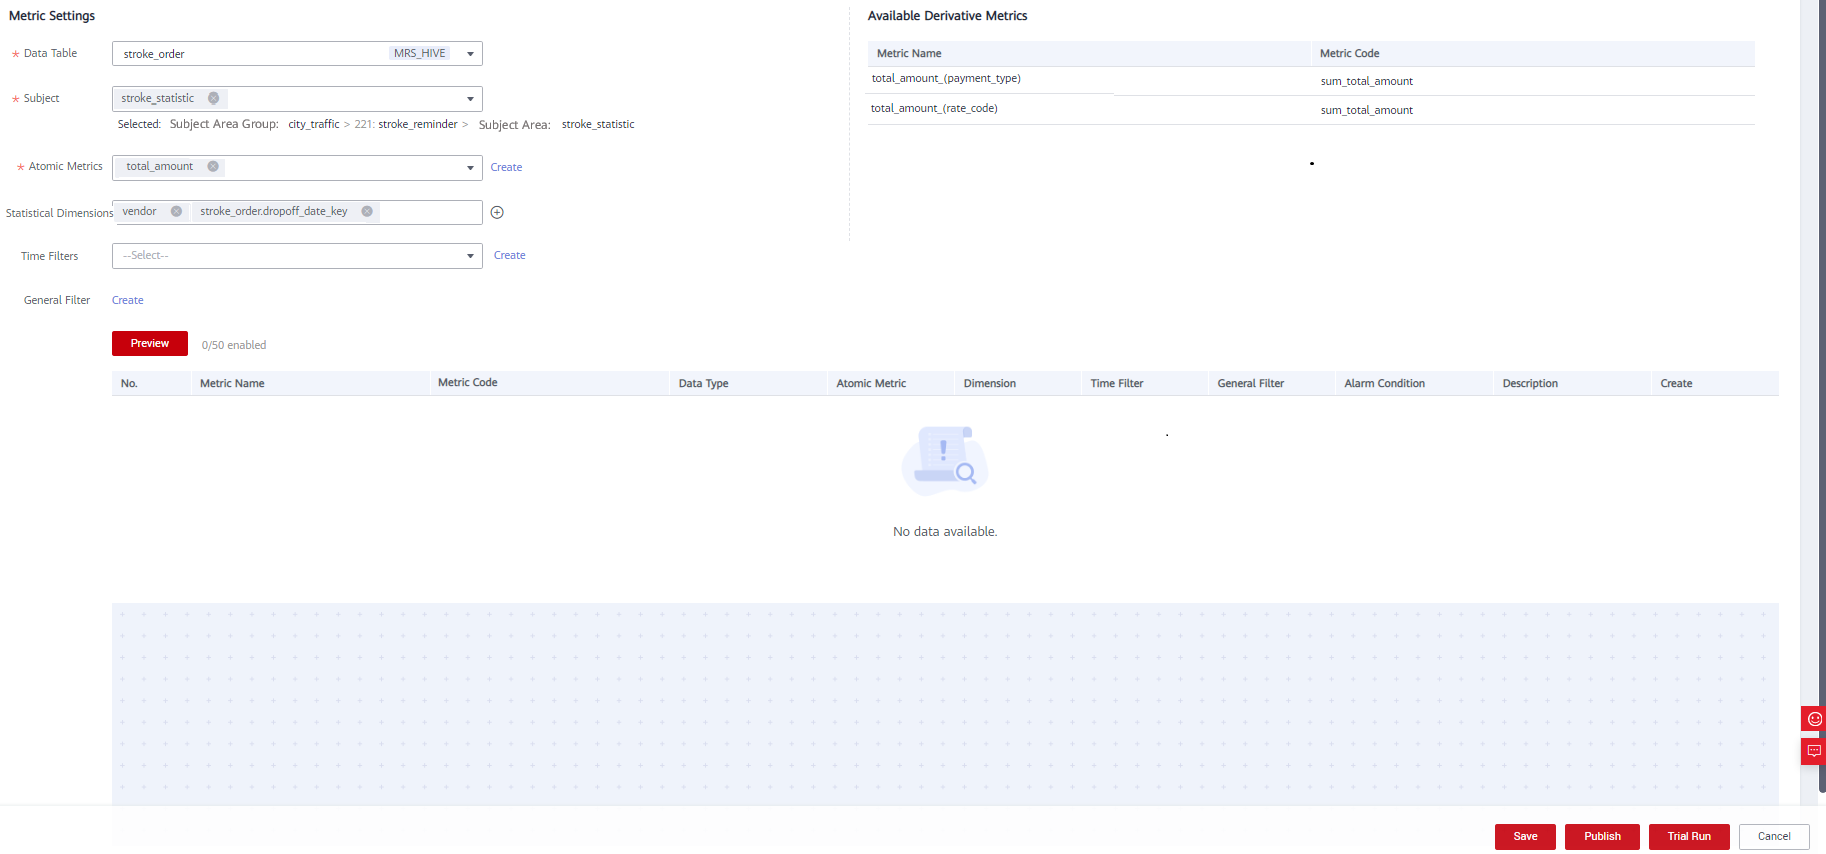
- Create total_amount_(payment_type) to collect statistics on the total fares based on payment_type.
- Return to the Derivative Metrics tab page, select the three derivative metrics and click Publish. In the dialog box displayed, select a reviewer and click OK. Wait for the reviewer to review the application. If you have the reviewer permissions, select Auto-review and click OK.
Data Mart: Creating and Publishing Summary Tables for the DM Layer
Create the three summary tables listed in Table 16 for the DM layer.
|
*Subject |
*Table Name |
* Table English Name |
Statistical Dimension |
Data Connection Type |
*Data Connection Name |
*Database |
Owner |
Description |
|---|---|---|---|---|---|---|---|---|
|
stroke_statistic |
dws_payment_type |
dws_payment_type |
payment_type |
MRS_HIVE |
mrs_hive_link |
demo_dm_db |
- |
None |
|
stroke_statistic |
dws_rate_code |
dws_rate_code |
rate_code |
MRS_HIVE |
mrs_hive_link |
demo_dm_db |
- |
None |
|
stroke_statistics |
dws_vendor |
dws_vendor |
vendor and stroke_order.dim_dropoff_date_key |
MRS_HIVE |
mrs_hive_link |
demo_dm_db |
- |
None |
- On the DataArts Architecture console, choose Data Mart in the navigation pane on the left.
- Click the Summary Tables tab.
- Create three summary tables: payment_type, rate_code, and vendor.
- On the Summary Tables page, choose in the directory tree, and click Create to create a summary table named dws_payment_type. On the Create Summary Table page, set the parameters and click Save.
Set the basic settings as shown in the figure below.
Figure 49 Creating a summary table named dws_payment_type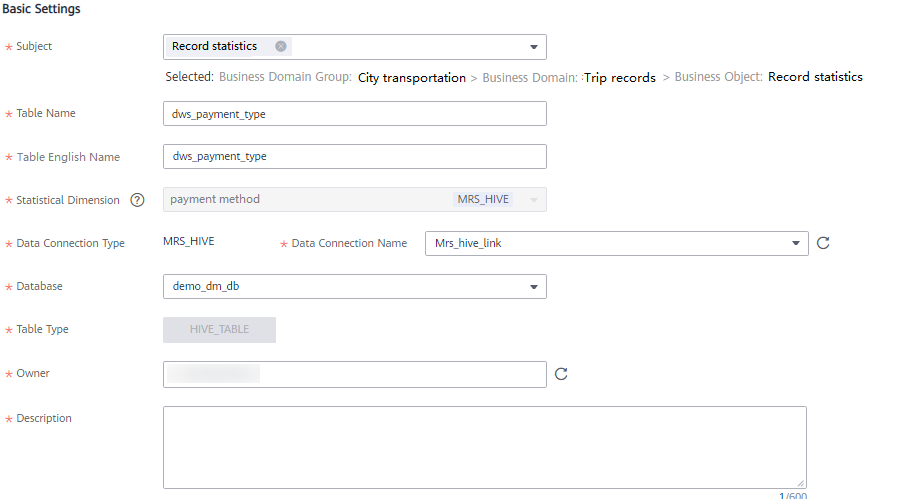
On the Field Settings tab page, click Add, enter the time field name, and select the data type.
Figure 50 Field settings
On the Field Settings tab page, click Add to add the derivative metric total_amount_(payment_mode). Set associated objects and select corresponding metrics. You can add only published derivative or compound metrics that are associated with the specified statistical dimension.
Figure 51 Field settings
Click Save.
- On the Summary Tables page, choose in the directory tree, and click Create to create a summary table named dws_rate_code. On the Create Summary Table page, set the parameters and click Save.
Figure 52 Creating a summary table named dws_rate_code (Basic Settings)
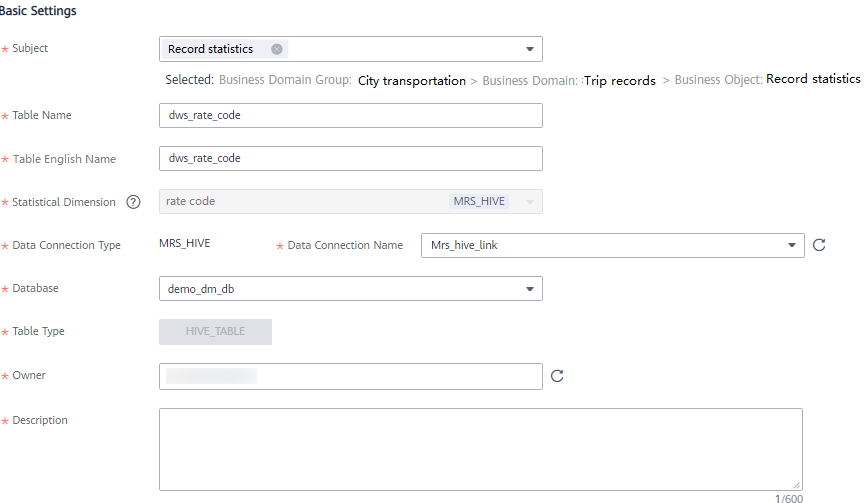 Figure 53 Creating a summary table named dws_rate_code (Field Settings)
- On the Summary Tables page, choose in the directory tree, and click Create to create a summary table named dws_vendor. On the Create Summary Table page, set the parameters and click Save.
Figure 54 Creating a summary table named dws_vendor (Basic Settings)
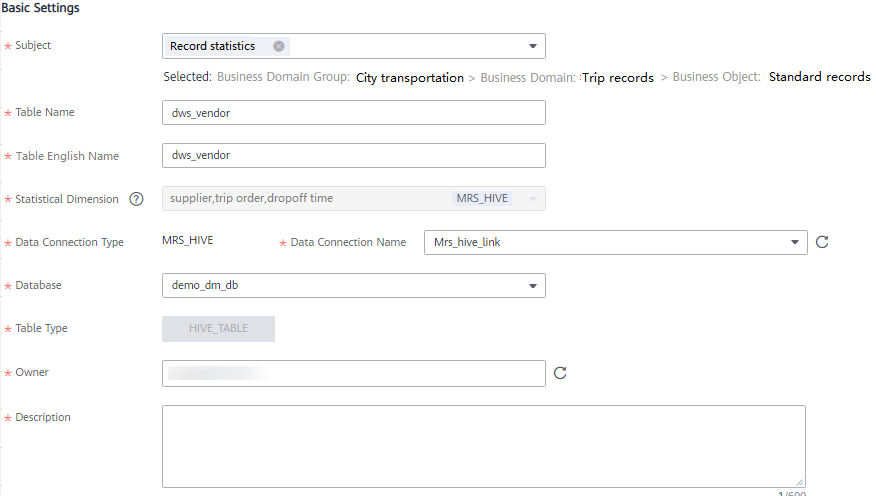 Figure 55 Creating a summary table named dws_vendor (Field Settings)
- On the Summary Tables page, choose in the directory tree, and click Create to create a summary table named dws_payment_type. On the Create Summary Table page, set the parameters and click Save.
- Return to the Summary Tables tab page, select the three new summary tables, and click Publish.
- In the dialog box displayed, select a reviewer and click OK. After the reviewer approves the publishing application, the summary table is automatically created. If you have the reviewer permissions, select Auto-review and click OK.
- Return to the Summary Tables tab page, find the new summary tables in the list, and view Sync Status.
- If all items in Sync Status are displayed as Succeeded, the summary tables are published and created in the database.
- If an item in Sync Status is displayed as Failed, choose in the row. On the page displayed, click the History tab to view logs. Troubleshoot the fault based on the logs. After the fault is rectified, choose above the summary table list, and click OK in the dialog box displayed. If the fault persists, contact technical support for assistance.
Reviewing an Application
- Log in to the DataArts Studio console as a reviewer. Locate the created DataArts Studio instance and click Access. In the workspace list, locate the target workspace and click DataArts Architecture.
- Choose in the left navigation pane, click the Pending Review tab, select the objects to be reviewed in the list, and click Review above the list.
- Enter review comments and click Accept.
Feedback
Was this page helpful?
Provide feedbackThank you very much for your feedback. We will continue working to improve the documentation.


