Copied.
Example: Using ALT to Promote a Read Replica to Primary
This section describes how to use ALT to promote a read replica to primary. The process for minor version upgrades and specification changes is similar.
Constraints
If workloads are interrupted, see Precautions.
Prerequisites
Operations in Buying a DB Instance have been completed.
Procedure
Step 1: Create a Proxy Instance
- Log in to the TaurusDB console.
- Click
 in the upper left corner and select a region and project.
 - On the Instances page, click the instance name.
- In the navigation pane, choose Database Proxy.
- Click Create Proxy Instance.
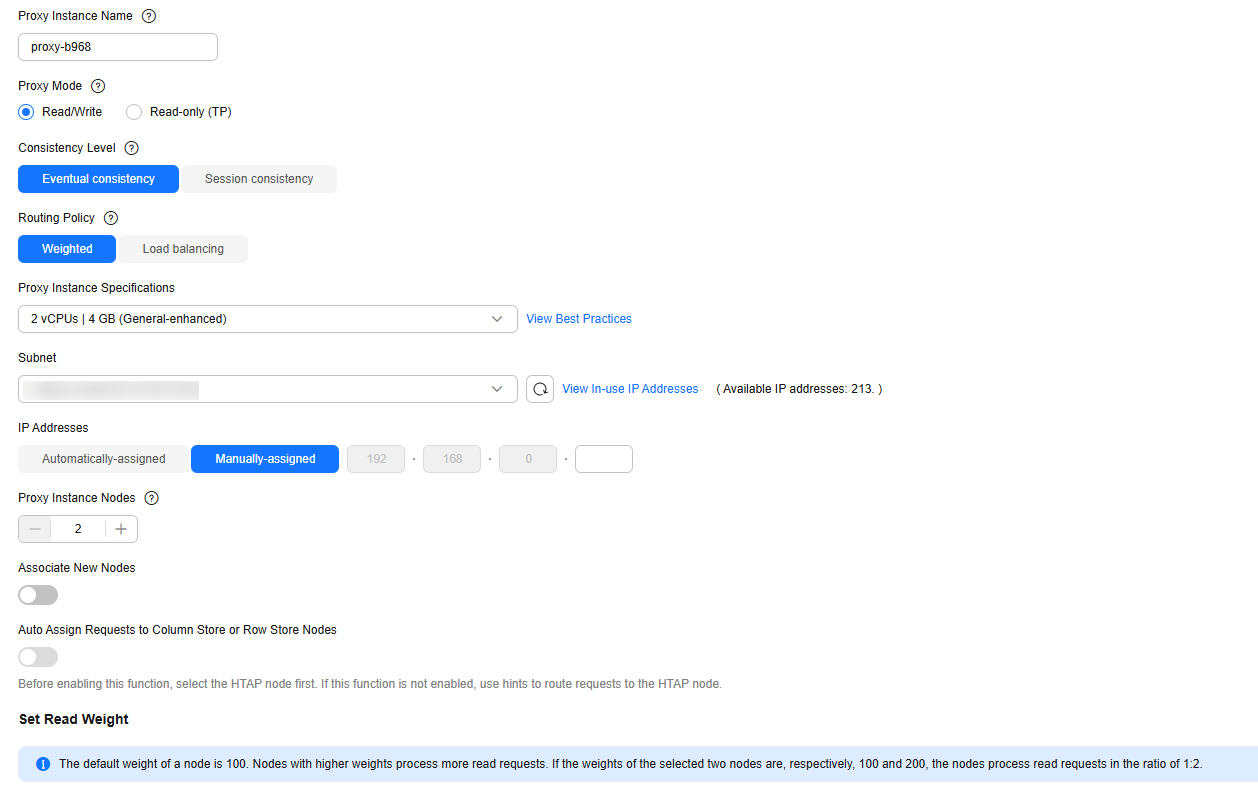
- On the displayed page, set required parameters and click Next.
Figure 1 Creating a proxy instance

Table 1 Parameter description Parameter
Description
Proxy Instance Name
The name can consist of 4 to 64 characters and must start with a letter. Only letters (case-sensitive), digits, hyphens (-), and underscores (_) are allowed.
Proxy Mode
You can select Read/Write, Read-only (TP), or Read-only (AP) as needed.
- Read/Write: All write requests are forwarded only to the primary node, and all read requests are forwarded to the selected nodes based on the read weights or active connections. The default read weight of a node is 100.
- Read-only (TP): Write requests are not forwarded to any node. All read requests are forwarded to the selected read replicas based on the read weights or active connections. The read requests are not forwarded to the primary node, even if the primary node is selected.
- Only read requests are supported in the read-only (TP) mode. If write requests are forwarded to any node, an error message is displayed.
- DDL, DML, and temporary table operations are not supported in the read-only (TP) mode.
- Read-only (AP): Write requests are not forwarded to any node. All read requests are forwarded to the selected nodes based on the read weights. This mode is in the OBT phase. To use it, submit a service ticket.
- Only the weighted routing policy is supported in the read-only (AP) mode. The weights of AP nodes cannot be all 0.
- Binlog pull is not supported.
- Session consistency is not supported. Only eventual consistency is supported.
- Transaction splitting is not supported.
- The feature for assigning requests to row and column store nodes is not supported.
- Session-level connection pooling is not supported.
- ALT is not supported.
- New nodes cannot be automatically associated with a proxy instance.
- Multi-primary instances do not support the read-only (AP) mode.
Consistency Level
The consistency level can only be configured when the kernel version of your TaurusDB instance is 2.0.28.1 or later. For details about how to check the kernel version, see How Can I Check the Version of a TaurusDB Instance?
Value:
- Eventual consistency
After a proxy instance is created, requests for SELECT operations are routed to different nodes based on their read weights. Because there is a replication latency between the primary node and each read replica and the replication latency varies for different read replicas, the result returned by each SELECT statement may be different when you repeatedly execute a SELECT statement within a session. In this case, only eventual consistency is ensured.
To offload read requests from the primary node to read replicas, you can select eventual consistency.
- Session consistency
To eliminate data inconsistencies caused by eventual consistency, session consistency is provided. Session consistency ensures the result returned by each SELECT statement in a session is the data that was updated after the last write request.
To use session consistency, the kernel version of your proxy instance must be 2.7.4.0 or later.
- Global consistency
Global consistency ensures data consistency in different sessions. It means that once data is written, you can immediately query the updated data.
You can select global consistency when there are more read operations than write operations.
Global consistency is only available when the TaurusDB instance kernel is 2.0.57.240900 or later and the proxy instance kernel is 2.25.06.000 or later.
For more information about consistency levels, see Changing the Consistency Level of a Proxy Instance.
Routing Policy
Value:
- Weighted: Read requests are assigned to nodes based on the weights you specify.
- Load balancing: Read requests are assigned to nodes with fewer active connections.
To use load balancing, the kernel version of your proxy instance must be 2.22.07.000 or later.
For more information about routing policies, see Changing the Routing Policy of a Proxy Instance.
Proxy Instance Specifications
You can select the proxy instance specifications as needed.
- Kunpeng general computing-plus: 2 vCPUs | 4 GB, 4 vCPUs | 8 GB, and 8 vCPUs | 16 GB
- General-enhanced: 2 vCPUs | 4 GB, 4 vCPUs | 8 GB, and 8 vCPUs | 16 GB
Subnet
This function is in the OBT phase. To use it, submit a service ticket.
When creating a proxy instance, you can specify a subnet for the proxy instance. If the subnet where the TaurusDB instance is associated with is a secondary CIDR block, you can only select the same subnet as the TaurusDB instance for the proxy instance.
IP Addresses
IPv4 addresses can be automatically or manually assigned.
- Automatically-assigned: When you create a proxy instance, TaurusDB automatically assigns an IPv4 proxy address.
- Manually-assigned: You can enter an idle IPv4 address within the subnet CIDR block as the proxy address of the TaurusDB instance. You can click View In-use IP Addresses to view the IP addresses that have been used.
Proxy Instance Nodes
You can enter an integer from 2 to 16. The default value is 2.
Number of recommended proxy instance nodes = (Number of vCPUs of the primary node + Total number of vCPUs of all read replicas)/(4 x Number of vCPUs of the proxy instance), rounded up.
Associate New Nodes
After Associate New Nodes is enabled, new read replicas will be automatically associated with the proxy instance.
New Node Weight
If Routing Policy is Weighted, you need to configure read weights for the new nodes. The default weight of a node is 100. Nodes with higher weights process more read requests.
Auto Assign Requests to Column Store or Row Store Nodes
After this function is enabled, a proxy instance distributes requests based on the actual execution cost of a SQL statement to maximize the query performance. For details about the usage and constraints, see Enabling Request Distribution Among Row Store and Column Store Nodes for Complex OLAP Queries.
Database Nodes
Select nodes to be associated with the proxy instance for processing read requests. The nodes displayed in the list include TaurusDB nodes (the primary node and read replicas) and HTAP nodes (BE nodes and FE nodes).
- If Routing Policy is Load balancing, you do not need to configure read weights for selected nodes. Read requests are forwarded to nodes with fewer active connections.
- If Routing Policy is Weighted, you need to configure read weights of the primary node and read replicas. Read requests are forwarded to nodes based on the weights you specify.
For example, read weights assigned to one primary node and two read replicas are 100, 200, and 200, respectively.
In the read/write mode, the primary node and two read replicas process read requests in the ratio of 1:2:2. The primary node processes 20% of read requests, and each read replica processes 40% of read requests. Write requests are automatically routed to the primary node.
In the read-only mode, the read weight of the primary node does not take effect, and the two read replicas process 50% of read requests, respectively.
- Confirm the proxy instance configuration.
- If you need to modify your settings, click Previous.
- If you do not need to modify your settings, click Submit.
- View the proxy instance and associated nodes.
After the proxy instance creation is complete, you can view the created proxy instance on the Database Proxy page.
Figure 2 Viewing the created proxy instance
Click Basic Information in the navigation pane. Click
 in the upper right corner of the page and select View Instance Topology. In the instance topology, you can view the database nodes associated with the proxy instance. You can move the pointer to a node name to view its details.Figure 3 Viewing information about nodes associated with a proxy instance
Step 2: Enable ALT
- Log in to the TaurusDB console.
- Click
 in the upper left corner and select a region and project.
 - On the Instances page, click the instance name.
- In the navigation pane, choose Database Proxy.
- Click a proxy instance to go to the Basic Information page.
- In the Proxy Instance Information area, click
 under ALT.
 - In the displayed dialog box, click OK.
Figure 4 Enabling ALT

To disable ALT, click
 . Disabling ALT will cause the proxy instance to reboot. Once ALT is disabled for all proxy instances, the TaurusDB instance will also reboot.
 - On the Basic Information page of the proxy instance, check that the proxy instance status changes from ALT is being configured to Available.
Step 3: Connect Your Application to the Proxy Instance
- View the proxy address and port on the TaurusDB console.
Click the TaurusDB instance name. In the navigation pane, choose Database Proxy. In the proxy instance list, view the proxy address and port.
Figure 5 Viewing a proxy address and port
- Log in to an ECS.
For details, see Elastic Cloud Server User Guide.
- Run the following command to connect to the TaurusDB instance through the proxy address:
mysql -h host -P port -u userName -p
Example:
mysql -h 192.168.0.61 -P 3306 -u root -p
Enter the password of the database account if the following information is displayed:Enter password:
Step 4: Promote a Read Replica to Primary
- Log in to the TaurusDB console.
- Click
 in the upper left corner and select a region and project.
 - On the Instances page, click the instance name to go to the Basic Information page.
- In the Node List area, locate the read replica to be promoted and click Promote to Primary in the Operation column.
Figure 6 Promoting a read replica to the new primary node

- In the displayed dialog box, click Yes.
- During a manual switchover, there may be a brief disconnection lasting about 30 seconds. Ensure that your applications support automatic reconnection.
- During a manual switchover, the DB instance status is Promoting to primary and this process takes several seconds or minutes.
- If you have enabled operation protection, click Send Code in the displayed Identity Verification dialog box and enter the obtained verification code. Then, click OK.
Two-factor authentication improves the security of your account. For details about how to enable operation protection, see Identity and Access Management User Guide.
- After a switchover is complete, the node types of the original primary node and read replica have been exchanged, and the read replica status changes to Available.
Step 5: Test the ALT Effect
If ALT is enabled and you promote a read replica to primary using sysbench, tpcc-mysql, or the mysql client that is connected to the proxy address, your database only freezes briefly.
The following figures show you what effect ALT has when you promote a read replica to primary using sysbench, tpcc-mysql, and the mysql client.
- Promoting a read replica to primary using sysbench

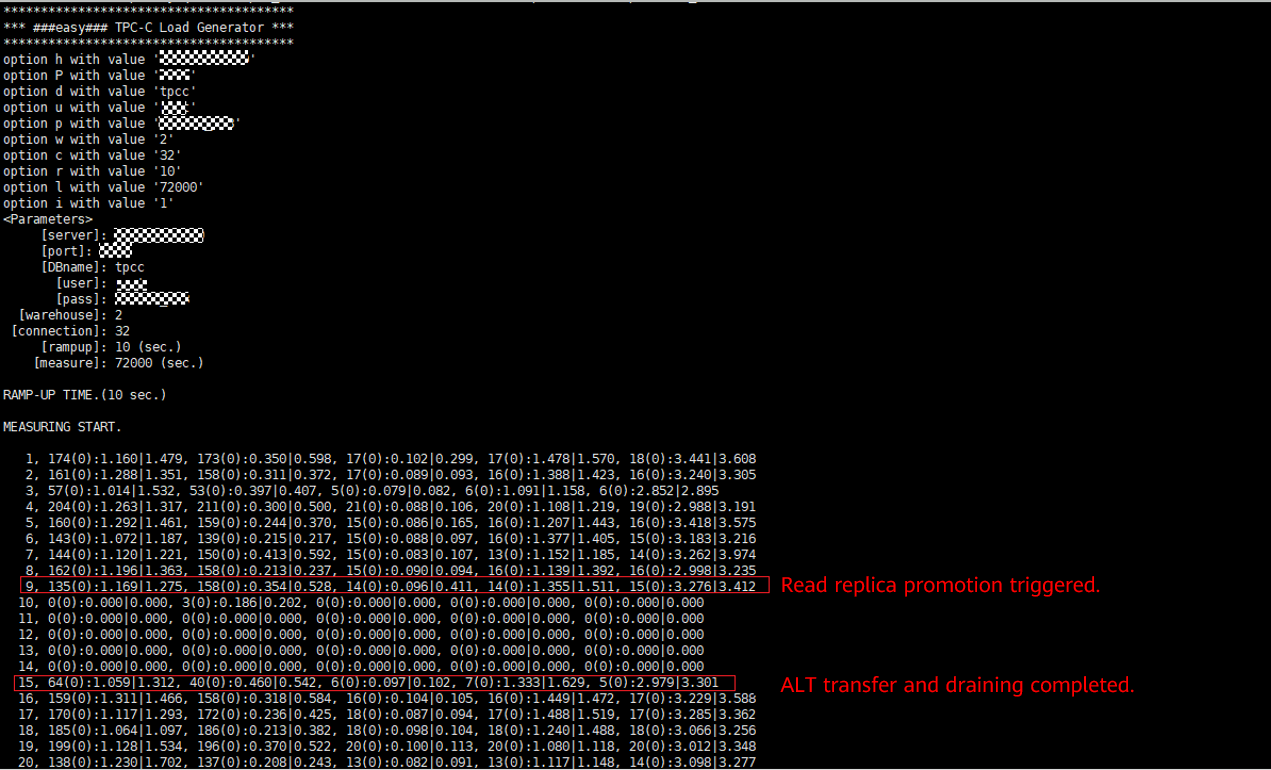
- Promoting a read replica to primary using tpcc-mysql

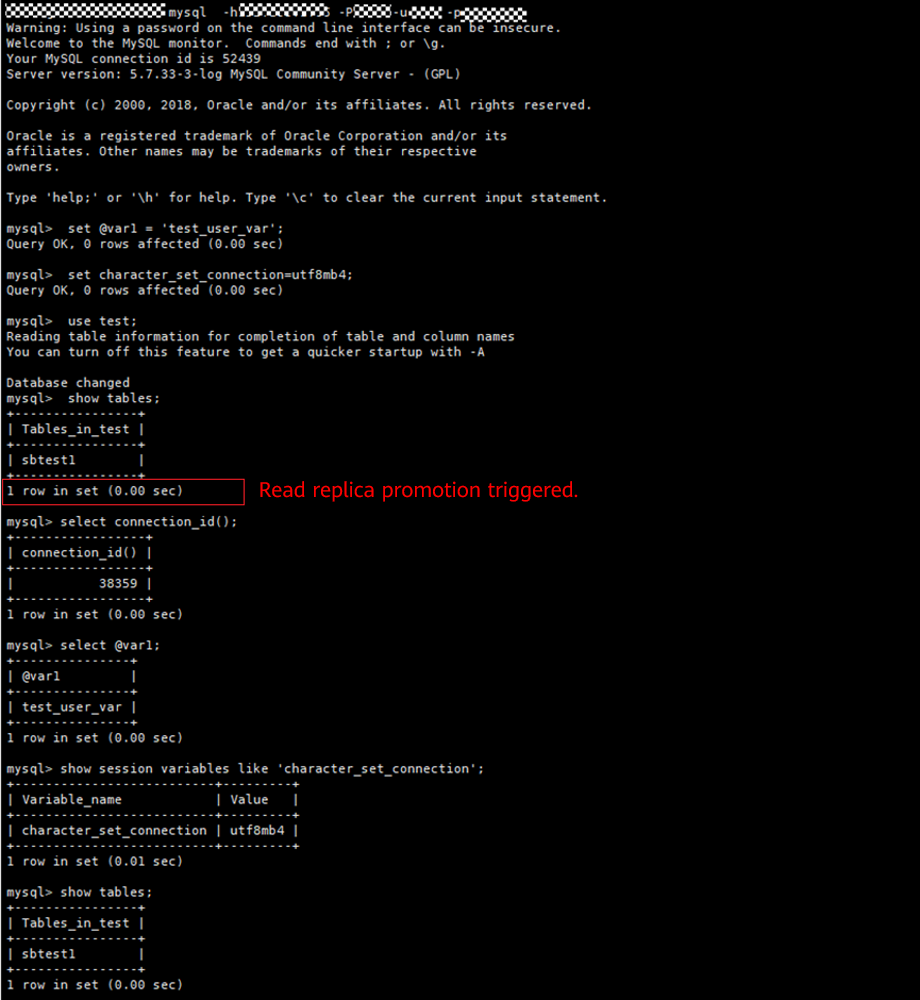
- Promoting a read replica to primary using the MySQL CLI
As shown in the following figure, user-defined variables, session variables, and databases remain unchanged before and after you promote a read replica to primary.

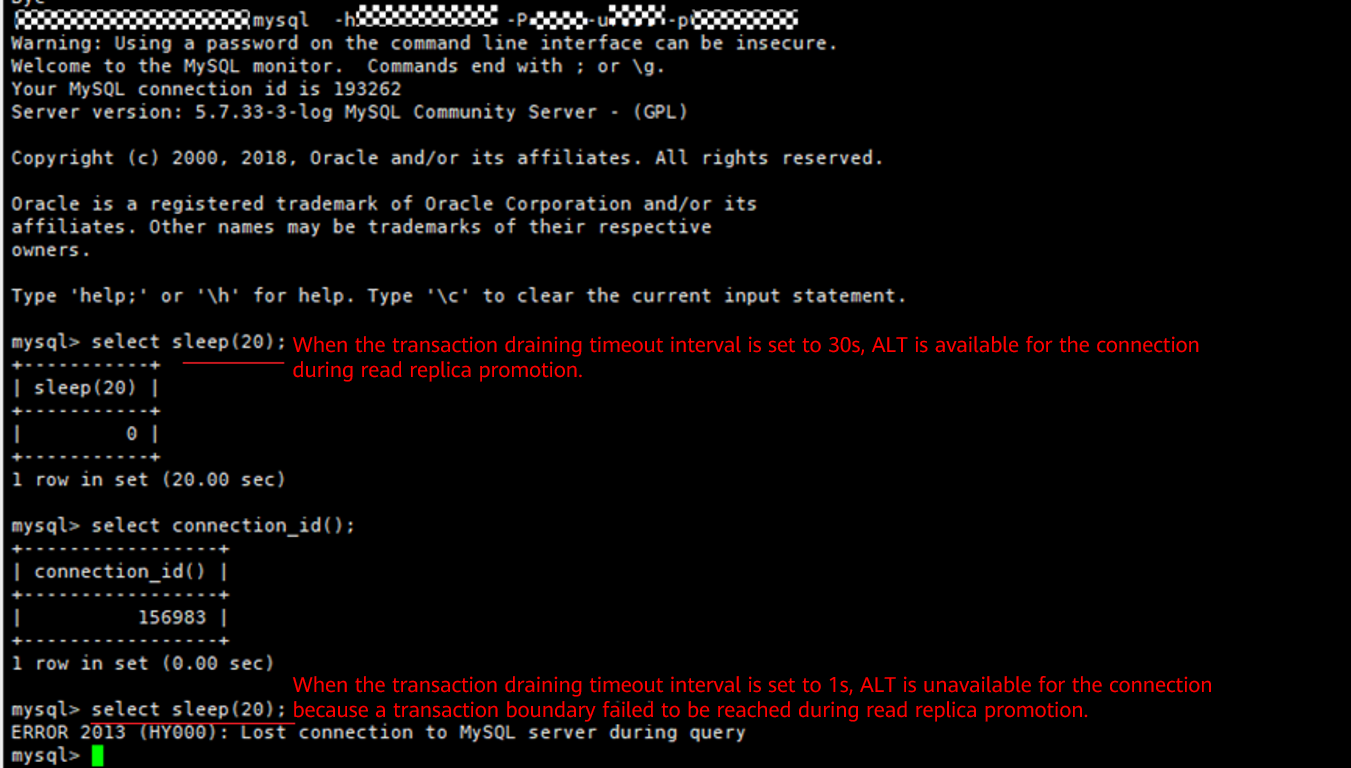
The following figure shows how the transaction draining timeout interval determines whether ALT is available for the current session.

Feedback
Was this page helpful?
Provide feedbackThank you very much for your feedback. We will continue working to improve the documentation.See the reply and handling status in My Cloud VOC.
For any further questions, feel free to contact us through the chatbot.
Chatbot


