
Configuring a Change-triggered Pipeline
Microservice
Microservices are a software governance architecture. A complex software project consists of one or more microservices. Microservices in a system are loosely coupled. Each microservice is independently developed, verified, deployed, and released. Changes can be used to meet requirements and fix vulnerabilities. A change belongs to only one microservice. In microservices, you can create change-triggered pipelines to associate them with change resources and release changes for quick project delivery.
Microservices have the following benefits:
- Specialized: Each microservice focuses on a specific function. It is relatively easy to develop and maintain a single microservice.
- Independently deployable: A microservice is independently deployed and updated without affecting the whole system.
- Tech-diverse: For microservices architectures, different services communicate over RESTful APIs. You can choose the desired technology for each service.
A change-triggered pipeline has the following features:
- A microservice can have only one change-triggered pipeline.
- An integration branch is automatically created during the execution of the change-triggered pipeline. After successful execution, the branch content is merged to the master branch.
- After successful execution, the change status is automatically updated.
- Only one pipeline instance can run at one time.
- A change-triggered pipeline cannot be triggered by an event or at a specified time.
Notes and Constraints
- When you create a microservice, if you set Pipeline Source to None, after the microservice is created, you can click its name to associate it with a pipeline source on the Overview page.
- A repository can be associated with only one microservice.
- After creating a microservice, when you change its code repository, if there are unclosed changes or running pipelines in the microservice, the Data Processing window will be displayed. In that case, close all changes and stop all running pipelines.
Prerequisites
- You have enabled and authorized CodeArts Pipeline.
- Your role is a project administrator or pipeline creator. For details about how to configure permissions, see Authorizing CodeArts Pipeline.
Creating a Microservice
- Access the CodeArts Pipeline homepage through a project.
- Click the Microservices tab.
- Click Create Microservice. On the displayed page, configure parameters.
Table 1 Microservice parameters Parameter
Description
Example Value
Project
Project to which the microservice belongs. The project cannot be changed.
The default value is project01.
Microservice Name
The name can contain a maximum of 128 characters, including letters, digits, and underscores (_).
Enter Microservice01.
Pipeline Source
Only Repo is supported.
Select Repo.
Repository
Code repository associated with the microservice. Select a created code repository.
Select Repo01.
Default Branch
Default branch associated with a microservice. This branch will be used when a change-triggered pipeline is executed. After the change-triggered pipeline is executed, all changed feature branches will be merged into the default branch.
Select master.
Language
The development language of the microservice. Available languages: Java, Python, Node.js, Go, .Net, C++, and PHP.
Select Java.
Description
Description of the microservice. Enter a maximum of 1,024 characters.
-
- Click OK. A message is displayed, indicating that the microservice is created successfully. The Overview page is displayed.
Information such as the creator, creation time, and code source is displayed. You can edit the language, repository, and description.
Figure 1 Microservice overview page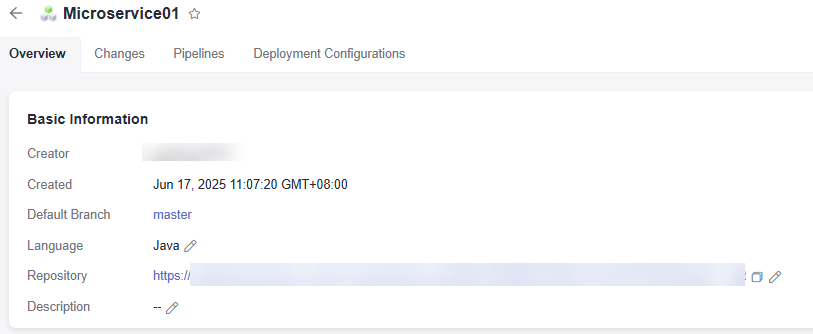
- Return to the microservice list to review the created microservice, as shown in the following table.
Figure 2 Microservice list

Table 2 Microservice list Item
Description
Microservice
Microservice name.
Creator
Name of the user who created the microservice.
Created
Time when the microservice was created. You can move the cursor to the Created column and click
 to sort microservices by creation time.
Status
Status of a microservice. After a microservice was created, it is in an activated status.
Operation
Click
 to favorite a microservice. After the microservice is favorited, the icon changes to
  . You can click the icon again to unfavorite the microservice. Also, you can click
  to delete the microservice. If a microservice is deleted, all changes and pipelines in the microservice will be deleted.
- The microservice list displays all microservices of the project.
- You can enter a microservice name in the search box to search for it.
Creating a Change
You can manage changes in the microservice.
Procedure
- Access the CodeArts Pipeline homepage through a project.
- Click the Microservices tab.
- Click a microservice name. The Overview page is displayed.
- Click the Changes tab.
All changes are displayed. Click All Changes and select My Changes to filter changes created by the login user.
- Click Create Change. On the displayed page, set parameters.
Figure 3 Change parameters
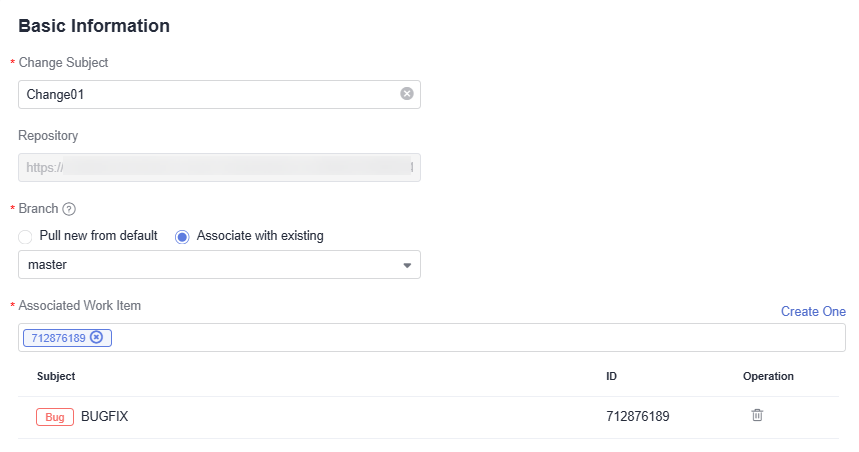
Table 3 Change parameters Parameter
Description
Example Value
Change Subject
Name of the change. Enter a maximum of 256 characters.
Enter Change01.
Repository
Name of the repository associated with the microservice. The repository cannot be changed.
-
Branch
You can pull a new branch from the default branch or associate the change with an existing branch. After the change is released through the change-triggered pipeline, the code branch will be automatically merged to the default branch of the microservice.
Select Associate with an existing branch and select master from the drop-down list.
Associated Work Item
Select started or ongoing work items in CodeArts Req.
Select the work item BUGFIX created in Preparations.
- Click OK. A message is displayed, indicating that the change is created successfully. The change details page is displayed.
The details page displays the change overview, associated work items, and operation history. You can submit the change for release, exit release, or cancel the change.
Figure 4 Change details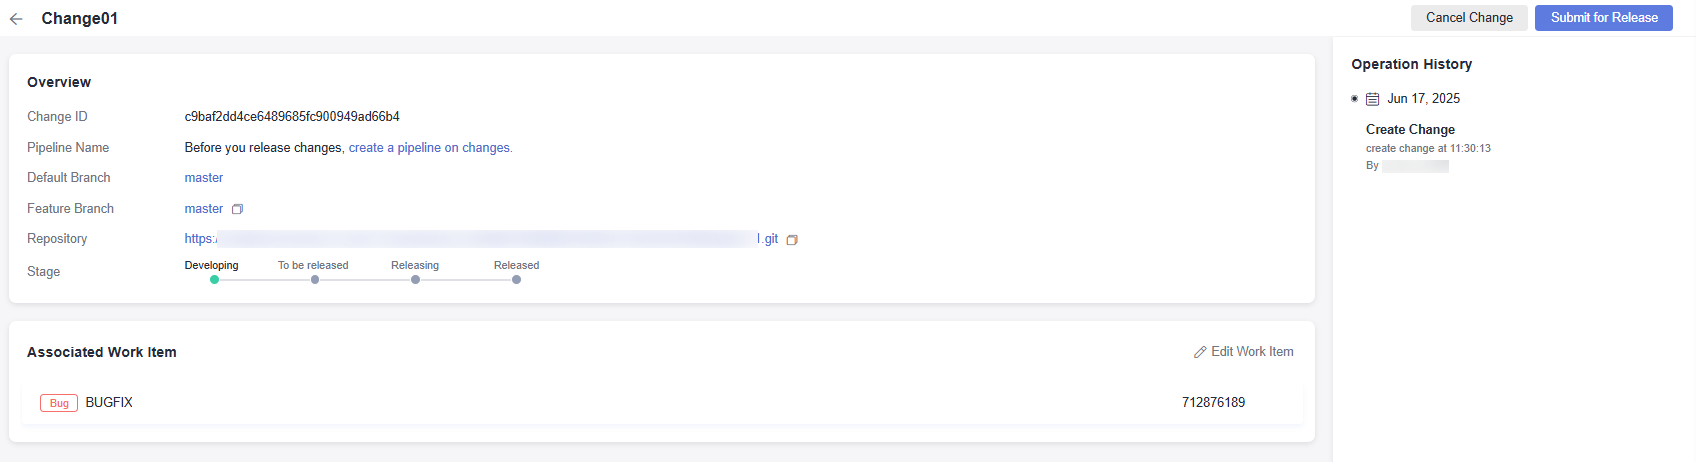
A change's lifecycle includes developing, to be released, releasing, and released.
For a change in the Developing status, click Edit Work Item to modify the associated work item.
The following describes how to submit a change for release, exit release, and cancel the change.
- Submit for release
For a change in the Developing status, click Submit for Release. The Submit for Release dialog box is displayed.
- If the microservice does not have a change-triggered pipeline, create one by referring to Creating a Change-triggered Pipeline.
- If there is a change-triggered pipeline, click OK to submit the change.
After the change is submitted, the change status changes from Developing to To be released.
- Exit release
For a change in the To be released or Releasing status, click Exit Release to exit the release. The change status will change to Developing. For a change in the Releasing status, if the change-triggered pipeline is running, you cannot exit release.
- Submit for release
Creating a Change-triggered Pipeline
- Access the CodeArts Pipeline homepage through a project.
- Click the Microservices tab.
- Click a microservice name. The Overview page is displayed.
- Switch to the Pipelines tab.
- Click Create Pipeline. On the displayed page, configure parameters.
Table 4 Pipeline parameters Parameter
Description
Example Value
Name
Pipeline name, which is generated based on the creation time by default. Enter a maximum of 128 characters, including only letters, digits, underscores (_), and hyphens (-).
Enter Pipeline-1.
Agency URN
Unique identifier of IAM agency. If set: uses this agency identity and permissions to access other cloud services. If not set: uses the operator's identity and permissions.
-
Project
Project to which the microservice belongs.
The default value is project01.
Pipeline Source
Source of the code repository. Only Repo is supported.
Select Repo.
Repository
Name of the repository associated with the microservice. If you change the code repository of a microservice, the repository for all pipelines of the microservice will also be changed.
Select Repo01.
Default Branch
The default branch associated with the microservice. If you change the default branch of a microservice, the default branch for all pipelines of the microservice will also be changed.
Select master.
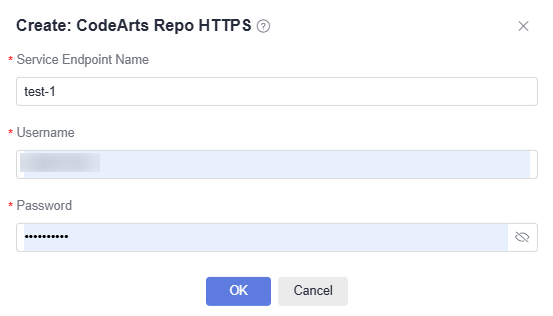
Repo Endpoint
- Configure an endpoint to elevate permissions on repository operations. Endpoints are used for change-triggered pipelines and repository operation extensions. Click Create One to create a Repo endpoint. For details, see Creating Service Endpoints.
- If you use an incorrect username or password when creating this endpoint, the pipeline will fail to run. For details, see FAQs.
Create an endpoint as shown in the following figure.
Alias
Repository alias. Enter a maximum of 128 characters, including only letters, digits, and underscores (_).
After you set a repository alias, system parameters will be generated based on the alias. For example, Alias_REPOSITORY_NAME indicates the repository name. You can check the generated parameters on the Parameter Configuration page and reference them in a pipeline in the format of ${Parameter name}.
-
Change-based Trigger
If Change-based Trigger is enabled for a pipeline, this pipeline is marked with
 . A microservice can have only one change-triggered pipeline.
Click
 to enable Change-based Trigger.
Description
Pipeline description. Enter a maximum of 1,024 characters.
-
- Click Next. On the displayed page, select a template or select Blank Template.
- Click OK. On the Task Orchestration tab page, orchestrate a pipeline.
- Click Save. A message is displayed, indicating that the pipeline is saved successfully.
Executing a Change-triggered Pipeline
- Access the CodeArts Pipeline homepage through a project.
- Click the Microservices tab.
- Click a microservice name. The Overview page is displayed.
- Switch to the Pipelines tab.
- Click a pipeline name. The pipeline Execution History page is displayed.
- Click Execute in the upper right corner and configure the execution.
Figure 5 Execution configurations for a change-triggered pipeline
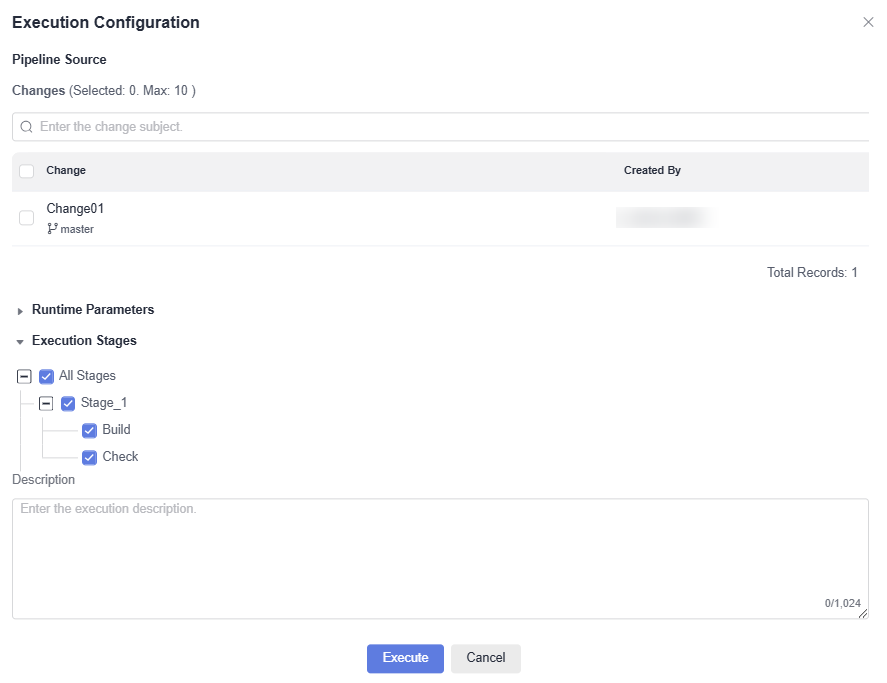
- Changes: Changes in To be released or Releasing status are displayed. Select one or more changes.
- Runtime Parameters: (Optional) Set runtime parameters and then save them. For details, see Using a Parameter in a Pipeline.
- Execution Stages: Select one or more jobs to execute. By default, all jobs are selected for execution.
- Description: Describe the debugging about the execution.
- After the configurations, click Execute. The pipeline details page is displayed.
Figure 6 Executing a change-triggered pipeline

When the change-triggered pipeline is running, there are MergeReleaseBranch and MergeDefaultBranch stages.
- MergeReleaseBranch: The change-triggered pipeline automatically pulls a new branch from the master branch and integrates all change feature branches into the new branch.
- MergeDefaultBranch: The new branch is merged to the master branch.
- After the execution is complete, check the pipeline execution result. For details about possible problems, see FAQs.
After the pipeline was successfully executed, the status of all selected changes changed to Released.
- Click the pipeline name to go to its details page.
- Click View More on the pipeline source card. In the displayed dialog box, review the selected changes.
- Click a change name to go to its details page.
- Click the Releases tab.
- All changes in the To be released and Releasing statuses are displayed.
- You can enter a keyword in the search box to search for a change.
- Click
 in the Operation column. In the displayed dialog box, click OK. The change status will become Developing. For a change in the Releasing status, you can exit the release only after the change-triggered pipeline execution is complete or stopped.
- Click the pipeline name to go to its details page.
Tutorial Video
This video shows how to release a change through a change-triggered pipeline.
Feedback
Was this page helpful?
Provide feedbackThank you very much for your feedback. We will continue working to improve the documentation.See the reply and handling status in My Cloud VOC.
For any further questions, feel free to contact us through the chatbot.
Chatbot


