
Configuring Pipeline Parameters
Pipeline Parameter
Parameters are configurable values used during pipeline running and control pipeline process and output. These parameters can be transferred among tasks. By configuring pipeline parameters, you can streamline data of build, deployment, and API test tasks. Parameters include:
- Predefined Parameters: They are preconfigured by the system and cannot be configured, deleted, or edited.
- Custom Parameters: You can add parameters of string, enumeration, or auto-increment type. You can create a maximum of 100 custom parameters.
- Parameter Groups: You can associate all pipelines in the same project with a parameter group. You can create a maximum of 5 parameter groups and add up to 100 custom parameters to each group.
Notes and Constraints
- If a code source alias is set, repository-related system parameters will be generated based on the alias. If no alias is set, the repository name is used as the alias to generate system parameters, for example, Alias_TAG indicates the repository tag name.
- If a parameter with the same name exists, the parameter priority is as follows: predefined parameters > custom parameters > parameter groups.
- If a pipeline is associated with multiple parameter groups that contain parameters with the same name, the value of the parameter in the last associated parameter group will be used.
Prerequisites
- You have enabled and authorized CodeArts Pipeline.
- Your role is a project administrator or pipeline creator. For details about how to configure permissions, see Authorizing CodeArts Pipeline.
Pipeline Parameters
CodeArts Pipeline includes predefined parameters, custom parameters, and parameter groups.
Predefined Parameters
Table 1 lists the predefined parameters. The parameter reference format is ${Parameter name}. Enter $ in the text box and the predefined parameter list will be displayed.
|
Parameter |
Description |
|---|---|
|
PROJECT_ID |
ID of the project to which the current pipeline belongs. |
|
COMPONENT_ID |
Component ID. |
|
PIPELINE_ID |
ID of the current pipeline. |
|
PIPELINE_NUMBER |
Pipeline execution number. |
|
COMMIT_ID |
The last commit ID before execution. |
|
COMMIT_ID_SHORT |
The last short commit ID before execution. |
|
TIMESTAMP |
Pipeline execution timestamp. For example, 20211222124301. |
|
PIPELINE_TRIGGER_TYPE |
Pipeline trigger type, which includes Manual, Scheduler, Rollback, and Webhook (CreateTag, Note, Issue, MR, and Push). |
|
PIPELINE_NAME |
Pipeline name. |
|
REPO_URL |
Code repository address (HTTPS). |
|
EXECUTE_USER |
The user who executes the pipeline. |
|
EXECUTE_USER_ID |
Executor ID. |
|
EXECUTE_USER_NAME |
Executor name. |
|
EXECUTE_USER_NICKNAME |
Executor alias. |
|
PASS_CONDITIONS_LINK |
Pipeline execution details link. |
|
EXTERNAL_SYSTEM |
External system that triggered a pipeline. |
|
EXTERNAL_USER_ID |
ID of the user who triggered a pipeline via an external system. |
|
EXTERNAL_USER_NAME |
Name of the user who triggered a pipeline via an external system. |
|
PIPELINE_RUN_ID |
Pipeline execution ID. |
|
MERGE_ID |
Merge request ID. |
|
WEBHOOK_PAYLOAD |
Webhook request payload information. |
|
COMPONENT_CHANGE_IDS |
Change ID list. For example, <ID1>, <ID2>,...<IDn>. If a pipeline is triggered based on specific changes, this parameter contains the change IDs that initiated the run. If a pipeline is triggered based on the code repository, it contains the change IDs associated with the microservice's repository. |
|
Repo01_REPOSITORY_NAME |
Repository name. |
|
Repo01_SOURCE_BRANCH |
The name of a merge request's source branch in the repository used to trigger the pipeline. |
|
Repo01_TARGET_BRANCH |
Name of the target branch for repository operations. |
|
Repo01_TAG |
Repository tag name. |
|
Repo01_COMMIT_ID |
The last commit ID before the repository execution. |
|
Repo01_COMMIT_ID_SHORT |
The last short commit ID before execution. |
|
Repo01_REPO_URL |
Code repository address (HTTPS). |
Configuring Custom Parameters
You can create and configure pipeline parameters. The parameter reference format is ${Parameter name}. Enter $ in the text box and the custom parameter list will be displayed.
- Access the CodeArts Pipeline homepage.
- On the pipeline list page, search for the target pipeline, click
 in the Operation column, and select Edit.
 - Switch to the Parameter Configuration tab page.
- On the displayed page, click Create Now to configure parameters. If there are custom parameters, click Create Parameter to add a new one.
Figure 1 Creating a custom parameter

Table 2 Custom parameters Parameter
Description
Example Value
Name
The specified name cannot be the same as that of a predefined parameter. Enter a maximum of 128 characters, including only letters, digits, and underscores (_).
Enter test01.
Type
Parameter types, including String (default), Auto Increment, and Enumeration.
Select String.
Default
Default value of the parameter.
- String: The value can contain no more than 8,192 characters. It can be left blank.
- Auto-Increment: The value can contain no more than 8,192 characters. The value cannot be empty. If an auto-increment parameter is referenced in a pipeline, its value (which ends with a digit) is incremented by 1 each time the pipeline runs.
- Enumeration: Enter a maximum of 8,192 characters, including only letters, digits, hyphens (-), underscores (_), commas (,), periods (.), and slashes (/).
After you select Enumeration, the Enumeration dialog box is displayed for you to set optional values. The value cannot be empty. After that, click the Default drop-down list box, select or search for a value.
Enter releaseversion.
Private Parameter
Parameters are encrypted for storage and decrypted at runtime. Private parameters are not displayed in run logs and will not be cloned synchronously during pipeline cloning. Only parameters of string can be set to Private Parameter.
-
Runtime Setting
If Runtime Setting is enabled, you can change the value of the parameter during execution configuration.
Click
 to enable Runtime Setting.
Description
Description of the custom parameter. Enter a maximum of 512 characters.
-
Operation
Click
 in the Operation column to add a parameter.
Click
 in the Operation column to delete a parameter.
-
- After the configuration, click Save. A message is displayed, indicating that the pipeline is saved successfully.

Configuring a Parameter Group
- Access the CodeArts Pipeline homepage through a project.
- Click the Parameter Groups tab and then click Create Group.
- On the displayed page, set parameters by referring to Table 3.
Figure 2 Creating a parameter group
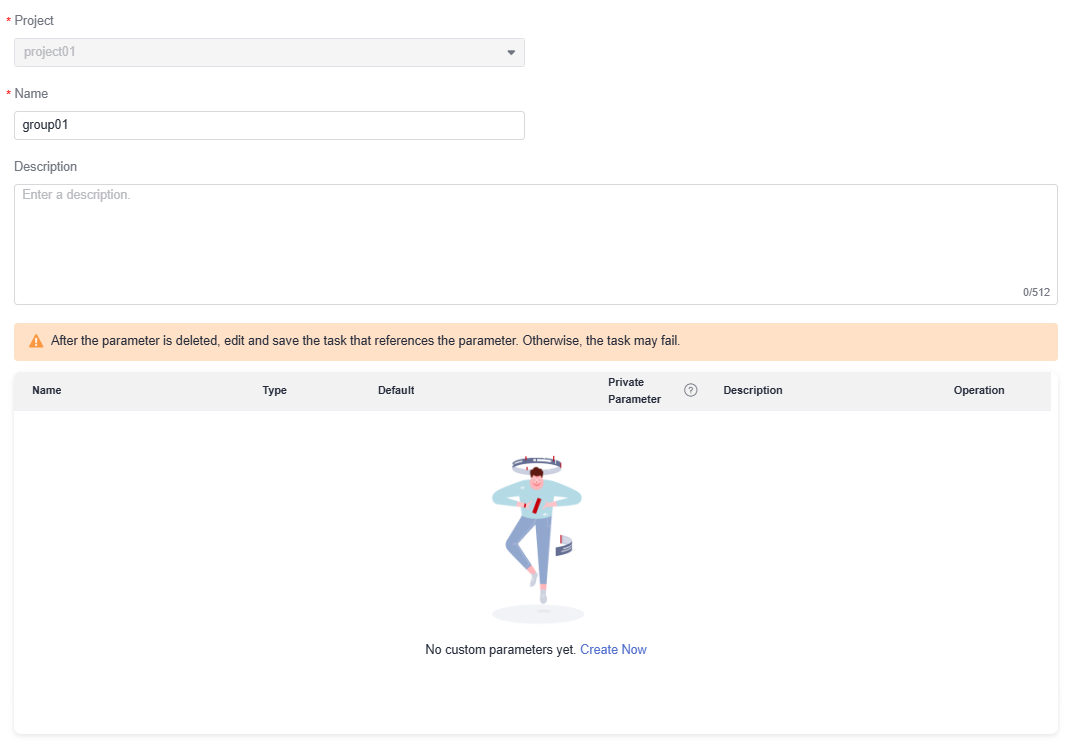
Table 3 Parameter group description Basic Information
Description
Example Value
Project
Project to which the parameter group belongs. The project cannot be changed.
The default value is project01.
Name
Enter a maximum of 128 characters, including only letters, digits, and underscores (_).
Enter group01.
Description
Description of the parameter group. Enter a maximum of 512 characters.
-
Custom parameter list
Click Create Now to create custom parameters. For details, see Configuring Custom Parameters.
The following figure shows a new parameter.

- Click OK.
- Locate the pipeline to be associated with the parameter group, click
 in the Operation column, and select Edit. Click the Parameter Configuration tab and click Parameter Groups.
 - Click Associate Now, select the desired parameter group, and click Confirm to associate the pipeline with the parameter group.
- Expand the group to check parameter details.
- Click
 in the Operation column to diassociate from the parameter group.
Figure 3 Associating with a parameter group
- After the configuration, click Save. A message is displayed, indicating that the operation is successful.

Using a Parameter in a Pipeline
This section describes how to configure the releaseversion parameter in a pipeline and transfer the parameter to a build job.
- Create a build task.
- Click the Parameters tab, add the releaseversion parameter, set the default value, and enable Runtime Settings.
Figure 4 Creating a build task parameter

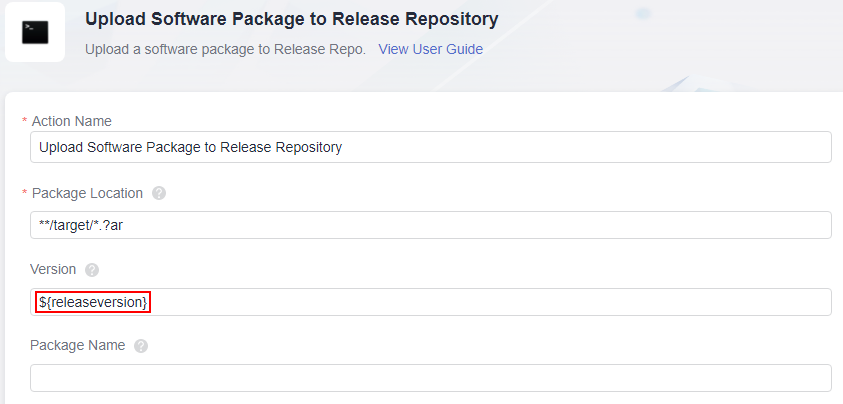
- Click the Build Actions tab. On the displayed page, click Add Action, move the cursor to the Upload to Release Repo card, click Add, and set Version to a reference parameter. After you enter $ in the text box, a parameter list is displayed. Select the releaseversion parameter created in the previous step. $ will not trigger the display of parameter groups.
Figure 5 Referencing a build task parameter
- After the configuration, click Save.
- Create a pipeline using the blank template, add the Build extension and select the created build task. The parameter releaseversion is displayed.
Figure 6 Configuring a build task parameter
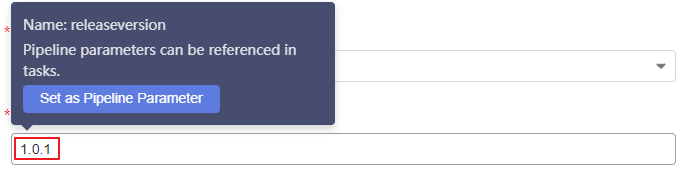
- Move the cursor to the releaseversion parameter and click Set as Pipeline Parameter. Alternatively, click OK, switch to the Parameter Configuration tab page, create the pipeline parameter releaseversion, set Type to Auto-increment or String, set a default value, and enable Runtime Setting.
Figure 7 Creating a pipeline parameter

- Switch back to the Task Orchestration tab page, and edit the added build task. Use $ to reference the releaseversion parameter in the build job.
Figure 8 Referencing a pipeline parameter


- Only text parameters for which Runtime Settings is enabled will be displayed.
- You can move the cursor to a parameter name to quickly set the parameter as a pipeline parameter.
- Save the information and click Save and Execute. In the displayed window, check the parameter information.
The parameter value is the default value specified when you added the parameter. You can change the value if needed. If you change it, the new value will be used in the build job.
- Click Execute to execute the pipeline.
Feedback
Was this page helpful?
Provide feedbackThank you very much for your feedback. We will continue working to improve the documentation.See the reply and handling status in My Cloud VOC.
For any further questions, feel free to contact us through the chatbot.
Chatbot


