
Orchestrating Pipeline Jobs
Jobs in a Pipeline
A job is the minimum manageable execution unit in a pipeline. Jobs can be managed and orchestrated in serial and parallel modes, and executed based on a specific sequence and time in a stage. Refer to this section to configure jobs.
Notes and Constraints
- You can configure a pipeline from scratch or from a template only when you have configured a job template. For details about how to configure a job template, see Configuring a Job Template.
- A tenant can create a maximum of 200 execution plans.
- Once a job template is modified, all associated pipelines will be modified and cannot be restored.
Prerequisites
- You have enabled and authorized CodeArts Pipeline.
- Your role is a project administrator or pipeline creator. For details about how to configure permissions, see Authorizing CodeArts Pipeline.
Configuring Pipeline Jobs
- Access the CodeArts Pipeline homepage.
- On the pipeline list page, search for the target pipeline, click
 in the Operation column, and select Edit.
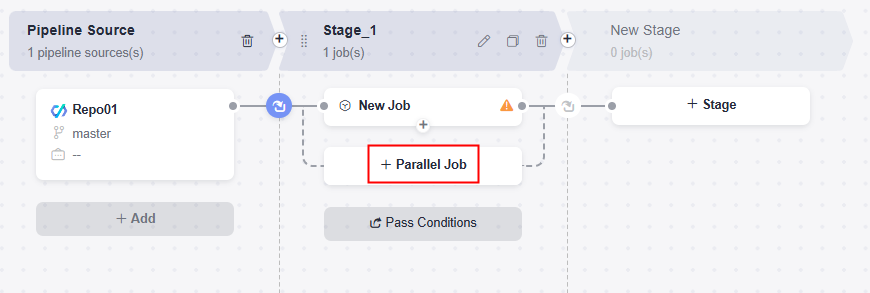
 - On the Task Orchestration page, click Job under a stage, and select From Scratch or From Template. If you use the blank template to create a pipeline, New Job in Stage_1 is empty by default and no job template can be selected.

- From empty: In the displayed window, configure jobs by referring to Table 1.
- From Template: In the displayed window, select a desired template. For details about templates, see Table 3.
- Click Clone. The job configuration page is displayed. You can configure the job template as needed.
- Click Associate. The job configuration page is displayed. The parameters cannot be modified.
Click
 under a job to add a serial job. For example, a build job and a deployment job must be executed sequentially.
Click Parallel Job to add a parallel job. For example, a code check job and a build job can be executed at the same time.
- Configure extensions and information for the job by referring to the following table.
Table 1 Job configuration Operation
Description
Adding an extension
There are five types of extensions: build, code check, deployment, test, and normal extensions. You can filter or search for extensions by type. For more information, see Managing Pipeline Extensions.
Move the cursor to an extension card and click Add. Then configure the following information:
- Enter an extension name.
- Select a task to be called. You can search for a task. If no proper task is available, create one as prompted.
- If the called task has parameters, the parameters will be displayed. Configure parameters as needed.
- You can add only one extension with flag Job to a single job. Extensions with flag Draft indicate that they are draft extensions.
- The extension for suspending a pipeline can only be added to stages that do not contain parallel jobs.
Deleting an extension
Move the cursor to an extension card, click
 , and select Delete to delete the extension.
Replacing an extension
Move the cursor to an extension card, click
 , and select Replace to replace the extension. Or, click Replace Step above the extension name to choose another extension.
Sorting extensions
Click, hold, and move an extension card to adjust the extension sequence.
Configuring jobs
Configure the following information:
- ID: The job ID must be unique. Enter a maximum of 128 characters, including letters, digits, hyphens (-), and underscores (_).
- Resource pool advanced settings: A pipeline job can run in the following resource pools. You only need to configure resource pools for non-job-level extensions.
- Default resource pool: isolates your environments from others by container.
- Dedicated resource pool: grants you exclusive access to the private VPC network via the intranet.
- Custom resource pool: manages your server resources that are connected via a network proxy. For details, see Managing Agent Pools.
NOTE:Dedicated resource pool is available only in AP-Singapore.
- Select Job
- Always: The job will always be selected for execution and cannot be canceled.
- Disabled: The job cannot be selected for execution.
- Selected by default: The job is selected for execution by default and can be modified.
- Not selected by default: Job is not selected for execution by default.
- Execute: Execution conditions are the triggers for executing jobs in a pipeline.
- Even when previous job is not selected: The current job is executed regardless of whether the previous serial job is completed or not selected.
- When previous job succeeds: The current job is executed only when the previous serial job is successfully executed.
- If previous job fails: The current job is executed only when the previous serial job fails.
- Always: The current job is always executed regardless of the previous serial job's final state (failed, completed, canceled, or ignored).
- With expression: When the previous job is COMPLETED, FAILED, CANCELED, or IGNORED and the expression result is true, the current job will be executed.
- Tag: Click the text box. In the displayed window, you can select desired contexts, functions, or operators. Or you can just manually enter an expression in the text box. For details about how to configure an expression, see Configuring Expressions.
Example:
To execute the current job regardless of whether the previous job (ID: job_1) succeeded or failed, the expression can be as follows:
jobs.job_1.status == 'COMPLETED' || jobs.job_1.status == 'FAILED'
- Code: The expression displayed here is in the string format and configured in the Tag mode. Manual input is not supported.
- Tag: Click the text box. In the displayed window, you can select desired contexts, functions, or operators. Or you can just manually enter an expression in the text box. For details about how to configure an expression, see Configuring Expressions.
- After configuring the job, click OK. After the job is added, you can edit, clone, delete, or move the job.
Table 2 Job management Operation
Description
Editing a job
Click a job card to edit the job.
Cloning a job
Click
 on the job card to create a serial job.
Deleting a job
Click
 on the job card and confirm the deletion as prompted.
Sorting jobs
Click, hold, and move a job card to adjust the sequence. Job sequence cannot be adjusted when jobs are executed in parallel.
- After the configuration, click Save. A message is displayed, indicating that the pipeline is saved successfully.
Configuring an Execution Plan
An execution plan outlines job execution steps, resource allocation, monitoring, and management. You can configure an execution plan in advance and select the plan when executing a pipeline manually or through schedulers.
- Access the CodeArts Pipeline homepage through a project.
- On the pipeline list page, search for the target pipeline, click
 in the Operation column, and select Execution Plan.
 - Click Create Plan. In the displayed window, configure the plan name, pipeline source information, runtime parameters, execution stages, and description. For details, see Executing a Pipeline.
Figure 1 Creating an execution plan
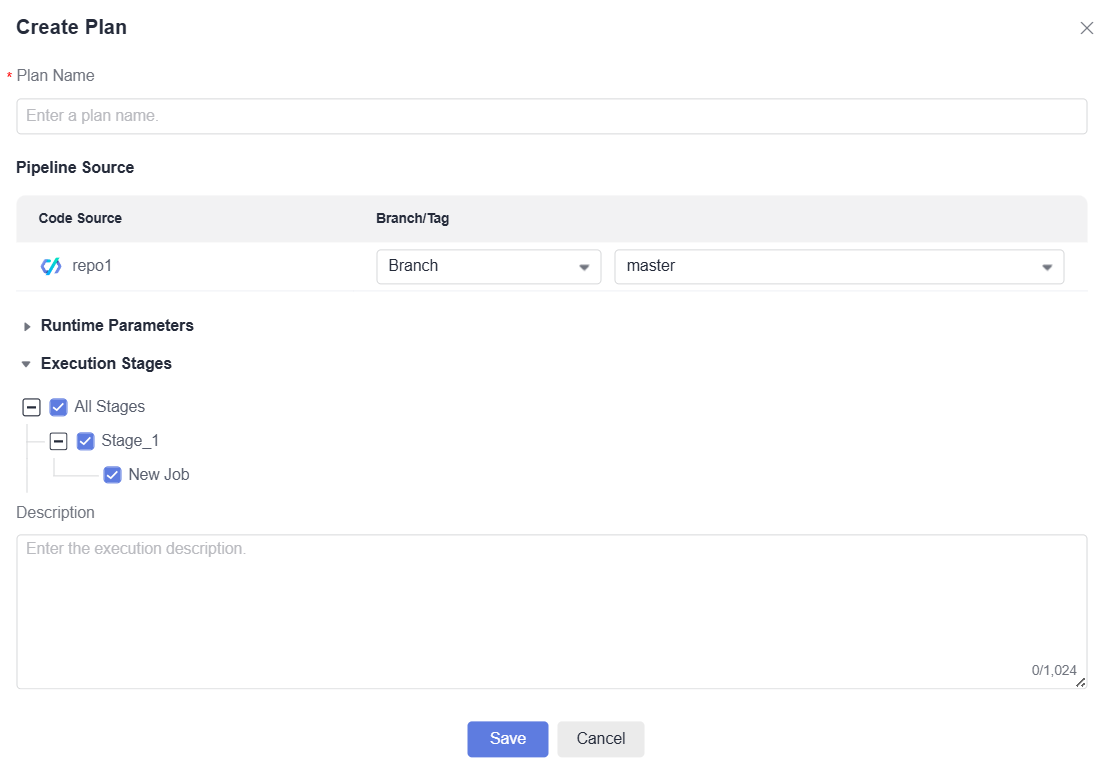
- Click Save. A message is displayed, indicating that an execution plan is created successfully. You can edit, clone, or delete the execution plan.

Configuring a Job Template
A pipeline job template is a ready-made model for creating and running specific jobs efficiently. It includes preset configurations and execution logic, saving time on repetitive work.
- Access the CodeArts Pipeline homepage.
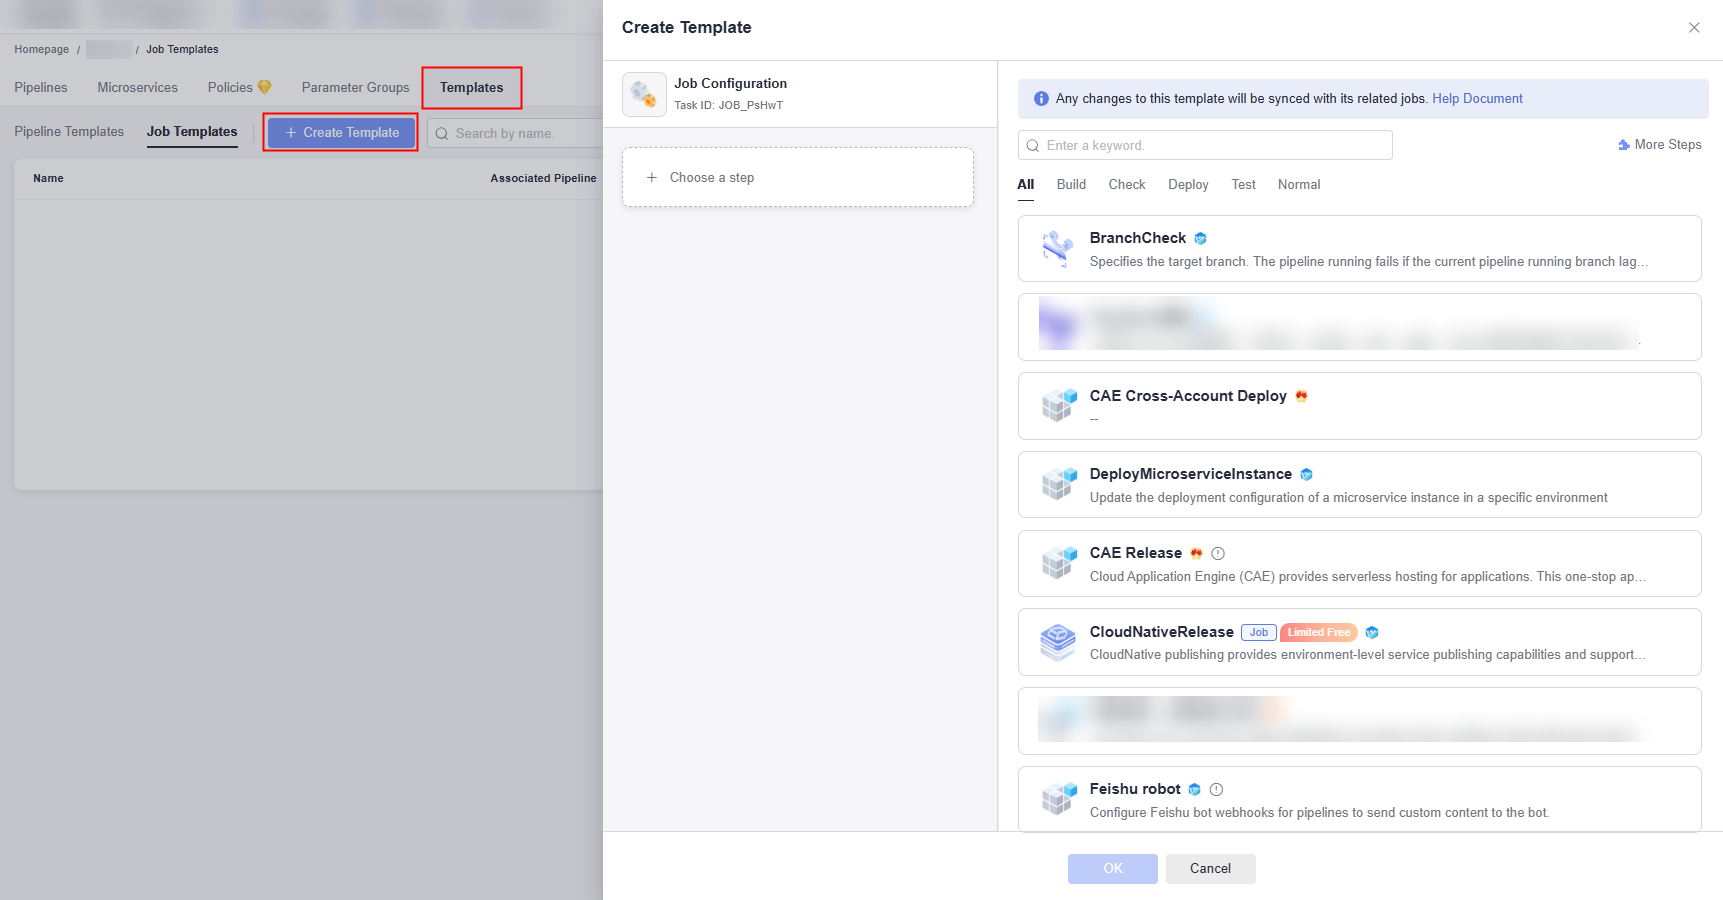
- Click Templates. In the displayed page, click Job Templates.
- Click Create Template. In the displayed window, set parameters.
- Configure extensions and information for the template by referring to the following table.
Table 3 Configuring a job template Operation
Description
Example Value
Adding an extension
There are five types of extensions: build, code check, deployment, test, and normal extensions. You can filter or search for extensions by type. For more information, see Managing Pipeline Extensions.
Move the cursor to an extension card and click Add. Then configure the following information:
- Enter an extension name.
- Select a task to be called. You can search for a task. If no proper task is available, create one as prompted.
- If the called task has parameters, the parameters will be displayed. Configure parameters as needed.
- You can add only one extension with flag Job to a single job. Extensions with flag Draft indicate that they are draft extensions.
The following uses the Build extension as an example. You need to create a build task build01 in advance. When adding the extension, set the parameters as follows:
- Name: Build
- Project Config: This Project
- Select Task: build01
- Repository: Pipeline
Deleting an extension
Move the cursor to an extension card, click
, and select Delete to delete the extension.-
Replacing an extension
Move the cursor to an extension card, click
, and select Replace to replace the extension. Or, click Replace Step above the extension name to choose another extension.-
Sorting extensions
Click, hold, and move an extension card to adjust the extension sequence.
-
Configuring jobs
Configure the following information:
- Basic information:
- Name: name of the job template.
- Description: description of the job template. A maximum of 1,024 characters are allowed.
- ID: The job ID must be unique. Enter a maximum of 128 characters, including letters, digits, hyphens (-), and underscores (_).
NOTE:
During pipeline orchestration, you can only edit the job ID in a job template.
- Resource pool advanced settings: A pipeline job can run in the following resource pools. You only need to configure resource pools for non-job-level extensions.
- Default resource pool: isolates your environments from others by container.
- Dedicated resource pool: grants you exclusive access to the private VPC network via the intranet.
- Custom resource pool: manages your server resources that are connected via a network proxy. For details, see Managing Agent Pools.
NOTE:Dedicated resource pool is available only in AP-Singapore.
- Select Job
- Always: The job will always be selected for execution and cannot be canceled.
- Disabled: The job cannot be selected for execution.
- Selected by default: The job is selected for execution by default and can be modified.
- Not selected by default: Job is not selected for execution by default.
- Execute: Execution conditions are the triggers for executing jobs in a pipeline.
- Even when previous job is not selected: The current job is executed regardless of whether the previous serial job is completed or not selected.
- When previous job succeeds: The current job is executed only when the previous serial job is successfully executed.
- If previous job fails: The current job is executed only when the previous serial job fails.
- Always: The current job is always executed regardless of the previous serial job's final state (failed, completed, canceled, or ignored).
- With expression: When the previous job is COMPLETED, FAILED, CANCELED, or IGNORED and the expression result is true, the current job will be executed.
- Tag: Click the text box. In the displayed window, you can select desired contexts, functions, or operators. Or you can just manually enter an expression in the text box. For details about how to configure an expression, see Configuring Expressions.
Example:
To execute the current job regardless of whether the previous job (ID: job_1) succeeded or failed, the expression can be as follows:
jobs.job_1.status == 'COMPLETED' || jobs.job_1.status == 'FAILED'
- Code: The expression displayed here is in the string format and configured in the Tag mode. Manual input is not supported.
- Tag: Click the text box. In the displayed window, you can select desired contexts, functions, or operators. Or you can just manually enter an expression in the text box. For details about how to configure an expression, see Configuring Expressions.
The following uses the Build Template as an example. Set the parameters as follows:
- Name: Build Template
- ID: JOB_KJbee
- Select Job: use the default value
- Execute: Even when previous job is not selected
- After the configuration is complete, click OK. The template page is displayed.

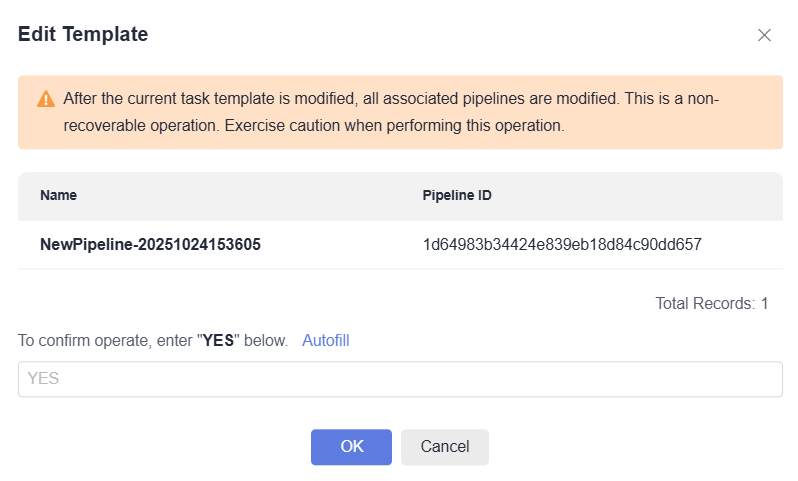
- Click
 to edit the job template.
After the job template is edited, click OK. In the displayed window, click Autofill and then OK.
- Click
 to delete the job template.
- Click
Feedback
Was this page helpful?
Provide feedbackThank you very much for your feedback. We will continue working to improve the documentation.See the reply and handling status in My Cloud VOC.
For any further questions, feel free to contact us through the chatbot.
Chatbot


