Installing the Agent in a Third-Party Private Network Cluster
Scenario
Install the agent on a third-party private network cluster that cannot access the public network. After the configuration is complete, HSS automatically installs the agent on existing cluster nodes, installs the agent on new nodes when the cluster is scaled out, and uninstalls the agent from removed nodes when the cluster is scaled in.
Prerequisites
A Direct Connect connection has been created between the third-party private network cluster and the VPC on the cloud. For details about how to create a Direct Connect connection, see Getting Started with Direct Connect.
Constraints
- Supported cluster orchestration platforms: Kubernetes 1.19 or later
- Supported node OS: Linux
- Node specifications: at least 2 vCPUs, 4 GiB memory, 40 GiB system disk, and 100 GiB data disk
- Restrictions on private network cluster access: Currently, only clusters in CN North-Beijing1, CN North-Beijing4, CN East-Shanghai1, CN East-Shanghai2, CN South-Guangzhou, CN-Hong Kong, AP-Singapore, CN Southwest-Guiyang1, AP-Jakarta, AP-Bangkok, and ME-Riyadh can be accessed from third-party cloud clusters or on-premises clusters through private networks.
- The agent is incompatible with clusters of Galera 3.34, MySQL 5.6.51, or earlier versions.
Step 1: Create an ECS
- Log in to the ECS console and buy an ECS.
- Configure ECS parameters as prompted.
You are advised to configure some parameters by referring to Table 1 and configure other parameters based on site requirements.
Table 1 Parameters for purchasing an ECS Parameter
Description
Example Value
Billing Mode
ECS billing mode.
- Yearly/Monthly: Prepaid mode. Yearly/monthly ECSs are billed by the purchased duration specified in the order.
- Pay-per-use: Postpaid billing mode. You pay as you go and just pay for what you use. Pay-per-use ECSs are billed by the second and settled by the hour.
- Spot price: Spot pricing is a postpaid billing mode. You pay as you go and just pay for what you use. In Spot pricing billing mode, your purchased ECS is billed at a lower price than that of a pay-per-use ECS with the same specifications. In Spot pricing billing mode, you can select Spot or Spot block for the Spot Type. Spot ECSs and Spot block ECSs are billed by the second and settled by the hour.
Pay-per-use
CPU Architecture
Select a CPU architecture. The value can be x86 or Kunpeng.
x86
Instance
General computing, 2 vCPUs, 4 GiB
Image
An image is an ECS template that contains an OS. It may also contain proprietary software and application software. You can use images to create ECSs.
Public image, EulerOS 2.5 64 bit (40 GiB)
System Disk
Stores the OS of an ECS, and is automatically created and initialized upon ECS creation.
Ultra-high I/O
- Click Create. In the displayed dialog box, click Agree and Create. After the payment is complete, the ECS will be automatically created and started by default.
- In the ECS list, view the created ECS and record its private IP address.
Step 2: Set Up Nginx
- Log in to the server created in Step 1: Create an ECS.
- Go to the temp directory.
cd /temp
- Run the following command to create the install_nginx.sh file:
vi install_nginx.sh
- Press i to enter the editing mode and copy the following content to the install_nginx.sh file:
#!/bin/bash

yum -y install pcre-devel zlib-devel popt-devel openssl-devel openssl
wget http://www.nginx.org/download/nginx-1.21.0.tar.gz
tar zxf nginx-1.21.0.tar.gz -C /usr/src/
cd /usr/src/nginx-1.21.0/
useradd -M -s /sbin/nologin nginx
./configure \
--prefix=/usr/local/nginx \
--user=nginx \
--group=nginx \
--with-file-aio \
--with-http_stub_status_module \
--with-http_gzip_static_module \
--with-http_flv_module \
--with-http_ssl_module \
--with-stream \
--with-pcre && make && make install
ln -s /usr/local/nginx/sbin/nginx /usr/local/sbin/
nginx
- Paste the content, press Esc, run the following command, and press Enter to exit.
:wq!
- Run the following command to install Nginx:
bash /temp/install_nginx.sh
- Run the following command to modify the Nginx configuration file:
cat <<END >> /usr/local/nginx/conf/nginx.conf
stream {
  upstream backend_hss_anp {
    server {{ANP_backend_address}}:8091 weight=5 max_fails=3 fail_timeout=30s;
  }
  server {
    listen 8091 so_keepalive=on;
    proxy_connect_timeout 10s;
    proxy_timeout 300s;
    proxy_pass backend_hss_anp ;
  }
}
END
Replace {{ANP_backend_address}} with the actual address and then run the command. For details, see Table 2.
Table 2 ANP backend addresses Region
ANP Backend Address
Guiyang1, Bangkok, Shanghai2, Guangzhou, Beijing4, Beijing2, and Shanghai1
hss-proxy.RegionCode.myhuaweicloud.com
Other
hss-anp.RegionCode.myhuaweicloud.com
For details about region codes, see Regions and Endpoints.
- Run the following command to make the Nginx configuration take effect:
nginx -s reload
Step 3: Prepare the kubeconfig File
The kubeconfig file specifies the cluster permissions assigned to HSS. The kubeconfig file configured using method 1 contains the cluster administrator permissions, whereas the file generated using method 2 contains only the permissions required by HSS. If you want to minimize HSS permissions, prepare the file using method 2.
- Method 1: configuring the default kubeconfig file
- Perform the following operations to create a dedicated namespace for HSS:
- Log in to a cluster node.
- Create the hss.yaml file and copy the following content to the file:
1{"metadata":{"name":"hss"},"apiVersion":"v1","kind":"Namespace"}
- Run the following command to create a namespace:
kubectl apply -f hss.yaml
- Find and download the config file in the $HOME/.kube/config directory.
- Change the file name from config to config.yaml.
- Perform the following operations to create a dedicated namespace for HSS:
- Method 2: generating a kubeconfig file dedicated to HSS
- Create a dedicated namespace and an account for HSS.
- Log in to a cluster node.
- Create the hss-account.yaml file and copy the following content to the file:
1{"metadata":{"name":"hss"},"apiVersion":"v1","kind":"Namespace"}{"metadata":{"name":"hss-user","namespace":"hss"},"apiVersion":"v1","kind":"ServiceAccount"}{"metadata":{"name":"hss-user-token","namespace":"hss","annotations":{"kubernetes.io/service-account.name":"hss-user"}},"apiVersion":"v1","kind":"Secret","type":"kubernetes.io/service-account-token"}
- Run the following command to create a namespace and an account:
kubectl apply -f hss-account.yaml
- Generate the kubeconfig file.
- Create the gen_kubeconfig.sh file and copy the following content to the file:
 1
 2
 3
 4
 5
 6
 7
 8
 9
10
#!/bin/bash

KUBE_APISERVER=`kubectl config view  --output=jsonpath='{.clusters[].cluster.server}' | head -n1 `
CLUSTER_NAME=`kubectl config view -o jsonpath='{.clusters[0].name}'`
kubectl get secret hss-user-token -n hss -o yaml |grep ca.crt: | awk '{print $2}' |base64 -d >hss_ca_crt

kubectl config set-cluster ${CLUSTER_NAME} --server=${KUBE_APISERVER}  --certificate-authority=hss_ca_crt  --embed-certs=true --kubeconfig=hss_kubeconfig.yaml
kubectl config set-credentials hss-user --token=$(kubectl describe secret hss-user-token -n hss | awk '/token:/{print $2}') --kubeconfig=hss_kubeconfig.yaml
kubectl config set-context hss-user@kubernetes --cluster=${CLUSTER_NAME} --user=hss-user --kubeconfig=hss_kubeconfig.yaml
kubectl config use-context hss-user@kubernetes --kubeconfig=hss_kubeconfig.yaml
- Run the following command to generate the kubeconfig file named hss_kubeconfig.yaml:
bash gen_kubeconfig.sh
- Create the gen_kubeconfig.sh file and copy the following content to the file:
- Create a dedicated namespace and an account for HSS.
Step 4: Install the Agent for a Third-Party Private Network Cluster
- Log in to the HSS console.
- Click
 in the upper left corner and select a region or project.
 - In the navigation pane, choose .
- On the Cluster tab page, click Install Container Agent. The Container Asset Access and Installation slide-out panel is displayed.
- Select Non-CCE cluster (private network access) and click Configure Now.
- Configure image repository information and click Generate Command. For more information, see Table 3.
Table 3 Image repository parameters Parameter
Description
Third-Party Image Repository Address
Third-party image repository address.
Example: hub.docker.com
Image Repository Type
Type of the image repository. It can be:
- Harbor
- Quay
- Jfrog
- Other
Organization Name
Organization name of the image repository.
Username
Image repository username.
Password
Password of the image repository.
Advanced Configuration
- Image Architecture
Optional. You can select the image architecture used by a container. By default, the container uses a multi-architecture image.
- ANP Proxy Address
Enter the private IP address of the server created in Step 1: Create an ECS.
- Hostguard Proxy Address
Private IP address of a Direct Connect server (port 10180).
- Container Name
After a cluster is connected to HSS, ANP-agent and Hostguard (the HSS agent) will run on nodes as containers. To identify these containers, set easily distinguishable names for them.
- DNS Configuration
The DNS of the pod is configured in Kubernetes, so that you can search for a service in a running container by its name instead of IP address.
You can configure DNS for the pods of the ANP-agent and Hostguard (the HSS agent) to facilitate search.
Options are as follows:
- Default: The pod inherits the domain name resolution configuration from the node where the pod is running.
- ClusterFirst: Any DNS query (for example, www.kubernetes.io) that does not match the configured cluster domain suffix is forwarded by the DNS server to the upstream DNS server. Cluster administrators may have extra stub-domain and upstream DNS servers configured.
- ClusterFirstWithHostNet: For the pods running in hostNetwork mode, the DNS policy should be explicitly set to ClusterFirstWithHostNet. Otherwise, the pods that run in hostNetwork mode and use the ClusterFirst policy will roll back to the Default policy.
- None: If the pod's dnsPolicy is set to None, the list must contain at least one IP address, otherwise this property is optional. The listed servers will be combined with the base domain name servers generated using a specified DNS policy, and duplicate addresses will be removed.
- Perform the following operations to upload the images of the cluster connection component (ANP-agent) and the HSS agent to your private image repository:
- In the Access and Install Container Assets dialog box, click cluster protection component image package.rar to download the package to the local PC and copy the package to any cluster node.
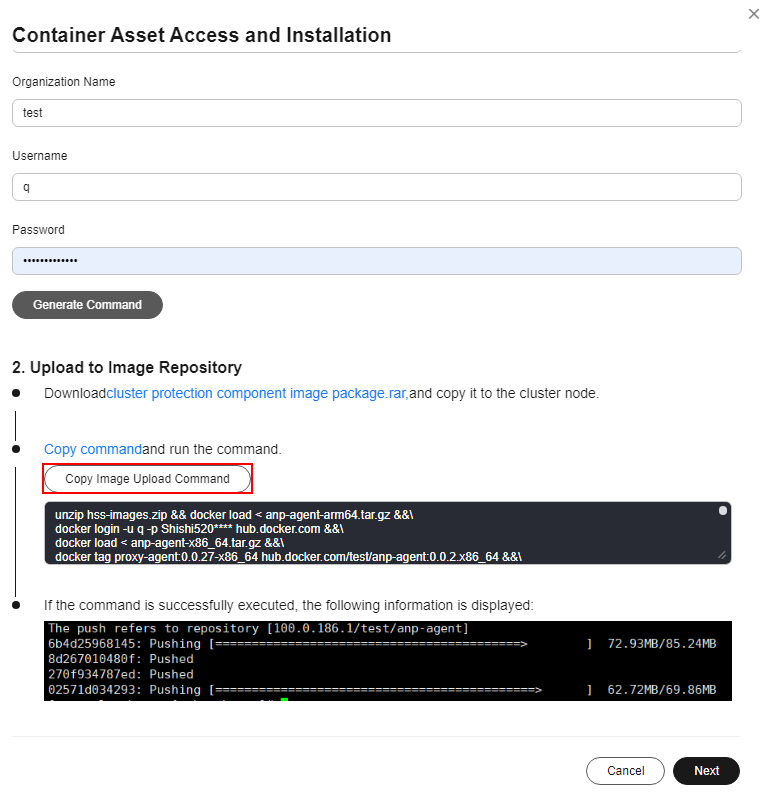
- In the Container Asset Access and Installation dialog box, click Copy Image Upload Command to copy the command and run it on the cluster node.
Figure 1 Copying image upload commands

If the command output shown in Figure 2 is displayed, the upload succeeded.
- In the Container Asset Access and Installation dialog box, click Next.
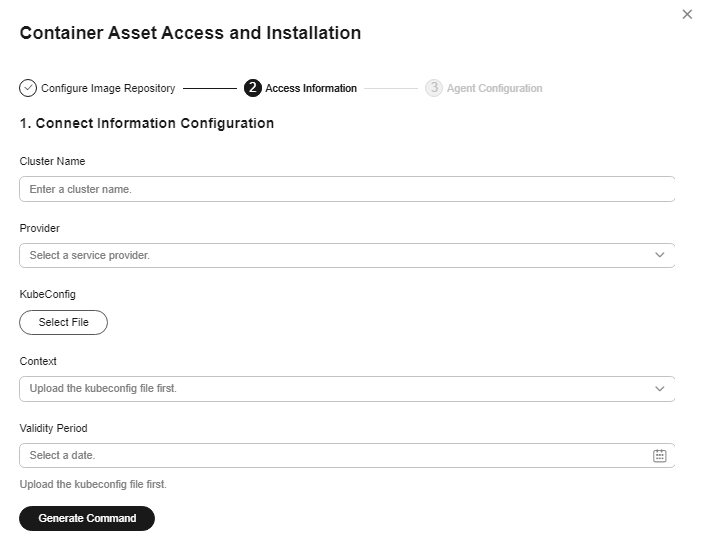
- Configure cluster access information and click Generate Command. For more information, see Table 4.
Figure 3 Configuring cluster access information

Table 4 Access parameters Parameter
Description
Cluster Name
Name of the cluster to be connected.
Provider
Service provider of the cluster. Currently, the clusters of the following service providers are supported:
- Alibaba Cloud
- Tencent Cloud
- AWS
- Azure
- User-built
- On-premises IDC
KubeConfig
Add and upload the kubeconfig file configured as required in Step 3: Prepare the kubeconfig File.
Context
After the kubeconfig file is uploaded, HSS automatically parses the context.
Validity Period
After the kubeconfig file is uploaded, HSS automatically parses the validity period. You can also specify a time before the final validity period. After the specified validity period expires, you need to connect to the asset again.
- Perform the following operations to install the cluster connection component (ANP-agent) and establish a connection between HSS and the cluster:
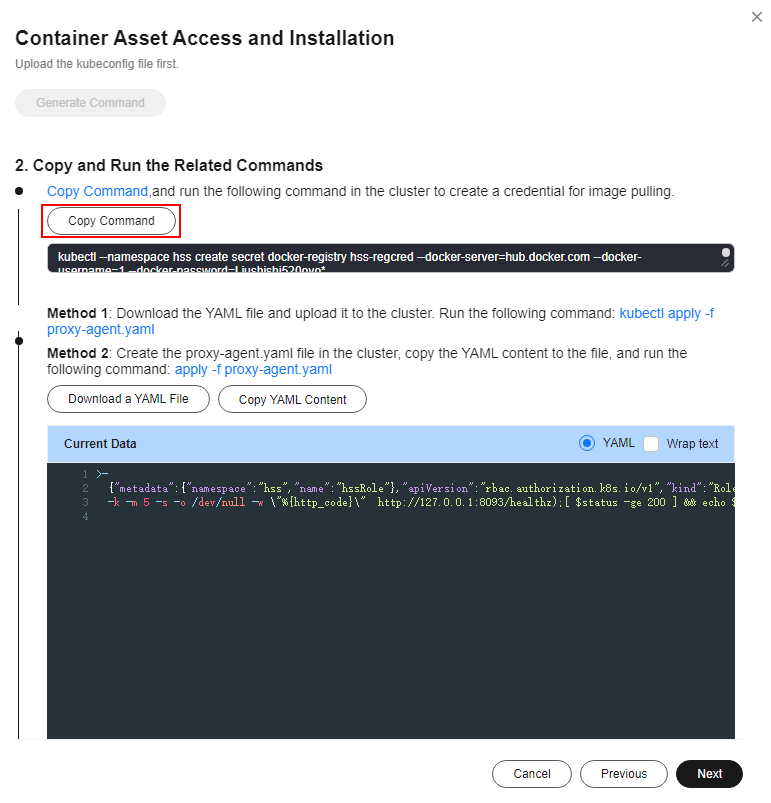
- In the Container Asset Access and Installation dialog box, click Copy Command.
Figure 4 Copying the command

- Log in to a node and run the copied command to create a credential for the cluster to pull private images:
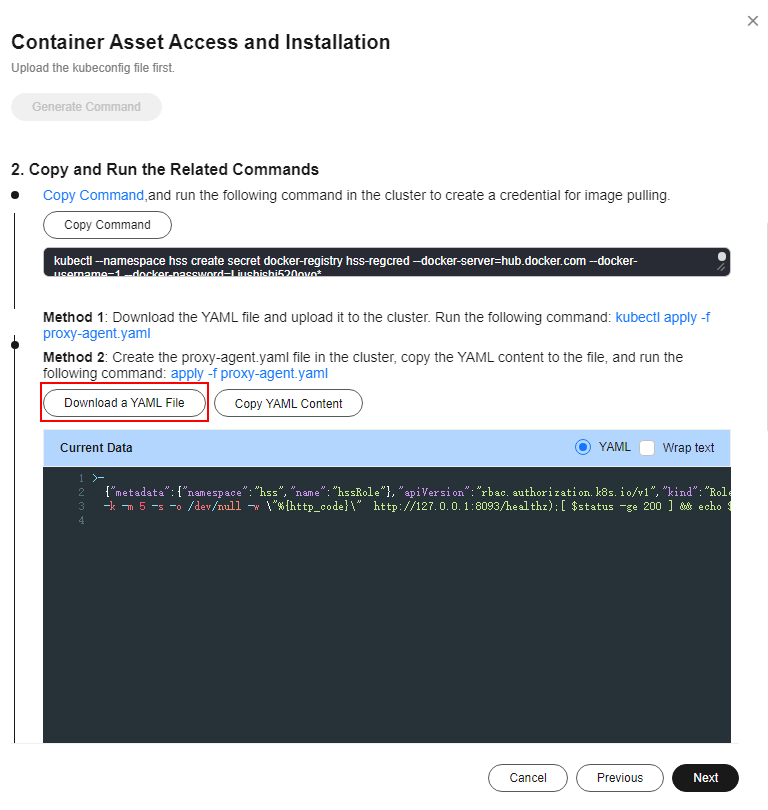
- In the Container Asset Access and Installation dialog box, click Download a YAML File.
Figure 5 Downloading the YAML file

- Copy the file to the directory of any node.
- Run the following command to install the cluster connection component (ANP-Agent):
kubectl apply -f proxy-agent.yaml
- Run the following command to check whether the cluster connection component (ANP-agent) has been installed:
kubectl get pods -n hss | grep proxy-agent
If the command output shown in Figure 6 is displayed, the cluster connection component (ANP-agent) is successfully installed.
- Run the following command to check whether the cluster is connected to HSS:
for a in $(kubectl get pods -n hss| grep proxy-agent | cut -d ' ' -f1); do kubectl -n hss logs $a | grep 'Start serving';done
If the command output shown in Figure 7 is displayed, the cluster is connected to HSS.
- In the Container Asset Access and Installation dialog box, click Copy Command.
- In the Container Asset Access and Installation dialog box, click Next.
- Configure agent parameters. For more information, see Table 5.
Table 5 Agent parameters Parameter
Description
Configuration Rules
Select an agent configuration rule.
- Default Rule: Select this if the sock address of container runtime is a common address. The agent will be installed on nodes having no taints.
- Custom: Select this rule if the sock address of your container runtime is not a common address or needs to be modified, or if you only want to install the agent on specific nodes.
NOTE:- If the sock address of your container runtime is incorrect, some HSS functions may be unavailable after the cluster is connected to HSS.
- You are advised to select all runtime types.
(Optional) Advanced Configuration
This parameter can be set if Custom is selected for Configuration Rules.
Click
 to expand advanced configurations. The Enabling auto upgrade agent option is selected by default.
- Enabling auto upgrade
Configure whether to enable automatic agent upgrade. If it is enabled, HSS automatically upgrades the agent to the latest version between 00:00 to 06:00 every day to provide you with better services.
- Node Selector Configuration
Set the Key and Value of tags of the nodes where the agent is to be installed and click Add. If no tags are specified, the agent will be installed on all the nodes having no taints.
- Tolerance Configuration
If you added a node whose tag contains a taint in Node Selector Configuration, set the Key, Value, and Effect of the taint, and click Add to allow agent installation on the node.
- After the configuration is complete, click OK to install the HSS agent.
- In the cluster list, check the cluster status. If the cluster status is Running, the cluster is successfully connected to HSS.
Follow-up Operations
After the agent is installed in a cluster, enable protection.
Feedback
Was this page helpful?
Provide feedbackThank you very much for your feedback. We will continue working to improve the documentation.See the reply and handling status in My Cloud VOC.
For any further questions, feel free to contact us through the chatbot.
Chatbot


